相机系统 GLFW OPENGL
0. 前言
游戏或者三维软件中的相机,与现实中的相机没有什么特别大的区别。
1. 世界坐标系
世界坐标系并非是一个特殊的坐标系,因为他得到了所有其他坐标系的认可(参照)所以被称为世界坐标系。可以用来表示位置和方向, 基于X Y Z 坐标轴。
我们日常生活中,常用 前后左右(Forward Left Right Up) 来表示其他物体相对于自身的坐标。这是一个很好,很直觉的模式。
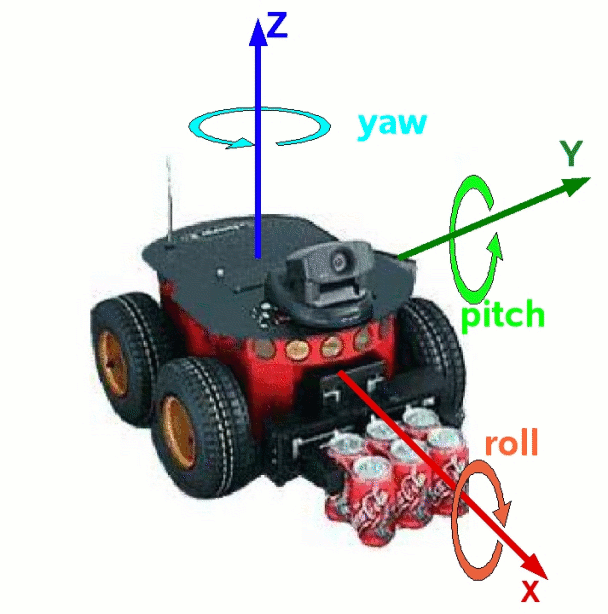
涉及到机器人学,飞机,火箭等课程,又会常用 俯仰角(点头) 偏航角(偏头) 滚转角(飞行员在一个直立圆环上转着测试)(Pitch Yaw Roll)来描述一个物体的状态。
好了,人们更愿意用某些方位和姿态的描述性词语来 描绘 这个世界。但这无论如何不是严谨的,不是数学的。这些描述性词语需要与X Y Z坐标轴进行绑定,然后可以走进数学的殿堂。
问题是没有任何强制性的规定说 X代表东方, Y代表北方, Z轴指向天空。
所以在不同的领域里,这些绑定关系是不同的,甚至 X Y Z 坐标轴的旋转顺序也是不同的,有左手系,右手系之分。
这里举出几个例子:
机器人学 x forward; y left; z up;https://www.ros.org/reps/rep-0103.html
图形学(游戏引擎) x right; y up; z front(Unity) or back(OpenGL)
2. GLFW 窗口坐标系 与 坐标系变换
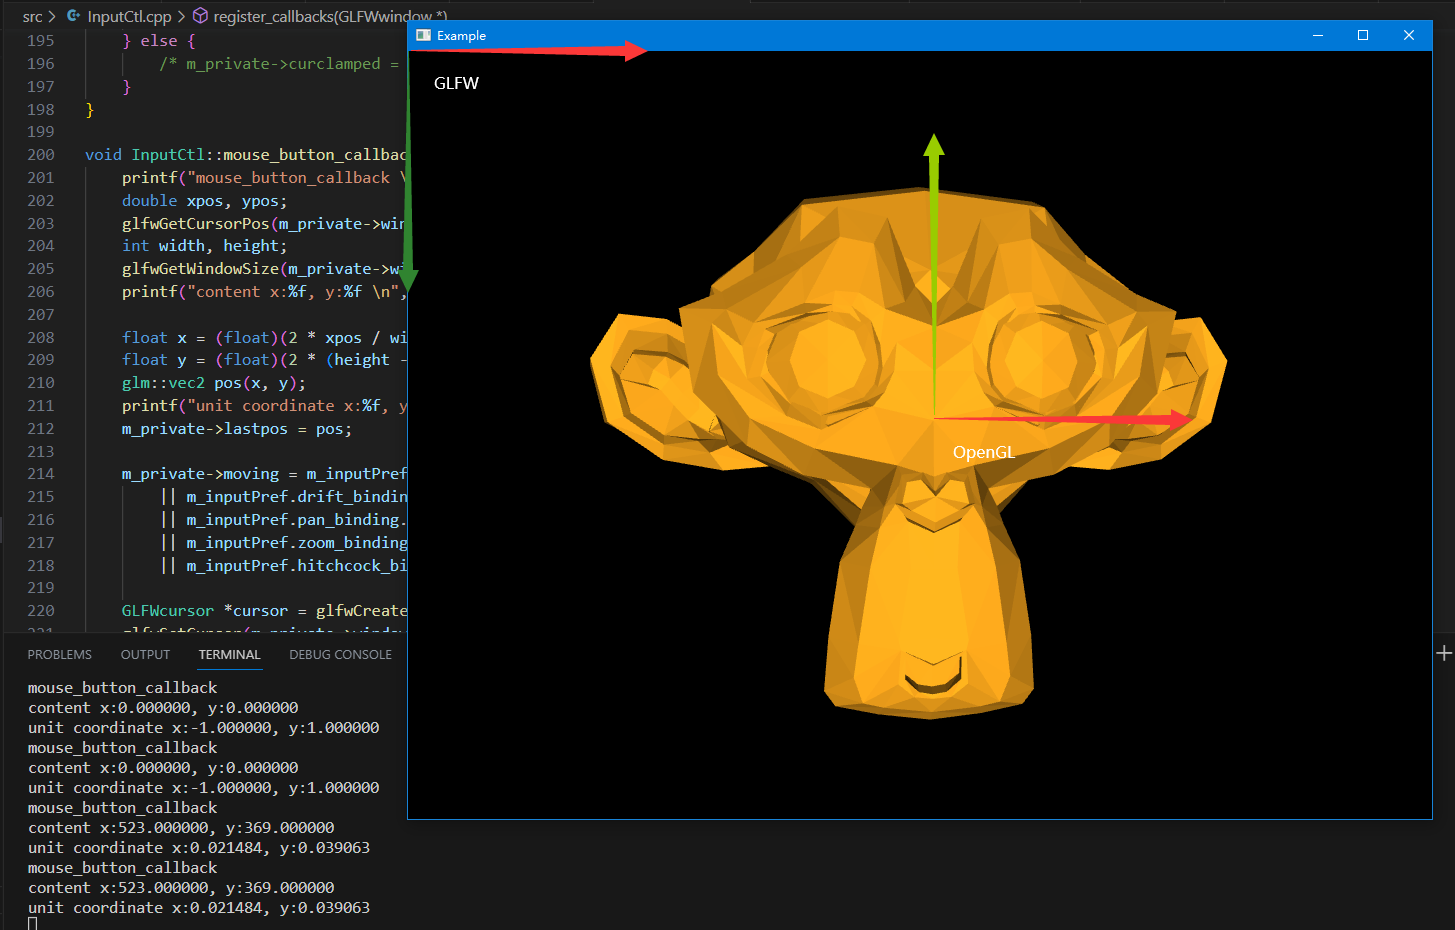
GLFW的窗口坐标系以窗口的左上角为坐标原点,向右侧延展为X正轴, 向下侧延展为Y正轴。
ref Introduction to the API GLFW
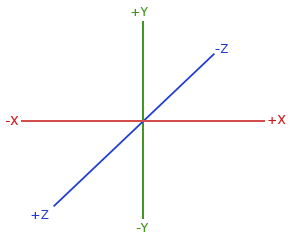
我们可以把这个坐标系变换为OPENGL的屏幕坐标系。窗口中心为坐标原点,向右侧延展为X正轴,向上侧延展为Y正轴。
	printf("mouse_button_callback \n");

    double xpos, ypos;

    glfwGetCursorPos(m_private->window, &xpos, &ypos);

    int width, height;

    glfwGetWindowSize(m_private->window, &width, &height);

    printf("content x:%f, y:%f \n", xpos, ypos);

    float x = (float)(2 * xpos / width - 1);

    float y = (float)(2 * (height - ypos) / height - 1);

    glm::vec2 pos(x, y);

    printf("unit coordinate x:%f, y:%f \n", x, y);
glfwSetMouseButtonCallback 这东西按下去调用一次,抬起来调用一次。
https://glfw-d.dpldocs.info/v1.0.1/glfw3.api.glfwSetMouseButtonCallback.html
3. 相机是什么东西
在OpenGL中,相机代表着 View 矩阵,即将世界坐标系的物体转换到相机坐标系里。
要进行这种转换,就需要在世界坐标系下描述相机坐标系。即相机坐标原点,以及三条互相垂直的坐标轴,总共四条信息。
问题是我们需要提供这么多信息吗?实际上提供3条信息就好,一个相机原点,两条垂直的轴就可以,第三条轴可以通过叉积自动算出来。
OpenGL提供了一个简单的函数来生成这个坐标系,即LookAt()。毫无疑问,他有三条参数。
Parameters

	eye	Position of the camera

	center	Position where the camera is looking at

	up	Normalized up vector, how the camera is oriented. Typically (0, 0, 1)
https://glm.g-truc.net/0.9.9/api/a00668.html#gaa64aa951a0e99136bba9008d2b59c78e
因此,我们要更新,相机的位置与姿态,就需要改动三个值,分别是相机位置,相机拍摄的位置,相机的上侧向量。这些向量定义在世界坐标系中。
事实上,当我们在观察一个物体时,我们看到物体在屏幕里左右摇晃,实际上,不是物体在动,而是相机在动。这就是相对论~。
4. 相机的平面位移(上下左右)
想象着一个相机固定在一个平面里,甚至就在我们的屏幕的黑框里,他只能在这个平面里动来动去,但是不可以旋转(相机的上侧向量会改变)。
显而易见,相机的位置和相机拍摄的位置会发生改变,这也是相机平面位移功能主要修改的两个变量。
/* Code from Peng Yu Bin 《OpenGL Tutor》 */
// translate left ,right, up and down.
void pan(InputCtl::InputPreference const &pref, glm::vec2 delta) {
delta *= -pref.pan_speed;
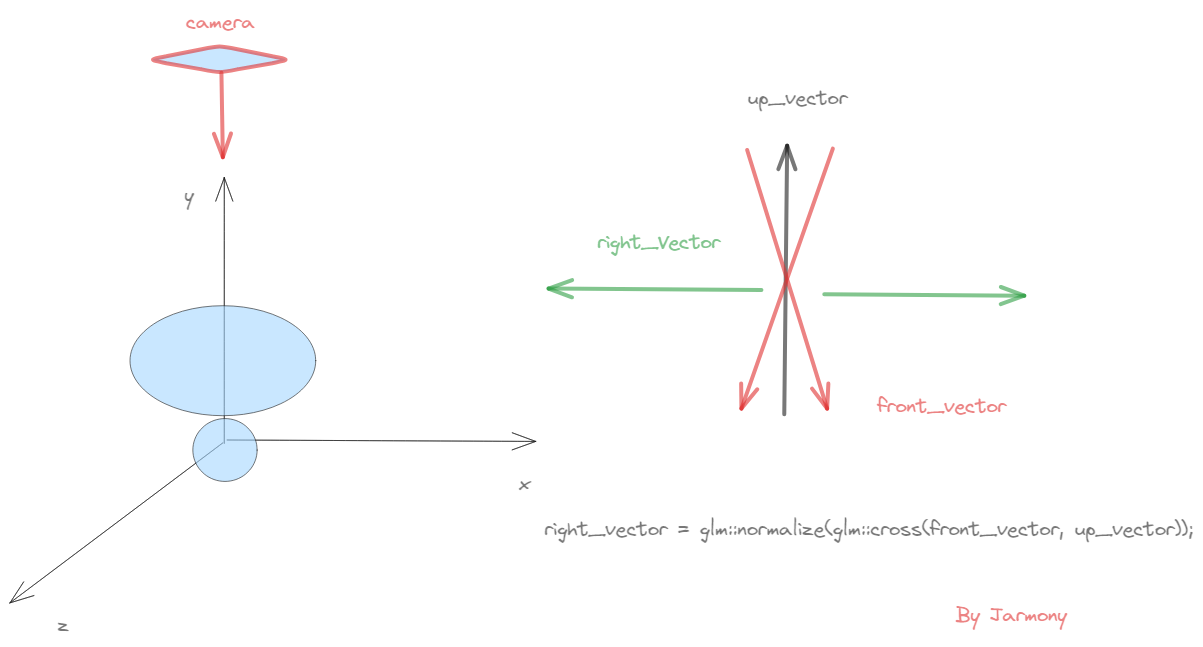
auto front_vector = glm::normalize(lookat - eye);
auto right_vector = glm::normalize(glm::cross(front_vector, up_vector));
auto fixed_up_vector = glm::normalize(glm::cross(right_vector, front_vector));
auto delta3d = delta.x * right_vector + delta.y * fixed_up_vector;
eye += delta3d;
lookat += delta3d;
printf("translate left and right \n");
}
glm::mat4x4 view_matrix() const {
return glm::lookAt(eye, lookat, up_vector);
}
根据相对论,当我们以为我们把一个物体向左移动,以为自己不动,物体左动。
但是实际上,物体并没有动,是我们在动,我们相对物体向右动。
所以当我们向左滑动物体,物体位置偏移量delta = pos - lastpos为负值,实际上却是相机向右滑动,在世界坐标系中。
为什么我们需要 fixed_up_vector, 在LearnOpenGL的Camera教程里详细的展示了如何从三个信息中生成View矩阵。在初始化的时候,我们绝不保证up_vector严格的指向相机的上方,而是要和direction vector = cameraPos - cameraTarget共面,来生成 Right axis,之后再通过direction vector X Right axis来生成真正的向上的相机向量。
glm::vec3 cameraUp = glm::cross(cameraDirection, cameraRight);
那么当up_vector在初始化时与direction vector共线会发生什么情况呢?答案就是生成不出正确的View矩阵,因为存在三条信息的限制,却只给出2条信息。OpenGL直接撂挑子不干了, 会黑屏。
glm::vec3 eye = {0, 0, 5};

glm::vec3 lookat = {0, 0, 0};

glm::vec3 up_vector = {0, 0, -5};

glm::lookAt(eye, lookat, up_vector);
5. 相机的聚焦点环绕(球形环绕 ArcBall Orbit)
球形环绕可以想象成相机绕着一个球面进行环绕,相机的镜头聚焦于拍摄物体。相机的成像平面(up_vector right_vector)为球面的切平面。
相机聚焦点环绕有个非常重要的事情,那就是相机的水平轴(right-axis or X-axis or 显示器屏幕的长边。)需要尽可能的保持水平,相对于世界坐标系里正常摆放的物体。
为什么呢?因为我们坐在屏幕前的头一开始是水平摆放的,并且也一直是水平摆放的。
一旦我们的虚拟相机的水平轴发生旋转,这就像我们拿手机斜着拍摄一个物体一样,映射到屏幕上会让人很不舒服。
5.1 如何保持水平轴水平 固定向上轴
一个简便的方法就是保持up_vector = {0, 1, 0}这样无论方向向量怎么看,水平轴永远是水平的。将三个自由度化为一个自由度即眼的位置,look_at在orbit里不会变化。
围绕up_vector我们可以生成一个过这个向量的平面,这个平面可有无数个,但是唯一需要注意的是相机的front_vector无论怎么变化,都是在其中的某一个平面里,因此 ringht_vector始终垂直于这个平面,并且与up_vector保持垂直。也就是说不会斜过来拍摄。
很好,似乎可以正常工作,实际上它与后面讲的修正基本没什么差别。
问题来到了特殊情况,我们知道当我们固定up_vector = {0, 1, 0}时,在移动相机的front_vector时,难免会与up_vector共线,也就是从头顶往下看。这种情况OpenGL绝对撂挑子不干, 会黑屏。
有一个好消息是,只要我们开始计算front_vector, 由于计算机数值的原因,我们几乎不会算出front_vector = {0, 1, 0} ,而是会出现front_vector vec3(-0.000316, -1.000000, -0.000136)这样的情况。也就是说,基本没有可能会与up_vector共线。
但是因此也会出现另一种状况,当我们的front_vector与up_vector将要共线时,他们挨的特别近。由于叉积的特性,他们两个的位置稍有方向上的变化(0.001度的变化),那么垂直向量会有巨大的变化(180度的变化)。
当我们上下滑动鼠标时调用
// rotation 2: based on the mouse vertical axis

glm::mat4x4 rotation_matrixY = glm::rotate(glm::mat4x4(1), angle_Y_inc, right_vector);
相机到了与up_vector共线的小区域,且每次调用相机绕right_vector滑动距离很小angle_Y_inc: -0.00260419。而相机right_vector的正负摆动非常快,同样的步长,正负转化,导致
- 正负摆动,导致相机左右异常跳变。直接反应到屏幕上来。
- 正负摆动,且是同一符号步长,导致旋转抵消。相机位置不可变化。
void orbit(InputCtl::InputPreference const &pref, glm::vec2 delta, bool isDrift) {

        if (isDrift) {

            delta *= -pref.drift_speed;

            delta *= std::atan(film_height / (2 * focal_len));

        } else {

            delta *= pref.orbit_speed;

        }

        auto angle_X_inc = delta.x;

        auto angle_Y_inc = delta.y;

        // pivot choose: drift mode rotates around eye center, orbit mode rotates around target object

        auto rotation_pivot = isDrift ? eye : lookat;

        auto front_vector = glm::normalize(lookat - eye);

        std::cout<<"front_vector "<<glm::to_string(front_vector)<<std::endl;

        // new right vector (orthogonal to front, up)

        auto right_vector = glm::normalize(glm::cross(front_vector, up_vector));

        std::cout<<"right_vector "<<glm::to_string(right_vector)<<std::endl;

        // new up vector (orthogonal to right, front)

        auto new_up_vector = glm::normalize(glm::cross(right_vector, front_vector));

        std::cout<<"new_up_vector "<<glm::to_string(new_up_vector)<<std::endl;

        // rotation 1: based on the mouse horizontal axis

        glm::mat4x4 rotation_matrixX = glm::rotate(glm::mat4x4(1), -angle_X_inc, new_up_vector);

        //auto new_right_vector = glm::vec3(rotation_matrixX * glm::vec4(right_vector, 1));

        // rotation 2: based on the mouse vertical axis

        glm::mat4x4 rotation_matrixY = glm::rotate(glm::mat4x4(1), angle_Y_inc, right_vector);

        std::cout<<"angle_Y_inc: "<<angle_Y_inc<<std::endl;

        std::cout<<"rotation_matrixY: "<<glm::to_string(rotation_matrixY)<<std::endl;

        // translate back to the origin, rotate and translate back to the pivot location

        auto transformation = glm::translate(glm::mat4x4(1), rotation_pivot)

            * rotation_matrixY * rotation_matrixX

            * glm::translate(glm::mat4x4(1), -rotation_pivot);

        std::cout<<"transformation: "<<glm::to_string(transformation)<<std::endl;

        // update eye and lookat coordinates

        eye = glm::vec3(transformation * glm::vec4(eye, 1));

        lookat = glm::vec3(transformation * glm::vec4(lookat, 1));

        std::cout<<"Eye: "<<glm::to_string(eye)<<std::endl;

         /**

        // try to keep the camera horizontal line correct (eval right axis error)

        float right_o_up = glm::dot(right_vector, keep_up_axis);

        float right_handness = glm::dot(glm::cross(keep_up_axis, right_vector), front_vector);

        float angle_Z_err = glm::asin(right_o_up);

        angle_Z_err *= glm::atan(right_handness);

        // rotation for up: cancel out the camera horizontal line drift

        glm::mat4x4 rotation_matrixZ = glm::rotate(glm::mat4x4(1), angle_Z_err, front_vector);

        up_vector = glm::mat3x3(rotation_matrixZ) * up_vector;

        printf("orbit \n");

        */

    }
5.1.1 上方观看 跳变LOG
#include <glm/gtx/string_cast.hpp>
GLM输出向量,矩阵等信息。需要添加一个头文件。
front_vector vec3(-0.000316, -1.000000, -0.000136)

right_vector vec3(0.395702, 0.000000, -0.918379)

new_up_vector vec3(-0.918379, 0.000344, -0.395702)

angle_Y_inc: -0.00260419

rotation_matrixY: mat4x4((0.999997, 0.002392, -0.000001, 0.000000), (-0.002392, 0.999997, -0.001030, 0.000000), (-0.000001, 0.001030, 0.999999, 0.000000), (0.000000, 0.000000,

0.000000, 1.000000))

transformation: mat4x4((0.999997, 0.002392, -0.000001, 0.000000), (-0.002392, 0.999997, -0.001030, 0.000000), (-0.000001, 0.001030, 0.999999, 0.000000), (0.000000, 0.000000, 0.000000, 1.000000))

Eye: vec3(-0.010380, 4.999970, -0.004472)

front_vector vec3(0.002076, -0.999998, 0.000894)

right_vector vec3(-0.395702, 0.000000, 0.918379)

new_up_vector vec3(0.918377, 0.002260, 0.395701)

rotation_matrixY: mat4x4((0.999997, -0.002392, -0.000001, 0.000000), (0.002392, 0.999997, 0.001030, 0.000000), (-0.000001, -0.001030, 0.999999, 0.000000), (0.000000, 0.000000,

0.000000, 1.000000))

transformation: mat4x4((0.999997, -0.002392, -0.000001, 0.000000), (0.002392, 0.999997, 0.001030, 0.000000), (-0.000001, -0.001030, 0.999999, 0.000000), (0.000000, 0.000000, 0.000000, 1.000000))

Eye: vec3(0.001578, 4.999983, 0.000680)
5.2 不固定向上轴 导致水平轴发生旋转
这个最后需要进行修正。
我们放开固定向上轴的限制,反而在过程中更新向上轴,同时使用上一帧的向上轴来构建新的向上轴以及其他一系列轴。
不固定向上轴带来一个问题,那就是我们的向上轴的朝向可以是任意的。拿出我们的手机进行拍摄,你随意的摆放向上轴,会发现因为水平轴也一并变得随意了。
而我们是要固定水平轴的。所以最后要进行一个奇妙的修正。
 void orbit(InputCtl::InputPreference const &pref, glm::vec2 delta, bool isDrift) {

        if (isDrift) {

            delta *= -pref.drift_speed;

            delta *= std::atan(film_height / (2 * focal_len));

        } else {

            delta *= pref.orbit_speed;

        }

        auto angle_X_inc = delta.x;

        auto angle_Y_inc = delta.y;

        // pivot choose: drift mode rotates around eye center, orbit mode rotates around target object

        auto rotation_pivot = isDrift ? eye : lookat;

        auto front_vector = glm::normalize(lookat - eye);

        // new right vector (orthogonal to front, up)

        auto right_vector = glm::normalize(glm::cross(front_vector, up_vector));

        // new up vector (orthogonal to right, front)

        up_vector = glm::normalize(glm::cross(right_vector, front_vector));

		// 这块的正负  -angle_X_inc  angle_Y_inc 最好拿自己的拳头当作相机,比划一下。

        // rotation 1: based on the mouse horizontal axis

        glm::mat4x4 rotation_matrixX = glm::rotate(glm::mat4x4(1), -angle_X_inc, up_vector);

        //auto new_right_vector = glm::vec3(rotation_matrixX * glm::vec4(right_vector, 1));

        // rotation 2: based on the mouse vertical axis

        glm::mat4x4 rotation_matrixY = glm::rotate(glm::mat4x4(1), angle_Y_inc, right_vector);

        // translate back to the origin, rotate and translate back to the pivot location

        auto transformation = glm::translate(glm::mat4x4(1), rotation_pivot)

            * rotation_matrixY * rotation_matrixX

            * glm::translate(glm::mat4x4(1), -rotation_pivot);

        // update eye and lookat coordinates

        eye = glm::vec3(transformation * glm::vec4(eye, 1));

        lookat = glm::vec3(transformation * glm::vec4(lookat, 1));

         /**

        // try to keep the camera horizontal line correct (eval right axis error)

        float right_o_up = glm::dot(right_vector, keep_up_axis);

        float right_handness = glm::dot(glm::cross(keep_up_axis, right_vector), front_vector);

        float angle_Z_err = glm::asin(right_o_up);

        angle_Z_err *= glm::atan(right_handness);

        // rotation for up: cancel out the camera horizontal line drift

        glm::mat4x4 rotation_matrixZ = glm::rotate(glm::mat4x4(1), angle_Z_err, front_vector);

        up_vector = glm::mat3x3(rotation_matrixZ) * up_vector;

        printf("orbit \n");

        */

    }
X.ref
相机系统 GLFW OPENGL的更多相关文章
- ISP图像处理&&相机系统
如何理解 ISO.快门.光圈.曝光这几个概念? 摄影基础篇——彻底弄清光圈.快门与ISO 理解这三个参数各自都是如何控制进入的光线量: 快门速度一般的表示方法是1/100s.1/30s.2s: 小的“ ...
- 为什么说使用 Linux 系统学习 OpenGL 更方便
前言 上一篇随笔介绍了我的电脑,同时也介绍了 Ubuntu 20.10 系统的安装和美化.这一篇,我将正式开始 OpenGL 之旅.使用 Ubuntu 来进行开发,不仅仅只是因为我对 Linux 桌面 ...
- Android 显示系统:OpenGL简介和Gralloc代码分析
一.OpenGL ES与EGL Android的GUI系统是基于OpenGL/EGL来实现的. 由于OpenGL是通用函数库,在不同平台系统上需要被“本土化”——把它与具体平台的窗口系统建立起关联,F ...
- Unity 利用Cinemachine快速创建灵活的相机系统
在第一或第三人称ACT和FPS游戏中,相机的运动需求是多种多样的,Unity内置的Cinemachine包可以助你快速实现不同相机功能,例如范围追踪,边界设置等. 例如,考虑这样一个功能,这在很多游戏 ...
- opengl入门学习
OpenGL入门学习 说起编程作图,大概还有很多人想起TC的#include <graphics.h>吧? 但是各位是否想过,那些画面绚丽的PC游戏是如何编写出来的?就靠TC那可怜的640 ...
- OpenGL 简介
OpenGL是一个底层图形库规范.它为程序员提供了一个小的几何图元(点.线.多边形.图片和位图)库和一个支持2D/3D几何对象绘图命令库,通过所提供的图元和命令来控制对象的呈现(绘图). 由于Open ...
- Android OpenGL 学习笔记 --开始篇
转自: http://www.cnblogs.com/TerryBlog/archive/2010/07/09/1774475.html 1.什么是 OpenGL? OpenGL 是个专业的3D程序接 ...
- 摄影初学者挑选相机的常见问题 FAQ
数码相机一次次降价,越来越多的人加入摄影的行列,照相器材还是一个比较专业的领域,并非简单的参数比一下高低就可以知道好坏,很多朋友往往了解了好久还没弄清孰优孰劣,在购机前踌躇半天拿不定主意,我收集了被问 ...
- OpenGL ES应用开发实践指南:iOS卷
<OpenGL ES应用开发实践指南:iOS卷> 基本信息 原书名:Learning OpenGL ES for iOS:A Hands-On Guide to Modern 3D Gra ...
- OpenGL入门学习(转)
OpenGL入门学习 http://www.cppblog.com/doing5552/archive/2009/01/08/71532.html 说起编程作图,大概还有很多人想起TC的#includ ...
随机推荐
- MPI4PY的数据类型 —— MPI4Py data type
原文地址: http://education.molssi.org/parallel-programming/03-distributed-examples-mpi4py/index.html MPI ...
- 在线flex布局----自己写的一个flex布局的小玩意,需要的私聊加关注0.0
- 2023 SMU RoboCom-CAIP 选拔赛
前言 更详细题解可以参考咱学长的( 2023 SMU RoboCom-CAIP 选拔赛.zip A. 小斧头 f_k 表示满足条件的j = k 的(i,j)对的数量.如上图中第四行即为f1至f5的元素 ...
- 蓝松SDK版本更新至【4.8.0】
[Android更新] 1. android增加低精度模型,一些低端机也可以流畅抠图. 2. android针对直播机硬件做了特定API,并C语言开源. 3. 视频编辑引出帧解码图层, 允许外界异步形 ...
- PostgreSQL允许远程连接
PostgreSQL安装后,貌似默认是只接受本地机器连接访问.如果想在其他主机上访问PostgreSQL数据库服务器,就需要进行相应的配置.以下是我配置远程连接PostgreSQL数据库方式: 修改配 ...
- Python if __name__ == "__main__" 解释
一种机制,允许脚本以不同的方式运行,这取决于作为独立的程序执行还是作为模块被其他脚本导入.这种机制就是 if __name == "__main__" 其作用是控制某些代码块只在该 ...
- 【ETL工具】DataX + DataXWeb 初使用过程记录
版本:DataX v202309 DataXWeb 2.1.3预发布版 DataX: Github:https://github.com/alibaba/DataX 功能介绍文档:https://g ...
- C# 泛型对象和DataTable之间的相互转换
应用场景 实际开发场景下会经常出现DataTable和List对象需要相互转换的时候,通过方法提取避免重复造轮子 List转换成DataTable 基本思路: 向DataTable里面添加新的数据内容 ...
- Node.js开发博客项目笔记-http请求处理(1)
处理get与post请求示例代码: const http = require('http'); const querystring = require('querystring'); const se ...
- TS2Vec: 面向通用的时间序列表示《TS2Vec: Towards Universal Representation of Time Series》(时间序列、对比学习、多尺度特征(池化操作)、分层对比、上下文一致性(时间戳掩码+随机裁剪))
今天是2024年5月22日,10:24,今天看这篇经典的论文(如果你问我为什么最近频繁看论文,因为我的创新点无了,要找创新点+太菜了,菜就多看多学). 论文:TS2Vec: Towards Unive ...