
Linux LAMP架构搭建
一.部署LAMP基本架构
1.L(linux)A(apache)M(mysql)P(php)
2.稳定版本(mysql5.1,php5.3,apache2.2)
3.安装顺序,mysql-->apache-->php
4.将所需的压缩包放指定目录。
(1)编译原理:主要为了让C语言开发的包编译成二进制文件。
(2)系统是区分64位与32位 ,对应的安装包
(3)查看linux系统位,uname –a。i686是32 x86是64。
5.安装mysql
(1)解压mysql压缩包
tar zxvf mysql.tar.gz
(2)将mysql目录移动/usr/下。
mv mysql目录 /usr/local/mysql
(3)在mysql目录下,创建目录,作为datadir(数据目录)
mkdir /data/mysql
(4)创建mysql用户,不允许登陆,不创建家目录。
useradd -s /sbin/nologin -M mysql
(5)将/data/mysql/目录所属组所属主给mysql用户。
chown -R mysql:mysql /data/mysql/
(6)将配置文件存放到/etc/my.conf覆盖。
cp /mysql目录/support-files/my-large.cnf /etc/my.cnf
(7)修改配置文件
vim进入/etc/my.conf
# For advice on how to change settings please see

# http://dev.mysql.com/doc/refman/5.6/en/server-configuration-defaults.html

# *** DO NOT EDIT THIS FILE. It's a template which will be copied to the

# *** default location during install, and will be replaced if you

# *** upgrade to a newer version of MySQL.

[mysqld]

port            = 3306

socket          = /usr/local/mysql/mysql.sock

datadir      = /data/mysql

pid-file = /data/mysql/mysql.pid

# Remove leading # and set to the amount of RAM for the most important data

# cache in MySQL. Start at % of total RAM for dedicated server, else %.

# innodb_buffer_pool_size = 128M
------------------------------------------
常用参数:
Port #监听端口
Socket #通信方式
Key_buffer_size #mysql内存使用大小
Log-bin=mysql-bin #记录二进制日志,注释掉。
Binlog_format=mixed #日志相关参数,注释掉。
Server_id=1 #主从复制参数,注释掉。
(8)将服务的启动脚本放入/etc/init.d/下。
cp /mysql目录/support-files/mysql.server /etc/init.d/mysqld
(9)修改启动文件。
vi /etc/init.d/mysqld
# The following variables are only set for letting mysql.server find things.

# Set some defaults

mysqld_pid_file_path=

if test -z "$basedir"

then

  basedir=/usr/local/mysql

  bindir=/usr/local/mysql/bin
  mysqld_pid_file_path=/data/mysql/master.pid
------------------------------------------
basedir #定义程序所在路径
bindir #定义数据库启动路径
(10)在mysql目录下初始化mysql服务,看到两个ok就没问题。
mysql]#./scripts/mysql_install_db --user=mysql --datadir=/data/mysql
报错1:Installing MySQL system tables..../bin/mysqld: error while loading shared libraries: libaio.so.: cannot open shared object file: No such file or directory

    解决:yum install –y libai*

报错2:Installing MySQL system tables..../bin/mysqld: error while loading shared libraries: libnuma.so.: cannot open shared object file: No such file or directory

    解决:yum install –y numactl-*
(10)报错
(11)查看是否生成mysql,test。
mysql]#ls /data/mysql
(12)启动mysql。
mysql]#/etc/init.d/mysqld start
报错1:Starting MySQL.... ERROR! The server quit without updating PID file (/data/mysql/localhost.localdomain.pid).

    解决:[root@localhost ~]# cd /usr/local/mysql

             [root@localhost mysql]# chown -R mysql.mysql .

             [mysql@localhost mysql]#scripts/mysql_install_db
(12)报错
(13)查看mysql进程。
ps aux|grep mysql
(14)开启mysql命令终端Mysql>。
/usr/local/mysql/bin/mysql
报错1:ERROR  (HY000): Can't connect to local MySQL server through socket '/tmp/mysql.sock' (2)

    解决:ln -s  /usr/local/mysql/mysql.sock           /tmp/mysql.sock
(15)报错
6.apache安装
(1)解压。
tar zxf httpd-2.2.16.tar.gz
(2)进入解压后目录。
cd httpd-2.2.16
(3)安装gcc
yum -y gcc
(4)编译安装。
./configure --prefix=/usr/local/apache2 --with-included-apr --with-pcre --enable-mods-shared=most
--whit-included-apr
注:可进行平台移植,动态运行库

--enable-mods-shared=most

注:enable静态模块,与apache一通执行,占用内存cpu,速度快

注:shared动态模块,可调用执行
注:enable-mods-shared=all 安装所有动态模块,不用可以手动禁掉
报错1:在http2.4编译安装时会出现报错

configure: error: Bundled APR requested but not found at ./srclib/. Download and unpack the corresponding apr and apr-util packages to ./srclib/.

解决:在Apache官网下载 两个ARP插件覆盖到http文件内

# cd /usr/local/src<br data-filtered="filtered"># wget http://apache.fayea.com/apr/apr-1.5.2.tar.bz2

# wget http://apache.fayea.com/apr/apr-util-1.5.4.tar.bz2

# tar -jxvf apr-util-1.5..tar.bz2

# tar -jxvf apr-1.5..tar.bz2

# cp -rf apr-1.5. /usr/local/src/httpd-2.4./srclib/apr

# cp -rf apr-util-1.54 /usr/local/src/httpd-2.4./srclib/apr

报错2:configure: error: pcre-config for libpcre not found. PCRE is required and available from http://pcre.org/

    解决:yum -y install pcre-devel
(4)报错
(5)编译。测试echo $?
make
报错1: xml/apr_xml.c:: 错误:‘apr_xml_parser’没有名为‘xp’的成员

    解决:yum inatsll expat-devel -y
(5)报错
(6)编译安装
make install
7.php安装(最后安装)
(1)解压
tar zxf php-5.3.28.tar.gz
(2)进入解压目录
cd php-5.3.28
(3)编译安装,依赖模块。
./configure --prefix=/usr/local/php --with-apxs2=/usr/local/apache2/bin/apxs --with-config-file-path=/usr/local/php/etc --with-mysql=/usr/local/mysql --with-libxml-dir -with-gd --with-jpeg-dir --with-png-dir --with-freetype-dir --with-iconv-dir --with-zlib-dir --with-bz2 --with-openssl --with-mcrypt --enable-soap --enable-gd-native-ttf --enable-mbstring --enable-sockets --enable-exif --disable-ip6
yum -y install  libxml2-devel*

yum -y install  bzip2-devel*

yum -y install  curl curl-devel

yum -y install  libjpeg-devel

yum -y install  openssl-devel*

yum -y install  freetype-devel*
yum -y install libpng-devel

yum -y install  libmcrypt-devel*

#没有安装包需要下载源码包
#安装编译包
注:如果报错可同过 yum list | grep 报错名 :来查找需要安装的包
make #编译
make install #编译安装
7.配置LAMP架构文件
(1)apche主配置文件。
/usr/local/apache2/conf/httpd.conf
(2).so模块。
/usr/local/apache2/modules/
注:libphp5.so做支持的与/usr/local/php/bin/php相同。
(3)查看模块命令。
ldd /usr/local/apache2/modules/libphp5.so
(4)查看php编译参数目录。
/usr/local/php/bin/php -i |les s
cat /usr/local/apache2/build/config.nice #查看apche编译参数目录。
cat /usr/local/mysql/bin/mysqlbug|grep configure #查看mysql编译参数目录
①php-5.4.28]#cp php.ini-developmen /usr/local/php/etc/php.ini #开发环境使用。
②php-5.4.28]#cp php.ini-production /usr/local/php/etc/php.ini #生产环境使用。
注:/usr/local/php/bin/php –i |less #验证加载配置文件。

(6)查看php加载的模块。
/usr/local/php/bin/php -m
/usr/local/apache2/bin/apachectl -M #查看apache加载模块。
注:(shared)动态。(static)静态。
(7)查看状态。
/usr/local/apache2/bin/apachectl -t
注:apr sockaddr_info_get() #表示SELINUX没有关闭。
Syntax OK #没有问题。
(8)启动apahce配置文件。
usr/local/apache2/bin/apachectl start
报错1:AH00558: httpd: Could not reliably determine the server's fully qualified domain name, using localhost.localdomain. Set the 'ServerName' directive globally to suppress this message

    解决:[root@server conf]# vi httpd.conf

    #ServerName www.example.com:

       ServerName localhost:
(8)报错
(9)查看启动进程。
ps aux | grep httpd
8.测试httpd解析php。
(1)编辑解析php。
vim /usr/local/apache2/htdocs/1.php
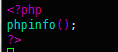
注:页面访问。
(2)访问失败,排错。
Vim /usr/local/apache2/conf/httpd.conf #排查配置文件。

注:查看php模块加载。

注:添加AddType。
(3)测试配置文件。
/usr/local/apache2/bin/apachectl -t
(4)重启配置文件。
/usr/local/apache2/bin/apachectl restart
9.测试启动
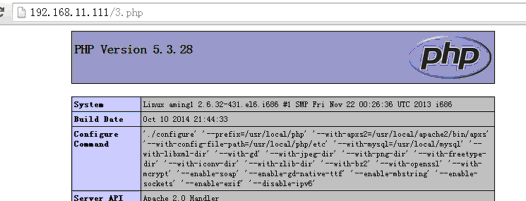
二.在LAMP基础上架设论坛网站,虚拟主机。
1.关闭SELINUX
(1)编辑配置文件注:长期关闭。
vim /etc/selinux/config
# This file controls the state of SELinux on the system.

# SELINUX= can take one of these three values:

#     enforcing - SELinux security policy is enforced.

#     permissive - SELinux prints warnings instead of enforcing.

#     disabled - No SELinux policy is loaded.

SELINUX=disabled

# SELINUXTYPE= can take one of these two values:

#     targeted - Targeted processes are protected,

#     mls - Multi Level Security protection.

SELINUXTYPE=targeted
(2)临时关闭
getenforce 0
2.查找php无法解析原因。
(1)查看apache是否调用php模块。
/usr/local/apache2/bin/apachectl -M
php5_module (shared)
(2)如果没有模块,需要查找是否有编译过php模块。

(3)如果有需要看一下apache主配置文件下是否调用php模块。
vim /usr/local/apache2/conf/httpd.conf
 LoadModule php5_module        modules/libphp5.so
  注:这个php模块是在编译的时候通过apxs模块自动写入的。
(4)查看apache主配置文件下,php支持模块是否写入。
vim /usr/local/apache2/conf/httpd.conf
AddType application/x-httpd-php .php
(5)apache主配置文件下添加index.php主页类型。
vim /usr/local/apache2/conf/httpd.conf
<IfModule dir_module>

    DirectoryIndex index.html index.php

</IfModule>
3.编辑虚拟主机
(1)解开注释,虚拟主机配置文件。
vim /usr/local/apache2/conf/httpd.conf
Include conf/extra/httpd-vhosts.conf
(2)编辑解注释一行的配置文件。
vim /usr/local/apache2/conf/extra/httpd-vhosts.conf
# You may use the command line option '-S' to verify your virtual host

# configuration.

#

# VirtualHost example:

# Almost any Apache directive may go into a VirtualHost container.

# The first VirtualHost section is used for all requests that do not

# match a ServerName or ServerAlias in any <VirtualHost> block.

#

<Directory "/usr/local/apache">

    Options Indexes FollowSymLinks

    AllowOverride all

    Require all granted

</Directory>

<VirtualHost *:80>

    DocumentRoot "/usr/local/apache"

    ServerName 123.com

    CustomLog "logs/123.com-access_log" common

</VirtualHost>
-------------------------------------------
常用参数
<VirtualHost *:80>
Serveradmin #管理员邮箱
documentRoot #目录URL
ServerName #域名访问
ServerAlias #域名别名(可写多行)
Errorlog #错误日志
Customlog #访问日志common格式
</VirtualHost>
----------------------------------------------
虚拟主机参数,适用Apache2.4往后版本
<Directory "C:/xxx/xxx">
Options Indexes FollowSymLinks
AllowOverride all
Require all granted
</Directory>
<VirtualHost *:80>
DocumentRoot "C:/xxx/xxx"
ServerName www.xxx.com
</VirtualHost>
注:虚拟主机,可以给予多IP多端口多域名的配置。
(3)apache主配置文件下的相对路径参数。
vim /usr/local/apache2/conf/extra/httpd-vhosts.conf
ServerRoot "/usr/local/apache2"
(4)测试配置文件。
/usr/local/apache2/bin/apachectl -t
(5)重启主配置文件。
/usr/local/apache2/bin/apachectl restart
4.安装论坛网站
(1)解压论坛文件包。
unzip Discuz_X3.2_SC_GBK.zip
(2)将网站程序移动到网站目录下。
mv uplocad/* ./
(3)删除多余文件。
rm -rf upload/ utility/ readme/
(4)权限修改。
ps aux | grep httpd
注:http执行用户位daemon用户,而网站文件是root用户,则没有权限执行
chown -R daemon config/ data uc_client/data uc_server/data
注:修改网站文件目录的执行用户,-R递归目录下的子目录。
注:域名访问IP首选是 虚拟主机
打开 windos系统下hosts文件
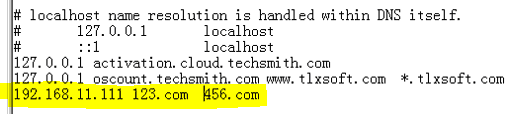
(5)打开网站安装。

(6)安装,下一步à。

(7)配置mysql,数据库网站安装。
/etc/init.d/mysqld start
注:启动mysql。
(8)添加开机自启动。
chkconfig --list | grep mysql #查看是否存在mysql服务。
chkconfig --add mysqld #添加mysqld服务
chkconfig mysqld on #打开开机自启动
/usr/local/mysql/bin/mysql
注:测试启动mysql
(9)添加环境变量赋值。可使用mysql命令直接启动。在当前终端生效。
PATH=$PATH:/usr/local/sbin:/usr/local/bin:/sbin:/bin:/usr/sbin:
/usr/bin:/root/bin:/usr/local/mysql/bin
(10)设置所有终端都可访问。
vim /etc/profile
#文件最下面输入

export PATH=$PATH:/usr/local/sbin:/usr/local/bin:/sbin:/bin:/usr/sbin:/usr/bin:/root/bin:/usr/local/mysql/bin
source /etc/profile #即时生效
(11)设置mysql管理员密码。
mysqladmin -uroot password ’123456‘
mysql -u root –p #登陆
注:再次登陆应输入管理员,与密码。
(12)mysql下添加普通用户赋予管理权限,对应主机,与密码。
mysql> grant all on *.* to 'user1'@'localhost' identified by 'discuz';
(13)继续安装论坛

注:添加数据库选项。
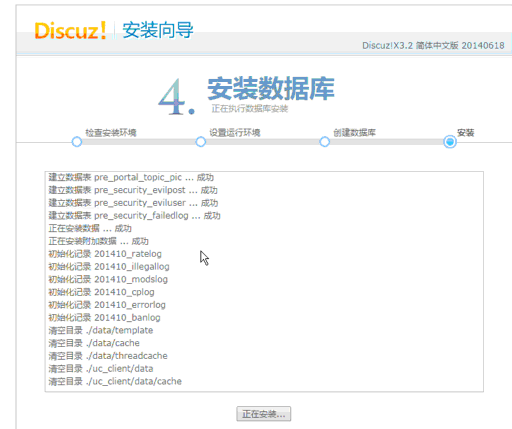
注:安装数据库。

注:完成论坛安装。
Linux LAMP架构搭建的更多相关文章
- lamp架构搭建
目录 1. LAMP架构介绍 2.web服务器工作流程 2.1 cgi与fastcgi 2.2 httpd与php结合的方式 2.3 web工作流程 3. lamp平台搭建 3.1 安装httpd 3 ...
- Linux LAMP环境搭建
什么是LAMP Linux+Apache+Mysql/MariaDB+Perl/PHP/Python一组常用来搭建动态网站或者服务器的开源软件,本身都是各自独立的程序,但是因为常被放在一起使用,拥有了 ...
- LAMP架构搭建+Discuz论坛搭建【weber出品必属精品】
一. 本机简介: 本机系统: CentOS-6.4-x86_64 主机名:oracle.ywb IP地址:192.168.146.129 二. 在Linux环境下安装Apache步骤 ...
- Linux LNMP架构搭建
一.搭建LNMP基本架构 1.L(http) N(nginx) M(mysql) P(php) 2.安装顺序 Mysql-->PHP-->Nginx 3.安装包 Discuz_3. htt ...
- LAMP架构的搭建
什么是LAMP架构? L : Linux,2.6.18-308.el5(redhat5.8) A :Apache,httpd 2.4.4 M : mysql-5.5.28 P : php-5.4. ...
- linux的基本操作(LAMP环境搭建)
LAMP 环境搭建 经过前部分章节的学习,你已经掌握了linux的基础知识了.但是想成为一名系统管理员恐怕还有点难度,因为好多单位招聘这个职位的时候都要求有一定的工作经验.然而真正的经验一天两天是学不 ...
- 搭建《深入Linux内核架构》的Linux环境
作者 彭东林 pengdonglin137@163.com 软件 Host: Ubuntu14.04 64 Qemu 2.8.0 Linux 2.6.24 busybox 1.24.2 gcc 4.4 ...
- linux下LAMP环境搭建
++++++++++++++++++++++++++++++++++++++++++++++ linux下LAMP环境搭建 ++++++++++++++++++++++++++++++++++++++ ...
- Linux下Discuz!7.2 LAMP环境搭建
linux下Discuz LAMP环境搭建 1.需要的源代码 httpd-2.2.15.tar.gz mysql-5.1.44.tar.gz php-5.3.2.tar.gz ...
随机推荐
- 【LeetCode每天一题】Find First and Last Position of Element in Sorted Array(找到排序数组中指定元素的开始和结束下标)
Given an array of integers nums sorted in ascending order, find the starting and ending position of ...
- android studio 设置安装不占用C盘
我们知道,android studio 安装会占用大量的空间,比如我们我们将andriod status 安装到了D:\IDE\Android Studio这里,但是你会发现,在编译出包过程中,C盘的 ...
- react全局的公共组件-------弹框 (Alert)
最近研究react,发现写一个组件很容易,但是要写一个全局的好像有点麻烦.不能像VUE一样,直接在原型上面扩展,注册全局组件 下面实现一个弹框,只需要引入之后,直接调用方法即可,不需要写入组件 给出我 ...
- .NET拾忆:EventLog(Windows事件日志监控)
操作Windows日志:EventLog 1:事件日志名(logName):“事件查看器”中的每一项,如“应用程序”.“Internet Explorer”.“安全性”和“系统”都是日志(严格地说是日 ...
- iOS 添加启动图片
之前添加启动图片,一直都是通过添加LaunchImage来实现,见链接 http://www.cnblogs.com/jys509/p/4856068.html 这种方法,就需要给每个尺寸添加图片. ...
- iOS 第三方框架-SDWebImage
iOS中著名的牛逼的网络图片处理框架.包含的功能:图片下载.图片缓存.下载进度监听.gif处理等等.用法极其简单,功能十分强大,大大提高了网络图片的处理效率.国内超过90%的iOS项目都有它的影子. ...
- Vue系列之 => 使用第三方animated.css动画
<!DOCTYPE html> <html lang="en"> <head> <meta charset="UTF-8&quo ...
- uvalive 3353 Optimal Bus Route Design
题意: 给出n个点,以及每个点到其他点的有向距离,要求设计线路使得每一个点都在一个环中,如果设计的线路拥有最小值,那么这个线路就是可选的.输出这个最小值或者说明最小线路不存在. 思路: 在DAG的最小 ...
- 压缩和解压缩(I)
ZipArchive 压缩方法 -(void)zipArchiveWithFiles { //创建解压缩对象 ZipArchive *zip = [[ZipArchive alloc]init]; / ...
- 【2017-03-20】HTML框架,标题栏插入小图标,锚点,插入音频视频,滚动效果
一.html框架 iframe 在网页中嵌入一个别的网页 1.格式: <iframe src="链接地址" width="" height=&quo ...