QT 中Widgets-Scene3d例子学习
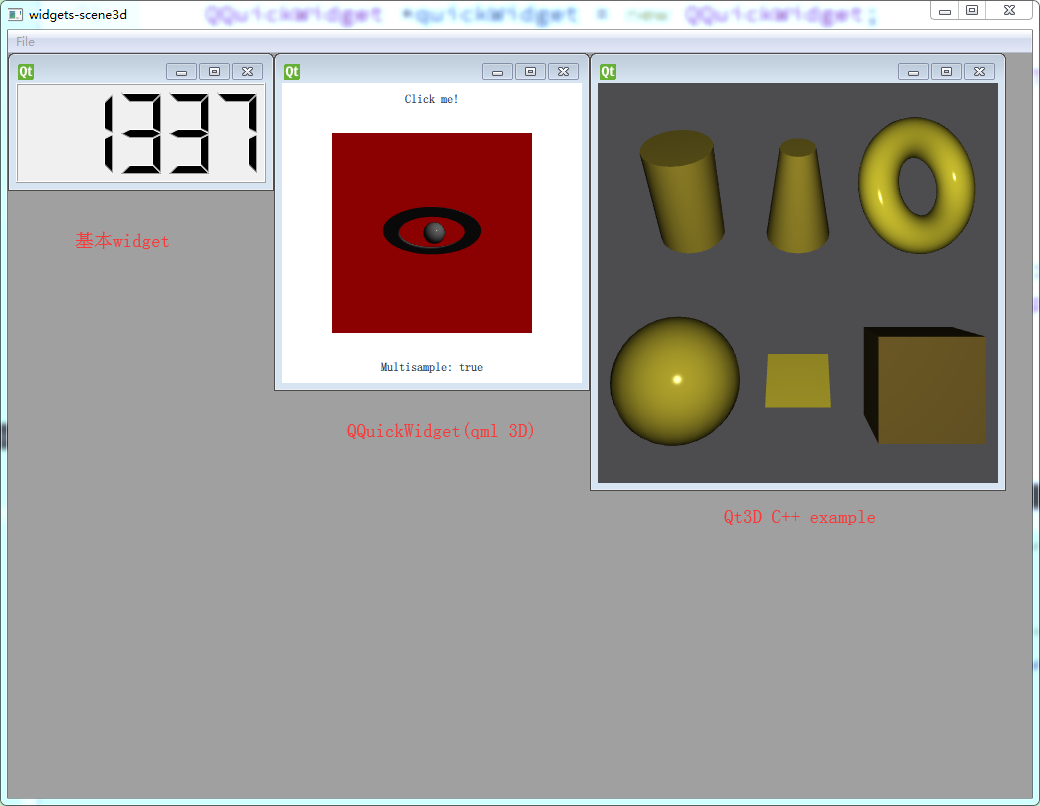
QT中自带的例子widgets-scene3d实现在基于Widget的应用程序中使用qml 3d场景的功能,我在此基础上,将basicshapes-cpp的例子加以嵌入:
相关代码如下:
|
1
2 3 4 5 6 7 8 9 10 11 12 13 14 15 16 17 18 19 20 21 22 23 24 25 26 27 28 29 30 31 32 33 34 35 36 37 38 39 40 41 42 43 44 45 46 47 48 49 50 51 52 53 54 55 56 57 58 59 60 61 62 63 64 65 66 67 68 69 70 71 72 73 74 75 76 77 78 79 80 81 82 83 84 85 86 87 88 89 90 91 92 93 94 95 96 97 98 |
#include <QApplication>
#include <QMainWindow> #include <QQuickWidget> #include <QMdiArea> #include <QLCDNumber> #include <QMenuBar> #include "scenemodifier.h" #include <Qt3DRender/qcamera.h> #include <Qt3DCore/qentity.h> #include <Qt3DRender/qcameralens.h> #include <Qt3DInput/QInputAspect> #include <Qt3DExtras/qtorusmesh.h> #include <Qt3DCore/qtransform.h> #include <Qt3DRender/qrenderaspect.h> #include <Qt3DExtras/qt3dwindow.h> int main(int argc, char **argv) QMainWindow mainWindow; QMdiArea *centralWidget = new QMdiArea; Qt3DInput::QInputAspect *input = new Qt3DInput::QInputAspect; // Root entity Qt3DCore::QEntity *lightEntity = new Qt3DCore::QEntity(rootEntity); // For camera controls // Set root object of the scene mainWindow.setCentralWidget(centralWidget); QMenu *fileMenu = mainWindow.menuBar()->addMenu(QObject::tr("&File")); mainWindow.resize(); return app.exec(); |
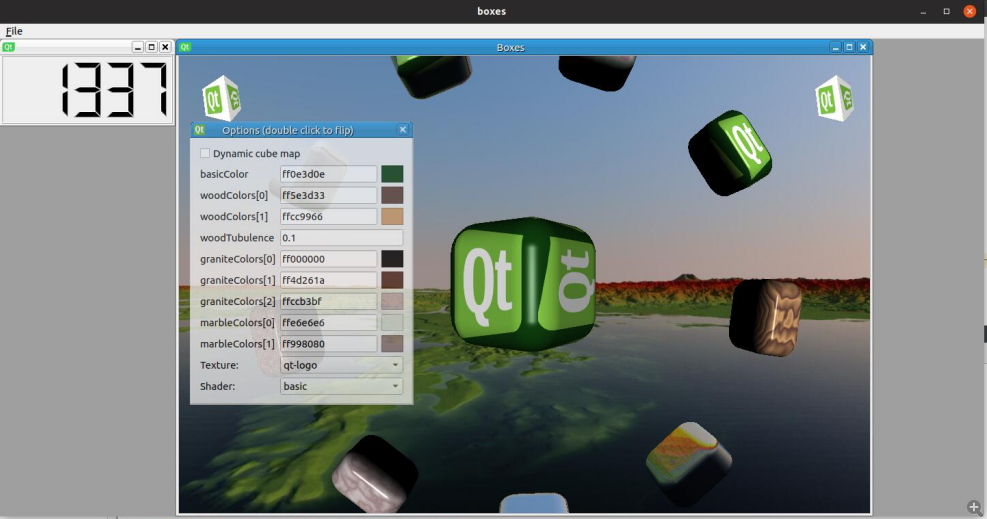
再进一步,我将QT场景视图(Graphics-View)嵌入多文档界面,下面尝试将QT自带的boxes例子(GraphicsView With OpenGL)嵌入,相关代码如下:
|
1
2 3 4 5 6 7 8 9 10 |
// 子窗口4-GraphicsView With OpenGL
QGLWidget *widget = new QGLWidget(QGLFormat(QGL::SampleBuffers)); widget->makeCurrent(); Scene scene(1024, 768, maxTextureSize);; GraphicsView view; view.setViewport(widget); view.setViewportUpdateMode(QGraphicsView::FullViewportUpdate); view.setScene(&scene); //gview.show(); centralWidget->addSubWindow(&gview); |
我在Ubuntu中测试的一个截图效果如下:
QT 中Widgets-Scene3d例子学习的更多相关文章
- PyQt学习随笔:Qt中Model/View中的怎么构造View匹配的Model
老猿Python博文目录 老猿Python博客地址 在<PyQt学习随笔:Qt中Model/View相关的主要类及继承关系>介绍了Model/View架构的主要类,在实际使用时,view相 ...
- PyQt(Python+Qt)学习随笔:快速理解Qt 中Action是什么
一.引言 Qt中Action这个词接触很久了,一直以来没去学习,今天终于准备学习了,查了些资料,初步总结为: Action为界面操作的抽象,应用程序可以通过菜单,工具栏按钮以及键盘快捷键来调用通用的命 ...
- Qt学习笔记:Qt中使用Lua
今天想在Qt中使用Lua进行数据操作 结果发现在Qt中使用Lua的文章较少,虽然很简单,但是还是写出来提供入门,顺便记录一下 我使用的是Qt Creator 3.4.2,用的是mingw4.9.2的编 ...
- OpenCV2学习笔记03:Qt中配置OpenCV环境
在Qt中开发基于OpenCV的应用时,需要配置对应函数库到环境变量,这时候我们需要使用到qmake能够识别的变量来指定环境变量. INCLUDEPATH: 用于指定搜索头文件到文件夹路径. LIBS: ...
- QT中静态库的生成与使用——创建共享库代码,附例子
一. 静态库的生成 1. 测试目录: lib 2. 源码文件名: mywindow.h, mywindow.cpp, 类MyWindow继承于QPushButton, 并将文字设置为&qu ...
- <QT之Bug制造机>QT中串口类“QSerialPort”的学习笔记
QT5中已经增加了串口类QSrialPort,可以直接调用API函数进行快速开发. 1. 获取串口信息 Dialog::Dialog(QWidget *parent) : QDialog(parent ...
- PyQt学习随笔:Qt中Model/View中的Model Index
Qt中Model/View中的Model Index是一个类,该类用于定位Model/View中数据模型中的数据. Model Index是从QAbstractItemModel派生的子类,用于在项视 ...
- PyQt(Python+Qt)学习随笔:Qt中的部分类型QString、QList和指针、引用在PyQt中的实现方式
老猿Python博文目录 老猿Python博客地址 在我们查阅Qt的文档资料时,可以看到Qt中的链表使用的是QList,字符串使用的是QString,但老猿在测试时发现这两个类型PyQt不支持,无法找 ...
- Qt学习日记篇-Qt中使用Curl和jsonCpp
1.Qt中安装并使用jsonCPP库 1.1 官网下载.https://sourceforge.net/projects/jsoncpp/ 解压文件得到 jsoncpp-src-0.5.0 文 ...
随机推荐
- android圆角功能,非常好用,可以用在图片,视频,gif等上面
使用方式:直接在xml中使用即可. <com.base.baseview.RoundLayout android:id="@+id/example_view" android ...
- javaweb中为mysql的curd多个值的语句
更新语句 String sql = "update student set num=?,name=?,birthday=?,score=?,password=? where id=?&quo ...
- php integer
一.整数的表示方法: 整型值可以使用十进制,十六进制,八进制或二进制表示,前面可以加上可选的符号(- 或者 +) 要使用二进制表达,数字前必须加上 0b 要使用八进制表达,数字前必须加上 0. 要使用 ...
- Mac如何找到从AppStore下载的正版Xcode安装包、以及Xcode清理缓存
前言:本文介绍在Mac下如何找到AppStore下载的安装包路径,以及如何提取出来供以后使用,希望对大家有所帮助(前提:想要提取某个安装包,前提是你正在从AppStore安装这个程序.比如你想提取im ...
- Java基础之理解Annotation
一.概念 Annontation是Java5开始引入的新特征.中文名称一般叫注解.它提供了一种安全的类似注释的机制,用来将任何的信息或元数据(metadata)与程序元素(类.方法.成员变量等)进行关 ...
- AngularJS中监视Scope变量以及外部调用Scope方法
在AngularJS中,有时候需要监视Scope中的某个变量,因为变量的改变会影响一些界面元素的显示.有时,也希望通过jQuery调用Scope的某个方法. 比如以下场景: <div> & ...
- [Docker] Benefits of Multi-stage Builds
The benfits of multi-stage builds: Avoid manual creation of intermediate images Reduce complexity Se ...
- BaseDAO使用
BaseDao接口的过人之处在于:一般是提供从数据库 增加.删除.修改记录.查询所有记录.查询符合某个条件记录.取得某条记录等方法的底层数据操作自定义类.由于我们可能操作多个数据库表,这样就需要为每个 ...
- 《Unix&Linux大学教程》学习笔记6——Unix文件系统
1:Unix文件类型——3种 普通文件(常规文件):文本文件(纯文本.脚本.源程序.配置文件.html等).二进制文件(多媒体文件.数据库等) 目录:用于组织文件 伪文件:不存储数据,目的是提供一种服 ...
- Android——TabHost(标签容器)相关知识总结贴
android 2.3 r1 中文 api (58) —— TabHost http://www.apkbus.com/android-18911-1-1.html android中文api (5 ...