nginx的安装 、Nginx默认虚拟主机、nginx用户认证、nginx 域名重定向
1、nginx:
官网:www.nginx.org
下载:wget -c http://nginx.org/download/nginx-1.14.0.tar.gz
解压:tar -zxvf nginx-1.14.0.tar.gz
进入:cd nginx-1.14.6
安装依赖包:yum install gcc gcc-c++ glibc pcre pcre-devel zlib zlib-devel
生成配制文件:./configure --prefix=/usr/local/nginx --user=*** --group=*** --with-http_ssl_module --with-http_stub_status_module
编译安装:make && make install
升级、降级:下载安装包后,按照原来的参数进行编译后,不再安装(make install) 然后复制cp obj/nginx 到原安装目录下,就可以了。
注意:
a,编译前可以隐藏版本:编辑源码包里:vim nginx-1.14.0/src/core/nginx.h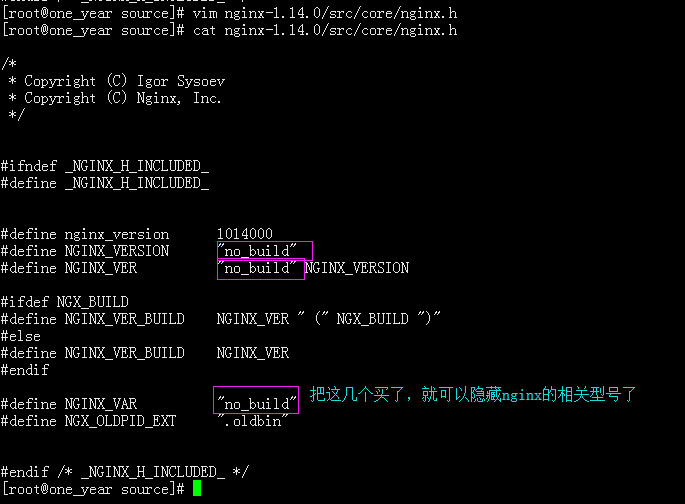
查看: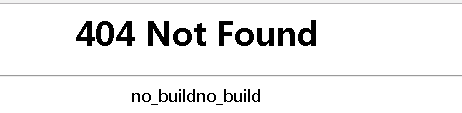
安装完成后,编辑配制文件:
cp /usr/local/nginx/conf/nginx.conf /usr/local/nginx/conf/nginx.conf.bak
vim /usr/local/nginx/conf/nginx.conf
把内容全部删除后 加入这这些语句:
/usr/local/nginx/sbin/nginx -t
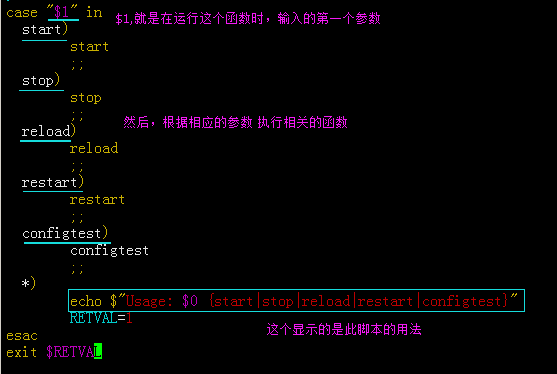
vim /etc/init.d/nginx
加入以下代码:
加入后,更加权限:
chmod 755 /etc/init.d/nginx
若需要开机启动的话,再加入服务启动列表:
chkconfig --list 查看有哪些服务列表
chkconfig --add /etc/init.d/nginx (增加nginx服务)
chkconfig --level 2345 nginx on (设置为2345模式下为自动启动)
查检语法:
/usr/local/nginx/sbin/nginx -t
启动查看:
/etc/init.d/nginx start
ps aux |grep nginx
netstat -tulnp
图例:
安装无成后的目录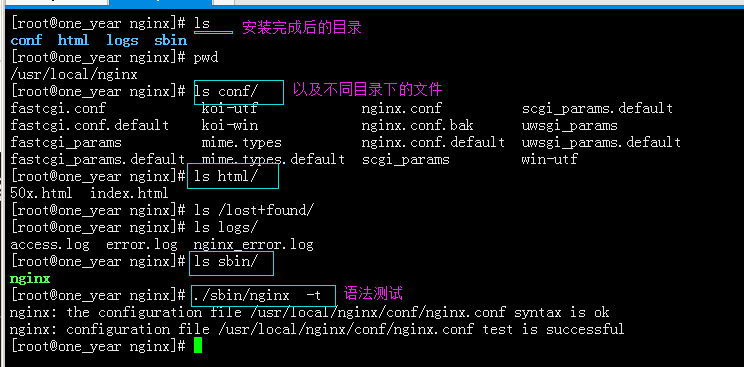
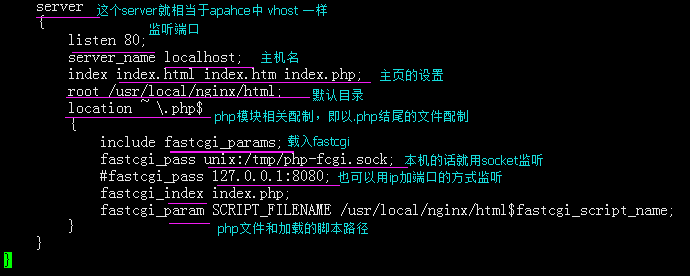
配制文件相关: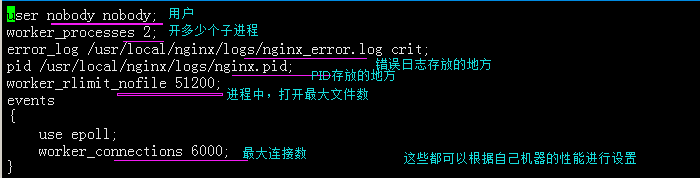

启动文件相关: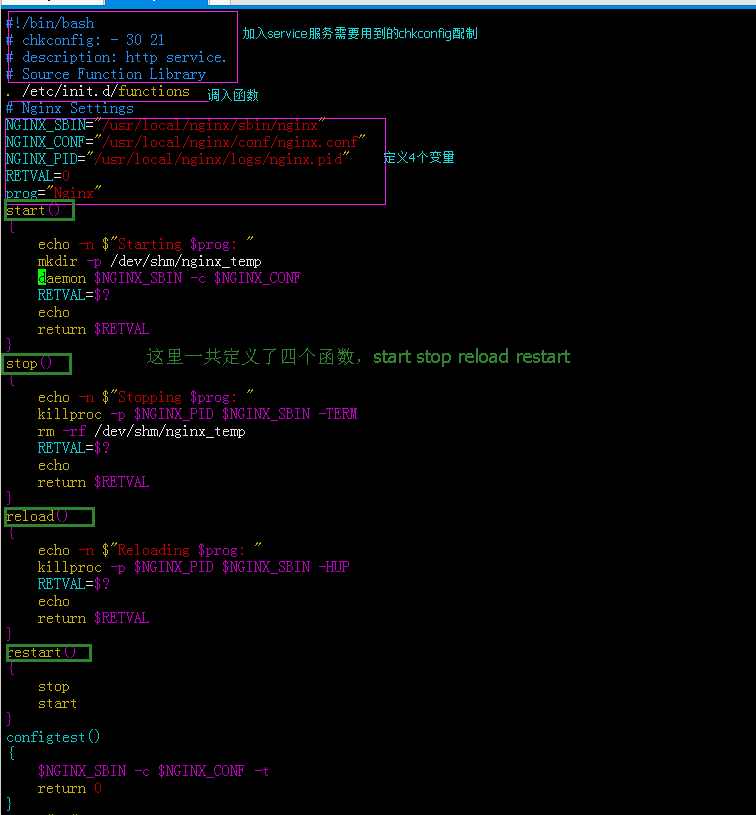
启动、查看: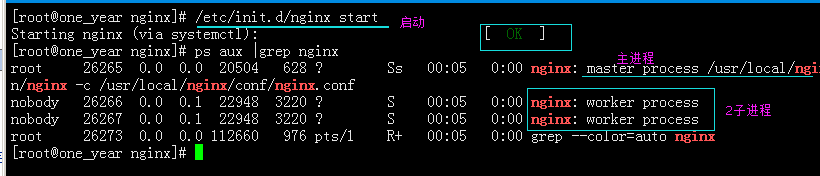
2、Nginx默认虚拟主机
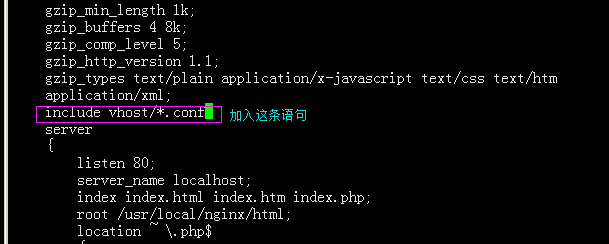
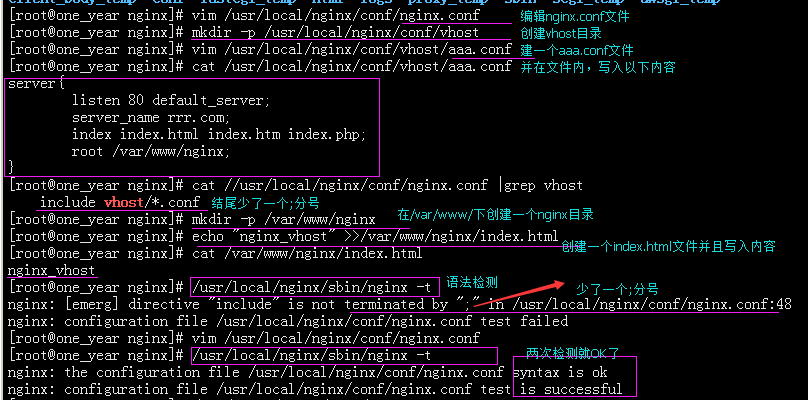
编辑:/usr/local/nginx/conf/nginx.conf
加入这条语句(在http下)include vhost/*.conf
然后,在 conf目录下 创建vhost 目录
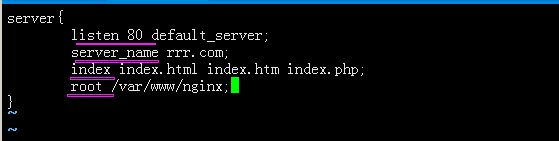
最后在conf目录下,创建以 .conf 结尾的文件,写入:
server{
listen 80 default_server;
server_name rrr.com;
index index.html index.htm index.php;
root /var/www/nginx;
}
若/var/www/目录下没有nginx目录,那么就需要创建:mkdir -p /var/www/nginx
再创建index.html文件:
echo "nginx_vhost" >>/var/www/nginx/index.html
配制完成后测试语法:/usr/local/nginx/sbin/nginx -t
最后重新加载nginx服务:/usr/local/nginx/sbin/nginx -s reload
访问测试:curl -x127.0.0.1:80 rrr.com

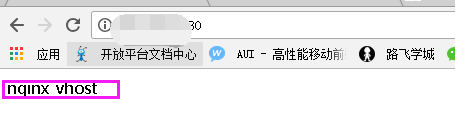
到此nginx虚拟主机配制完成。
3、nginx用户认证
若没有安装httpd需要先安装:
yum install httpd -y
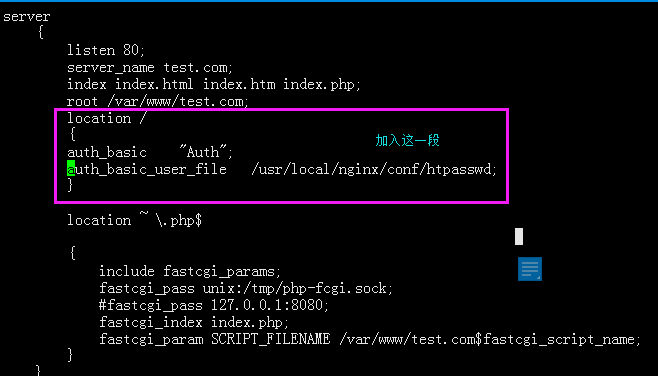
在/usr/local/nginx/conf/vhost/ 下面新建一个test.com.conf
写入以下代码:
location /
{
auth_basic "Auth";
auth_basic_user_file /usr/local/nginx/conf/htpasswd;
}
语法检查:
/usr/local/nginx/sbin/nginx -t
生成密码文件:
htpasswd -c -m /usr/local/nginx/conf/htpasswd test (-c 是创建文件 -m 是md5加密)
htpasswd -m /usr/local/nginx/conf/htpasswd test1
重新加载nginx:
/usr/local/nginx/sbin/nginx -s reload
访问查看: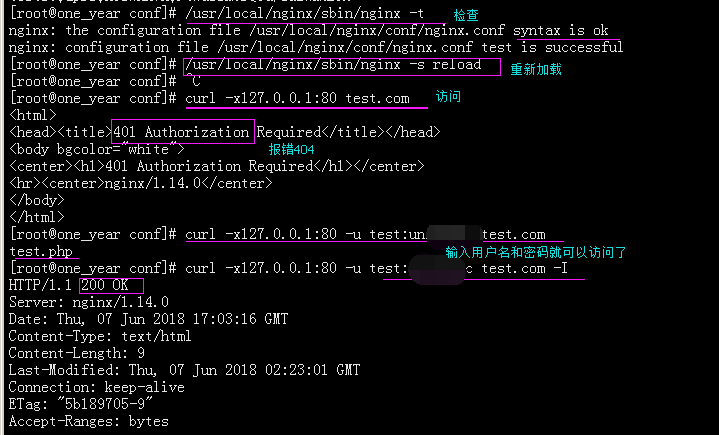
若要配制某个目录的权限只需要改:
若需要对某个文件进行权限设置的话,就改成:
查看测试: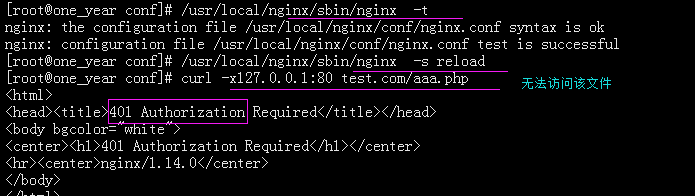

4、nginx 域名重定向:
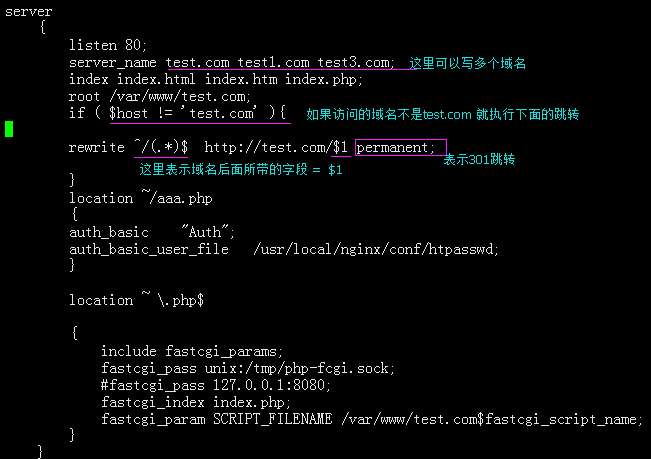
在vhost目录下的配制文件test.com.conf 加入:
和多设置几个域名:server_name test.com test1.com test3.com;
if ( $host != 'test.com' ){
rewrite ^/(.*)$ http://test.com/$1 permanent;
}
然后,查检和测试:
/usr/local/nginx/sbin/nginx -t
/usr/local/nginx/sbin/nginx -s reload
curl -x127.0.0.1:80 test3.com/index.html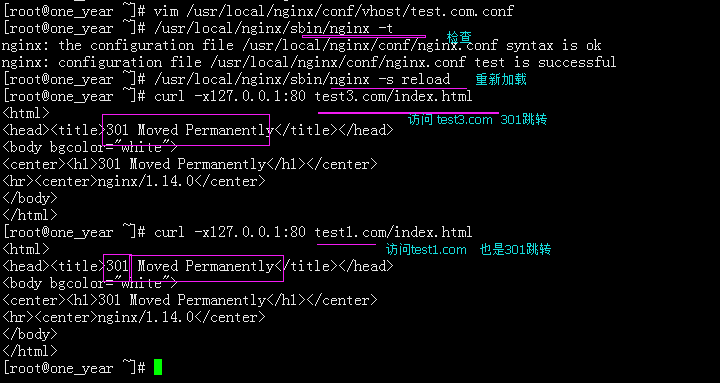
到此,域名跳转配制完成。
nginx的安装 、Nginx默认虚拟主机、nginx用户认证、nginx 域名重定向的更多相关文章
- Nginx安装、默认虚拟主机、Nginx用户认证和域名重定向
6月7日任务 12.6 Nginx安装12.7 默认虚拟主机12.8 Nginx用户认证12.9 Nginx域名重定向 扩展nginx.conf 配置详解 http://www.ha97.com/51 ...
- Linux centosVMware Nginx安装、 默认虚拟主机、Nginx用户认证、Nginx域名重定向
一. Nginx安装 cd /usr/local/src wget http://nginx.org/download/nginx-1.12.1.tar.gz 版本在http://nginx.org/ ...
- nginx之安装、多虚拟主机、反向代理和负载均衡
一.web服务器与web框架 1.web服务器简介 Web 网络服务是一种被动访问的服务程序,即只有接收到互联网中其他主机发出的请求后才会响应,最终用于提供服务程序的Web服务器会通过 HTTP(超文 ...
- LAMP 1.8默认虚拟主机
默认虚拟主机是为了解决别人域名恶心绑定自己的服务器ip,可导致服务器上的网站排名靠后,即干扰seo优化 我们访问指定的两个网站可以直接访问,ip也可以访问 打开配置文件 vim /usr/local/ ...
- apache禁止默认虚拟主机
禁止默认虚拟主机:作用使除特定域名外,其它的域名/ip无法访问此站点. 在虚拟主机配置文件中 即:/usr/local/apache2/conf/extra/httpd-vhosts.conf 将其中 ...
- [转] linux学习第四十四篇:Nginx安装,Nginx默认虚拟主机,Nginx域名重定向
Nginx安装 进入存放源码包的目录: cd /usr/local/src 下载源码包: wget http://nginx.org/download/nginx-1.12.1.tar.gz 解压: ...
- Nginx安装及配置虚拟主机
nginx安装部分 依赖环境 yum -y install gcc zlib openssl-devel zlib-devel 1. 下载好下面两个包:nginx-1.8.1.tar.gz pcre- ...
- nginx创建默认虚拟主机
创建默认虚拟主机配置文件作用:禁止任何人通过ip或未允许的域名访问web服务. 如:vim vhosts/default.conf server { listen 80 default; server ...
- Nginx 反向代理 负载均衡 虚拟主机配置
Nginx 反向代理 负载均衡 虚拟主机配置 通过本章你将学会利用Nginx配置多台虚拟主机,清楚代理服务器的作用,区分正向代理和反向代理的区别,搭建使用Nginx反向搭理和负载均衡,了解Nginx常 ...
随机推荐
- python+ajaxFileUpload 无刷新上传文件
需要准备文件 http://pan.baidu.com/s/1bp4N3nL qqi0 html <script src="{% static 'js/jquery.js' %}& ...
- lodash 学习资料
lodash.js 是什么不多说,工作时间长了就基本绕不过去他,工作项目中也很好的弥补angular ,jquery 的不足,由中文bootstrap 退出的中文版学习资料 http://lodash ...
- python 学习 模块
在计算机程序的开发过程中,随着程序代码越写越多,在一个文件里代码就越来越长,越来越不容易 维护, 为了编写可维护的代码,我们把很多函数分组,分别放到不同的文件里,这样,每个文件包含的代码就相对较少,很 ...
- java中构造方法和方法全面解析
构造方法和方法的区别: 构造方法要与类名相同,无返回类型,在类初始化的时候调用. 方法最好与类名不同,对象调用,静态方法可用类名.方法(). 构造器和方法在下面三个方面区别:修饰符,返回值, ...
- base64加密解密c++代码
关于base64加密解密代码: 程序运行功能请自行查看main函数: #include <stdio.h> #include <string.h> #include <a ...
- vector容器的注意事项
1.容器是指对象的集合,每一个元素都是一个对象,并且对象的类型相同.可以使用索引去访问容器中的对象. 2.由于容器中存放的是对象,所以引用无法成为vector的成员. 3.容器的初始化,与string ...
- 下载python中package的简便方法
pip install -i https://pypi.tuna.tsinghua.edu.cn/simple xxx
- js 循环遍历数组
var a =[1,3,4]; a.each(functiom{ .... }) or for (var x in a ){ .... }
- 十、编写LED混杂设备驱动
led.c修改为: #include <linux/init.h> #include <linux/module.h> #include <linux/miscdevic ...
- php优秀框架codeigniter学习系列——constants.php
该文件位于application/config/constants.php.