CentOS优化
一、CentOS6.x优化
#、更改yum源

mv /etc/yum.repos.d/CentOS-Base.repo /etc/yum.repos.d/CentOS-Base.repo.backup &&\

wget -O /etc/yum.repos.d/CentOS-Base.repo http://mirrors.aliyun.com/repo/Centos-6.repo

#、关闭selinux

sed -i 's/SELINUX=enforcing/SELINUX=disabled/' /etc/selinux/config

grep SELINUX=disabled /etc/selinux/config

setenforce

getenforce

#、关闭iptables

/etc/init.d/iptables stop

/etc/init.d/iptables stop

chkconfig iptables off

#、精简开机自启动服务

chkconfig|egrep -v "crond|sshd|network|rsyslog|sysstat"|awk '{print "chkconfig",$1,"off"}'|bash

export LANG=en

chkconfig --list|grep :on

#、提权oldboy可以sudo

useradd oldboy

echo |passwd --stdin oldboy

\cp /etc/sudoers /etc/sudoers.ori

echo "oldboy  ALL=(ALL) NOPASSWD: ALL " >>/etc/sudoers

tail - /etc/sudoers

visudo -c

#、中文字符集

cp /etc/sysconfig/i18n /etc/sysconfig/i18n.ori

echo 'LANG="zh_CN.UTF-8"'  >/etc/sysconfig/i18n

source /etc/sysconfig/i18n

echo $LANG

#、时间同步

echo '#time sync by oldboy at 2010-2-1' >>/var/spool/cron/root

echo '*/5 * * * * /usr/sbin/ntpdate time.nist.gov >/dev/null 2>&1' >>/var/spool/cron/root

crontab -l

#、命令行安全

#echo 'export TMOUT=300' >>/etc/profile

#echo 'export HISTSIZE=5' >>/etc/profile

#echo 'export HISTFILESIZE=5' >>/etc/profile

#tail - /etc/profile

#. /etc/profile

#、加大文件描述

echo '*               -       nofile          65535 ' >>/etc/security/limits.conf

tail - /etc/security/limits.conf

#、内核优化

cat >>/etc/sysctl.conf<<EOF

net.ipv4.tcp_fin_timeout =

net.ipv4.tcp_tw_reuse =

net.ipv4.tcp_tw_recycle =

net.ipv4.tcp_syncookies =

net.ipv4.tcp_keepalive_time =

net.ipv4.ip_local_port_range =

net.ipv4.tcp_max_syn_backlog =

net.ipv4.tcp_max_tw_buckets =

net.ipv4.route.gc_timeout =

net.ipv4.tcp_syn_retries =

net.ipv4.tcp_synack_retries =

net.core.somaxconn =

net.core.netdev_max_backlog =

net.ipv4.tcp_max_orphans =

#以下参数是对iptables防火墙的优化,防火墙不开会提示,可以忽略不理。

net.nf_conntrack_max =

net.netfilter.nf_conntrack_max =

net.netfilter.nf_conntrack_tcp_timeout_established =

net.netfilter.nf_conntrack_tcp_timeout_time_wait =

net.netfilter.nf_conntrack_tcp_timeout_close_wait =

net.netfilter.nf_conntrack_tcp_timeout_fin_wait =

EOF

#CentOS6 epel源

wget -O /etc/yum.repos.d/epel.repo http://mirrors.aliyun.com/repo/epel-6.repo

wget http://download.fedoraproject.org/pub/epel/6/i386/epel-release-6-8.noarch.rpm

rpm -ivh epel-release--.noarch.rpm

检查EPEL源,EPEL源的配置安装到了 /etc/yum.repos.d/epel.repo 文件

yum repolist

重建缓存

yum makecache

yum install lrzsz nmap tree dos2unix nc -y

#yum -y update

升级所有包,改变软件设置和系统设置,系统版本内核都升级

#yum -y upgrade

升级所有包,不改变软件设置和系统设置,系统版本升级,内核不改变

模板机特殊处理技巧:方便后续克隆改IP和主机名等

修改主机名和IP脚本

[root@backup ~]# cat /server/scripts/m.sh

#!/bin/sh

if [ $# -ne  ];then

  echo "/bin/sh $0 hostname PartIP"

  exit

fi

sed  -i "s#oldboy#$1#g" /etc/sysconfig/network

hostname $

sed -i "s#100#$2#g" /etc/sysconfig/network-scripts/ifcfg-eth0

sed -i "s#100#$2#g" /etc/sysconfig/network-scripts/ifcfg-eth1

调整克隆后网站正常配置

[root@backup ~]# tail - /etc/rc.local

>/etc/udev/rules.d/-persistent-net.rules

删除模板及网卡配置里mac所在行及uuid所在行。

B、模板机配置

a./etc/hosts

hosts解析

cat >/etc/hosts<<EOF

127.0.0.1   localhost localhost.localdomain localhost4 localhost4.localdomain4

::         localhost localhost.localdomain localhost6 localhost6.localdomain6

172.16.1.5      lb01

172.16.1.6      lb02

172.16.1.7      web02

172.16.1.8      web01

172.16.1.51     db01

172.16.1.31     nfs01

172.16.1.41     backup

172.16.1.61     m01

EOF
二、CentOS7.x优化
1、安装常用软件包
yum -y install wget vim bash-completion lrzsz nmap telnet tree net-tools bind-utils lsof
2、更改yum源(一般不需要改)
mv /etc/yum.repos.d/CentOS-Base.repo /etc/yum.repos.d/CentOS-Base.repo.backup
wget -O /etc/yum.repos.d/CentOS-Base.repo http://mirrors.aliyun.com/repo/Centos-7.repo
wget -O /etc/yum.repos.d/epel.repo http://mirrors.aliyun.com/repo/epel-7.repo
3、更改网卡名称为eth(默认网上名称随机分配)
在装系统时修改网卡名称:进入启动菜单后按Tab键,在quiet后添加net.ifnames=0 biosdevname=0,例:
> vmlinuz initrd=initrd.img inst.stage2=hd:LABEL=CentOS\x207\x20x86_64 quiet net.ifnames=0 biosdevname=0
在装完系统后修改:
[root@localhost network-scripts]# cat ifcfg-eth0
TYPE=Ethernet
BOOTPROTO=none
DEFROUTE=yes
IPV4_FAILURE_FATAL=no
NAME=eth0
UUID=64d3ac01-c44b-42be-919e-677d6ae9f758
DEVICE=eth0
ONBOOT=yes
IPADDR=10.47.39.200
PREFIX=24
GATEWAY=10.47.39.254
DNS1=10.47.39.10
[root@CentOS7 ~]# cat /etc/sysconfig/grub
GRUB_TIMEOUT=5
GRUB_DISTRIBUTOR="$(sed 's, release .*$,,g' /etc/system-release)"
GRUB_DEFAULT=saved
GRUB_DISABLE_SUBMENU=true
GRUB_TERMINAL_OUTPUT="console"
GRUB_CMDLINE_LINUX="rhgb net.ifnames=0 biosdevname=0 quiet"
GRUB_DISABLE_RECOVERY="true"
[root@CentOS7 ~]# grub2-mkconfig -o /boot/grub2/grub.cfg #生成启动菜单
[root@CentOS7 ~]# reboot
修改网卡名称:http://oldboy.blog.51cto.com/2561410/1722101
4、常用命令
[root@CentOS7 ~]# cat /etc/os-release #查看Centos7版本
[root@CentOS7 ~]# nmtui #进入图形界面的网络管理
[root@CentOS7 ~]# vim /etc/hostname or #hostnamectl set-hostname CentOS7 #修改主机名
[root@CentOS7 ~]# localectl set-locale LANG=zh_CN.UTF-8 #设置字符集
[root@CentOS7 ~]# systemctl set-default multi-user.target #设置命令行启动
[root@CentOS7 ~]# ls -lh /usr/lib/systemd/system/runlevel*.target
[root@CentOS7 ~]# systemd-analyze time
[root@CentOS7 ~]# systemd-analyze blame
[root@CentOS7 ~]# systemd-analyze plot > bootime.svg
[root@CentOS7 ~]# systemctl disable <servicesname> #关闭不需要的开机启动服务
[root@CentOS7 ~]# systemctl disable firewalld #关闭防火墙开机启动
[root@CentOS7 ~]# systemctl stop firewalld #关闭防火墙服务
[root@CentOS7 ~]# systemctl status firewalld #查看防火墙状态
[root@CentOS7 ~]# sed -i 's#SELINUX=enforcing#SELINUX=disabled#g' /etc/selinux/config #关闭selinux
[root@CentOS7 ~]# systemctl list-unit-files|grep postfix #查看单个服务状态
[root@CentOS7 ~]# systemctl list-unit-files|grep enabled #查看所有enable的服务
abrt-ccpp.service                             enabled

abrt-oops.service                             enabled

abrt-vmcore.service                           enabled

abrt-xorg.service                             enabled

abrtd.service                                 enabled  #调试相关的服务

atd.service                                   enabled  #一次性任务服务

auditd.service                                enabled  #selinux相关

chronyd.service                               enabled  #时间同步服务,改名了,也不需要,用ntpdate

crond.service                                 enabled  #定时任务

dbus-org.fedoraproject.FirewallD1.service     enabled

dbus-org.freedesktop.NetworkManager.service   enabled  #dbus相关,系统服务

dbus-org.freedesktop.nm-dispatcher.service    enabled  #dbus相关,系统服务

dmraid-activation.service                     enabled  #raid相关

firewalld.service                             enabled  #防火墙服务

getty@.service                                enabled  #tty窗口

irqbalance.service                            enabled  #多核CPU调度

kdump.service                                 enabled  #内核出问题dump保存信息

libstoragemgmt.service                        enabled  #用于存储管理的库

lvm2-monitor.service                          enabled  #不用lvm关闭

mdmonitor.service                             enabled  #软raid相关

microcode.service                             enabled  #Intel的CPU会提供一个外挂的微指令集提供系统运行

NetworkManager-dispatcher.service             enabled  #网络相关

NetworkManager.service                        enabled  #网络相关

postfix.service                               enabled  #邮件服务

rngd.service                                  enabled  #为内核提供随机数服务

rsyslog.service                               enabled  #系统日志

smartd.service                                enabled  #检测硬盘状态

sshd.service                                  enabled  #ssh服务

sysstat.service                               enabled  #系统检测服务

systemd-readahead-collect.service             enabled  #系统服务

systemd-readahead-drop.service                enabled  #系统服务

systemd-readahead-replay.service              enabled  #系统服务

tuned.service                                 enabled  #服务器能耗管理

dm-event.socket                               enabled  #监控设备对应表(device mapper)

lvm2-lvmetad.socket                           enabled  #不用lvm时关闭

lvm2-lvmpolld.socket                          enabled  #不用lvm时关闭

default.target                                enabled

multi-user.target                             enabled

remote-fs.target                              enabled

runlevel2.target                              enabled

runlevel3.target                              enabled

runlevel4.target                              enabled
Linux基础优化与安全重点小结:
1)不用root登录管理系统,而以普通用户登录通过sudo授权管理。
2)更改默认的远程连接SSH服务端口,禁止root用户远程连接,甚至要更改SSH服务只监听内网IP。
3)定时自动更新服务器的时间,使其和互联网时间同步。
4)配置yum更新源,从国内更新源下载安装软件包。
5)关闭SELinux及iptables(在工作场景中,如果有外部IP一般要打开iptables,高并发高流量的服务器可能无法开启)。
6)调整文件描述符的数量,进程及文件的打开都会消耗文件描述符数量。
7)定时自动清理邮件临时目录垃圾文件,防止磁盘的inodes数被小文件占满(注意Centos6和Centos5要清除的目录不同)。
8)精简并保留必要的开机自启动服务(如crond、sshd、network、rsyslog、sysstat)。
9)Linux内核参数优化/etc/sysctl.conf,执行sysctl -p生效。
10)更改系统字符集为“zh_CN.UTF-8”,使其支持中文,防止出现乱码问题。
11)锁定关键系统文件如/etc/passwd、/etc/shadow、/etc/group、/etc/gshadow、/etc/inittab, 处理以上内容后把chattr、lsattr改名为oldboy,转移走,这样就安全多了。
12)清空/etc/issue、/etc/issue.net,去除系统及内核版本登录前的屏幕显示。
13)清除多余的系统虚拟用户账号。
14)为grub引导菜单加密码。
15)禁止主机被ping。
16)打补丁并升级有已知漏洞的软件。
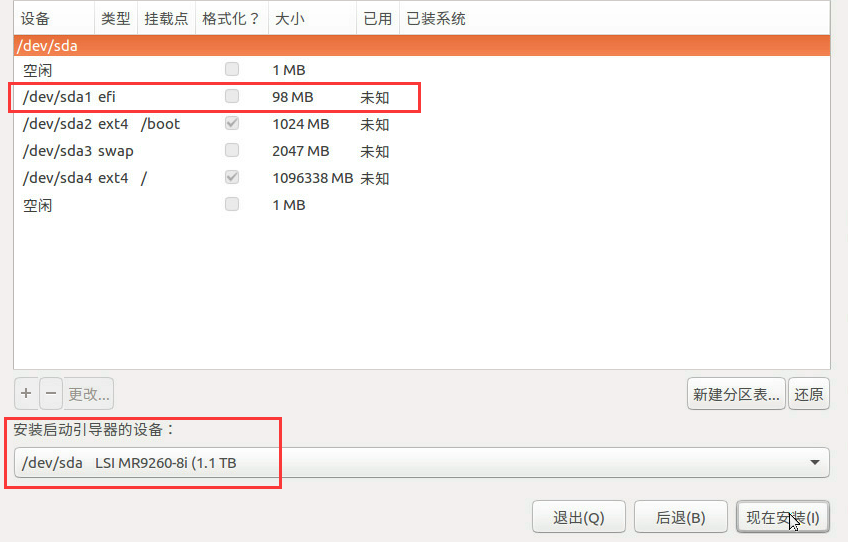
三、CentOS7和ubuntu使用UEFI启动的分区方法: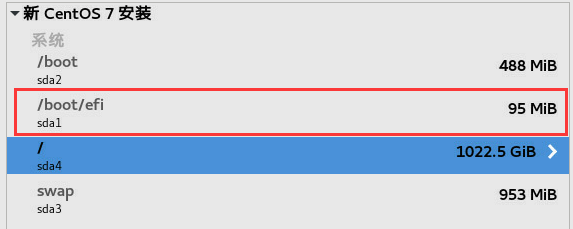
四、自定义linux系统日志格式(messages,cron,ssh等日志格式)
[root@localhost ~]# vim /etc/rsyslog.conf
#定义自己的时间格式

$template myformat,"%$NOW% %TIMESTAMP:8:15% %hostname% %syslogtag% %msg%\n"

#Use default timestamp format

#把这行注释,系统的日志格式默认是由这行定义的

#$ActionFileDefaultTemplate RSYSLOG_TraditionalFileFormat

#使用自定义的格式

$ActionFileDefaultTemplate myformat
[root@localhost ~]# systemctl restart rsyslog
CentOS7 相关中文文档:
http://www.jinbuguo.com/systemd/systemd.service.html
https://access.redhat.com/documentation/zh-CN/Red_Hat_Enterprise_Linux/7/index.html
个人博客:
https://oldqiang.com/
https://www.dgstack.cn/
https://man.linuxde.net/ #Linux命令查询
CentOS优化的更多相关文章
- Centos优化Hadoop
导读 Hadoop是一个能够让用户轻松架构和使用的分布式计算平台,用户可以轻松地在Hadoop上开发和运行处理海量数据的应用程序,本节讲安装并且优化centos 6.7 系统下的Supper Hado ...
- Linux/CentOS优化配置 汇总
[强烈要求做的]CentOS启用sudo,禁用root远程登录 Linux命令行修改IP.网关.DNS.主机名 的方法 Linux开机直接进入“命令行”模式 更改CentOS 6.x yum源为国内1 ...
- Linux收藏
Unix目录结构的来历 vi 操作笔记 Linux下安装和配置JDK与Tomcat(升级版) Windows下 刷新本地DNS缓存:ipconfig /flushdns 深圳DNS: 202.9 ...
- 构建高可用Linux服务器二
centos优化: 1.关闭不需要的服务:ntsysv crond:自动计划任务 network:已配置网络接口的脚步程序服务. sshd:openssh服务器守护进程. irqbalance:启用i ...
- 聊聊数据库~5.SQL运维上篇
1.6.SQL运维篇 运维这块逆天只能说够用,并不能说擅长,所以这篇就当抛砖之用,欢迎补充和纠错 PS:再说明下CentOS优化策略这部分的内容来源:首先这块逆天不是很擅长,所以主要是参考网上的DBA ...
- CC视频CTO栗伟:CDN系统架构及CC视频应用实践
2017 年 11 月9日,CC视频获2.08 亿元C轮融资. EGO 北京分会会员.CC视频CTO栗伟获邀作为 EGO 线上分享第三季嘉宾,与大家交流了CDN系统架构及CC 视频的应用实践. \\ ...
- CentOS(5.8/6.7)linux生产环境若干优化实战
CentOS系统安装之后并不能立即投入生产环境使用,往往需要先经过我们运维人员的优化才行.在此讲解几点关于Linux系统安装后的基础优化操作.注意:本次优化都是基于CentOS(5.8/6.7). 下 ...
- CentOS 6.5 安全加固及性能优化 (转)
通过修改CentOS 6.5 的系统默认设置,对系统进行安全加固,进行系统的性能优化. 环境: 系统硬件:vmware vsphere (CPU:2*4核,内存2G) 系统版本:Centos-6.5- ...
- Debian/Ubuntu/CentOS VPS安装Net-Speeder并优化
安装过程: CentOS安装 wget --no-check-certificate https://gist.github.com/LazyZhu/dc3f2f84c336a08fd6a5/raw/ ...
随机推荐
- Job for php-fpm.service failed because the control process exited with error code. See "systemctl status php-fpm.service" and "journalctl -xe" for details.
[root@web01 ~]# systemctl start php-fpm Job for php-fpm.service failed because the control process ...
- QML手动连接信号槽【Connections】
1.使用Connections import QtQuick 2.6 import QtQuick.Window 2.2 import QtQuick.Controls 1.4 Window { vi ...
- Installing Jenkins as a Windows service
Install Jenkins as a Windows service NOTE: if you installed Jenkins using the windows installer, you ...
- 什么是TF-A?
1. TF-A的全称是什么? Arm Trusted Firmware 2. TF-A的作用是什么? 在secure world和non-secure world之间切换 3. TF-A涉及到哪几个部 ...
- 配置vim
VundleVuldle是一个全自动的插件管理器,让我们通过维护插件列表的方式管理插件.它为安装.更新.删除插件提供了方便的命令.在安装Git的情况下(本文不赘述Git的安装),输入命令: git c ...
- php的缓冲/缓存 js对象 ,php编程的深入思考-1
proto- 表示前缀, 表示"原始的, 主要的, 原型的, 最初的. 所以 prototype: 是原型的意思. webserver服务器apach, 的角色,就像一个 仓库/仓库保管员而 ...
- String comparison is too slow in R language
## String comparison is too slow in R language ## it will take 3 minutes, it is too slow date() strA ...
- iis默认文档有什么用?
设置默认文档就是指在只输入路径,不输入具体网页名的时候,浏览器显示的默认网页名称. 比如说,服务器地址:http://123.xxx.com,在未设置默认文档的时候或指定的默认文档不存在时,要正常访问 ...
- P1948 [USACO08JAN]电话线Telephone Lines(二分答案+最短路)
思路 考虑题目要求求出最小的第k+1大的边权,想到二分答案 然后二分第k+1大的边权wx 把所有边权<=wx的边权变为0,边权>wx的边权变为0,找出最短路之后,如果dis[T]<= ...
- 题解——code[vs] 1506 传话(传递闭包)
裸的传递闭包 直接Floyd暴力即可 #include <cstdio> #include <algorithm> #include <cstring> using ...