Tensorflow 搭建神经网络及tensorboard可视化
1. session对话控制
matrix1 = tf.constant([[3,3]])

matrix2 = tf.constant([[2],[2]])

product = tf.matmul(matrix1,matrix2) #类似于numpy的np.dot(m1,m2)
方法1:
sess = tf.Session()

result = sess.run(product)

print(result) # [[12]]

sess.close()
方法2:
with tf.Session() as sess:#不需要手动关闭sess

    result2 = sess.run(product)

    print(result2) # [[12]]
2. Variable变量
state = tf.Variable(0,name='counter')

#定义常量 one

one = tf.constant(1)

#定义加法步骤(注:此步并没有直接计算)

new_value = tf.add(state,one)

#将 State 更新成 new_value

update = tf.assign(state,new_value)

# 如果定义 Variable, 就一定要 initialize

# init = tf.initialize_all_variables() # tf 马上就要废弃这种写法

init = tf.global_variables_initializer()  # 替换成这样就好

with tf.Session() as sess:

    sess.run(init)

    for _ in range(3):

        sess.run(update)

        print(sess.run(state))

>>>1

2

3
3. placeholder
Tensorflow 如果想要从外部传入data, 那就需要用到 tf.placeholder(), 然后以这种形式传输数据 sess.run(***, feed_dict={input: **}).
接下来, 传值的工作交给了 sess.run() , 需要传入的值放在了feed_dict={} 并一一对应每一个 input. placeholder 与 feed_dict={} 是绑定在一起出现的。
input1 = tf.placeholder(tf.float32) #大部分只能处理float32

input2 = tf.placeholder(tf.float32) #两行两列[2,2]

output = tf.multiply(input1,input2)

with tf.Session() as sess:

    print(sess.run(output,feed_dict={input1:[2.],input2:[1.]}))

>>>[2.]
4. 添加层def add_layer()
import tensorflow as tf

def add_layer(inputs,in_size,out_size,activation_function=None):

    with tf.name_scope('layer'):

        with tf.name_scope('weights'):

            Weights = tf.Variable(tf.random_normal([in_size,out_size]),name='W')

        biases = tf.Variable(tf.zeros([1,out_size])+0.1)

        Wx_plus_biase = tf.add(tf.matmul(inputs,Weights),biases)

        if activation_function == None:

            outputs = Wx_plus_biase

        else:

            outputs = activation_function(Wx_plus_biase)

        return outputs
5. 搭建神经网络
import numpy as np x_data = np.linspace(-1,1,300)[:,np.newaxis]
noise = np.random.normal(0,0.05,x_data.shape).astype(np.float32)
y_data = np.square(x_data) - 0.5 + noise # 利用占位符定义我们所需的神经网络的输入。 tf.placeholder()就是代表占位符,这里的None代表无论输入有多少都可以,因为输入只有一个特征,所以这里是1。
with tf.name_scope('inputs'):
xs = tf.placeholder(tf.float32,[None,1],name='x_input')
ys = tf.placeholder(tf.float32,[None,1],name='y_input') #层
l1 = add_layer(xs,1,10,activation_function=tf.nn.relu)
prediction = add_layer(l1,10,1,activation_function=None) #loss
loss = tf.reduce_mean(tf.reduce_sum(tf.square(ys-prediction),
reduction_indices=1)) #优化器
train_step = tf.train.GradientDescentOptimizer(learning_rate=0.1).minimize(loss) # init = tf.initialize_all_variables() # tf 马上就要废弃这种写法
init = tf.global_variables_initializer() # 替换成这样就好
sess = tf.Session()
sess.run(init) for i in range(1000):
sess.run(train_step,feed_dict={xs:x_data,ys:y_data})
if i % 50 == 0:
# to see the step improvement
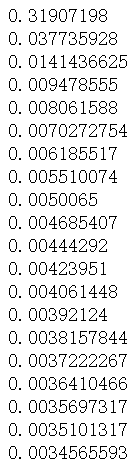
print(sess.run(loss, feed_dict={xs: x_data, ys: y_data}))
结果如下:
6. 结果可视化
import matplotlib.pyplot as plt

fig = plt.figure()

ax = fig.add_subplot(1,1,1)

ax.scatter(x_data,y_data)

# plt.ion() #plt.ion()用于连续显示

# plt.show()

# 每隔50次训练刷新一次图形,用红色、宽度为5的线来显示我们的预测数据和输入之间的关系,并暂停0.1s。

for i in range(1000):

    sess.run(train_step,feed_dict={xs:x_data,ys:y_data})

    if i % 50 == 0:

        try:

            ax.lines.remove(lines[0])

        except Exception:

            pass

        prediction_value = sess.run(prediction,feed_dict={xs:x_data})

        lines = ax.plot(x_data,prediction_value,'r-',lw=5)#线宽度=5

#         ax.lines.remove(lines[0])#去除lines的第一个线段

        plt.pause(0.1) #暂停0.1s

#         plt.show()

7. TensorFlow的优化器
tf.train.GradientDescentOptimizer

tf.train.AdadeltaOptimizer

tf.train.AdagradDAOptimizer

tf.train.MomentumOptimizer

tf.train.AdamOptimizer

tf.train.FtrlOptimizer

tf.train.RMSPropOptimizer
8. 可视化神经网络
# 图纸搭建 指定这里名称的会将来在可视化的图层inputs中显示出来
import tensorflow as tf
with tf.name_scope('inputs'):
# define placeholder for inputs to network
xs = tf.placeholder(tf.float32,[None,1],name='x_in')
ys = tf.placeholder(tf.float32,[None,1],name='y_in') def add_layer(inputs, in_size, out_size, activation_function=None):
# add one more layer and return the output of this layer
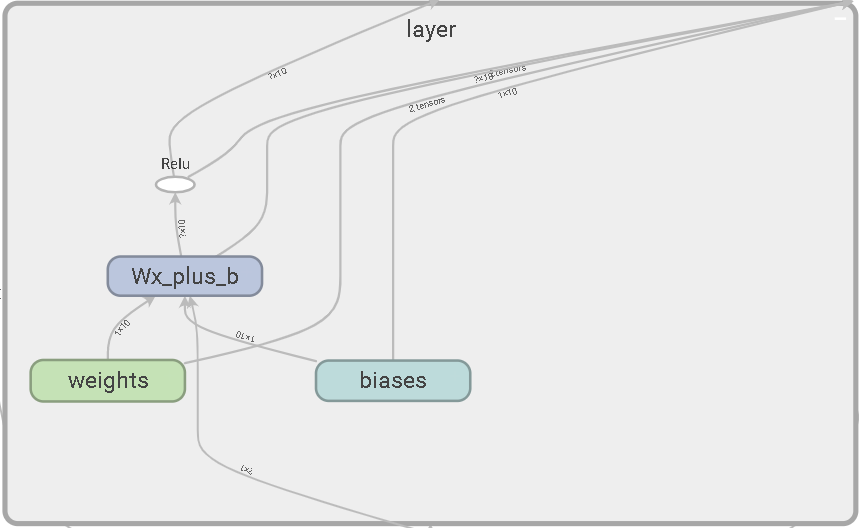
with tf.name_scope('layer'):
with tf.name_scope('weights'):
Weights = tf.Variable(
tf.random_normal([in_size, out_size],name='W'),
name='W')
with tf.name_scope('biases'):
biases = tf.Variable(tf.zeros([1, out_size]) + 0.1,name='b')
with tf.name_scope('Wx_plus_b'):
Wx_plus_b = tf.add(
tf.matmul(inputs, Weights),
biases)
if activation_function is None:
outputs = Wx_plus_b
else:
outputs = activation_function(Wx_plus_b, )
return outputs #层
l1 = add_layer(xs,1,10,activation_function=tf.nn.relu)
prediction = add_layer(l1,10,1,activation_function=None) # the error between prediciton and real data
with tf.name_scope('loss'):
loss = tf.reduce_mean(
tf.reduce_sum(
tf.square(ys - prediction),
# eduction_indices=[1]
)) with tf.name_scope('train'):
train_step = tf.train.GradientDescentOptimizer(0.1).minimize(loss) sess = tf.Session() # get session
# tf.train.SummaryWriter soon be deprecated, use following
writer = tf.summary.FileWriter("E:/logs", sess.graph)
sess.run(tf.global_variables_initializer())
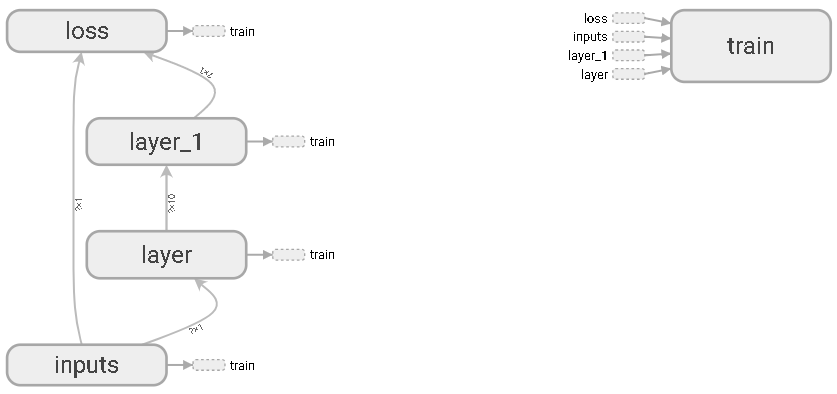
inputs输入层

隐藏层layer
隐藏层layer1

损失函数

训练

9. 可视化训练过程
输入数据:
import tensorflow as tf

import numpy as np

# 图纸搭建   指定这里名称的会将来在可视化的图层inputs中显示出来

with tf.name_scope('inputs'):

    # define placeholder for inputs to network

    xs = tf.placeholder(tf.float32,[None,1],name='x_in')

    ys = tf.placeholder(tf.float32,[None,1],name='y_in')

 ## make up some data

 x_data= np.linspace(-1, 1, 300, dtype=np.float32)[:,np.newaxis]

 noise=  np.random.normal(0, 0.05, x_data.shape).astype(np.float32)

 y_data= np.square(x_data) -0.5+ noise
添加层:
def add_layer(inputs ,

              in_size,

              out_size,n_layer,

              activation_function=None):

    ## add one more layer and return the output of this layer

    layer_name='layer%s'%n_layer

    with tf.name_scope(layer_name):

         with tf.name_scope('weights'):

              Weights= tf.Variable(tf.random_normal([in_size, out_size]),name='W')

              # tf.histogram_summary(layer_name+'/weights',Weights)

              tf.summary.histogram(layer_name + '/weights', Weights) # tensorflow >= 0.12

         with tf.name_scope('biases'):

              biases = tf.Variable(tf.zeros([1,out_size])+0.1, name='b')

              # tf.histogram_summary(layer_name+'/biase',biases)

              tf.summary.histogram(layer_name + '/biases', biases)  # Tensorflow >= 0.12

         with tf.name_scope('Wx_plus_b'):

              Wx_plus_b = tf.add(tf.matmul(inputs,Weights), biases)

         if activation_function is None: #最后一层不需要激活

            outputs=Wx_plus_b

         else:

            outputs= activation_function(Wx_plus_b)

         # tf.histogram_summary(layer_name+'/outputs',outputs)

         tf.summary.histogram(layer_name + '/outputs', outputs) # Tensorflow >= 0.12

    return outputs
损失函数:
with tf.name_scope('loss'):

     loss= tf.reduce_mean(tf.reduce_sum(

              tf.square(ys- prediction), reduction_indices=[1]))

     # tf.scalar_summary('loss',loss) # tensorflow < 0.12

     tf.summary.scalar('loss', loss) # tensorflow >= 0.12
接下来,开始合并打包。 tf.merge_all_summaries()方法会对我们所有的summaries合并到一起。因此在原有代码片段中添加:
sess= tf.Session()

# merged= tf.merge_all_summaries()    # tensorflow < 0.12

merged = tf.summary.merge_all() # tensorflow >= 0.12

# writer = tf.train.SummaryWriter('logs/', sess.graph)    # tensorflow < 0.12

writer = tf.summary.FileWriter("logs/", sess.graph) # tensorflow >=0.12

# sess.run(tf.initialize_all_variables()) # tf.initialize_all_variables() # tf 马上就要废弃这种写法

sess.run(tf.global_variables_initializer())  # 替换成这样就好
训练
for i in range(1000):

    sess.run(train_step,feed_dict={xs:x_data,ys:y_data})

    if i % 50 == 0:

        result = sess.run(merged,feed_dict={xs:x_data,ys:y_data})

    writer.add_summary(result,i)
(1)DISTRIBUTIONS

(2)EVENTS
# tf.scalar_summary('loss',loss) # tensorflow < 0.12

     tf.summary.scalar('loss', loss) # tensorflow >= 0.12

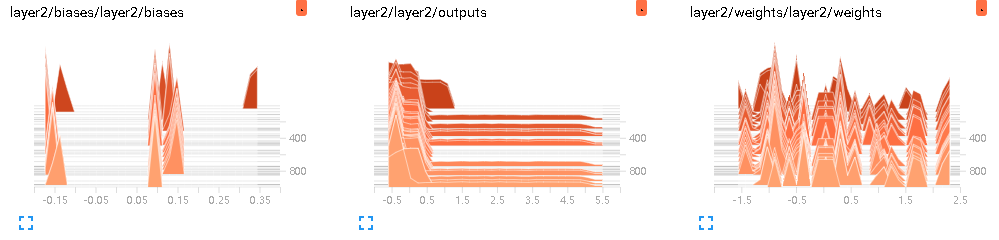
(3)HISTOGRAMS
# tf.histogram_summary(layer_name+'/biase',biases)  # Tensorflow < 0.12

tf.summary.histogram(layer_name + '/biases', biases)  # Tensorflow >= 0.12
参考文献:
【1】莫烦Python
Tensorflow 搭建神经网络及tensorboard可视化的更多相关文章
- (转)一文学会用 Tensorflow 搭建神经网络
一文学会用 Tensorflow 搭建神经网络 本文转自:http://www.jianshu.com/p/e112012a4b2d 字数2259 阅读3168 评论8 喜欢11 cs224d-Day ...
- 用Tensorflow搭建神经网络的一般步骤
用Tensorflow搭建神经网络的一般步骤如下: ① 导入模块 ② 创建模型变量和占位符 ③ 建立模型 ④ 定义loss函数 ⑤ 定义优化器(optimizer), 使 loss 达到最小 ⑥ 引入 ...
- 一文学会用 Tensorflow 搭建神经网络
http://www.jianshu.com/p/e112012a4b2d 本文是学习这个视频课程系列的笔记,课程链接是 youtube 上的,讲的很好,浅显易懂,入门首选, 而且在github有代码 ...
- 超简单tensorflow入门优化程序&&tensorboard可视化
程序1 任务描述: x = 3.0, y = 100.0, 运算公式 x×W+b = y,求 W和b的最优解. 使用tensorflow编程实现: #-*- coding: utf-8 -*-) im ...
- kaggle赛题Digit Recognizer:利用TensorFlow搭建神经网络(附上K邻近算法模型预测)
一.前言 kaggle上有传统的手写数字识别mnist的赛题,通过分类算法,将图片数据进行识别.mnist数据集里面,包含了42000张手写数字0到9的图片,每张图片为28*28=784的像素,所以整 ...
- Tensorflow搭建神经网络及使用Tensorboard进行可视化
创建神经网络模型 1.构建神经网络结构,并进行模型训练 import tensorflow as tfimport numpy as npimport matplotlib.pyplot as plt ...
- TensorFlow基础笔记(9) Tensorboard可视化显示以及查看pb meta模型文件的方法
参考: http://blog.csdn.net/l18930738887/article/details/55000008 http://www.jianshu.com/p/19bb60b52dad ...
- tensorflow搭建神经网络
最简单的神经网络 import tensorflow as tf import numpy as np import matplotlib.pyplot as plt date = np.linspa ...
- tensorflow搭建神经网络基本流程
定义添加神经层的函数 1.训练的数据2.定义节点准备接收数据3.定义神经层:隐藏层和预测层4.定义 loss 表达式5.选择 optimizer 使 loss 达到最小 然后对所有变量进行初始化,通过 ...
随机推荐
- Codeforces 1096D - Easy Problem - [DP]
题目链接:http://codeforces.com/problemset/problem/1096/D 题意: 给出一个小写字母组成的字符串,如果该字符串的某个子序列为 $hard$,就代表这个字符 ...
- iOS知识点持续更新。。。
1.自动布局拉伸和压缩优先级 Autolayout中每个约束都有一个优先级,优先级的范围是1~1000.创建一个约束,默认的优先级最高是1000. Content Hugging Priority:该 ...
- day4_修改文件
修改文件有两种方式:一种是把文件的全部内容都读到内存中,然后把原有的文件内容清空,重新写新的内容:第二种是把修改后的文件内容写到一个新的文件中 第一种:一次性把文件全部读到,读到内存这个能,这种文件小 ...
- AVD启动报错:Running an x86 based Android Virtual Device (AVD) is 10x faster
1.cmd窗口中输入emulator -avd test 启动AVD时报错: Running an x86 based Android Virtual Device (AVD) is 10x fast ...
- 洛谷P3246 序列 [HNOI2016] 莫队/线段树+扫描线
正解:莫队/线段树+扫描线 解题报告: 传送门! 似乎是有两种方法的,,,所以分别港下好了QAQ 第一种,莫队 看到这种询问很多区间之类的就会自然而然地想到莫队趴?然后仔细思考一下,发现复杂度似乎是欧 ...
- kali蓝牙连接
http://blog.csdn.net/hailangnet/article/details/47723181 http://www.aiuxian.com/article/p-3012084.ht ...
- java读取配置文件的信息
1. 首先,工程结构如下: 注:a. 蓝色标注的两个文件是和com包平级的,都在src下.EnnNotificationPushProxy.ini是这个工程的配置文件,log4j.properties ...
- Eclipse EE下载安装与配置
Eclipse EE下载安装与配置 一.下载 下载链接:http://www.eclipse.org/downloads/eclipse-packages/ 1.进入Eclipse官网进行下载选择Ec ...
- 8-GPIO复用
8-GPIO引脚复用与重映射 0.通用GPIO 在复位期间及复位刚刚完成后,复用功能尚未激活,I/O 端口被配置为输入浮空模式. 复位后,调试引脚处于复用功能上拉/下拉状态: ● PA15:JTDI ...
- 【JMeter】【性能测试】配置元件
HTTP Cookie Manager 用来存储浏览器产生的用户信息 Clear Cookies each Iteration:每次迭代请求,清空cookies,GUI中定义的任何cookie都不会被 ...