Spring Cloud Gateway过滤器精确控制异常返回(实战,完全定制返回body)
欢迎访问我的GitHub
这里分类和汇总了欣宸的全部原创(含配套源码):https://github.com/zq2599/blog_demos
本篇概览
Spring Cloud Gateway应用中,处理请求时若发生异常未被捕获,请求方收到的响应是系统默认的内容,无法满足实际业务需求
因此,从前一篇文章《Spring Cloud Gateway过滤器精确控制异常返回(分析篇)》开始,咱们深入分析了Spring Cloud Gateway的相关源码,了解到全局异常的处理细节,然后,通过前文《Spring Cloud Gateway过滤器精确控制异常返回(实战,控制http返回码和message字段)》的实战,咱们已经能随意设置http返回码,以及body中的message字段,也就是控制下图两个红框中的内容:
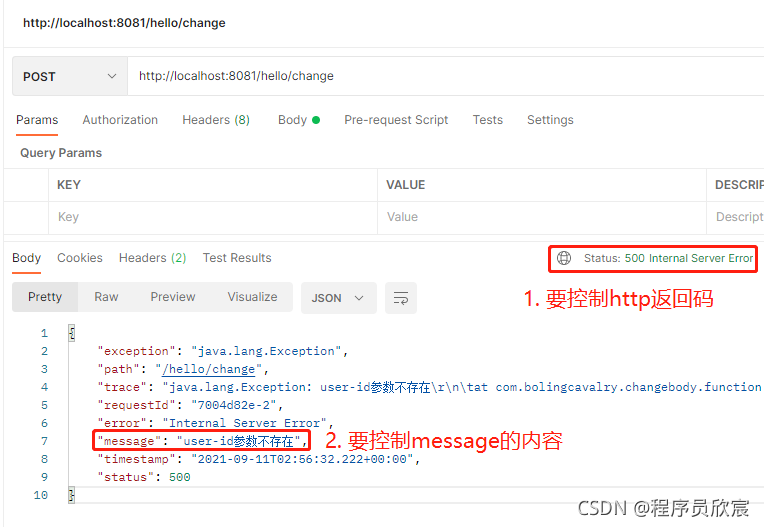
- 正如上图所示,异常发生时系统固定返回8个字段,这就有些不够灵活了,在一些对格式和内容有严格要求的场景下,咱们需要能够完全控制返回码和返回body的内容,如下所示,只返回三个字段,每个字段都是完全为业务服务的:
{

    # 这是有具体业务含义的返回码

    "code": "010020003",

    # 这是能精确描述错误原因的文本信息

    "message": "请确保请求参数中的user-id字段是有效的",

    # 这是常规的业务数据,发生异常时该字段为空

    "data": null

}
- 今天咱们的目标就是通过编码定制异常发生时的返回信息,具体内容就是上述JSON数据:只有code、message、data三个字段
源码下载
- 本篇实战中的完整源码可在GitHub下载到,地址和链接信息如下表所示(https://github.com/zq2599/blog_demos):
| 名称 | 链接 | 备注 |
|---|---|---|
| 项目主页 | https://github.com/zq2599/blog_demos | 该项目在GitHub上的主页 |
| git仓库地址(https) | https://github.com/zq2599/blog_demos.git | 该项目源码的仓库地址,https协议 |
| git仓库地址(ssh) | git@github.com:zq2599/blog_demos.git | 该项目源码的仓库地址,ssh协议 |
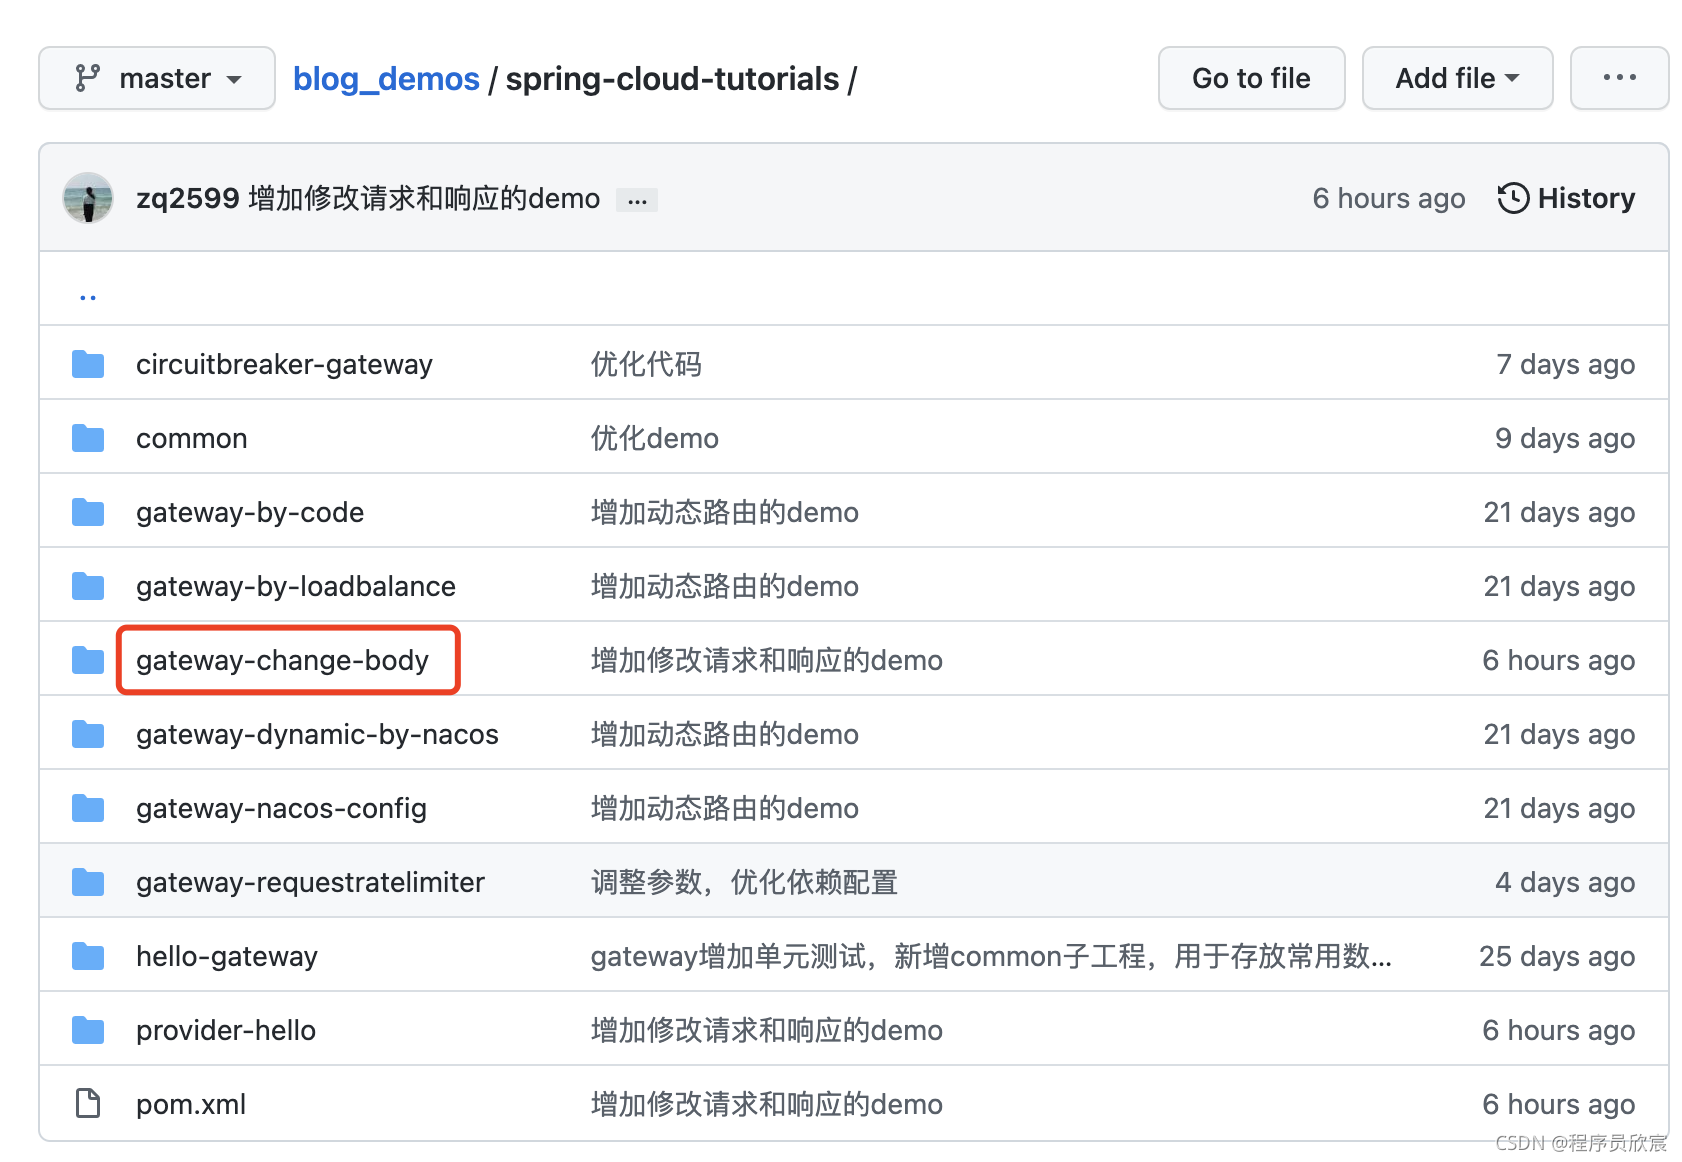
- 这个git项目中有多个文件夹,本篇的源码在spring-cloud-tutorials文件夹下,如下图红框所示:

- spring-cloud-tutorials文件夹下有多个子工程,本篇的代码是gateway-change-body,如下图红框所示:
为何不用常规手段
- 提到全局异常处理,经验丰富的您应该想到了常用的ControllerAdvice和ExceptionHandler注解修饰的全局异常处理类,但是Spring Cloud Gateway是基于WebFlux的,咱们之前处理异常时用到的HttpServletRequest在Spring Cloud Gateway中并不适用,因此,不能用ControllerAdvice和ExceptionHandler的手段来处理全局异常
基本思路
在动手前做好充足的理论分析,写出的代码才能正常工作
打开DefaultErrorWebExceptionHandler.java,找到renderErrorResponse方法,来看看Spring Cloud Gateway原本是如何构造异常返回内容的:
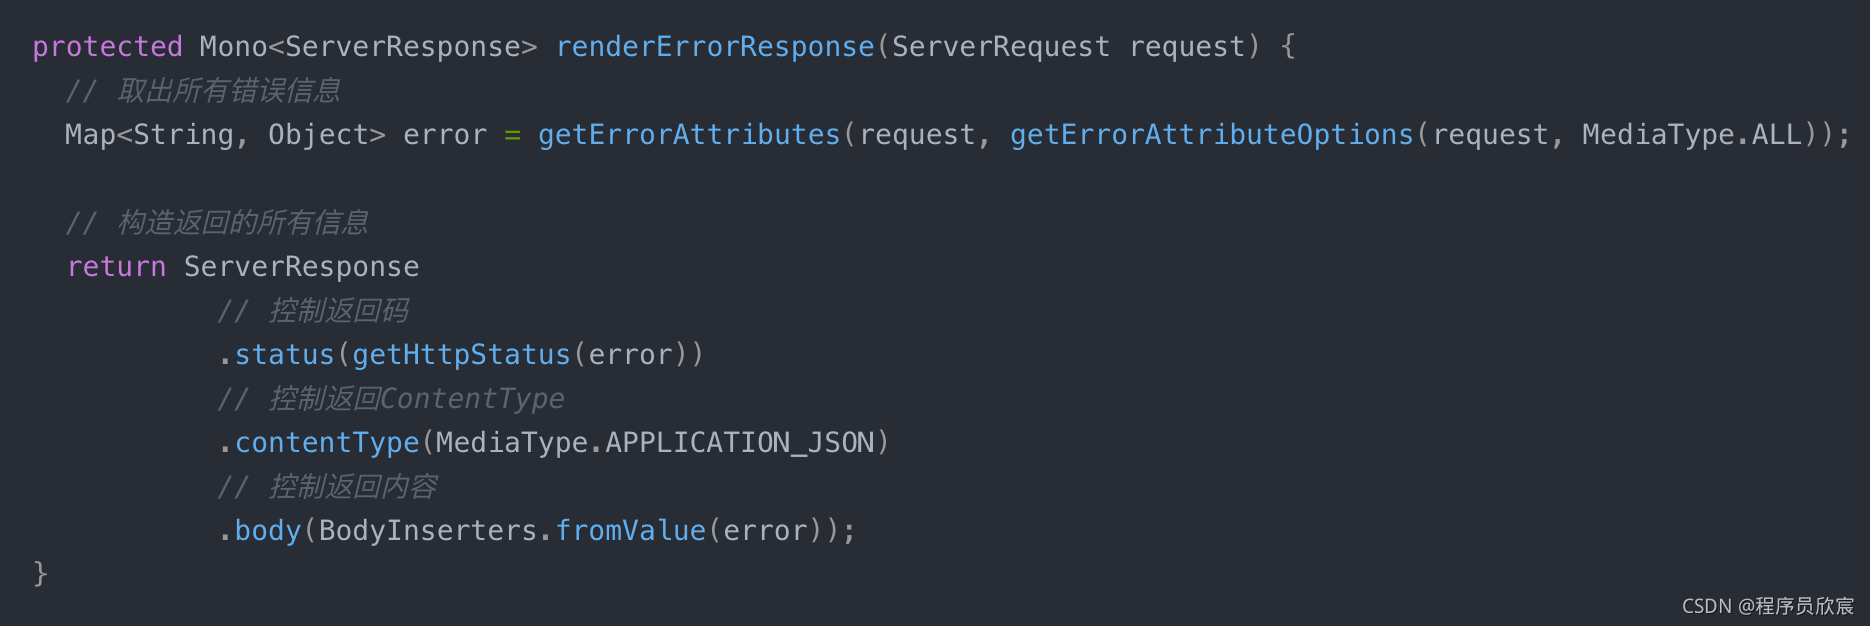
- 此刻聪明的您应该想到怎么做了:做个新的类继承DefaultErrorWebExceptionHandler,覆盖其renderErrorResponse方法,新的renderErrorResponse方法中,按照实际业务需要来设置返回内容,没错,这就是咱们的思路,不过还要细化一下,最终具体的步骤如下:
新增一个异常类CustomizeInfoException.java,该类有三个字段:http返回码、业务返回码、业务描述信息
在返回异常的代码位置,使用CustomizeInfoException类来抛出异常,按照实际业务场景设置CustomizeInfoException实例的各个字段
新增MyErrorWebExceptionHandler.java,继承自DefaultErrorWebExceptionHandler,重写了renderErrorResponse方法,这里面检查异常实例是否是CustomizeInfoException类型,如果是,就从其中取出http返回码、业务返回码、业务描述信息等字段,构造返回body的内容,异常实例若不是CustomizeInfoException类型,就保持之前的处理逻辑不变;
新增configuration类,用于将MyErrorWebExceptionHandler实例注册到spring环境
- 分析完毕,开始编码吧,为了简单起见,本篇不再新增maven子工程,而是基于前文创建的子工程gateway-change-body,在这里面继续写代码;
编码
- 新增异常类CustomizeInfoException.java:
package com.bolingcavalry.changebody.exception;

import lombok.Data;

import org.springframework.http.HttpStatus;

@Data

public class CustomizeInfoException extends Exception {

    /**

     * http返回码

     */

    private HttpStatus httpStatus;

    /**

     * body中的code字段(业务返回码)

     */

    private String code;

    /**

     * body中的message字段(业务返回信息)

     */

    private String message;

}
- 修改RequestBodyRewrite.java的apply方法,这里面是在处理请求body,如果检查到没有user-id字段,就不将请求转发到服务提供方provider-hello,而是返回错误,这里的错误就用CustomizeInfoException类来处理:
@Override

    public Publisher<String> apply(ServerWebExchange exchange, String body) {

        try {

            Map<String, Object> map = objectMapper.readValue(body, Map.class);

            // 如果请求参数中不含user-id,就返回异常

            if (!map.containsKey("user-id")) {

                CustomizeInfoException customizeInfoException = new CustomizeInfoException();

                // 这里返回406,您可以按照业务需要自行调整

                customizeInfoException.setHttpStatus(HttpStatus.NOT_ACCEPTABLE);

                // 这里按照业务需要自行设置code

                customizeInfoException.setCode("010020003");

                // 这里按照业务需要自行设置返回的message

                customizeInfoException.setMessage("请确保请求参数中的user-id字段是有效的");

                return Mono.error(customizeInfoException);

            }

            // 取得id

            int userId = (Integer)map.get("user-id");

            // 得到nanme后写入map

            map.put("user-name", mockUserName(userId));

            return Mono.just(objectMapper.writeValueAsString(map));

        } catch (Exception ex) {

            log.error("1. json process fail", ex);

            return Mono.error(new Exception("1. json process fail", ex));

        }

    }
- 异常处理类MyErrorWebExceptionHandler.java,这里有一处需要重点关注的是:下面的代码仅是参考而已,您无需拘泥于CustomizeInfoException有关的逻辑,完全能按照业务需求自由设置返回的状态码和body:
package com.bolingcavalry.changebody.handler;

import com.bolingcavalry.changebody.exception.CustomizeInfoException;

import org.springframework.boot.autoconfigure.web.ErrorProperties;

import org.springframework.boot.autoconfigure.web.WebProperties;

import org.springframework.boot.autoconfigure.web.reactive.error.DefaultErrorWebExceptionHandler;

import org.springframework.boot.web.reactive.error.ErrorAttributes;

import org.springframework.context.ApplicationContext;

import org.springframework.http.MediaType;

import org.springframework.web.reactive.function.BodyInserters;

import org.springframework.web.reactive.function.server.ServerRequest;

import org.springframework.web.reactive.function.server.ServerResponse;

import reactor.core.publisher.Mono;

import java.util.HashMap;

import java.util.Map;

public class MyErrorWebExceptionHandler extends DefaultErrorWebExceptionHandler {

    public MyErrorWebExceptionHandler(ErrorAttributes errorAttributes, WebProperties.Resources resources, ErrorProperties errorProperties, ApplicationContext applicationContext) {

        super(errorAttributes, resources, errorProperties, applicationContext);

    }

    @Override

    protected Mono<ServerResponse> renderErrorResponse(ServerRequest request) {

        // 返回码

        int status;

        // 最终是用responseBodyMap来生成响应body的

        Map<String, Object> responseBodyMap = new HashMap<>();

        // 这里和父类的做法一样,取得DefaultErrorAttributes整理出来的所有异常信息

        Map<String, Object> error = getErrorAttributes(request, getErrorAttributeOptions(request, MediaType.ALL));

        // 原始的异常信息可以用getError方法取得

        Throwable throwable = getError(request);

        // 如果异常类是咱们定制的,就定制

        if (throwable instanceof CustomizeInfoException) {

            CustomizeInfoException myGatewayException = (CustomizeInfoException) throwable;

            // http返回码、body的code字段、body的message字段,这三个信息都从CustomizeInfoException实例中获取

            status = myGatewayException.getHttpStatus().value();

            responseBodyMap.put("code", myGatewayException.getCode());

            responseBodyMap.put("message", myGatewayException.getMessage());

            responseBodyMap.put("data", null);

        } else {

            // 如果不是咱们定制的异常,就维持和父类一样的逻辑

            // 返回码

            status = getHttpStatus(error);

            // body内容

            responseBodyMap.putAll(error);

        }

        return ServerResponse

                // http返回码

                .status(status)

                // 类型和以前一样

                .contentType(MediaType.APPLICATION_JSON)

                // 响应body的内容

                .body(BodyInserters.fromValue(responseBodyMap));

    }

}
- 最后是配置类MyErrorWebFluxAutoConfiguration.java:
package com.bolingcavalry.changebody.config;

import com.bolingcavalry.changebody.handler.MyErrorWebExceptionHandler;

import org.springframework.beans.factory.ObjectProvider;

import org.springframework.boot.autoconfigure.AutoConfigureBefore;

import org.springframework.boot.autoconfigure.condition.ConditionalOnClass;

import org.springframework.boot.autoconfigure.condition.ConditionalOnWebApplication;

import org.springframework.boot.autoconfigure.web.ServerProperties;

import org.springframework.boot.autoconfigure.web.WebProperties;

import org.springframework.boot.autoconfigure.web.reactive.WebFluxAutoConfiguration;

import org.springframework.boot.context.properties.EnableConfigurationProperties;

import org.springframework.boot.web.reactive.error.ErrorAttributes;

import org.springframework.boot.web.reactive.error.ErrorWebExceptionHandler;

import org.springframework.context.ApplicationContext;

import org.springframework.context.annotation.Bean;

import org.springframework.context.annotation.Configuration;

import org.springframework.core.annotation.Order;

import org.springframework.http.codec.ServerCodecConfigurer;

import org.springframework.web.reactive.config.WebFluxConfigurer;

import org.springframework.web.reactive.result.view.ViewResolver;

import java.util.stream.Collectors;

@Configuration(proxyBeanMethods = false)

@AutoConfigureBefore(WebFluxAutoConfiguration.class)

public class MyErrorWebFluxAutoConfiguration {

    private final ServerProperties serverProperties;

    public MyErrorWebFluxAutoConfiguration(ServerProperties serverProperties) {

        this.serverProperties = serverProperties;

    }

    @Bean

    @Order(-1)

    public ErrorWebExceptionHandler errorWebExceptionHandler(ErrorAttributes errorAttributes,

                                                             org.springframework.boot.autoconfigure.web.ResourceProperties resourceProperties,

                                                             WebProperties webProperties, ObjectProvider<ViewResolver> viewResolvers,

                                                             ServerCodecConfigurer serverCodecConfigurer, ApplicationContext applicationContext) {

        MyErrorWebExceptionHandler exceptionHandler = new MyErrorWebExceptionHandler(errorAttributes,

                resourceProperties.hasBeenCustomized() ? resourceProperties : webProperties.getResources(),

                this.serverProperties.getError(), applicationContext);

        exceptionHandler.setViewResolvers(viewResolvers.orderedStream().collect(Collectors.toList()));

        exceptionHandler.setMessageWriters(serverCodecConfigurer.getWriters());

        exceptionHandler.setMessageReaders(serverCodecConfigurer.getReaders());

        return exceptionHandler;

    }

}
- 编码完成,该把程序运行起来验证效果了;
验证
启动应用gateway-change-body
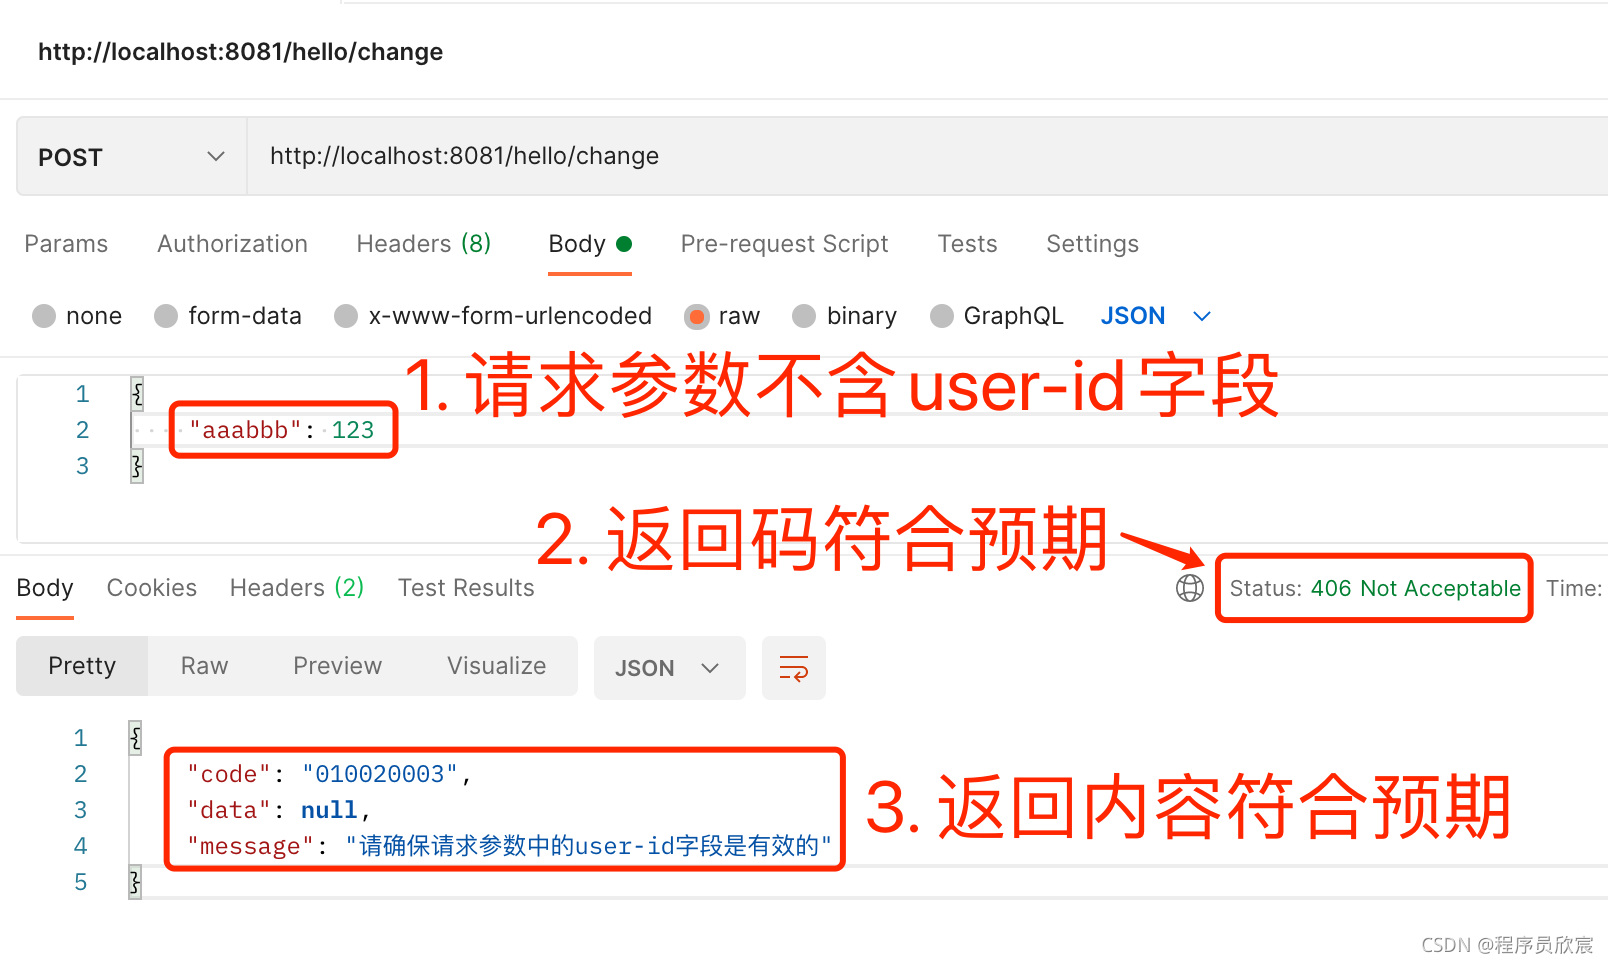
用postman发起POST请求,地址是http://localhost:8081/hello/change,如下图,红框2中的http返回码是咱们代码里设置的,红框3显示返回的内容就是咱们定制的那三个字段:
- 至此,控制Spring Cloud Gateway应用异常返回的实战已经全部完成,从源码分析结合实战演练,希望欣宸的文章能陪伴您深入了解Spring Cloud Gateway,打造出更加强大的网关应用;
你不孤单,欣宸原创一路相伴
欢迎关注公众号:程序员欣宸
微信搜索「程序员欣宸」,我是欣宸,期待与您一同畅游Java世界...
https://github.com/zq2599/blog_demos
Spring Cloud Gateway过滤器精确控制异常返回(实战,完全定制返回body)的更多相关文章
- Spring Cloud Gateway过滤器精确控制异常返回(实战,控制http返回码和message字段)
欢迎访问我的GitHub 这里分类和汇总了欣宸的全部原创(含配套源码):https://github.com/zq2599/blog_demos 本篇概览 前文<Spring Cloud Gat ...
- Spring Cloud Gateway过滤器精确控制异常返回(分析篇)
欢迎访问我的GitHub 这里分类和汇总了欣宸的全部原创(含配套源码):https://github.com/zq2599/blog_demos 本篇概览 在<Spring Cloud Gate ...
- Spring Cloud Gateway之全局异常拦截器
/** * @version 2019/8/14 * @description: 异常拦截器 * @modified: */ @Slf4j public class JsonExceptionHand ...
- Spring Cloud Gateway 网关限流
Spring Cloud Gateway 限流 一.背景 二.实现功能 三.网关层限流 1.使用默认的redis来限流 1.引入jar包 2.编写配置文件 3.网关正常响应 4.网关限流响应 2.自定 ...
- Spring Cloud Gateway自定义过滤器实战(观测断路器状态变化)
欢迎访问我的GitHub https://github.com/zq2599/blog_demos 内容:所有原创文章分类汇总及配套源码,涉及Java.Docker.Kubernetes.DevOPS ...
- 【Spring Cloud & Alibaba 实战 | 总结篇】Spring Cloud Gateway + Spring Security OAuth2 + JWT 实现微服务统一认证授权和鉴权
一. 前言 hi,大家好~ 好久没更文了,期间主要致力于项目的功能升级和问题修复中,经过一年时间的打磨,[有来]终于迎来v2.0版本,相较于v1.x版本主要完善了OAuth2认证授权.鉴权的逻辑,结合 ...
- Spring Cloud Gateway 整合阿里 Sentinel网关限流实战!
大家好,我是不才陈某~ 这是<Spring Cloud 进阶>第八篇文章,往期文章如下: 五十五张图告诉你微服务的灵魂摆渡者Nacos究竟有多强? openFeign夺命连环9问,这谁受得 ...
- Spring Cloud Gateway实战之五:内置filter
欢迎访问我的GitHub https://github.com/zq2599/blog_demos 内容:所有原创文章分类汇总及配套源码,涉及Java.Docker.Kubernetes.DevOPS ...
- Spring Cloud gateway 网关服务二 断言、过滤器
微服务当前这么火爆的程度,如果不能学会一种微服务框架技术.怎么能升职加薪,增加简历的筹码?spring cloud 和 Dubbo 需要单独学习.说没有时间?没有精力?要学俩个框架?而Spring C ...
随机推荐
- Ubuntu安装 配置GCC和Vim
VMware14.0和Ubuntu镜像安装 https://mp.weixin.qq.com/s/045wrbdv92PkUQn2abddvA 适应屏幕设置 按照下列流程检查虚拟机设置 查看 -> ...
- Java(15)面向对象之继承
作者:季沐测试笔记 原文地址:https://www.cnblogs.com/testero/p/15201615.html 博客主页:https://www.cnblogs.com/testero ...
- Java---String和StringBuffer类
Java---String和StringBuffer类 Java String 类 字符串在Java中属于对象,Java提供String类来创建和操作字符串. 创建字符串 创建字符串常用的方法如下: ...
- 什么是产品待办列表?(What is Product Backlog)
正如scrum指南中所描述的,产品待办事项列表是一个紧急而有序的列表,其中列出了改进产品所需的内容.它是scrum团队承担的工作的唯一来源. 在sprint计划 (Sprint Planning)活动 ...
- Coursera Deep Learning笔记 结构化机器学习项目 (上)
参考:https://blog.csdn.net/red_stone1/article/details/78519599 1. 正交化(Orthogonalization) 机器学习中有许多参数.超参 ...
- 『学了就忘』Linux基础 — 14、Linux系统的设备文件名和挂载
目录 1.设备文件名 (1)为什么需要设备文件名 (2)硬件设备文件名命名规则 2.挂载点 3.挂载 (1)什么是挂载 (2)挂载前的分区要求 (3)小结(重点) 1.设备文件名 (1)为什么需要设备 ...
- 转载:10G以太网光口与Aurora接口回环实验
10G以太网光口与高速串行接口的使用越来越普遍,本文拟通过一个简单的回环实验,来说明在常见的接口调试中需要注意的事项.各种Xilinx FPGA接口学习的秘诀:Example Design.欢迎探讨. ...
- cf22A Second Order Statistics(STL-UNIQUE的使用)
题意: N个数,找出第二大的数.如果没有输出-1. 思路: UNIQUE的使用. 代码: int a[105]; int n; int main(){ cin>>n; rep(i,0,n- ...
- Connected to an idle instance.
Connected to an idle instance:连接到空闲实例 原因:数据库或者监听没启动
- Spring源码学习之容器的基本实现(一)
前言 最近学习了<<Spring源码深度解析>>受益匪浅,本博客是对学习内容的一个总结.分享,方便日后自己复习或与一同学习的小伙伴一起探讨之用. 建议与源码配合使用,效果更嘉, ...