spring security 认证源码跟踪
spring security 认证源码跟踪
在跟踪认证源码之前,我们先根据官网说明一下security的内部原理,主要是依据一系列的filter来实现,大家可以根据https://docs.spring.io/spring-security/site/docs/5.5.3/reference/html5/#servlet-hello 查看相关的文档说明,英文不好的可以配合使用google翻译。
security 原理说明

在上图中,红色方框圈出来的是security 的filter,每一个http request都会经过上图的每一个指定的过滤器。请求其中:
DelegatingFilterProxy:主要负责在servlet容器的生命周期和Spring上下文进行衔接,也就是说security的所有过滤器都委托给它进行代理。
FilterChainProxy:是一个特殊的过滤器,被包装在DelegatingFilterProxy内部。它代理代理了SecurityFilterChain
SecurityFilterChain:SecurityFilterChain 确定应为此请求调用哪些 Spring 安全过滤器。
DelegatingFilterProxy
这是一个过滤器,所以肯定会有doFilter方法,我们主要查看内部的2个方法,首先从doFilter方法看起:
@Override

public void doFilter(ServletRequest request, ServletResponse response, FilterChain filterChain)

      throws ServletException, IOException {

   // Lazily initialize the delegate if necessary.

   Filter delegateToUse = this.delegate;

   if (delegateToUse == null) {

      synchronized (this.delegateMonitor) {

         delegateToUse = this.delegate;

         if (delegateToUse == null) {

             // 拿到Spring Web上下文

            WebApplicationContext wac = findWebApplicationContext();

            if (wac == null) {

               throw new IllegalStateException("No WebApplicationContext found: " +

                     "no ContextLoaderListener or DispatcherServlet registered?");

            }

             // 初始化委托filter

            delegateToUse = initDelegate(wac);

         }

         this.delegate = delegateToUse;

      }

   }

   // Let the delegate perform the actual doFilter operation.

   invokeDelegate(delegateToUse, request, response, filterChain);

}

// 初始化委托filter

protected Filter initDelegate(WebApplicationContext wac) throws ServletException {

    	// 众多filter中,会有一个是FilterChainProxy

		String targetBeanName = getTargetBeanName();

		Assert.state(targetBeanName != null, "No target bean name set");

		Filter delegate = wac.getBean(targetBeanName, Filter.class);

		if (isTargetFilterLifecycle()) {

			delegate.init(getFilterConfig());

		}

		return delegate;

	}
FilterChainProxy
它也是一个过滤器,那一定也会有doFilter方法,我们查看该方法
@Override

public void doFilter(ServletRequest request, ServletResponse response, FilterChain chain)

      throws IOException, ServletException {

    // 当前request是否已经清除了上下文,因为每一个请求都会经过这个过滤器

   boolean clearContext = request.getAttribute(FILTER_APPLIED) == null;

   if (!clearContext) {

      doFilterInternal(request, response, chain);

      return;

   }

   try {

      request.setAttribute(FILTER_APPLIED, Boolean.TRUE);

       // 内部的filter方法,我们看到该方法

      doFilterInternal(request, response, chain);

   }

   catch (RequestRejectedException ex) {

      this.requestRejectedHandler.handle((HttpServletRequest) request, (HttpServletResponse) response, ex);

   }

   finally {

      SecurityContextHolder.clearContext();

      request.removeAttribute(FILTER_APPLIED);

   }

}

private void doFilterInternal(ServletRequest request, ServletResponse response, FilterChain chain)

			throws IOException, ServletException {

    // 拿到防火墙配置,对于这里不重要

		FirewalledRequest firewallRequest = this.firewall.getFirewalledRequest((HttpServletRequest) request);

		HttpServletResponse firewallResponse = this.firewall.getFirewalledResponse((HttpServletResponse) response);

    // 这里可以看到,FilterChainProxy在这里拿到了这次请求request具体还要经过的一系列过滤器链,其中包括CsrfFilter、UsernamePasswordAuthenticationFilter等过滤器,包含了SecurityFilterChain 涉及的filter

		List<Filter> filters = getFilters(firewallRequest);

		if (filters == null || filters.size() == 0) {

			if (logger.isTraceEnabled()) {

				logger.trace(LogMessage.of(() -> "No security for " + requestLine(firewallRequest)));

			}

			firewallRequest.reset();

			chain.doFilter(firewallRequest, firewallResponse);

			return;

		}

		if (logger.isDebugEnabled()) {

			logger.debug(LogMessage.of(() -> "Securing " + requestLine(firewallRequest)));

		}

		VirtualFilterChain virtualFilterChain = new VirtualFilterChain(firewallRequest, chain, filters);

		virtualFilterChain.doFilter(firewallRequest, firewallResponse);

	}
认证源码跟踪
回到认证这里,在网上随便搜一搜就能搜到spring scurity认证的几种方式,这次我们主要跟踪第三种认证方式:数据库认证,也是我们平时在用的方式。先给大家说明一下数据库认证的知识点,有个大概印象:
- UsernamePasswordAuthenticationFilter
- 实现
UserDetailsService接口并注入到spring管理
这三种认证方式分为为:
1、在xml中配置账号密码
spring.security.user.name=user

spring.security.user.password=123456
2、在代码中将账号、密码加载到内存中
@Bean

public UserDetailsService userDetailsService() {

    UserDetails userDetails = User.withDefaultPasswordEncoder()

            .username("user")

            .password("password")

            .roles("USER")

            .build();

    return new InMemoryUserDetailsManager(userDetails);

}
3、从数据库中读取账号进行认证校验
public class MyUserDetailsService implements UserDetailsService {

    @Autowired

    private UserMapper userMapper;

    @Override

    public UserDetails loadUserByUsername(String username) throws UsernameNotFoundException {

        // 从数据库尝试读取该用户

        User user = userMapper.findByUserName(username);

        // 用户不存在,抛出异常

        if (user == null) {

            throw new UsernameNotFoundException("用户不存在");

        }

        // 将数据库形式的roles解析为UserDetails的权限集

        // AuthorityUtils.commaSeparatedStringToAuthorityList是Spring Security

        //提供的用于将逗号隔开的权限集字符串切割成可用权限对象列表的方法

        // 当然也可以自己实现,如用分号来隔开等,参考generateAuthorities

        user.setAuthorities(AuthorityUtils.commaSeparatedStringToAuthorityList(user.getRoles()));

        return user;

    }

}
在这个例子中,我们会有一个自定义WebSecurityConfig类,其中定义了哪些Url路径需要拦截,以及需要哪些权限才能够访问,同时在这个配置中,注入一个一个密码编码类,默认是不采用加密方式NoOpPasswordEncoder。
@EnableWebSecurity(debug = true)

public class WebSecurityConfig extends WebSecurityConfigurerAdapter {

    @Override

    protected void configure(HttpSecurity http) throws Exception {

        http

                .authorizeRequests()

                .antMatchers("/admin/api/**").hasRole("ADMIN")

                .antMatchers("/user/api/**").hasRole("USER")

                .antMatchers("/app/api/**").permitAll()

                .antMatchers("/css/**", "/index").permitAll()

                .antMatchers("/user/**").hasRole("USER")

                .and()

                .formLogin()

                .loginPage("/login")

                .failureUrl("/login-error")

                .permitAll();

    }

    @Bean

    public PasswordEncoder passwordEncoder() {

        return NoOpPasswordEncoder.getInstance();

    }

}
我们先不去实现UserDetailsService接口,看看spring security是怎么去实现认证的?
UsernamePasswordAuthenticationFilter
首先找到UsernamePasswordAuthenticationFilter类,发现它继承了AbstractAuthenticationProcessingFilter类,那我们就先看一下AbstractAuthenticationProcessingFilter类,发现这个类中主要有四个方法,分别是:
- doFilter(reqeust,response,chain):每个filter都会有的方法,最重要的一个。
- attemptAuthentication(request,response); 是个抽象方法,交给具体的实现类去实现认证的逻辑
- successfulAuthentication(request,response,chain,authenticationResult); 认证成功后的处理逻辑,通过不同的策略实现
- unsuccessfulAuthentication(request,resonse,failed);认证失败后的处理逻辑,通过不同的策略实现
private void doFilter(HttpServletRequest request, HttpServletResponse response, FilterChain chain)

      throws IOException, ServletException {

   if (!requiresAuthentication(request, response)) {

      chain.doFilter(request, response);

      return;

   }

   try {

       // 具体的认证方法,是个抽象方法,交给具体的实现类去实现认证的逻辑

      Authentication authenticationResult = attemptAuthentication(request, response);

      if (authenticationResult == null) {

         // return immediately as subclass has indicated that it hasn't completed

         return;

      }

      this.sessionStrategy.onAuthentication(authenticationResult, request, response);

      // Authentication success

      if (this.continueChainBeforeSuccessfulAuthentication) {

         chain.doFilter(request, response);

      }

       // 认证成功后的处理逻辑

      successfulAuthentication(request, response, chain, authenticationResult);

   }

   catch (InternalAuthenticationServiceException failed) {

      this.logger.error("An internal error occurred while trying to authenticate the user.", failed);

      unsuccessfulAuthentication(request, response, failed);

   }

   catch (AuthenticationException ex) {

      // Authentication failed

       // 认证失败后的处理逻辑

      unsuccessfulAuthentication(request, response, ex);

   }

}
接着我们看回UsernamePasswordAuthenticationFilter类,发现它主要是重写了AbstractAuthenticationProcessingFilter类的attemptAuthentication(request,response)认证方法。具体如下:
@Override

public Authentication attemptAuthentication(HttpServletRequest request, HttpServletResponse response)

      throws AuthenticationException {

   if (this.postOnly && !request.getMethod().equals("POST")) {

      throw new AuthenticationServiceException("Authentication method not supported: " + request.getMethod());

   }

    // 获取请求的用户名

   String username = obtainUsername(request);

   username = (username != null) ? username : "";

   username = username.trim();

    // 获取请求输入的密码

   String password = obtainPassword(request);

   password = (password != null) ? password : "";

    // 构造带有用户名、密码的UsernamePasswordAuthenticationToken对象

   UsernamePasswordAuthenticationToken authRequest = new UsernamePasswordAuthenticationToken(username, password);

   // Allow subclasses to set the "details" property

    // 设置认证的对象

   setDetails(request, authRequest);

   return this.getAuthenticationManager().authenticate(authRequest);

}
接着我们运行程序,直接访问http://localhost:8080/admin/api/hello地址,重定向到登录页后,随意输入账号、密码后,在UsernamePasswordAuthenticationFilter类的attemptAuthentication方法上打断点进行跟踪,跟踪到DaoAuthenticationProvider类的retrieveUser(String username, UsernamePasswordAuthenticationToken authentication)方法,
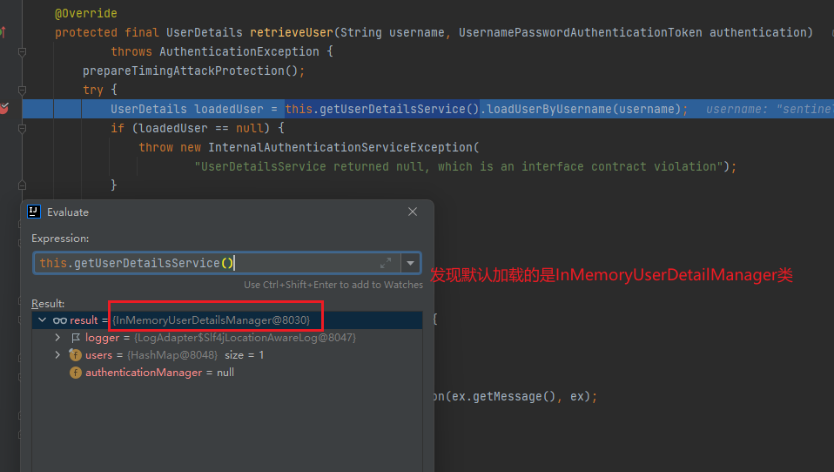
在AbstractUserDetailsAuthenticationProvider抽象中的需要指定一个实现UserDetailsService 接口的实现类,如果我们没有指定,就是会去加载默认的InMemoryUserDetailManager类。
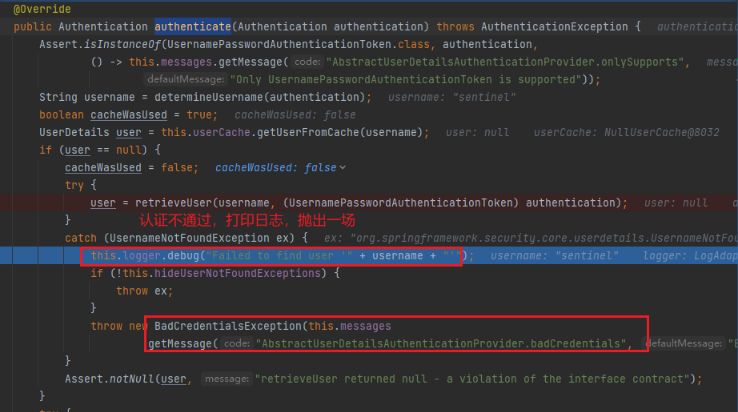
因为采用的是上面提过的第二种方式:在代码中将账号、密码加载到内存中,然后我们并没有在内存中预先加载我们输入的账号、密码,所以自然是认证不通过的。
UserDetailsService 接口
想要通过自定义的认证方式,也就是上面提到的第三种认证方式:从数据库中读取账号进行认证校验。所以需要自己去实现UserDetailsService 接口。刚才我们在跟踪代码的过程中,发现AbstractUserDetailsAuthenticationProvider类是需要一个实现了UserDetailsService接口的对象,于是我们就自定义一个实现该接口的实现类,并注入到spring容器中。
@Service

public class MyUserDetailsService implements UserDetailsService {

    @Autowired

    private UserMapper userMapper;

    @Override

    public UserDetails loadUserByUsername(String username) throws UsernameNotFoundException {

        // 从数据库尝试读取该用户

        User user = userMapper.findByUserName(username);

        // 用户不存在,抛出异常

        if (user == null) {

            throw new UsernameNotFoundException("用户不存在");

        }

        // 将数据库形式的roles解析为UserDetails的权限集

        // AuthorityUtils.commaSeparatedStringToAuthorityList是Spring Security

        //提供的用于将逗号隔开的权限集字符串切割成可用权限对象列表的方法

        // 当然也可以自己实现,如用分号来隔开等,参考generateAuthorities

        user.setAuthorities(AuthorityUtils.commaSeparatedStringToAuthorityList(user.getRoles()));

        return user;

    }

}
如上图,我们重写了UserDetailsService接口的loadUserByUsername(String username)方法,从而实现我们的自定义认证逻辑。然后我们再重启服务,重新访问http://localhost:8080/admin/api/hello,再次登录,并进行代码跟踪,
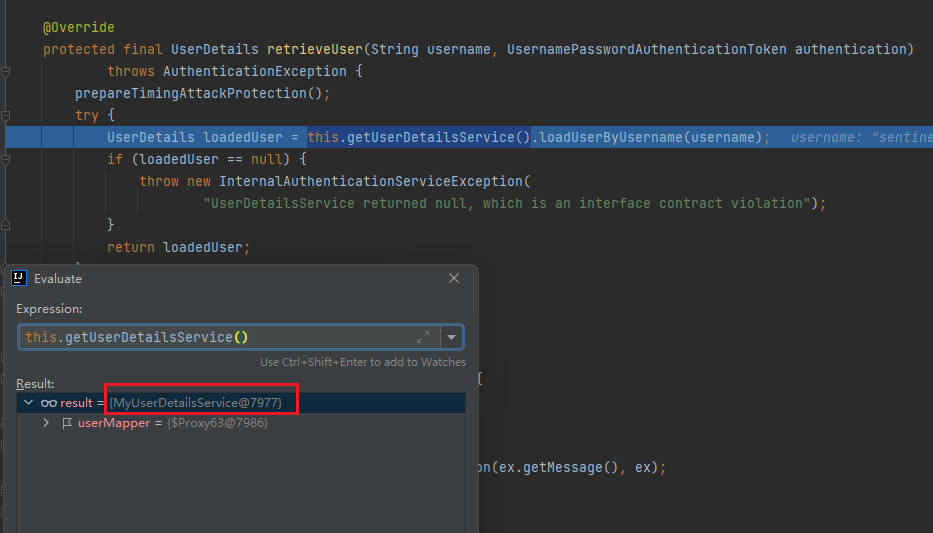
这个时候就发现DaoAuthenticationProvider从自己的userDetailsService拿到了我们自定义的对象,接着就会走我们的自定义认证逻辑。
认证源码跟踪就到这里,接下来是授权的源码跟踪,跟踪文章较短,但大家了解一下还是有些收获的。加油!
spring security 认证源码跟踪的更多相关文章
- Spring Security 解析(七) —— Spring Security Oauth2 源码解析
Spring Security 解析(七) -- Spring Security Oauth2 源码解析 在学习Spring Cloud 时,遇到了授权服务oauth 相关内容时,总是一知半解,因 ...
- Spring Security 访问控制 源码解析
上篇 Spring Security 登录校验 源码解析 分析了使用Spring Security时用户登录时验证并返回token过程,本篇分析下用户带token访问时,如何验证用户登录状态及权限问 ...
- spring security 实践 + 源码分析
前言 本文将从示例.原理.应用3个方面介绍 spring data jpa. 以下分析基于spring boot 2.0 + spring 5.0.4版本源码 概述 Spring Security 是 ...
- Spring Security OAuth2 源码分析
Spring Security OAuth2 主要两部分功能:1.生成token,2.验证token,最大概的流程进行了一次梳理 1.Server端生成token (post /oauth/token ...
- Spring组件扫描--源码跟踪
看这篇文章之前可以先了解之前的跟踪流程,https://www.jianshu.com/p/4934233f0ead 代码过宽,可以shift + 鼠标滚轮 左右滑动查看 这篇文章主要跟踪spring ...
- spring-security-4 (4)spring security 认证和授权原理
在上一节我们讨论了spring security过滤器的创建和注册原理.请记住springSecurityFilterChain(类型为FilterChainProxy)是实际起作用的过滤器链,Del ...
- spring security之 默认登录页源码跟踪
spring security之 默认登录页源码跟踪 2021年的最后2个月,立个flag,要把Spring Security和Spring Security OAuth2的应用及主流程源码研究透 ...
- spring security 之自定义表单登录源码跟踪
上一节我们跟踪了security的默认登录页的源码,可以参考这里:https://www.cnblogs.com/process-h/p/15522267.html 这节我们来看看如何自定义单表认 ...
- spring security 授权方式(自定义)及源码跟踪
spring security 授权方式(自定义)及源码跟踪 这节我们来看看spring security的几种授权方式,及简要的源码跟踪.在初步接触spring security时,为了实现它的 ...
随机推荐
- Linux系统安装MySql5.7并通过sql脚本导入数据
为了下载到的MySQL版本和目标系统相互兼容,在开启之前,最好了解目标系统的相关信息. 查询系统版本: cat /etc/issue 查看系统位数 getconf LONG_BIT 选择MySQL 根 ...
- WPF实现Win10汉堡菜单
WPF开发者QQ群: 340500857 | 微信群 -> 进入公众号主页 加入组织 前言 有小伙伴提出需要实现Win10汉堡菜单效果. 由于在WPF中没有现成的类似UWP的汉堡菜单,所以我们 ...
- epoll实现快速ping
概述 在VOIP的运营过程中,最常见的一类问题就是语音质量问题,网络间的丢包.延迟.抖动都会造成语音质量的体验下降. 当现网出现语音质量问题的时候,我们有没有工具能够快速的界定问题的边界,缩小排查的范 ...
- 【UE4 设计模式】外观模式 Facade Pattern
概述 描述 外部与一个子系统的通信必须通过一个统一的外观对象进行,为子系统中的一组接口提供一个一致的界面,外观模式定义了一个高层接口,这个接口使得这一子系统更加容易使用.外观模式又称为门面模式,它是一 ...
- 【c++ Prime 学习笔记】第13章 拷贝控制
定义一个类时,可显式或隐式的指定在此类型对象上拷贝.移动.赋值.销毁时做什么.通过5种成员函数实现拷贝控制操作: 拷贝构造函数:用同类型的另一个对象初始化本对象时做什么(拷贝初始化) 拷贝赋值算符:将 ...
- OO助教工作总结
\(OO\)助教的工作结束了,在这一学期中,我主要负责对作业进行测试,对指导书进行检查,讨论区管理,部分数据构造,以及完成随班助教的工作. 测试 指导书检查 每次指导书公开前我都会先把指导书看 ...
- 六个好习惯让你的PCB设计更优
PCB layout工程师每天对着板子成千上万条走线,各种各样的封装,重复着拉线的工作,也许很多人会觉得是很枯燥无聊的工作内容.看似软件操作搬运工,其实设计人员在过程中要在各种设计规则之间做取舍,兼顾 ...
- 洛谷 P3147 [USACO16OPEN]262144 P
链接: P3147 P3146双倍经验 前言: 今天发现的一道很有意思的DP题 分析: 第一眼以为是区间DP,于是设f[i][j]为从第i个数到第j个数可以合出的最大值,但思考后发现并不能简单合并,并 ...
- Vulnhub实战-dr4g0n b4ll靶机👻
Vulnhub实战-dr4g0n b4ll靶机 地址:http://www.vulnhub.com/entry/dr4g0n-b4ll-1,646/ 描述:这篇其实没有什么新奇的技巧,用到的提权方式就 ...
- DDD领域驱动设计-设计规范-Ⅵ
不以规矩,不能成方圆. -战国·邹·孟轲<孟子·离娄章句上 ...