
Pytorch 图片载入
import os

import torch

import pandas as pd

from skimage import io, transform

import numpy as np

import matplotlib.pyplot as plt

from torch.utils.data import Dataset, DataLoader

from torchvision import transforms, utils
# Ignore warnings

import warnings

warnings.filterwarnings("ignore")
载入图片和坐标
landmarks_frame = pd.read_csv('data/faces/face_landmarks.csv')

n=65

img_name = landmarks_frame.iloc[n, 0]  #获取图片的名称

landmarks = landmarks_frame.iloc[n, 1:].as_matrix()  #获取点的位置

landmarks = landmarks.astype('float').reshape(-1, 2)
landmarks_frame.iloc[:3, :] #展示一下csv里面的格式
{ vertical-align: top }
.dataframe thead th { text-align: right }
| image_name | part_0_x | part_0_y | part_1_x | part_1_y | part_2_x | part_2_y | part_3_x | part_3_y | part_4_x | ... | part_63_x | part_63_y | part_64_x | part_64_y | part_65_x | part_65_y | part_66_x | part_66_y | part_67_x | part_67_y | |
|---|---|---|---|---|---|---|---|---|---|---|---|---|---|---|---|---|---|---|---|---|---|
| 0 | 0805personali01.jpg | 27 | 83 | 27 | 98 | 29 | 113 | 33 | 127 | 39 | ... | 93 | 136 | 100 | 141 | 93 | 135 | 89 | 135 | 84 | 134 |
| 1 | 1084239450_e76e00b7e7.jpg | 70 | 236 | 71 | 257 | 75 | 278 | 82 | 299 | 90 | ... | 148 | 311 | 179 | 308 | 149 | 312 | 137 | 314 | 128 | 312 |
| 2 | 10comm-decarlo.jpg | 66 | 114 | 65 | 128 | 67 | 142 | 68 | 156 | 72 | ... | 128 | 162 | 136 | 167 | 127 | 166 | 121 | 165 | 116 | 164 |
3 rows × 137 columns
接下来,是如何展示图片,以及把点画在图片之上
def show_landmarks(image, landmarks):

    fig, ax = plt.subplots()

    ax.imshow(image)

    ax.scatter(landmarks[:, 0], landmarks[:, 1], s=10, marker='.', c='r')

    plt.pause(0.001)  #暂停让图片更新?

    plt.show()

show_landmarks(io.imread(os.path.join('data/faces/', img_name)),

              landmarks)
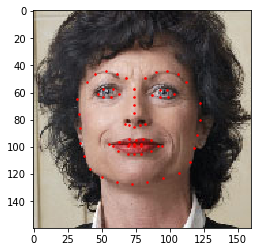
torch.utils.data.Dataset是一个抽象基类表示一个数据集,我们需要为其设定__len__方法和__getitem__方法.
class FaceLandmarksDataset(Dataset):

    def __init__(self, csv_file, root_dir, transform=None):

        self.landmarks_frame = pd.read_csv(csv_file)

        self.root_dir = root_dir

        self.transform = transform

    def __len__(self):

        return len(self.landmarks_frame)

    def __getitem__(self, idx):

        img_name = os.path.join(self.root_dir,

                               self.landmarks_frame.iloc[idx, 0])

        image = io.imread(img_name)

        landmarks = self.landmarks_frame.iloc[idx, 1:]

        landmarks = np.array([landmarks])

        landmarks = landmarks.astype('float').reshape(-1, 2)

        sample = {'image': image, 'landmarks': landmarks}

        if self.transform:

            sample = self.transform(sample)

        return sample
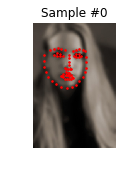
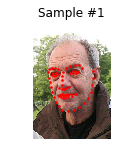
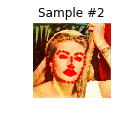
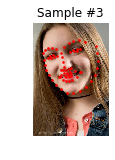
利用这个类,我们来展示一下前4幅图像
face_dataset = FaceLandmarksDataset(csv_file='data/faces/face_landmarks.csv',

                                    root_dir='data/faces/')

def show_landmarks(image, landmarks):

    plt.imshow(image)

    plt.scatter(landmarks[:, 0], landmarks[:, 1], s=10, marker='.', c='r')

    plt.pause(0.001)  #暂停让图片更新?

fig = plt.figure()

for i in range(len(face_dataset)):

    sample = face_dataset[i]

    print(i, sample['image'].shape, sample['landmarks'].shape)

    ax = plt.subplot(1, 4, i+1)

    plt.tight_layout()

    ax.set_title("Sample #{}".format(i))

    ax.axis("off")

    show_landmarks(**sample)

    if i == 3:

        plt.show()

        break
0 (324, 215, 3) (68, 2)
1 (500, 333, 3) (68, 2)
2 (250, 258, 3) (68, 2)
3 (434, 290, 3) (68, 2)
Transforms
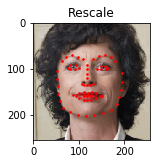
很多时候,我们需要对图片进行一些变化,比方说大小的调整等等
利用函子(_call_)能够很好很方便对图片进行处理
class Rescale(object):

    """Rescale the image in a sample to a given size.

    Args:

        output_size (tuple or int): Desired output size. If tuple, output is

            matched to output_size. If int, smaller of image edges is matched

            to output_size keeping aspect ratio the same.

    """

    def __init__(self, output_size):

        assert isinstance(output_size, (int, tuple)) #output_size应当是一个整数或者元组

        self.output_size = output_size

    def __call__(self, sample):

        image, landmarks = sample['image'], sample['landmarks']

        h, w = image.shape[:2]

        if isinstance(self.output_size, int): #如果是一个整数,那么缩放的逻辑是要保持比例

            if h > w:

                new_h, new_w = self.output_size * h / w, self.output_size

            else:

                new_h, new_w = self.output_size, self.output_size * w / h

        else: #否则就直接等于就好了

            new_h, new_w = self.output_size

        new_h, new_w = int(new_h), int(new_w)

        img = transform.resize(image, (new_h, new_w))

        # h and w are swapped for landmarks because for images,

        # x and y axes are axis 1 and 0 respectively

        landmarks = landmarks * [new_w / w, new_h / h] #坐标也要相应改变大小

        return {'image': img, 'landmarks': landmarks}
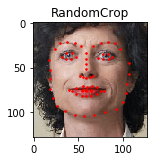
class RandomCrop(object): #随机裁剪,但是实际上是一整块来的

    """Crop randomly the image in a sample.

    Args:

        output_size (tuple or int): Desired output size. If int, square crop

            is made.

    """

    def __init__(self, output_size):

        assert isinstance(output_size, (int, tuple))

        if isinstance(output_size, int):

            self.output_size = (output_size, output_size)

        else:

            assert len(output_size) == 2

            self.output_size = output_size

    def __call__(self, sample):

        image, landmarks = sample['image'], sample['landmarks']

        h, w = image.shape[:2]

        new_h, new_w = self.output_size

        top = np.random.randint(0, h - new_h)

        left = np.random.randint(0, w - new_w)

        image = image[top: top + new_h,

                      left: left + new_w]

        landmarks = landmarks - [left, top]

        return {'image': image, 'landmarks': landmarks}
class ToTensor(object):

    """Convert ndarrays in sample to Tensors."""

    def __call__(self, sample):

        image, landmarks = sample['image'], sample['landmarks']

        # swap color axis because

        # numpy image: H x W x C

        # torch image: C X H X W

        image = image.transpose((2, 0, 1)) #把ndarray转换为tensor需要改变顺序

        return {'image': torch.from_numpy(image),

                'landmarks': torch.from_numpy(landmarks)}
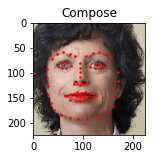
Compose transforms
利用torchvision.transforms.Compose可以帮助我们对一个图片进行多个操作
scale = Rescale(256)

crop = RandomCrop(128)

composed = transforms.Compose([Rescale(256),

                               RandomCrop(224)])

# Apply each of the above transforms on sample.

fig = plt.figure()

sample = face_dataset[65]

for i, tsfrm in enumerate([scale, crop, composed]):

    transformed_sample = tsfrm(sample)

    ax = plt.subplot(1, 3, i + 1)

    plt.tight_layout()

    ax.set_title(type(tsfrm).__name__)

    show_landmarks(**transformed_sample)

plt.show()
数据集的迭代
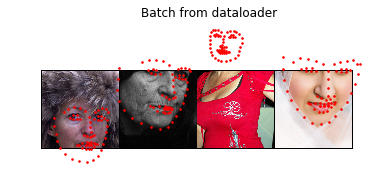
我们可以用 for ... in ... 来迭代数据集,但是这么做并不方便,因为很多时候训练神经网络是要分批和打乱顺序的torch.utils.data.DataLoader可以帮助我们完成这一个目标
transformed_dataset = FaceLandmarksDataset(csv_file='data/faces/face_landmarks.csv',

                                           root_dir='data/faces/',

                                           transform=transforms.Compose([

                                               Rescale(256),

                                               RandomCrop(224),

                                               ToTensor()

                                           ]))

dataloader = DataLoader(transformed_dataset, batch_size=4,

                        shuffle=True, num_workers=0) #batch_size: batch的大小 shuffle=True表示顺序打乱
def show_landmarks_batch(sample_batched):

    """Show image with landmarks for a batch of samples."""

    images_batch, landmarks_batch = \

            sample_batched['image'], sample_batched['landmarks']

    batch_size = len(images_batch)

    im_size = images_batch.size(2)

    grid_border_size = 2

    grid = utils.make_grid(images_batch) #为图片加入边框

    plt.imshow(grid.numpy().transpose((1, 2, 0)))

    for i in range(batch_size):

        plt.scatter(landmarks_batch[i, :, 0].numpy() + i * im_size + (i + 1) * grid_border_size, #既然图片加了边框,而且并排放置,所以我们需要把这部分加上去

                    landmarks_batch[i, :, 1].numpy() + grid_border_size,

                    s=10, marker='.', c='r')

        plt.title('Batch from dataloader')
for i_batch, sample_batched in enumerate(dataloader):

    print(i_batch, sample_batched['image'].size(),

          sample_batched['landmarks'].size())

    if i_batch == 0:

        plt.figure()

        show_landmarks_batch(sample_batched)

        plt.axis('off')

        plt.ioff()

        plt.show()

        break
0 torch.Size([4, 3, 224, 224]) torch.Size([4, 68, 2])

224
Pytorch 图片载入的更多相关文章
- Cocos2d-x 3.0心得(01)-图片载入与混合模式
近期開始用cocos2dx 3.0做东西,略有心(cao)得(dian),略微作下记录吧. v3.0相对v2.2来说,最引人注意的,应该是对触摸层级的优化.和lambda回调函数的引入(嗯嗯.不枉我改 ...
- [深度应用]·实战掌握PyTorch图片分类简明教程
[深度应用]·实战掌握PyTorch图片分类简明教程 个人网站--> http://www.yansongsong.cn/ 项目GitHub地址--> https://github.com ...
- Android图片载入框架最全解析(一),Glide的基本使用方法
转载请注明出处:http://blog.csdn.net/guolin_blog/article/details/53759439 本文同步发表于我的微信公众号.扫一扫文章底部的二维码或在微信搜索 郭 ...
- Android批量图片载入经典系列——afinal框架实现图片的异步缓存载入
一.问题描写叙述 在之前的系列文章中,我们使用了Volley和Xutil框架实现图片的缓存载入,接下来我们再介绍一下afinal 框架的使用. Afinal 是一个android的http框架.sql ...
- 一个方便的图片载入框架——ImageViewEx
我的博客:http://mrfufufu.github.io/ 一.前言 近期在整理项目中的一些代码,以备即将开展的新项目中使用,刚刚整理到一个图片载入的 lib.用起来很的简单,和 picasso ...
- Android Handler 异步消息处理机制的妙用 创建强大的图片载入类
转载请标明出处:http://blog.csdn.net/lmj623565791/article/details/38476887 ,本文出自[张鸿洋的博客] 近期创建了一个群.方便大家交流,群号: ...
- Android图片载入缓存框架Glide
Glide开源框架是Google推荐的图片载入和缓框架,其在Github上的开源地址是:https://github.com/bumptech/glide 当然一个Google推荐的框架肯定就是Vol ...
- 安卓图片载入之使用universalimageloader载入圆形圆角图片
前言 话说这universalimageloader载入图片对搞过2年安卓程序都是用烂了再熟悉只是了.就是安卓新手也是百度就会有一大堆东西出来,今天为什么这里还要讲使用universalimagelo ...
- Universal-Image-Loader(UIL)图片载入框架使用简介
这个也是近期项目中使用到的第三方图片载入框架.在这里也自己总结一下,简单的介绍一些使用的方式. UIL图片载入框架特点 简单介绍: 项目地址:https://github.com/nostra13/A ...
随机推荐
- Qt最好用评价最高的是哪个版本?
来源: http://www.qtcn.org/bbs/read-htm-tid-89455.html /// Qt4: 4.8.7 4.X 系列终结版本 Qt5 : 5.6 LT ...
- C++字节对齐(对象大小)
内部数据成员对齐参考这篇 https://www.cnblogs.com/area-h-p/p/10316128.html 这里只强调C++字节对齐特点 ①静态数据成员属于类域,在对象中不占大小 ②若 ...
- vim一键整理代码命令
vim下写代码超实用代码格式整理命令,仅需四步 ①先使用 gg 命令使光标回到第一行 ②shift+v 进入可视模式 ③shift+g 全选 ④按下 = 即可 混乱的代码格式 四步整理以后 工整又 ...
- 4.3 rust func closure
fn add_one_v1 (x: u32) -> u32 { x + 1 } let add_one_v2 = |x: u32| -> u32 { x + 1 }; let add_on ...
- ActiveRecord教程
(一.ActiveRecord基础) ActiveRecord是Rails提供的一个对象关系映射(ORM)层,从这篇开始,我们来了解Active Record的一些基础内容,连接数据库,映射表,访问数 ...
- 基于注解的方式搭建mybatis开发框架
1.创建工程 <groupId>com.hope</groupId> <artifactId>day01_eesy_01mybatis</artifa ...
- Leetcode 78题-子集
LeetCode 78 网上已经又很多解这题的博客了,在这只是我自己的解题思路和自己的代码: 先贴上原题: 我的思路: 我做题的喜欢在本子或别处做写几个示例,以此来总结规律:下图就是我从空数组到数组长 ...
- 通过静态分析和持续集成 保证代码的质量 (Helix QAC)1
前言 现代软件开发团队面临着很多挑战,这些挑战包括:产品交付期限越来越紧,团队的分布越来越广,软件的复杂度越来越高,而且对软件的质量要求越来越高. 本文分为两个章节.第一章讨论持续集成的原理,持续集成 ...
- 【CF1591】【数组数组】【逆序对】#759(div2)D. Yet Another Sorting Problem
题目:Problem - D - Codeforces 题解 此题是给数组排序的题,操作是选取任意三个数,然后交换他们,确保他们的位置会发生改变. 可以交换无限次,最终可以形成一个不下降序列就输出&q ...
- mysql的事务详解
事务及其ACID属性 事务是由一组SQL语句组成的逻辑处理单元,事务具有以下4个属性,通常简称为事务的ACID属性. 原子性(Atomicity) :事务是一个原子操作单元,其对数据的修改,要么全都执 ...