
C# NamePipe使用小结
最近在一次项目中使用到了C#中命名管道,所以在此写下一篇小结备忘。
为什么要使用命名管道呢?为了实现两个程序之间的数据交换。假设下面一个场景。在同一台PC上,程序A与程序B需要进行数据通信,此时我们就可以使用命名管道技术来实现。命名管道的两个对象。NamedPipeClientStream和 NamedPipeServerStream 对象。请求通信的一方为Client端,发送数据的一方为Server端。
使用NamedPipe来通信,如果Server端崩溃了,不会影响到客户端。
下面我们通过一个例子来说明:
Server端:
UI:
    <Grid>

        <Grid.RowDefinitions>

            <RowDefinition Height="*"/>

            <RowDefinition Height="Auto"/>

            <RowDefinition Height="Auto"/>

            <RowDefinition Height="*"/>

        </Grid.RowDefinitions>

        <Grid.ColumnDefinitions>

            <ColumnDefinition Width="Auto"/>

            <ColumnDefinition Width="*"/>

        </Grid.ColumnDefinitions>

        <TextBlock Text="Received Message:" Grid.Row="1" Margin="10"/>

        <TextBlock x:Name="tblRecMsg" VerticalAlignment="Center" Grid.Row="1" Grid.Column="1"/>

        <Button Content="Send" Grid.Row="2" Margin="10" Click="OnSend"/>

        <TextBox x:Name="txtSendMsg" VerticalAlignment="Center" Grid.Row="2" Grid.Column="1" Margin="10"/>

    </Grid>
Code:
private NamedPipeServerStream _pipe;

        private const string PipeName = "PipeSample";

        private const int PipeInBufferSize = 4096;

        private const int PipeOutBufferSize = 65535;

        private Encoding encoding = Encoding.UTF8;

        public MainWindow()

        {

            InitializeComponent();

            _pipe = new NamedPipeServerStream

            (

                PipeName,

                PipeDirection.InOut,

                1,

                PipeTransmissionMode.Message,

                PipeOptions.Asynchronous | PipeOptions.WriteThrough,

                PipeInBufferSize,

                PipeOutBufferSize

             );

            _pipe.BeginWaitForConnection(WaitForConnectionCallback, _pipe);

        }

        private void WaitForConnectionCallback(IAsyncResult ar)

        {

            var pipeServer = (NamedPipeServerStream)ar.AsyncState;

            pipeServer.EndWaitForConnection(ar);

            var data = new byte[PipeInBufferSize];

            var count = pipeServer.Read(data, 0, PipeInBufferSize);

            if (count > 0)

            {

                // 通信双方可以约定好传输内容的形式,例子中我们传输简单文本信息。

                string message = encoding.GetString(data, 0, count);

                Dispatcher.BeginInvoke(new Action(() =>

                {

                    tblRecMsg.Text = message;

                }));

            }

        }

        private void OnSend(object sender, RoutedEventArgs e)

        {

            if (_pipe.IsConnected)

            {

                try

                {

                    string message = txtSendMsg.Text;

                    byte[] data = encoding.GetBytes(message);

                    _pipe.Write(data, 0, data.Length);

                    _pipe.Flush();

                    _pipe.WaitForPipeDrain();

                }

                catch { }

            }

            Close();

        }
Client端:
UI:
    <Grid>

        <Grid.RowDefinitions>

            <RowDefinition Height="*"/>

            <RowDefinition Height="Auto"/>

            <RowDefinition Height="Auto"/>

            <RowDefinition Height="*"/>

        </Grid.RowDefinitions>

        <Grid.ColumnDefinitions>

            <ColumnDefinition Width="Auto"/>

            <ColumnDefinition Width="*"/>

        </Grid.ColumnDefinitions>

        <Button Content="Connect" Margin="10" Click="OnConnect"/>

        <TextBlock Text="Received Message:" Grid.Row="1" Margin="10"/>

        <TextBlock x:Name="tblRecMsg" Grid.Row="1" Grid.Column="1"/>

    </Grid>
Code:
private const string PipeServerName = "PipeServer.exe";

        private const string PipeName = "PipeSample";

        private Encoding encoding = Encoding.UTF8;

        private NamedPipeClientStream _pipe;

        private bool _starting = false;

        public MainWindow()

        {

            InitializeComponent();

        }

        private void OnConnect(object sender, RoutedEventArgs e)

        {

            if (_starting)

            {

                return;

            }

            var path = System.IO.Path.Combine(System.AppDomain.CurrentDomain.BaseDirectory, PipeServerName);

            var startInfo = new ProcessStartInfo(path)

            {

                UseShellExecute = false,

                CreateNoWindow = true

            };

            try

            {

                var process = Process.Start(startInfo);

                _pipe = new NamedPipeClientStream

                (

                    ".",

                    PipeName,

                    PipeDirection.InOut,

                    PipeOptions.Asynchronous | PipeOptions.WriteThrough

                );

                _pipe.Connect();

                _pipe.ReadMode = PipeTransmissionMode.Message;

                string message = "Connected!";

                byte[] data = encoding.GetBytes(message);

                _pipe.BeginWrite(data, 0, data.Length, PipeWriteCallback, _pipe);

                _starting = true;

            }

            catch (Exception ex)

            {

                Debug.Write(ex.StackTrace);

            }

        }

        private void PipeWriteCallback(IAsyncResult ar)

        {

            var pipe = (NamedPipeClientStream)ar.AsyncState;

            pipe.EndWrite(ar);

            pipe.Flush();

            pipe.WaitForPipeDrain();

            var data = new byte[65535];

            var count = pipe.Read(data, 0, data.Length);

            if (count > 0)

            {

                string message = encoding.GetString(data, 0, count);

                Dispatcher.BeginInvoke(new Action(() => {

                    tblRecMsg.Text = message;

                }));

            }

        }
需要注意的地方:因为我们在同一台PC上面进行通信,我们只需要将 NamedPipeClientStream 构造参数中pipeServer设为"."即可。另外因为这只是一个示例,所以PipeServer中只传递简单String类型。当然也可以传递其他类型的内容。
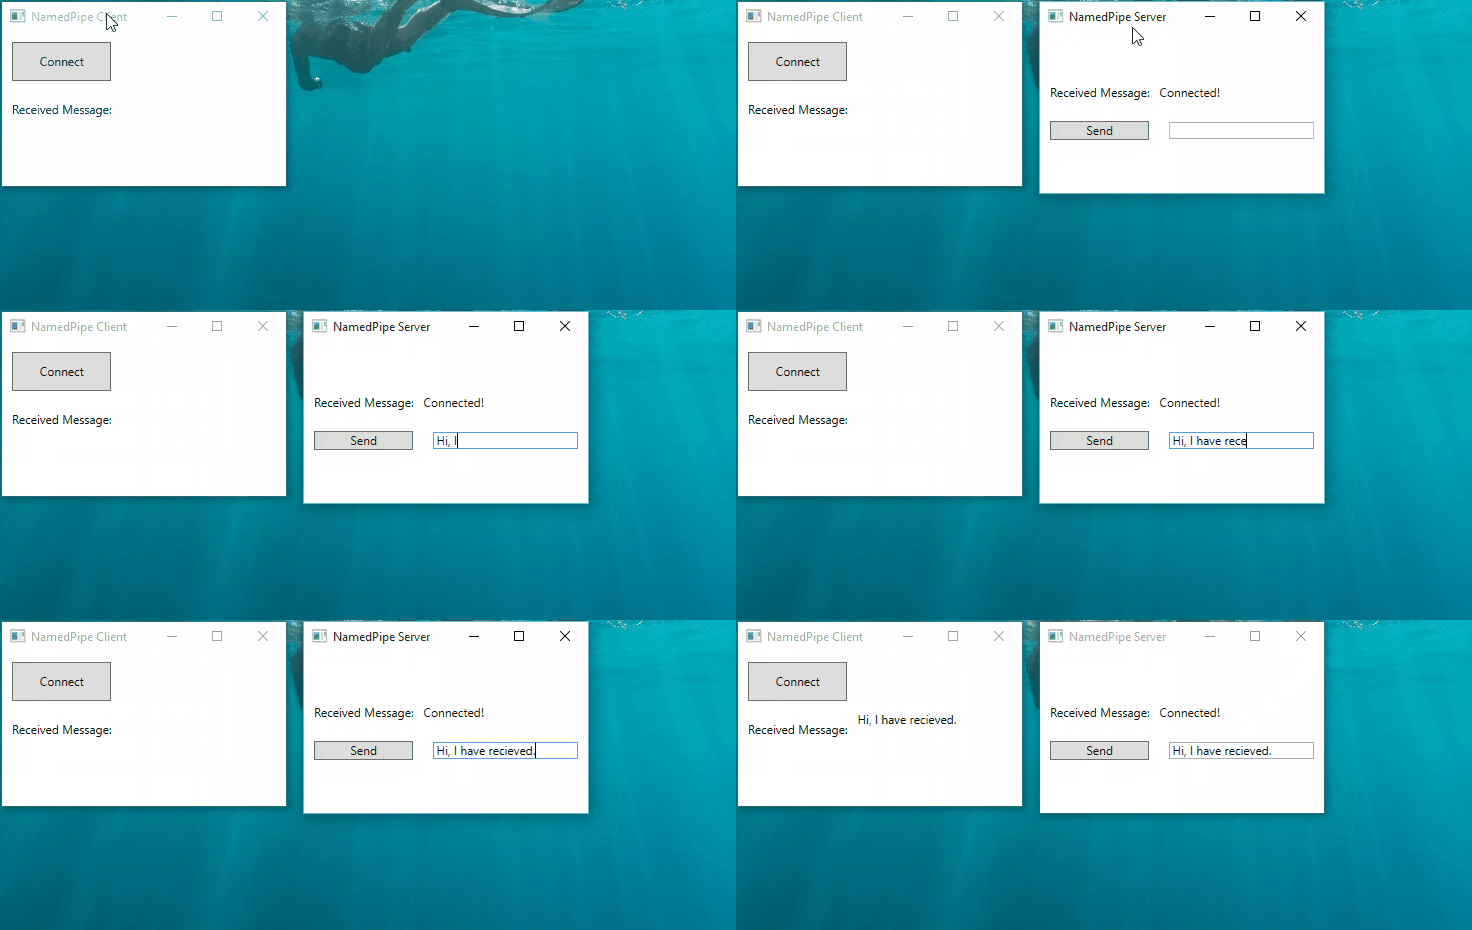
运行效果:
感谢您的阅读!
C# NamePipe使用小结的更多相关文章
- 从零开始编写自己的C#框架(26)——小结
一直想写个总结,不过实在太忙了,所以一直拖啊拖啊,拖到现在,不过也好,有了这段时间的沉淀,发现自己又有了小小的进步.哈哈...... 原想框架开发的相关开发步骤.文档.代码.功能.部署等都简单的讲过了 ...
- Python自然语言处理工具小结
Python自然语言处理工具小结 作者:白宁超 2016年11月21日21:45:26 目录 [Python NLP]干货!详述Python NLTK下如何使用stanford NLP工具包(1) [ ...
- java单向加密算法小结(2)--MD5哈希算法
上一篇文章整理了Base64算法的相关知识,严格来说,Base64只能算是一种编码方式而非加密算法,这一篇要说的MD5,其实也不算是加密算法,而是一种哈希算法,即将目标文本转化为固定长度,不可逆的字符 ...
- iOS--->微信支付小结
iOS--->微信支付小结 说起支付,除了支付宝支付之外,微信支付也是我们三方支付中最重要的方式之一,承接上面总结的支付宝,接下来把微信支付也总结了一下 ***那么首先还是由公司去创建并申请使用 ...
- iOS 之UITextFiled/UITextView小结
一:编辑被键盘遮挡的问题 参考自:http://blog.csdn.net/windkisshao/article/details/21398521 1.自定方法 ,用于移动视图 -(void)mov ...
- K近邻法(KNN)原理小结
K近邻法(k-nearst neighbors,KNN)是一种很基本的机器学习方法了,在我们平常的生活中也会不自主的应用.比如,我们判断一个人的人品,只需要观察他来往最密切的几个人的人品好坏就可以得出 ...
- scikit-learn随机森林调参小结
在Bagging与随机森林算法原理小结中,我们对随机森林(Random Forest, 以下简称RF)的原理做了总结.本文就从实践的角度对RF做一个总结.重点讲述scikit-learn中RF的调参注 ...
- Bagging与随机森林算法原理小结
在集成学习原理小结中,我们讲到了集成学习有两个流派,一个是boosting派系,它的特点是各个弱学习器之间有依赖关系.另一种是bagging流派,它的特点是各个弱学习器之间没有依赖关系,可以并行拟合. ...
- scikit-learn 梯度提升树(GBDT)调参小结
在梯度提升树(GBDT)原理小结中,我们对GBDT的原理做了总结,本文我们就从scikit-learn里GBDT的类库使用方法作一个总结,主要会关注调参中的一些要点. 1. scikit-learn ...
随机推荐
- POJ 2769
http://poj.org/problem?id=2796 题意:求n个数的和乘以这n个数中的最小值的积最大的数,以及其范围. 思路:求每一个数两边的比其大的数的和,再乘以这个数.还有一个范围,用单 ...
- Pywinauto在Windows Twain Driver自动化测试中的应用研究
摘 要: 以Python为基础,结合对Twain Driver测试工具的具体需求,将Pywinauto引入到Twain Driver的自动化测试中.介绍了Pywinauto的基本概念,通过测试用例说 ...
- ffmpeg-20160731-bin.7z
ESC 退出 0 进度条开关 1 屏幕原始大小 2 屏幕1/2大小 3 屏幕1/3大小 4 屏幕1/4大小 S 下一帧 [ -2秒 ] +2秒 ; -1秒 ' +1秒 下一个帧 -> -5秒 f ...
- ubuntu apc 安装
在ubuntu下安装APC,只需要两条命令,便可将APC和php绑一起. 安装代码: sudo apt-get install -y apache2-prefork-dev ...
- Ubuntu 配置 Tomcat
系统环境:Ubuntu 10.10(linux-kernel 2.6.35-22) 安装版本:apache-tomcat-7.0.29.tar.gz(官方网址:Apache Tomcat) 安装步骤: ...
- rabbitmq_hearbeat
heartbeat[心跳检测],用于报告客户端与服务器之间连接的一种检测机制.在rabbitmq中有Sender和consumer. 为了确保rabbitmq与客户端的状态,需启用heartbeat. ...
- Linux定时任务设定
使用crontab 命令进行设定. 详情可参见:http://blog.csdn.net/xiyuan1999/article/details/8160977. 共有6项构成,前5项为时间:分 时 天 ...
- 自定义Log模块
BuildConfig.DEBUG默认为true,在为app打上SignedKeyStore之后就为false, // Log控制器 MyLoger.openDebutLog(true); MyLog ...
- maximum subarray problem
In computer science, the maximum subarray problem is the task of finding the contiguous subarray wit ...
- Codeforces Round #371 (Div. 2)(set\unique)
B. Filya and Homework time limit per test 1 second memory limit per test 256 megabytes input standar ...