spring security 学习三-rememberMe
功能:登录时的“记住我”功能
原理:
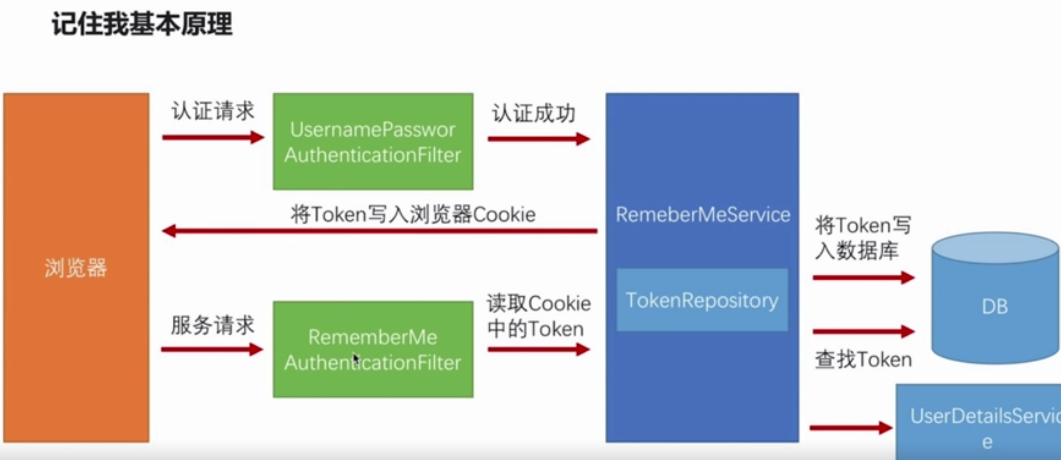
rememberMeAuthenticationFilter在security过滤器链中的位置,在请求走认证流程是,当前边的filter都不通过时,会走rememberMeAuthenticationFilter

代码:
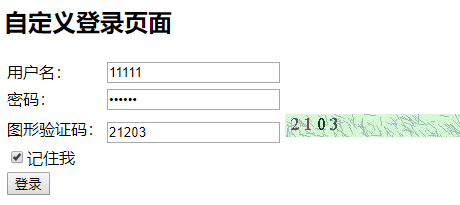
html:
<!DOCTYPE html>

<html lang="en">

<head>

    <meta charset="UTF-8">

    <title>自定义登录页面</title>

</head>

<body>

<h2>自定义登录页面</h2>

<form action="/authentication/form" method="POST">

    <table>

        <tr>

            <td>用户名:</td>

            <td><input type="text" name="username"></td>

        </tr>

        <tr>

            <td>密码:</td>

            <td><input type="password" name="password"></td>

        </tr>

        <tr>

            <td>图形验证码:</td>

            <td>

                <input type="text" name="imageCode">

                <img src="/code/image?width=200" alt="">

            </td>

        </tr>

        <tr>

            <td colspan="2"><!-- 其中的name值 remember-me 是固定不变的,security默认 -->

                <input type="checkbox" name="remember-me" value="true">记住我

            </td>

        </tr>

        <tr>

            <td colspan="2">

                <button type="submit">登录</button>

            </td>

        </tr>

    </table>

</form>

</body>

</html>
security配置:
  @Autowired

    private DataSource dataSource;//datasource 用的是springboot默认的application.yml中的配置

    @Autowired

    private UserDetailsService userDetailsService;

  @Bean

    public PersistentTokenRepository persistentTokenRepository() {

        JdbcTokenRepositoryImpl jdbcTokenRepository = new JdbcTokenRepositoryImpl();

        jdbcTokenRepository.setDataSource(dataSource);

        //自动创建相关的token表

        jdbcTokenRepository.setCreateTableOnStartup(true);

        return jdbcTokenRepository;

    }

  @Override

    protected void configure(HttpSecurity http) throws Exception {

        //用户可自定义、亦可以使用mysecurity默认的登录页

        String loginPage = securityProperties.getBrowser().getLoginPage();

        http.formLogin()

                .loginPage("/authentication/require").loginProcessingUrl("/authentication/form")

                .successHandler(custAuthenticationSuccessHandler)

                .failureHandler(custAuthenticationFailerHandler)

                .and()

                .rememberMe()

                .tokenRepository(persistentTokenRepository())//用于将token信息存储到数据库中

                .tokenValiditySeconds(3600)

                .userDetailsService(userDetailsService)//用于登录

                .and()

                .authorizeRequests()

                .antMatchers("/authentication/require", loginPage, "/code/image").permitAll()

                .anyRequest()

                .authenticated();

        http.csrf().disable();//暂时设为disable 防止跨站请求伪造的功能

    }
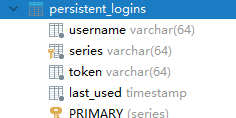
启动项目:(因配置了dbcTokenRepository.setCreateTableOnStartup(true) 所以会自动创建下表用于存储用户token信息)
页面:点击记住我后登录
登录成功之后会在persistent_login表中插入一条数据:

重启项目,直接访问资源路径:
http://localhost:8080/user/1
不需要跳转到登录页面,直接返回具体信息
源码:
UserNamePasswordAuthenticationFilter.class文件中的attempAuthentication方法
 public Authentication attemptAuthentication(HttpServletRequest request, HttpServletResponse response) throws AuthenticationException {

        if (this.postOnly && !request.getMethod().equals("POST")) {

            throw new AuthenticationServiceException("Authentication method not supported: " + request.getMethod());

        } else {

            String username = this.obtainUsername(request);

            String password = this.obtainPassword(request);

            if (username == null) {

                username = "";

            }

            if (password == null) {

                password = "";

            }

            username = username.trim();

            UsernamePasswordAuthenticationToken authRequest = new UsernamePasswordAuthenticationToken(username, password);

            this.setDetails(request, authRequest);

            return this.getAuthenticationManager().authenticate(authRequest);

        }

    }
查看其父类:
AbstractAuthenticationProcessingFilter类,this.attempAuthentication方法使用的是子类方法,也就是usernamepasswordauthenticationFilter类中的方法(上边的)
    public void doFilter(ServletRequest req, ServletResponse res, FilterChain chain) throws IOException, ServletException {

        HttpServletRequest request = (HttpServletRequest)req;

        HttpServletResponse response = (HttpServletResponse)res;

        if (!this.requiresAuthentication(request, response)) {

            chain.doFilter(request, response);

        } else {

            if (this.logger.isDebugEnabled()) {

                this.logger.debug("Request is to process authentication");

            }

            Authentication authResult;

            try {

                authResult = this.attemptAuthentication(request, response);

                if (authResult == null) {

                    return;

                }

                this.sessionStrategy.onAuthentication(authResult, request, response);

            } catch (InternalAuthenticationServiceException var8) {

                this.logger.error("An internal error occurred while trying to authenticate the user.", var8);

                this.unsuccessfulAuthentication(request, response, var8);

                return;

            } catch (AuthenticationException var9) {

                this.unsuccessfulAuthentication(request, response, var9);

                return;

            }

            if (this.continueChainBeforeSuccessfulAuthentication) {

                chain.doFilter(request, response);

            }

            this.successfulAuthentication(request, response, chain, authResult);

        }

    }
attempauthentication方法执行完之后,回到successfulAuthentication方法(也是AbstractAuthenticationProcessingFilter类),会有remberMeService类
    protected void successfulAuthentication(HttpServletRequest request, HttpServletResponse response, FilterChain chain, Authentication authResult) throws IOException, ServletException {

        if (this.logger.isDebugEnabled()) {

            this.logger.debug("Authentication success. Updating SecurityContextHolder to contain: " + authResult);

        }

        SecurityContextHolder.getContext().setAuthentication(authResult);

        this.rememberMeServices.loginSuccess(request, response, authResult);

        if (this.eventPublisher != null) {

            this.eventPublisher.publishEvent(new InteractiveAuthenticationSuccessEvent(authResult, this.getClass()));

        }

        this.successHandler.onAuthenticationSuccess(request, response, authResult);

    }
loginSuccess方法会进入AbstractRememberMeService抽象类中:
    public final void loginSuccess(HttpServletRequest request, HttpServletResponse response, Authentication successfulAuthentication) {

        if (!this.rememberMeRequested(request, this.parameter)) {

            this.logger.debug("Remember-me login not requested.");

        } else {

            this.onLoginSuccess(request, response, successfulAuthentication);

        }

    }
onLoginSuccess方法会进入PersistentTokenBaseRememberMeService类中(AbstractRememberMEService的子类)
    protected void onLoginSuccess(HttpServletRequest request, HttpServletResponse response, Authentication successfulAuthentication) {

        String username = successfulAuthentication.getName();

        this.logger.debug("Creating new persistent login for user " + username);

        PersistentRememberMeToken persistentToken = new PersistentRememberMeToken(username, this.generateSeriesData(), this.generateTokenData(), new Date());

        try {

            this.tokenRepository.createNewToken(persistentToken);

            this.addCookie(persistentToken, request, response);

        } catch (Exception var7) {

            this.logger.error("Failed to save persistent token ", var7);

        }

    }
这里的这个tokenRepository就是在配置文件中定义的persistentTokenRepository,addCookie方法会将token写到浏览器的cookie中,等下次请求的时候回自动带着token
下一次访问会进入到RememberAuthenticationFilter过滤器中:
    public void doFilter(ServletRequest req, ServletResponse res, FilterChain chain) throws IOException, ServletException {

        HttpServletRequest request = (HttpServletRequest)req;

        HttpServletResponse response = (HttpServletResponse)res;
     //判断context中是否已经有了一个认证的Authentication对象

        if (SecurityContextHolder.getContext().getAuthentication() == null) {
       //是否可以自动登录

            Authentication rememberMeAuth = this.rememberMeServices.autoLogin(request, response);

            if (rememberMeAuth != null) {

                try {

                    rememberMeAuth = this.authenticationManager.authenticate(rememberMeAuth);

                    //将一个已经认证的authentication对象放到context中
            SecurityContextHolder.getContext().setAuthentication(rememberMeAuth);

                    this.onSuccessfulAuthentication(request, response, rememberMeAuth);

                    if (this.logger.isDebugEnabled()) {

                        this.logger.debug("SecurityContextHolder populated with remember-me token: '" + SecurityContextHolder.getContext().getAuthentication() + "'");

                    }

                    if (this.eventPublisher != null) {

                        this.eventPublisher.publishEvent(new InteractiveAuthenticationSuccessEvent(SecurityContextHolder.getContext().getAuthentication(), this.getClass()));

                    }

                    if (this.successHandler != null) {

                        this.successHandler.onAuthenticationSuccess(request, response, rememberMeAuth);

                        return;

                    }

                } catch (AuthenticationException var8) {

                    if (this.logger.isDebugEnabled()) {

                        this.logger.debug("SecurityContextHolder not populated with remember-me token, as AuthenticationManager rejected Authentication returned by RememberMeServices: '" + rememberMeAuth + "'; invalidating remember-me token", var8);

                    }

                    this.rememberMeServices.loginFail(request, response);

                    this.onUnsuccessfulAuthentication(request, response, var8);

                }

            }

            chain.doFilter(request, response);

        } else {

            if (this.logger.isDebugEnabled()) {

                this.logger.debug("SecurityContextHolder not populated with remember-me token, as it already contained: '" + SecurityContextHolder.getContext().getAuthentication() + "'");

            }

            chain.doFilter(request, response);

        }

    }
autoLogin方法会进入到AbstractRememberMeService抽象类中:
    public final Authentication autoLogin(HttpServletRequest request, HttpServletResponse response) {

        String rememberMeCookie = this.extractRememberMeCookie(request);

        if (rememberMeCookie == null) {

            return null;

        } else {

            this.logger.debug("Remember-me cookie detected");

            if (rememberMeCookie.length() == 0) {

                this.logger.debug("Cookie was empty");

                this.cancelCookie(request, response);

                return null;

            } else {

                UserDetails user = null;

                try {

                    String[] cookieTokens = this.decodeCookie(rememberMeCookie);

                    user = this.processAutoLoginCookie(cookieTokens, request, response);

                    this.userDetailsChecker.check(user);

                    this.logger.debug("Remember-me cookie accepted");

                    return this.createSuccessfulAuthentication(request, user);

                } catch (CookieTheftException var6) {

                。。。。、。。。this.cancelCookie(request, response);

                return null;

            }

        }

    }
processAutoLoginCookie方法会走实现类PersistentTokenBasedRememberMeServices类中的方法:
    protected UserDetails processAutoLoginCookie(String[] cookieTokens, HttpServletRequest request, HttpServletResponse response) {

        if (cookieTokens.length != 2) {

            throw new InvalidCookieException("Cookie token did not contain 2 tokens, but contained '" + Arrays.asList(cookieTokens) + "'");

        } else {

            String presentedSeries = cookieTokens[0];

            String presentedToken = cookieTokens[1];

            PersistentRememberMeToken token = this.tokenRepository.getTokenForSeries(presentedSeries);

            if (token == null) {

                throw new RememberMeAuthenticationException("No persistent token found for series id: " + presentedSeries);

            } else if (!presentedToken.equals(token.getTokenValue())) {

                this.tokenRepository.removeUserTokens(token.getUsername());

                throw new CookieTheftException(this.messages.getMessage("PersistentTokenBasedRememberMeServices.cookieStolen", "Invalid remember-me token (Series/token) mismatch. Implies previous cookie theft attack."));

            } else if (token.getDate().getTime() + (long)this.getTokenValiditySeconds() * 1000L < System.currentTimeMillis()) {

                throw new RememberMeAuthenticationException("Remember-me login has expired");

            } else {

                if (this.logger.isDebugEnabled()) {

                    this.logger.debug("Refreshing persistent login token for user '" + token.getUsername() + "', series '" + token.getSeries() + "'");

                }

                PersistentRememberMeToken newToken = new PersistentRememberMeToken(token.getUsername(), token.getSeries(), this.generateTokenData(), new Date());

                try {

                    this.tokenRepository.updateToken(newToken.getSeries(), newToken.getTokenValue(), newToken.getDate());

                    this.addCookie(newToken, request, response);

                } catch (Exception var9) {

                    this.logger.error("Failed to update token: ", var9);

                    throw new RememberMeAuthenticationException("Autologin failed due to data access problem");

                }

                return this.getUserDetailsService().loadUserByUsername(token.getUsername());

            }

        }

    }
spring security 学习三-rememberMe的更多相关文章
- Spring Security 解析(三) —— 个性化认证 以及 RememberMe 实现
Spring Security 解析(三) -- 个性化认证 以及 RememberMe 实现 在学习Spring Cloud 时,遇到了授权服务oauth 相关内容时,总是一知半解,因此决定先把 ...
- SpringBoot + Spring Security 学习笔记(三)实现图片验证码认证
整体实现逻辑 前端在登录页面时,自动从后台获取最新的验证码图片 服务器接收获取生成验证码请求,生成验证码和对应的图片,图片响应回前端,验证码保存一份到服务器的 session 中 前端用户登录时携带当 ...
- SpringBoot + Spring Security 学习笔记(五)实现短信验证码+登录功能
在 Spring Security 中基于表单的认证模式,默认就是密码帐号登录认证,那么对于短信验证码+登录的方式,Spring Security 没有现成的接口可以使用,所以需要自己的封装一个类似的 ...
- [转]Spring Security学习总结二
原文链接: http://www.blogjava.net/redhatlinux/archive/2008/08/20/223148.html http://www.blogjava.net/red ...
- [转]Spring Security学习总结一
[总结-含源码]Spring Security学习总结一(补命名空间配置) Posted on 2008-08-20 10:25 tangtb 阅读(43111) 评论(27) 编辑 收藏 所属分 ...
- Spring security 学习 (自助者,天助之!)
自己努力,何必要强颜欢笑的求助别人呢? 手心向下不求人! Spring security学习有进展哦: 哈哈! 1.页面都是动态生产的吧! 2.设置权限: a:pom.xml配置jar包 b:cr ...
- Spring Security(三)
Spring Security(三) 个性化用户认证流程 自定义登录页面 在配置类中指定登录页面和接收登录的 url @Configuration public class BrowserSecuri ...
- 【权限管理系统】Spring security(三)---认证过程(原理解析,demo)
在前面两节Spring security (一)架构框架-Component.Service.Filter分析和Spring Security(二)--WebSecurityConfigurer配 ...
- spring security 学习资料
spring security 学习资料 网址 Spring Security 文档参考手册中文版 https://springcloud.cc/spring-security.html
随机推荐
- mysql常见的hint
mysql常用的hint对于经常使用oracle的朋友可能知道,oracle的hint功能种类很多,对于优化sql语句提供了很多方法.同样,在mysql里,也有类似的hint功能.下面介绍一些常用的. ...
- ThreadLocal的使用和理解
ThreadLocal是个threadlocalvariable(线程局部变量),其实就是为每一个使用该变量的线程都提供一个变量值的副本,从线程的角度看,每个线程都保持一个对其线程局部变量副本的隐式引 ...
- 力扣——Next Permutation(下一个排列) python实现
题目描述: 中文: 实现获取下一个排列的函数,算法需要将给定数字序列重新排列成字典序中下一个更大的排列. 如果不存在下一个更大的排列,则将数字重新排列成最小的排列(即升序排列). 必须原地修改,只允许 ...
- jQuery遍历之向上遍历
1.parent $(document).ready(function(){ $("a").parent().css({border:"4px solid black&q ...
- emoji处理方法
在做微信公众号开发时碰到了获取微信基本信息的需求,但是在像数据库保存用户昵称的时候出错了, 出错原因是微信用户的昵称中包含emoji等特殊符号,表情图片, mysql数据库使用的是utf8,最大存储3 ...
- 2018/8/26学习Mysql笔记
SELECT * FROM product; #.基本增删改查 #新增 #需求:添加一条数据到产品表 产品名称为苹果手机 卖价为5000 ); #删除 #需求:删除产品表中id=20的数据 ; #需求 ...
- numpy.unique
Find the unique elements of an array. Returns the sorted unique elements of an array. There are thre ...
- spring无法接收上传文件
现象 前端用ajax方式提交表单,代码类似于下面的例子. var formData = new FormData(); // HTML 文件类型input,由用户选择 formData.append( ...
- leetcode-165周赛-1277-统计全为1的正方形子矩阵
题目描述: 自己的提交: class Solution: def countSquares(self, matrix: List[List[int]]) -> int: if not matri ...
- PHP curl_multi_info_read函数
curl_multi_info_read — 获取当前解析的cURL的相关传输信息 说明 array curl_multi_info_read ( resource $mh [, int &$ ...