
Python PIL创建文字图片
PIL库中包含了很多模块,恰当地利用这些模块可以做许多图像处理方面的工作。
下面是我用来生成字母或字符串测试图片而写的类及测试代码。
主要用到的模块:
PIL.Image,PIL.ImageDraw,PIL.ImageFont
PIL.Image用来生成一个空的图片,ImageDraw用来在空图片上画图及写字符,ImageFont则是创建需要使用到的字体
主要用到的代码:
#创建一个空的图片

self.img = Image.new(self.imgMode, self.imgSize, self.bg_color)

self.drawBrush = ImageDraw.Draw(self.img)#创建画刷,用来写文字到图片img上

#创建字体,fontFile为字体文件,若非系统字体需加详细路径

self.font = ImageFont.truetype(fontFile,fontsize)

#使用特定字体写字,(textX0,textY0)为文字开始的左上角起始位置

self.drawBrush.text((textX0,textY0), self.letters, fill=self.fg_color,font=self.font)
详细代码:
#-*- coding:gb2312 -*-

from PIL import Image,ImageDraw,ImageFont,ImageOps

import numpy as np

import random

class LetterImage():

    def __init__(self,fontFile='',imgSize=(0,0),imgMode='RGB',bg_color=(0,0,0),fg_color=(255,255,255),fontsize=20):

        self.imgSize = imgSize

        self.imgMode = imgMode

        self.fontsize = fontsize

        self.bg_color = bg_color

        self.fg_color = fg_color

#         self.font = ImageFont.load('车牌字体.ttf')

        if ''==fontFile:

            self.font = ImageFont.truetype('DIN1451.ttf', fontsize)

        else:

            self.font = ImageFont.truetype(fontFile,fontsize)

    def GenLetterImage(self,letters):

        '''Generate the Image of letters'''

        self.letters = letters

        (self.letterWidth,self.letterHeight) = self.font.getsize(letters)

        if self.imgSize==(0,0):

            self.imgSize=(self.letterWidth+2,self.letterHeight+2)

        self.imgWidth,self.imgHeight=self.imgSize

        self.img = Image.new(self.imgMode, self.imgSize, self.bg_color)

        self.drawBrush = ImageDraw.Draw(self.img)

        textY0 = (self.imgHeight-self.letterHeight+1)/2

        textY0 = int(textY0)

        textX0 = int((self.imgWidth-self.letterWidth+1)/2)

        print 'text location:',(textX0,textY0)

        print 'text size (width,height):',self.letterWidth,self.letterHeight

        print 'img size(width,height):',self.imgSize

#         if textX0<0 or textY0<0:

#             raise Exception('size error text location x0:%d,y0:%d'%(textX0,textY0))

        self.drawBrush.text((textX0,textY0), self.letters, fill=self.fg_color,font=self.font)

    def SaveImg(self,saveName=''):

        if ''==saveName.strip():

            saveName = str(self.letters.encode('gb2312'))+'.png'

        fileName,file_format = saveName.split('.')

        fileName+='_'+str(self.fontsize)+'.'+file_format

        print fileName,file_format

        self.img.save(fileName, file_format)

    def Show(self):

        self.img.show()

def clearpictures():

    import os

    png = os.listdir(os.curdir)

    for i in png:

        if os.path.splitext(i)[1]==".png":

            os.remove(i)

if __name__=='__main__':

    letterList = []

    letterList.append(LetterImage(bg_color=(0,0,255),fontsize=10))

    letterList.append(LetterImage(fontFile='',bg_color=(0,0,255),fontsize=400))

    letter=[u'u',u'v']

    num_letter = 2

    svd_u=[]

    svd_s=[]

    svd_v=[]

    import cv2

    mergeImg = np.zeros((470,444))

    npareiImg =[]

    for i in range(num_letter):

        letterList[i].GenLetterImage(letter[i])

#         letterList[i].Show()

#         letterList[i].SaveImg()

        grayImg = ImageOps.grayscale(letterList[i].img)

        grayImg = grayImg.resize((222,470),resample=Image.BICUBIC)

        npareiImg.append( np.asarray(grayImg))

        cv2.namedWindow('%s'%i)

        cv2.imshow('%s'%i, npareiImg[i])

        mergeImg[0:470,i*222:(i+1)*222]=npareiImg[i]

        u,s,v=np.linalg.svd(npareiImg[i])

        print 'u and img \'s shape',u.shape,npareiImg[i].shape

        svd_u.append(u)

        svd_v.append(v)

        svd_s.append(s)

#     mergeImgNp=Image.fromarray(mergeImg)#, mode)

#     mergeImgNp.show()

    uDifNorm=np.linalg.norm(svd_u[0]-svd_u[1])

    print uDifNorm

    vDifNorm = np.linalg.norm(svd_v[0]-svd_v[1])

    print vDifNorm

    sDifNorm = np.linalg.norm(svd_s[0]-svd_s[1])

    print sDifNorm

    ou_norm = np.linalg.norm(np.asarray(npareiImg[0])-np.asarray(npareiImg[1]))

    print ou_norm

    f=open('record.txt','a')

    lines=[]

    lines.append('letters: %s,%s'%(letter[0],letter[1]))

    lines.append('SVD u diff norm:\t%f'%uDifNorm)

    lines.append('SVD v diff norm:\t%f'%vDifNorm)

    lines.append('SVD s diff norm:\t%f'%sDifNorm)

    lines.append('Ou norm:        \t%f'%ou_norm)

    str_to_write='\n'.join(lines)+'\n'

    print str_to_write

    f.write(str_to_write)

    f.close()

    cv2.waitKey()
上面的测试后部分是对图像做SVD变换的一点实验。
显示的结果(图像已经被resize到统一大小,代码中的字符图像类生成的图像其实会根据字体大小自动设定)
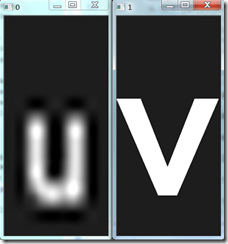
当然,生成这种测试图像也不一定就非得用PIL或者python,matlab中应该也可以,其实也就是先生成一个空的图像矩阵,然后调用写字符的函数在这个空图像上以特定的字体写上字符串罢了。
使用汉字字体时要注意的问题:
一般的做法是在文件开头的位置加上#-*- coding:gb2312 -*- 指定使用中文编码。这样一般不会有错。但有时可能我们需要对部分字符串转换编码,这时我们可利用字符对象的encode、decode方法。encode是对当前字符使用指定的编码方案重新编码。decode是使用指定的编码方案进行解码。两者都是码制的转换,但使用时往往容易弄错。encode其实是对本身为unicode的字符使用指定的编码方案进行编码,而decode则是使用指定编码将字符解码为unicode编码。所以在使用encode时,如果本身不是unicode码就会出错,在使用decode时,如果不知道本身所使用的编码方案也会出错.
Python PIL创建文字图片的更多相关文章
- 基于Python PIL实现简单图片格式转化器
基于Python PIL实现简单图片格式转化器 目录 基于Python PIL实现简单图片格式转化器 1.简介 2.前期资料准备 2.1.1如何实现图片格式转换? 2.1.2如何保存需要大小的图片? ...
- Python,PIL压缩裁剪图片
自己写了用来压缩 DC 照片的,批量处理整目录文件,非常方便.需要安装 PIL #!/usr/bin/env python import Image import os import os.path ...
- Python PIL模块笔记
利用python pil 实现给图片上添加文字 图片中添加文字#-*- coding: utf-8 -*- from PIL import Image,ImageDraw,ImageFont ttfo ...
- java生成竖排文字图片
package com.kadang.designer.web.action;import java.awt.Color;import java.awt.Font;import java.awt.Fo ...
- 基于PIL模块创建验证码图片
def get_valid_img(request): # 方式2:基于PIL模块创建验证码图片 from PIL import Image, ImageDraw, ImageFont from io ...
- Python批量创建word文档(2)- 加图片和表格
Python创建word文档,任务要求:小杨在一家公司上班,每天都需要给不同的客户发送word文档,以告知客户每日黄金价格.要求在文档开始处给出banner条,价格日期等用表格表示.最后贴上自己的联系 ...
- python PIL 图像处理操作
python PIL 图像处理 # 导入Image库 import Image # 读取图片 im = Image.open("1234.jpg") # 显示图片 im.show( ...
- Python简单的制作图片验证码
-人人可以学Python--这里示范的验证码都是简单的,你也可以把字符扭曲 人人可以学Python.png Python第三方库无比强大,PIL 是python的一个d第三方图片处理模块,我们也可以使 ...
- python PIL 图像处理
python PIL 图像处理 This blog is from: https://www.jianshu.com/p/e8d058767dfa Image读出来的是PIL的类型,而skimage. ...
随机推荐
- 1030: [JSOI2007]文本生成器 - BZOJ
Description JSOI交给队员ZYX一个任务,编制一个称之为“文本生成器”的电脑软件:该软件的使用者是一些低幼人群,他们现在使用的是GW文本生成器v6版.该软件可以随机生成一些文章―――总是 ...
- java.lang.NoSuchMethodError: javaxservlet.http.HttpServletRequest.isAsyncStarted()Z
鸣谢网址:http://stackoverflow.com/questions/25940571/java-lang-nosuchmethoderror-javaxservlet-http-https ...
- ExtJS4.2学习(八)表格限制输入数据的类型(转)
鸣谢:http://www.shuyangyang.com.cn/jishuliangongfang/qianduanjishu/2013-11-14/177.html --------------- ...
- jQuery.serializeArray() 函数详解
serializeArray()函数用于序列化一组表单元素,将表单内容编码为一个JavaScript数组. serializeArray()函数常用于将表单内容序列化为JSON对象,以便于被编码为JS ...
- [Jquery] js验证手机号
function checkIdPhone(id,idErr){ var reg0=/^(13[0-9]|15[012356789]|18[01235,idErr6789]|14[57]|17[0]) ...
- 如何在Ubuntu下启动Apache的Rewrite功能
在终端中执行 sudo a2enmod rewrite 指令后,即启用了 Mod_rewrite 模块. 另外,也可以通过将 /etc/apache2/mods-available/rewrite.l ...
- ubuntu12 开机自动转到命令行
命令: sudo gedit /etc/default/grub 找到这一行 GRUB_CMDLINE_LINUX_DEFAULT="quiet splash"改成 GRUB_CM ...
- Delphi里的RTTI与反射(举例换掉FOnChange)
Delphi2010之后的RTTI做了很大休整,现在用起来很爽了哦.甚至可以获取某些类的内部私有单元,然后为其赋值!讲这个RTTI增强的,可以参考网上的多个博客内容,我列举一下:Delphi2010R ...
- CityEngine 2013部署安装
安装环境: windows8.1 专业版 已安装arcgis10.2 2的授权方式也同样分为:单机许可和浮动 许可.单机许可是将许可部署在本机直接使用:浮动许可是部署到服务器上通过IP地址连接,可借出 ...
- POJ2531——Network Saboteur(随机化算法水一发)
Network Saboteur DescriptionA university network is composed of N computers. System administrators g ...