
Android01-布局篇
在Android中,共有五种布局方式,分别是:LinearLayout(线性布局),FrameLayout(帧布局),AbsoluteLayout(绝对布局),RelativeLayout(相对布局),
TableLayout(表格布局);还有一种,是在Android4.0以后出现的新布局:GridLayout(网袋布局)。下面简单介绍一下每个布局的特点。
一.线性布局:简单来说,这个布局就像它的名字一样,里面所有的控件的摆放方式都是像直线一样的摆放方式。要么垂直,要么水平。垂直或水平可以通过设置
android:orientation="vertical"属性来确定控件的摆放方式;vertical代表垂直,horizontal代表水平。当垂直布局时,每一行就只有一个控件,多个控件依次垂直往下;
水平布局时,只有一行,每一个控件依次向右排列。
LinearLayout里面还有一个特别的属性:android:layout_weight="1",这是设置控件的权重。举个列子:
<?xml version="1.0" encoding="utf-8"?>

<LinearLayout xmlns:android="http://schemas.android.com/apk/res/android"

    xmlns:tools="http://schemas.android.com/tools" android:id="@+id/activity_main"

    android:layout_width="match_parent" android:layout_height="match_parent"

    android:paddingBottom="@dimen/activity_vertical_margin"

    android:paddingLeft="@dimen/activity_horizontal_margin"

    android:paddingRight="@dimen/activity_horizontal_margin"

    android:paddingTop="@dimen/activity_vertical_margin"

    android:orientation="vertical"

    tools:context="temp.com.androidtouch.MainActivity">

    <Button

        android:layout_width="wrap_content"

        android:layout_height="wrap_content"

        android:text="按钮1"/>

    <Button

        android:layout_width="wrap_content"

        android:layout_height="wrap_content"

        android:text="按钮2"/>

</LinearLayout>
这是一个线性布局,里面控件的属性还没有给上权重,效果图如下:
aaarticlea/png;base64,iVBORw0KGgoAAAANSUhEUgAAAUgAAAGoCAMAAAATjoyDAAAAAXNSR0IArs4c6QAAADNQTFRF8/PzOEir4eLoampqMD6f19fXvb29+/v7PlC1AAAA////Xmy/jJbMr7bgjI2N9vf5PDw80lcjKQAABqlJREFUeNrt3IFy2jgUBVAhYUOwJPz/X7uSoW3a2XYT1kmDfV4zA3FpG5+R37sYTUNQSimllFJvqNH5gQQJEiRIpZTSQwwbkCBBgnR+Sik9xLABCfKtf2svjx9je9x2fd4Vt3HIAPKPdc55Otyf5/Yc5CN1yPHSK+ZmOeXT5VLyX4d8wh55uDEulIdjXp5c7+t0eZg68DmfP7VHPuOwKd8hy/E1ZI7l/hAOUyhhAvkfNdwdh+NryEOYGl08xOk45Hax5wLybRd3PPwEmU+lLcnp2CALyDcO7WvHW2b1K8h4PPfZ+XcgnzT+TA3vlnl+QE7hOMXjoV3XzbIpLqNc/PmPypd8/AXyWEJbjOE8xVDa1R/jGeRbJL89XpeSI//34Dkv9dffa7tpsRbkYdv1eZDnbRfIZ4MMG4cMIEHuE1KPBAkSJEiQpvZTxp+cf/kpXn8/3b4pZSpLTf/yY5cCsle8/Kxz+gnytPzm0CFjAPmHHjmdhgYxlWlZmTlPDbL0hZj7gan/Xs79JecSb2s0T/3ly2Jd/lAp/dDuh00Zclug0yWWaznnS4mXPF1OYWrfhqEdn6ZrHC7fIfundnFqh8/5urw8nst1+HVV7xHymvtXlynh3CzbpT1d+oHlYPtqh8/xO2Qo/Y/cIfvhOJXhl36wS8h8ybl53GWa3gI5LQduYr0F/ri0+ytiub/8xlcW271DDtcQrqfp3yGXp93vB2S3C98gO9807RgyvBo1eVlmd5kScrl9c45Dbhd1e9rX7PU7ZHtFbpP8VHK8vfz6BSH/QvzJy9MSe8xpz5cRk5fM054O0/l2fHg1tUuIfaSH2Htn/1D5DNI7G++13bQACRIkSPcjxR+QIOVIwwYkyLUgT9sukM8GGTYOGUCC3CekHgkSJEiQIE1t8WfPkNd3Fcjf9cgwvKuCHvkbyPg+yAgSJEiQe8qRW4QMXwCyLl/DMA79f1QF+Shkncc6pzrUVMe5zsNYE8hHemSda22Mw1zHIbVfNc165COQbRmmZjkMqa3MvhoryEcgxzl1wrYa25JMI8jH40+DTGl5XC5tkI9DjvPcpnUbNhXk41M71ZrGBbDN65RG8UcgB7mJHOm9NkiQIEGC/ICpfY2bc/S5Nkg5cptlExVIkO9tKCBXypH2/rj7AxKk+5Hea4P8KpD3vT/jOIx9zwXIByFT32mR0rJBoO/9qfNcQT6yZSWNY2prMtW6bBBolAnkA1N7vK/Ivn9qXjYHpGRqvx9yI3t/vkKO/LH3Z1y29c1y5IM9su/9qfe9K61HttIjH5nay96f2rc+P/HeH4EcJEiQ7v64jQYSpB758ZDX+K7yKaLPtUGC3FWO3GLZ1gdSjtQjQYIECRKkqS3+gASpRxo2IEGCBClHij8gQeqRhg1IkCBBypGmNkiQcqRhAxIkSJBypKkNEqQcqUeCBAkSJEhTW/wBKUfqkSBBggQJ0tQWf0CC1CMNG5AgQYKUI8UfkCD1SMMGJEiQIOVIUxskSDnSsAEJEiRIOdLUBglSjtQjQYIECRKkqS3+gJQj9UiQIEGCBGlqiz8gQeqRhg1IkCBBypHiD0iQeqRhAxIkSJBypKkNEqQcadiABAkSpBxpaoMEKUfqkSBBggQJ0tQWf0DKkXokSJAgQYI0tcUfkCD1SMMGJEiQIOVI8QckSD3SsAEJEiRIOdLUBglSjjRsQIIECVKONLVBgpQj9UiQIEGCBGlqiz8g5Ug9EiRIkCBBmtriD0iQeqRhAxIkSJBypPgDEqQeadiABAkSpBxpaoMEKUcaNiBBggQpR5raIEHKkXokSJAgQYI0tcUfkHKkHgkSJEiQIE1t8QckSD3SsAEJEiRIOVL8AQlSjzRsQIIECVKONLVBgpQjDRuQIEE+J+TLtuvzcuTGIQNIkPuE1CNBggQJ8n9DziDXmNpzjWmV00pDGOo6Qule8xPFnxprXQNyHsZ5nsdhjeWdxptjHZ8GMrXTf1kFcrwtxrpGX071G+iT5Mi2gLrhGpDzcH+yxpJ8K+RXGTb13tLWgPx27i+17hEygVzn0u4dcuVLe9zhpd1/1FhfVh02aXjZIOSb4s+wVvypc8uke40/y+heKZDXHshXeZc013ul57of+bRvEd2PdPcHJEiQIHd2P/KJy8exIPcAOfby+DG2Yds1bu4fAgkS5G/OLwW1RnHkuAfHvfXIFECucX4pgFzj/FIAucb5pQByjfNL5vaq85ojxz047qVHfvh63Ankx1/X+4D8hP64C8jPmDN7gDSvlVJqpfoHoCgNGqjo5VUAAAAASUVORK5CYIIA" alt="" />
当我给控件设置了权重之后:
<?xml version="1.0" encoding="utf-8"?>

<LinearLayout xmlns:android="http://schemas.android.com/apk/res/android"

    xmlns:tools="http://schemas.android.com/tools" android:id="@+id/activity_main"

    android:layout_width="match_parent" android:layout_height="match_parent"

    android:paddingBottom="@dimen/activity_vertical_margin"

    android:paddingLeft="@dimen/activity_horizontal_margin"

    android:paddingRight="@dimen/activity_horizontal_margin"

    android:paddingTop="@dimen/activity_vertical_margin"

    android:orientation="vertical"

    tools:context="temp.com.androidtouch.MainActivity">

    <Button

        android:layout_width="wrap_content"

        android:layout_height="wrap_content"

        android:text="按钮1"

        android:layout_weight="1"/>

    <Button

        android:layout_width="wrap_content"

        android:layout_height="wrap_content"

        android:text="按钮2"

        android:layout_weight="3"/>

</LinearLayout>
效果图如下:
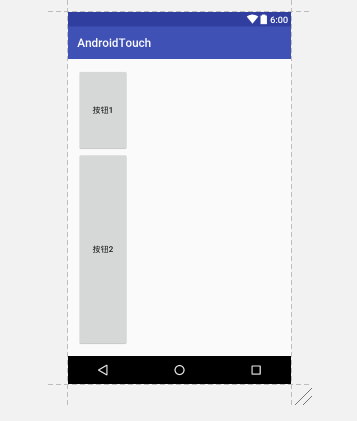
当我们设置了控件的权重之后,控件在整个布局里面所占的比例将会根据权重比来分配,权重是可以给小数的,但是我们基本上不会给。
权重是LinearLayout布局里的属性,其他的布局中不能使用。
二.帧布局:这是几个布局中最简单的一个布局,它会为每个添加进去的控件创建单独的帧,但是帧布局的摆放控件的方式是覆盖式的,就拿这段代码来说:
<?xml version="1.0" encoding="utf-8"?>

<FrameLayout xmlns:android="http://schemas.android.com/apk/res/android"

    xmlns:tools="http://schemas.android.com/tools" android:id="@+id/activity_main"

    android:layout_width="match_parent" android:layout_height="match_parent"

    android:paddingBottom="@dimen/activity_vertical_margin"

    android:paddingLeft="@dimen/activity_horizontal_margin"

    android:paddingRight="@dimen/activity_horizontal_margin"

    android:paddingTop="@dimen/activity_vertical_margin"

    android:orientation="vertical"

    tools:context="temp.com.androidtouch.MainActivity">

    <Button

        android:layout_width="wrap_content"

        android:layout_height="wrap_content"

        android:text="按钮1"

        android:layout_weight="1"/>

    <Button

        android:layout_width="wrap_content"

        android:layout_height="wrap_content"

        android:text="按钮2"

        android:layout_weight="3"/>

</FrameLayout>
当我把布局改为帧布局时
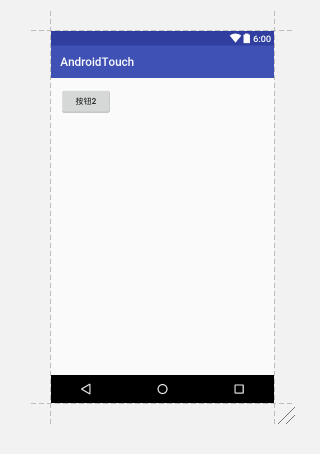
两个按钮就会重合在一起,第二个按钮会覆盖在第一个按钮之上。这就是帧布局唯一的特点。
三.绝对布局: AbsoluteLayout这个布局方式很简单,主要属性就两个: layout_x 和layout_y 控件依靠这两个属性来定义自己在布局中的X坐标和Y坐标。 以屏幕左上角为(0,0)的坐标轴的x,y值,当向下或向右移动时,坐标值将变大。AbsoluteLayout允许元素之间互相重叠。我们通常不推荐使用 AbsoluteLayout,因为AbsoluteLayout写出来的布局在不同的设备上使用时会变形,然后布局就会很丑。
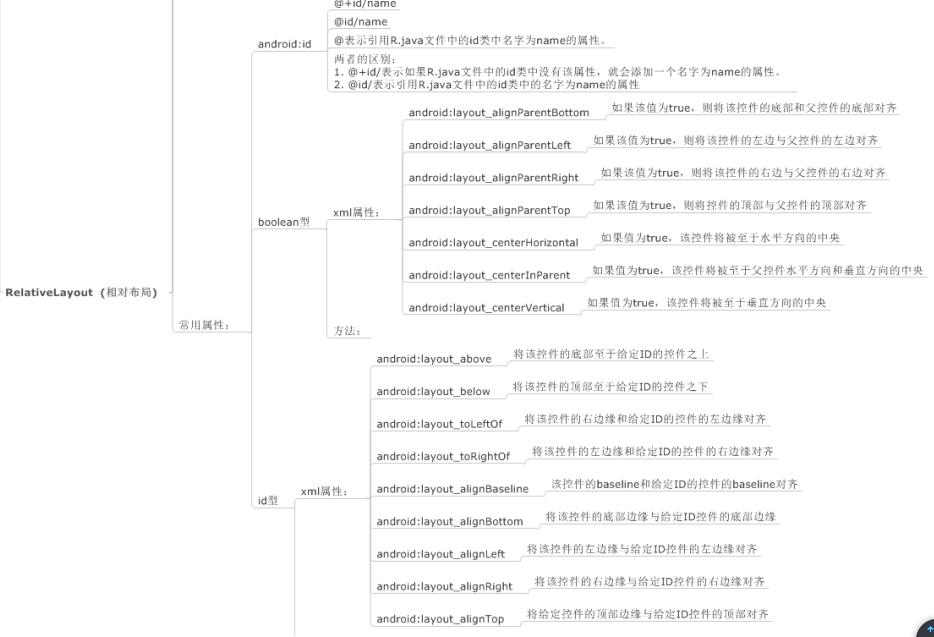
四.相对布局: RelativeLayout可以理解为某一个控件为参照物,来定位的布局方式,基本属性如下图:
五.表格布局:TableLayout类似Html里面的Table。每一个TableLayout里面有表格行TableRow,TableRow里面可以具体定义每一个控件。每个TableRow都会定义成一行。简单来说,TableLayout就是以一个<TableLayout></TableLayout>标签和多个<TableRow></TableRow>标签组成。布局里面有两个属性,一是 android:shrinkColumns="1"表示某列被收缩,另一个是android:stretchColumns="0"表示某列被拉伸,还有一个android:collapseColumns=""表示某列被隐藏。当然,在TableLayout里面可以合并行和和并列。
<?xml version="1.0" encoding="utf-8"?>

<LinearLayout xmlns:android="http://schemas.android.com/apk/res/android"

    android:layout_width="match_parent"

    android:layout_height="match_parent"

    android:orientation="vertical">

    <TextView

        android:layout_width="wrap_content"

        android:layout_height="wrap_content"

        android:text="表一 全局设置:列属性设置" />

    <TableLayout

        android:layout_width="wrap_content"

        android:layout_height="wrap_content"

        android:shrinkColumns="1"

        android:stretchColumns="0">

        <TableRow>

            <Button

                android:layout_width="wrap_content"

                android:layout_height="wrap_content"

                android:text="该列可伸展" />

            <Button

                android:layout_width="wrap_content"

                android:layout_height="wrap_content"

                android:text="该列可收缩" />

        </TableRow>

        <TableRow>

            <TextView

                android:layout_width="wrap_content"

                android:layout_height="wrap_content"

                android:text="我像行方向伸展,我可以很长很长很长很长" />

            <TextView

                android:layout_width="wrap_content"

                android:layout_height="wrap_content"

                android:text="我像列方向收缩,我可以很短很短很短很短" />

        </TableRow>

    </TableLayout>

    <TextView

        android:layout_width="wrap_content"

        android:layout_height="wrap_content"

        android:text="表二 单元格设置:指定属性单元格" />

    <TableLayout

        android:layout_width="350dp"

        android:layout_height="wrap_content"

        android:shrinkColumns="0,2"

        android:stretchColumns="1"

        >

        <TableRow>

            <Button

                android:layout_width="wrap_content"

                android:layout_height="wrap_content"

                android:text="第0列" />

            <Button

                android:layout_width="wrap_content"

                android:layout_height="wrap_content"

                android:text="第1列" />

            <Button

                android:layout_width="wrap_content"

                android:layout_height="wrap_content"

                android:text="第2列" />

        </TableRow>

        <TableRow>

            <TextView

                android:layout_width="wrap_content"

                android:layout_height="wrap_content"

                android:layout_column="1"

                android:text="我被指定在第一列" />

        </TableRow>

        <TableRow>

            <TextView

                android:layout_width="wrap_content"

                android:layout_height="wrap_content"

                android:layout_column="1"

                android:layout_span="2"

                android:text="我跨1列和2列 不信你看"

                />

        </TableRow>

    </TableLayout>

</LinearLayout>
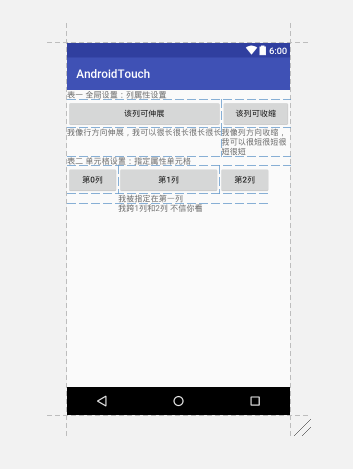
这是一个包含TableLayout里基本的属性的列子,效果图如下:
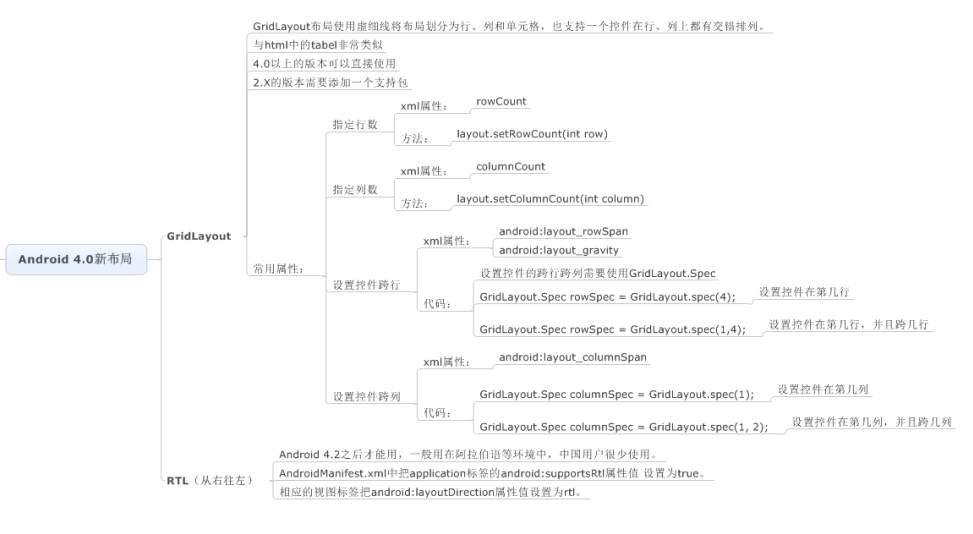
五个布局简单介绍完了,就只剩下最后一个,网袋布局。网袋布局较为灵活,基本属性如下图:
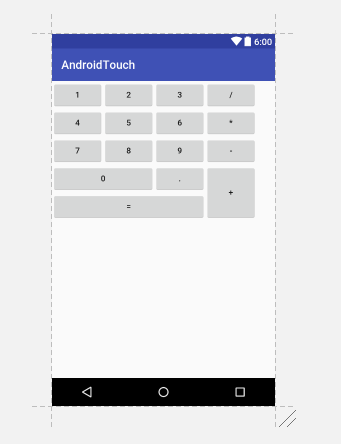
再举个用GridLayout写的比较简单的例子:
<?xml version="1.0" encoding="utf-8"?>

<GridLayout xmlns:android="http://schemas.android.com/apk/res/android"

    android:layout_width="match_parent"

    android:layout_height="match_parent"

    android:columnCount="4"

    android:orientation="horizontal"

    android:rowCount="6">

    <Button

        android:layout_width="wrap_content"

        android:layout_height="wrap_content"

        android:text="1" />

    <Button

        android:layout_width="wrap_content"

        android:layout_height="wrap_content"

        android:text="2" />

    <Button

        android:layout_width="wrap_content"

        android:layout_height="wrap_content"

        android:text="3" />

    <Button

        android:layout_width="wrap_content"

        android:layout_height="wrap_content"

        android:text="/" />

    <Button

        android:layout_width="wrap_content"

        android:layout_height="wrap_content"

        android:text="4" />

    <Button

        android:layout_width="wrap_content"

        android:layout_height="wrap_content"

        android:text="5" />

    <Button

        android:layout_width="wrap_content"

        android:layout_height="wrap_content"

        android:text="6" />

    <Button

        android:layout_width="wrap_content"

        android:layout_height="wrap_content"

        android:text="*" />

    <Button

        android:layout_width="wrap_content"

        android:layout_height="wrap_content"

        android:text="7" />

    <Button

        android:layout_width="wrap_content"

        android:layout_height="wrap_content"

        android:text="8" />

    <Button

        android:layout_width="wrap_content"

        android:layout_height="wrap_content"

        android:text="9" />

    <Button

        android:layout_width="wrap_content"

        android:layout_height="wrap_content"

        android:text="-" />

    <Button

        android:layout_width="wrap_content"

        android:layout_height="wrap_content"

        android:text="0"

        android:layout_columnSpan="2"

        android:layout_gravity="fill_horizontal"/>

    <Button

        android:layout_width="wrap_content"

        android:layout_height="wrap_content"

        android:text="." />

    <Button

        android:layout_width="wrap_content"

        android:layout_height="wrap_content"

        android:text="+"

        android:layout_rowSpan="2"

        android:layout_gravity="fill_vertical"/>

    <Button

        android:layout_width="wrap_content"

        android:layout_height="wrap_content"

        android:text="="

        android:layout_columnSpan="3"

        android:layout_gravity="fill_horizontal"/>

</GridLayout>
效果图如下:
布局就做了下简单的介绍,深入了解还是的靠自己。
第一次写博客,有很多考虑不周的地方,望各位博友多多指教。
Android01-布局篇的更多相关文章
- react-native 之布局篇
一.宽度单位和像素密度 react的宽度不支持百分比,设置宽度时不需要带单位,那么默认的单位是什么呢? /** * Sample React Native App * https://github.c ...
- 深入css布局篇(3)完结 — margin问题与格式化上下文
深入css布局(3) - margin问题与格式化上下文 在css知识体系中,除了css选择器,样式属性等基础知识外,css布局相关的知识才是css比较核心和重要的点.今天我们来深入学习一下 ...
- 深入css布局篇(2) — 定位与浮动
深入css布局(2) - 定位与浮动 在css知识体系中,除了css选择器,样式属性等基础知识外,css布局相关的知识才是css比较核心和重要的点.今天我们来深入学习一下css布局相关的知识 ...
- Angular Material 教程之布局篇
Angular Material 教程之布局篇 (一) : 布局简介https://segmentfault.com/a/1190000007215707 Angular Material 教程之布局 ...
- 【WPF】 布局篇
[WPF] 布局篇 一. 几个常用且至关重要的属性 1. Width,Height : 设置窗体,控件宽高. 这里注意,WPF是自适应的, 所以把这2个属性设置 Auto, 则控件宽高会自动改变. 2 ...
- 一步一步构建手机WebApp开发——页面布局篇
继上一篇:一步一步构建手机WebApp开发——环境搭建篇过后,我相信很多朋友都想看看实战案例,这一次的教程是页面布局篇,先上图: 如上图所示,此篇教程便是教初学者如何快速布局这样的页面.废话少说,直接 ...
- 使用wepy开发微信小程序商城第三篇:购物车(布局篇)
使用wepy开发微信小程序商城 第三篇:购物车(布局篇) 前两篇如下: 使用wepy开发微信小程序商城第一篇:项目初始化 使用wepy开发微信小程序商城第二篇:路由配置和页面结构 基于上两篇内容,开始 ...
- BFC之宽度自适应布局篇
说到自适应布局,我们曾在“抛砖引玉之宽度自适应布局”一文中学习过.当时的核心思想主要是利用float+margin的形式.利用块状元素的流体特性,然后计算出float元素的宽度,并赋予到块状元素的相应 ...
- Zara带你快速入门WPF(2)---布局篇
一.章节目标 这几章节我们会创建一个完整的Window程序,包括使用DataGrid空间,数据绑定是把.NET类中的数据提供给用户界面的一个重要概念,还允许修改数据,包括.NET4.5新增的INoti ...
- Android之微信布局篇
一.准备工作: 1. 下载好相关的图片: 2.创建一个名WeiChat的项目,将图片复制到res----->drawable-hdpi目录下. 二.编写代码: 1. 最终效果: 2.微信可划分为 ...
随机推荐
- 三分钟读懂TT猫分布式、微服务和集群之路
针对入门新手的普及,有过大型网站技术架构牛人路过,别耽误浪费了时间,阅读之前,请确保有一定的网络基础,熟练使用Linux,浏览大概需要3-5分钟的时间,结尾有彩蛋. 目录 分布式 微服务 负载均衡集群 ...
- 8.中断按键驱动程序之poll机制
本节继续在上一节中断按键程序里改进,添加poll机制. 那么我们为什么还需要poll机制呢.之前的测试程序是这样: ) { read(fd, &key_val, ); printf(" ...
- linux使用bbswitch+nvidia-xrun取代bumblebee
nvidia-xrun的比bumblebee使用nvidia optimus的性能更好,关键是xrun支持Vulkan. 本文保存并更新在github:levinit/itnotes/linux/ar ...
- 201521123055 《Java程序设计》第5周学习总结
1. 本章学习总结 2. 书面作业 Q1.代码阅读:Child压缩包内源代码 1.1 com.parent包中Child.java文件能否编译通过?哪句会出现错误?试改正该错误.并分析输出结果. 1. ...
- 201521123044 《Java程序设计》第5周学习总结
1. 本章学习总结 2. 书面作业 1. 代码阅读:Child压缩包内源代码 1.1 com.parent包中Child.java文件能否编译通过?哪句会出现错误?试改正该错误.并分析输出结果. 答: ...
- ubuntu下php不能显示中文的问题的解决过程。
在阿里的ECS上的ubuntu平台上成功的安装了apache2和php5与mysql,并进行了测试. 如图所示:
- 201521123030 《Java程序设计》 第13周学习总结
1. 本周学习总结 以你喜欢的方式(思维导图.OneNote或其他)归纳总结多网络相关内容. 2. 书面作业 1. 网络基础 1.1 比较ping www.baidu.com与ping cec.jmu ...
- 201521123070 《JAVA程序设计》第13周学习总结
1. 本章学习总结 以你喜欢的方式(思维导图.OneNote或其他)归纳总结多网络相关内容. 2. 书面作业 Q1. 网络基础 1.1 比较ping www.baidu.com与ping cec.jm ...
- 201521123014《Java程序设计》第13周学习总结
1. 本周学习总结 思维导图: 2. 书面作业 Q1. 网络基础 1.1 比较ping www.baidu.com与ping cec.jmu.edu.cn,分析返回结果有何不同?为什么会有这样的不同? ...
- Linux系统文件与目录权限管理
Linux文件目录权限管理 一.Linux文件属性及权限 1.Linux文件及目录权限及属性说明 (1)权限及属性说明 (2)文件权限说明 三种权限说明:r 读 read w 写 write x ...