【SpringBoot】整合Redis实战
========================9、SpringBoot2.x整合Redis实战 ================================
1、分布式缓存Redis介绍
简介:讲解为什么要用缓存和介绍什么是Redis,新手练习工具
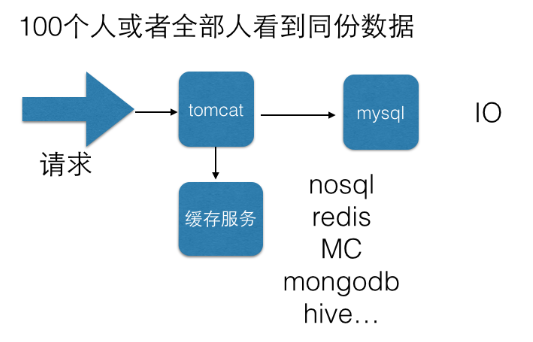
通过缓存减少数据库访问,提高访问速度
1、redis官网 https://redis.io/download
2、新手入门redis在线测试工具:http://try.redis.io/
2、源码编译安装Redis4.x
简介:使用源码安装Redis4.x和配置外网访问
1、快速安装 https://redis.io/download#installation
wget http://download.redis.io/releases/redis-4.0.9.tar.gz
tar xzf redis-4.0.9.tar.gz
cd redis-4.0.9
make
启动服务端:src/redis-server
启动客户端:src/redis-cli
2、默认是本地访问的,需要开放外网访问
1)打开redis.conf文件在NETWORK部分修改
注释掉bind 127.0.0.1可以使所有的ip访问redis
修改 protected-mode,值改为no
 查看当前占用端口
3、SpringBoot2.x整合redis实战讲解
简介:使用springboot-starter整合reids实战
1、官网:https://docs.spring.io/spring-boot/docs/2.1.0.BUILD-SNAPSHOT/reference/htmlsingle/#boot-features-redis
集群文档:https://docs.spring.io/spring-data/data-redis/docs/current/reference/html/#cluster
2、springboot整合redis相关依赖引入
<dependency>
<groupId>org.springframework.boot</groupId>
<artifactId>spring-boot-starter-data-redis</artifactId>
</dependency>
3、相关配置文件配置
#=========redis基础配置=========
spring.redis.database=0
spring.redis.host=127.0.0.1
spring.redis.port=6390
# 连接超时时间 单位 ms(毫秒)
spring.redis.timeout=3000
#=========redis线程池设置=========
# 连接池中的最大空闲连接,默认值也是8。
spring.redis.pool.max-idle=200
#连接池中的最小空闲连接,默认值也是0。
spring.redis.pool.min-idle=200
# 如果赋值为-1,则表示不限制;pool已经分配了maxActive个jedis实例,则此时pool的状态为exhausted(耗尽)。
spring.redis.pool.max-active=2000
# 等待可用连接的最大时间,单位毫秒,默认值为-1,表示永不超时
spring.redis.pool.max-wait=1000
4、常见redistemplate种类讲解和缓存实操(使用自动注入)
1、注入模板
@Autowired
private StirngRedisTemplate strTplRedis
2、类型String,List,Hash,Set,ZSet
对应的方法分别是opsForValue()、opsForList()、opsForHash()、opsForSet()、opsForZSet()
package com.atguigu.springboot.controller;

import org.json.JSONObject;

import org.springframework.beans.factory.annotation.Autowired;

import org.springframework.data.redis.core.StringRedisTemplate;

import org.springframework.web.bind.annotation.GetMapping;

import org.springframework.web.bind.annotation.RequestMapping;

import org.springframework.web.bind.annotation.RestController;

import com.atguigu.springboot.controller.domain.JsonData;

@RestController

@RequestMapping("/api/v1/redis")

public class RdisTestController {

    @Autowired

    private StringRedisTemplate redisTpl; //jdbcTemplate

    @GetMapping(value="add")

    public Object add(){

        //opsForValue : Returns the operations performed on simple values (or Strings in Redis terminology).

        redisTpl.opsForValue().set("name", "xdclass2018");

        return JsonData.buildSuccess();

    }

    @GetMapping(value="get")

    public Object get(){

        String value = redisTpl.opsForValue().get("name");

        return JsonData.buildSuccess(value);

    }

}
controller
4、Redis工具类封装讲解和实战
简介:高效开发方式 Redis工具类封装讲解和实战
1、常用客户端 https://redisdesktop.com/download
2、封装redis工具类并操作
utils用于 对象 转str str转对象
package net.xdclass.base_project.utils;

import java.io.IOException;

import org.springframework.util.StringUtils;

import com.fasterxml.jackson.databind.ObjectMapper;

public class JsonUtils {

    private static ObjectMapper objectMapper = new ObjectMapper();

    //对象转字符串

    public static <T> String obj2String(T obj){

        if (obj == null){

            return null;

        }

        try {

            return obj instanceof String ? (String) obj : objectMapper.writeValueAsString(obj);

        } catch (Exception e) {

            e.printStackTrace();

            return null;

        }

    }

    //字符串转对象

    public static <T> T string2Obj(String str,Class<T> clazz){

        if (StringUtils.isEmpty(str) || clazz == null){

            return null;

        }

        try {

            return clazz.equals(String.class)? (T) str :objectMapper.readValue(str,clazz);

        } catch (IOException e) {

            e.printStackTrace();

            return null;

        }

    }

}
utils
package net.xdclass.base_project.utils;

import org.springframework.beans.factory.annotation.Autowired;

import org.springframework.data.redis.core.StringRedisTemplate;

import org.springframework.stereotype.Component;

/**

 * 功能描述:redis工具类

 *

 * <p> 创建时间:Apr 29, 2018 10:07:30 PM </p>

 *

 *@作者 小D课堂  小D

 */

@Component

public class RedisClient {

    @Autowired

    private StringRedisTemplate redisTpl; //jdbcTemplate

    /**

     * 功能描述:设置key-value到redis中

     * @param key

     * @param value

     * @return

     */

    public boolean set(String key ,String value){

        try{

            redisTpl.opsForValue().set(key, value);

            return true;

        }catch(Exception e){

            e.printStackTrace();

            return false;

        }

    }

    /**

     * 功能描述:通过key获取缓存里面的值

     * @param key

     * @return

     */

    public String get(String key){

        return redisTpl.opsForValue().get(key);

    }

//    @Autowired

//    private StringRedisTemplate redisTemplate;

//

//

//     /**

//     * 通过字符串key获取值

//     * @param key 键

//     * @return 值

//     */

//    public String get(String key){

//        return key==null?null:redisTemplate.opsForValue().get(key);

//    }

//

//

//    /**

//     * 普通缓存放入

//     * @param key 键

//     * @param value 值

//     * @return true成功 false失败

//     */

//    public boolean set(String key,String value) {

//         try {

//            redisTemplate.opsForValue().set(key, value);

//            return true;

//        } catch (Exception e) {

//            e.printStackTrace();

//            return false;

//        }

//

//    }

//

//

//    /**

//     * 功能描述:设置某个key过期时间

//     * @param key

//     * @param time

//     * @return

//     */

//      public boolean expire(String key,long time){

//            try {

//                if(time>0){

//                    redisTemplate.expire(key, time, TimeUnit.SECONDS);

//                }

//                return true;

//            } catch (Exception e) {

//                e.printStackTrace();

//                return false;

//            }

//        }

//

//

//

//

//      /**

//       * 功能描述:根据key 获取过期时间

//       * @param key

//       * @return

//       */

//      public long getExpire(String key){

//            return redisTemplate.getExpire(key,TimeUnit.SECONDS);

//        }

//

//

//          /**

//         * 递增

//         * @param key 键

//         * @return

//         */

//        public long incr(String key, long delta){

//            return redisTemplate.opsForValue().increment(key, delta);

//        }

//

//

//        /**

//         * 递减

//         * @param key 键

//         * @param delta 要减少几

//         * @return

//         */

//        public long decr(String key, long delta){

//            return redisTemplate.opsForValue().increment(key, -delta);

//        }

//

//        //==============Map结构=====================

//

//

//        //==============List结构=====================

//

//

//

}
client
package net.xdclass.base_project.controller; import java.util.Date; import net.xdclass.base_project.domain.JsonData;
import net.xdclass.base_project.domain.User;
import net.xdclass.base_project.utils.JsonUtils;
import net.xdclass.base_project.utils.RedisClient; import org.springframework.beans.factory.annotation.Autowired;
import org.springframework.data.redis.core.StringRedisTemplate;
import org.springframework.web.bind.annotation.GetMapping;
import org.springframework.web.bind.annotation.RequestMapping;
import org.springframework.web.bind.annotation.RestController; @RestController
@RequestMapping("/api/v1/redis")
public class RdisTestController { @Autowired
private StringRedisTemplate redisTpl; //jdbcTemplate @Autowired
private RedisClient redis; @GetMapping(value="add")
public Object add(){ //redisTpl.opsForValue().set("name", "xdclass2018");
redis.set("username", "xddddddd");
return JsonData.buildSuccess(); } @GetMapping(value="get")
public Object get(){ //String value = redisTpl.opsForValue().get("name");
String value = redis.get("username");
return JsonData.buildSuccess(value); } @GetMapping(value="save_user")
public Object saveUser(){
User user = new User(1, "abc", "11", new Date());
String userStr = JsonUtils.obj2String(user);
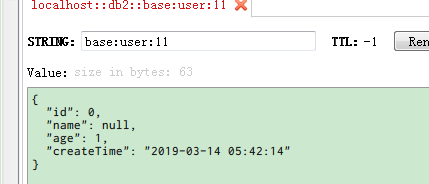
boolean flag = redis.set("base:user:11", userStr);
return JsonData.buildSuccess(flag); } @GetMapping(value="find_user")
public Object findUser(){ String userStr = redis.get("base:user:11");
User user = JsonUtils.string2Obj(userStr, User.class); return JsonData.buildSuccess(user); } }
controller

test单元测试
package base_project.base;

import net.xdclass.base_project.XdclassApplication;

import net.xdclass.base_project.domain.User;

import net.xdclass.base_project.utils.JsonUtils;

import net.xdclass.base_project.utils.RedisClient;

import org.junit.Test;

import org.junit.runner.RunWith;

import org.springframework.beans.factory.annotation.Autowired;

import org.springframework.boot.test.context.SpringBootTest;

import org.springframework.data.redis.core.StringRedisTemplate;

import org.springframework.test.context.junit4.SpringRunner;

@RunWith(SpringRunner.class)  //底层用junit  SpringJUnit4ClassRunner

@SpringBootTest(classes={XdclassApplication.class})//启动整个springboot工程

public class JsonTest {

    @Autowired

    private StringRedisTemplate strTpl;

    @Autowired

    private RedisClient redis;

    @Test

    public void testOne(){

        User u = new User();

        u.setAge(1);

        u.setPhone("22222");

        u.setPwd("0000");

        String str = JsonUtils.obj2String(u);

        strTpl.opsForValue().set("str", str);

        System.out.println(str);

    }

}
test
【SpringBoot】整合Redis实战的更多相关文章
- SpringBoot整合Redis、mybatis实战,封装RedisUtils工具类,redis缓存mybatis数据 附源码
创建SpringBoot项目 在线创建方式 网址:https://start.spring.io/ 然后创建Controller.Mapper.Service包 SpringBoot整合Redis 引 ...
- SpringBoot2.x整合Redis实战 4节课
1.分布式缓存Redis介绍 简介:讲解为什么要用缓存和介绍什么是Redis,新手练习工具 1.redis官网 https://redis.io/download 2.新手 ...
- springboot整合redis——redisTemplate的使用
一.概述 相关redis的概述,参见Nosql章节 redisTemplate的介绍,参考:http://blog.csdn.net/ruby_one/article/details/79141940 ...
- 小D课堂 - 零基础入门SpringBoot2.X到实战_第9节 SpringBoot2.x整合Redis实战_39、SpringBoot2.x整合redis实战讲解
笔记 3.SpringBoot2.x整合redis实战讲解 简介:使用springboot-starter整合reids实战 1.官网:https://docs.spring.io/spring-bo ...
- SpringBoot整合Redis、ApachSolr和SpringSession
SpringBoot整合Redis.ApachSolr和SpringSession 一.简介 SpringBoot自从问世以来,以其方便的配置受到了广大开发者的青睐.它提供了各种starter简化很多 ...
- SpringBoot整合Redis及Redis工具类撰写
SpringBoot整合Redis的博客很多,但是很多都不是我想要的结果.因为我只需要整合完成后,可以操作Redis就可以了,并不需要配合缓存相关的注解使用(如@Cacheable). ...
- SpringBoot 整合 Redis缓存
在我们的日常项目开发过程中缓存是无处不在的,因为它可以极大的提高系统的访问速度,关于缓存的框架也种类繁多,今天主要介绍的是使用现在非常流行的NoSQL数据库(Redis)来实现我们的缓存需求. Spr ...
- SpringBoot系列十:SpringBoot整合Redis
声明:本文来源于MLDN培训视频的课堂笔记,写在这里只是为了方便查阅. 1.概念:SpringBoot 整合 Redis 2.背景 Redis 的数据库的整合在 java 里面提供的官方工具包:jed ...
- springboot整合redis(注解形式)
springboot整合redis(注解形式) 准备工作 springboot通常整合redis,采用的是RedisTemplate的形式,除了这种形式以外,还有另外一种形式去整合,即采用spring ...
随机推荐
- 一键清空Form表单数据
今天在工作项目调试bug当中,遇到这样的需求:页面上的数据太多,一个一个清空太繁琐,所以就采用全部清空的写法: $(':input','#myform').not(':button, :submit, ...
- Entity FrameWork 增删改查
Entity Framework (又称ADO.NET Entity Framework) 是微软以 ADO.NET 为基础所发展出来的对象关系对应(O/R Mapping) 解决方案 ...
- Hibernate向数据库存入BLOB和CLOB类型的数据
我选用的是byte[] +@Lob 刚开始采用的java.sql.Blob,将上传的图片getBytes()后,通过Hibernate.getLobCreator(HibernateSessionFa ...
- 文献导读 | A Pan-Cancer Analysis of Enhancer Expression in Nearly 9000 Patient Samples
Chen, H., Li, C., Peng, X., Zhou, Z., Weinstein, J.N., Liang, H. and Cancer Genome Atlas Research Ne ...
- Petrozavodsk Winter Camp, Andrew, 2014, Bipartite Bicolored Graphs
由i个点和j个点组成的二分图个数为 $3^{ij}$,减去不联通的部分得到得到由i,j个点组成的联通二分图个数 $g_{i,j} = 3_{ij} - \sum_{k=1}^i \sum_{l=0}^ ...
- js 里面的那些节省字节的写法 a|0 void 0等等
//取整 parseInt(a,10); Math.floor(a); ~~a; //节省之后的写法 a|0; //节省之后的写法 //四舍五入 Math.round(a); a+.5|0; //节省 ...
- less的基本语法
参考:http://old.zhufengpeixun.cn/qianduanjishuziliao/mobileDevelopment/2016-07-22/528.html
- 多线程thread的使用
1.thread是多线程,凡是thread的子类都是一个线程. 2.thread必须调用start方法进开启线程,不能直接调用Runnable中的run方法,因为直接调用run方法没有创建新的线程,就 ...
- python scrapy同时执行spiders多个爬虫
假设spiders文件夹下多个文件: name.py name = 'name' name1.py name = 'name1' name2.py name = 'name2' . ...
- coursera-斯坦福-机器学习-吴恩达-笔记week2
1 多元线性回归 1.1 假设函数 多元线性回归是指有多个特征特征变量的情况.此时我们修改假设函数hθ(x)=θ0+θ1∗x为hθ(x)=θ0+θ1x1+θ2x2+⋯+θnxn.设x0=1,x为特征向 ...