Apollo源码阅读笔记(一)
Apollo源码阅读笔记(一)
先来一张官方客户端设计图,方便我们了解客户端的整体思路。

我们在使用Apollo的时候,需要标记@EnableApolloConfig来告诉程序开启apollo配置,所以这里就以EnableApolloConfig为入口,来看下apollo客户端的实现逻辑。关于apollo的使用方法详见 这里
1. 入口 @EnableApolloConfig 注解
@EnableApolloConfig(value={"application","test-yejg"})
默认的namespace是application;
通过@EnableApolloConfig注解,引入了ApolloConfigRegistrar
public class ApolloConfigRegistrar implements ImportBeanDefinitionRegistrar {

  @Override

  public void registerBeanDefinitions(AnnotationMetadata importingClassMetadata, BeanDefinitionRegistry registry) {

    AnnotationAttributes attributes = AnnotationAttributes.fromMap(importingClassMetadata.getAnnotationAttributes(EnableApolloConfig.class.getName()));

    String[] namespaces = attributes.getStringArray("value");

    int order = attributes.getNumber("order");

	// 暂存需要关注的namespaces,后面在PropertySourcesProcessor中会把配置属性加载env中

    PropertySourcesProcessor.addNamespaces(Lists.newArrayList(namespaces), order);

    Map<String, Object> propertySourcesPlaceholderPropertyValues = new HashMap<>();

    // to make sure the default PropertySourcesPlaceholderConfigurer's priority is higher than PropertyPlaceholderConfigurer

    propertySourcesPlaceholderPropertyValues.put("order", 0);

    BeanRegistrationUtil.registerBeanDefinitionIfNotExists(registry, PropertySourcesPlaceholderConfigurer.class.getName(), PropertySourcesPlaceholderConfigurer.class, propertySourcesPlaceholderPropertyValues);

    BeanRegistrationUtil.registerBeanDefinitionIfNotExists(registry, PropertySourcesProcessor.class.getName(), PropertySourcesProcessor.class);

    BeanRegistrationUtil.registerBeanDefinitionIfNotExists(registry, ApolloAnnotationProcessor.class.getName(), ApolloAnnotationProcessor.class);

    BeanRegistrationUtil.registerBeanDefinitionIfNotExists(registry, SpringValueProcessor.class.getName(), SpringValueProcessor.class);

    BeanRegistrationUtil.registerBeanDefinitionIfNotExists(registry, SpringValueDefinitionProcessor.class.getName(), SpringValueDefinitionProcessor.class);

    BeanRegistrationUtil.registerBeanDefinitionIfNotExists(registry, ApolloJsonValueProcessor.class.getName(), ApolloJsonValueProcessor.class);

  }

}
注意上面代码中,通过PropertySourcesProcessor.addNamespaces暂存了namespaces,下面就先沿着 PropertySourcesProcessor来展开
2. 配置设置到environment的过程
PropertySourcesProcessor实现了BeanFactoryPostProcessor,并能获取到env
public class PropertySourcesProcessor implements BeanFactoryPostProcessor, EnvironmentAware, PriorityOrdered{

    ...

}
在Spring应用启动的时候
refresh() –> invokeBeanFactoryPostProcessors(beanFactory) –> PropertySourcesProcessor.postProcessBeanFactory
—> initializePropertySources();
—> initializeAutoUpdatePropertiesFeature(beanFactory);
就这样,Apollo的PropertySourcesProcessor就被调用起来了。
在它的postProcessBeanFactory方法中依次调用initializePropertySources和initializeAutoUpdatePropertiesFeature,先来看initializePropertySources做了啥事情:
将NAMESPACE_NAMES (Multimap<Integer, String>)排序;
遍历排序后的namespaces,依次调用 ConfigService.getConfig(namespace) 获取配置信息Config;
将config封装成ConfigPropertySource[Apollo的],保存到CompositePropertySource[spring-core的];
此composite名为 ApolloPropertySources
ConfigPropertySource继承自spring-core的EnumerablePropertySource
代码:composite.addPropertySource(XXX);
循环处理完 NAMESPACE_NAMES 之后,将其清空掉;
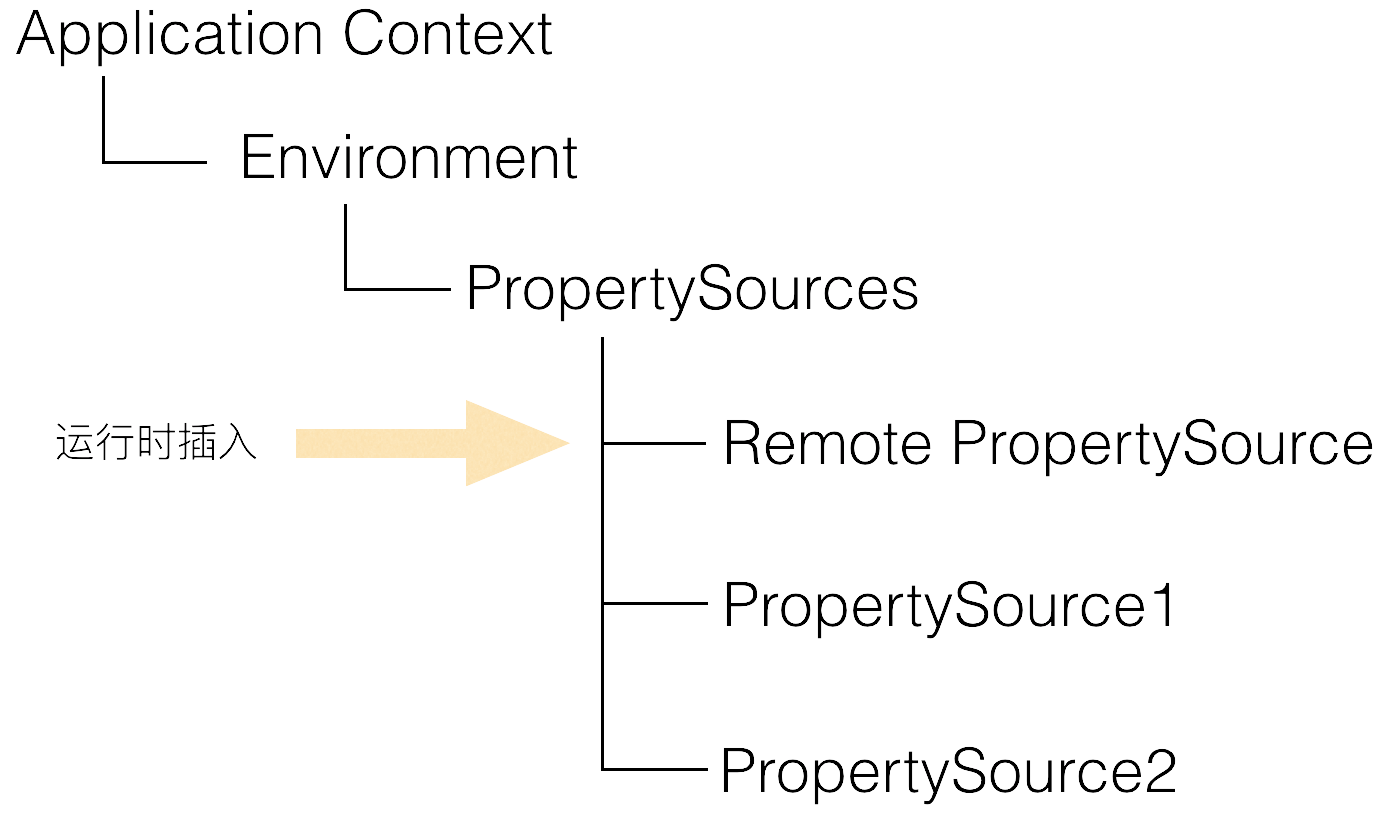
将前面循环处理好的compositePropertySource加入到env中;
加到env时,判断env中是否存在 ApolloBootstrapPropertySources是否存在,确保其在第一的位置,而前面循环处理得到的ApolloPropertySources紧随其后。
相关代码:
environment.getPropertySources().addAfter(“XXX source name”, composite);
environment.getPropertySources().addFirst(composite);
这部分的逻辑,其实就是佐证了Apollo的设计思路 。
盗用官方的一张图来简单说明这个流程:
Apollo源码阅读笔记(一)的更多相关文章
- Apollo源码阅读笔记(二)
Apollo源码阅读笔记(二) 前面 分析了apollo配置设置到Spring的environment的过程,此文继续PropertySourcesProcessor.postProcessBeanF ...
- CI框架源码阅读笔记5 基准测试 BenchMark.php
上一篇博客(CI框架源码阅读笔记4 引导文件CodeIgniter.php)中,我们已经看到:CI中核心流程的核心功能都是由不同的组件来完成的.这些组件类似于一个一个单独的模块,不同的模块完成不同的功 ...
- CI框架源码阅读笔记4 引导文件CodeIgniter.php
到了这里,终于进入CI框架的核心了.既然是“引导”文件,那么就是对用户的请求.参数等做相应的导向,让用户请求和数据流按照正确的线路各就各位.例如,用户的请求url: http://you.host.c ...
- CI框架源码阅读笔记3 全局函数Common.php
从本篇开始,将深入CI框架的内部,一步步去探索这个框架的实现.结构和设计. Common.php文件定义了一系列的全局函数(一般来说,全局函数具有最高的加载优先权,因此大多数的框架中BootStrap ...
- CI框架源码阅读笔记2 一切的入口 index.php
上一节(CI框架源码阅读笔记1 - 环境准备.基本术语和框架流程)中,我们提到了CI框架的基本流程,这里再次贴出流程图,以备参考: 作为CI框架的入口文件,源码阅读,自然由此开始.在源码阅读的过程中, ...
- 源码阅读笔记 - 1 MSVC2015中的std::sort
大约寒假开始的时候我就已经把std::sort的源码阅读完毕并理解其中的做法了,到了寒假结尾,姑且把它写出来 这是我的第一篇源码阅读笔记,以后会发更多的,包括算法和库实现,源码会按照我自己的代码风格格 ...
- Three.js源码阅读笔记-5
Core::Ray 该类用来表示空间中的“射线”,主要用来进行碰撞检测. THREE.Ray = function ( origin, direction ) { this.origin = ( or ...
- PHP源码阅读笔记一(explode和implode函数分析)
PHP源码阅读笔记一一.explode和implode函数array explode ( string separator, string string [, int limit] )此函数返回由字符 ...
- AQS源码阅读笔记(一)
AQS源码阅读笔记 先看下这个类张非常重要的一个静态内部类Node.如下: static final class Node { //表示当前节点以共享模式等待锁 static final Node S ...
随机推荐
- 记录使用 Cake 进行构建并制作 nuget 包
书接上一回(https://www.cnblogs.com/h82258652/p/4898983.html)?[手动狗头] 前段时间折腾了一下,总算是把我自己的图片缓存控件(https://gith ...
- vuejs-devtools
先看看http://www.cnblogs.com/zhnaglei/p/7121482.html 这里的方法. 如果出现vue.js not detected之类的错误.试试用调试模式,就是用npm ...
- [算法专题] 二分搜索&排序数组
基础知识 二分非递归写法: int binary_search(const int a[], const int size, const int val) { int lower = 0; int u ...
- 接之前的文章,VS2017中使用Spring.NET配置以及使用方法(framework4.6.1超详细)
众所周知,Spring在java中是很常见的框架,Spring.Net虽然体积比较大,但是功能相对齐全,本文介绍在VS2017 .Net FrameWork 4.6.1环境下,如何快速使用Spring ...
- 背水一战 Windows 10 (91) - 文件系统: Application Data 中的文件操作, Application Data 中的“设置”操作, 通过 uri 引用 Application Data 中的媒体
[源码下载] 背水一战 Windows 10 (91) - 文件系统: Application Data 中的文件操作, Application Data 中的“设置”操作, 通过 uri 引用 Ap ...
- 突然 不能f**q
ss 突然访问不了,于是去查看ip是否被f,发现国outer 国inner 都通,不知道什么情况,后来把 系统代理模式 改为全局,发觉可以,又把他改为 pac模式,正常了. 记录一 ...
- Typescript 学习笔记五:类
中文网:https://www.tslang.cn/ 官网:http://www.typescriptlang.org/ 目录: Typescript 学习笔记一:介绍.安装.编译 Typescrip ...
- Java中的引用传递和值传递
Java中的引用传递和值传递 关于Java的引用传递和值传递,在听了老师讲解后,还是没有弄清楚是怎么一回事,于是查了资料,所以在这里与大家分享,有不对的地方,欢迎大家留言. java中是没有指针的,j ...
- Python常用模块——json & pickle
序列化模块 1.什么是序列化-------将原本的字典,列表等对象转换成一个字符串的过程就叫做序列化 2.序列化的目的 1.以某种存储形式使自定义对象持久化 2.将对象从一个地方传递到另一个地方 3. ...
- Django+JWT实现Token认证
对外提供API不用django rest framework(DRF)就是旁门左道吗? 基于Token的鉴权机制越来越多的用在了项目中,尤其是对于纯后端只对外提供API没有web页面的项目,例如我们通 ...