SystemVerilog Tutorial
1.网站说明-tutorial
This SystemVerilog tutorial is written to help engineers with background in Verilog/VHDL to get jump start in SystemVerilog design and Verification. In case you find any mistake, please do let me know. I always love to hear about mistakes in my website.
As such this tutorial assumes that, you are already familiar with Verilog and bit of C/C++ language. If you are not well versed with verilog, you can refer to verilog section or go through the Verilog basics tutorial below.
Currently this website is getting more than 3 million hits every month.
总结就是网站帮助具有Verilog或VHDL背景的人员快速学习使用SystemVerilog来设计和验证.假想读者已经熟悉Verilog或者C/C++,否则可以先看看Verilog基础部分——verilog basic
2.SystemVerilog
Verilog 1995 version has been in market for a very long time. IEEE extended the features of Verilog 1995 and released it as Verilog 2001. But this was no good for verification engineers, so verifcation engineers had to use languages like "e", VERA, Testbuider. It was rather painfull to have two language, one for design and other for verification. SystemVerilog combines the Verification capabilties of HVL (Hardware Verification Language) with ease of Verilog to provide a single platform for both design and verification.
==Anyone with background of C++, or OO programming language will feel at home with SystemVerilog. But on other hand if you have been thinking C or C++ is not required, then you may be shocked to know that SystemVerilog is very much like C++. ==
*Now IEEE has accepted the SystemVerilog, and it is called 1800-2005 standard. *
Some of the new features in SystemVerilog are as listed below.
- C type data types like int, typedef, struct, union, enum.
- Dynamic data types : struct, classes, dynamic queues, dynamic arrays.
- New operators and built in methods.
- Enhanced flow control like, foreach, return, break, continue.
- Semaphores, mailboxes, event extensions.
- classes for object oriented programming.面向对象编程
- Assertions.断言
- Coverage.覆盖
- VPI extensions.
2.1Verilog Basic
- 主要回顾verilog最基础的部分,为SV入门必备
Verilog介绍
- Every new learner's dream is to understand Verilog in one day, at least enough to use it. The next few pages are my attempt to make this dream a reality. There will be some theory and examples followed by some exercises. This tutorial will not teach you how to program; it is designed for those with some programming experience. Even though Verilog executes different code blocks concurrently as opposed to the sequential execution of most programming languages, there are still many parallels. Some background in digital design is also helpful.不同于大多数编程语言,verilog语言中有许多并行执行的语句,有数字设计背景将有助于学习理解
- Life before Verilog was a life full of schematics. Every design, regardless of complexity, was designed through schematics. They were difficult to verify and error-prone, resulting in long, tedious development cycles of design, verification... design, verification... design, verification... Verilog语言出现之前,设计中多是原理图设计,对验证和错误检测带来了很大困难,从而导致开发周期很长
When Verilog arrived, we suddenly had a different way of thinking about logic circuits. The Verilog design cycle is more like a traditional programming one, and it is what this tutorial will walk you through. **Here's how it goes: **
- Specifications (specs) 协议
- High level design 高层次设计
- Low level (micro) design 低层次设计
- RTL coding RTL代码
- Verification 验证
- Synthesis. 综合
2.2Specifications
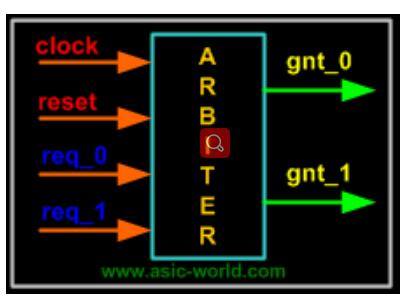
For this tutorial, we'll be building a two agent arbiter: a device that selects among two agents competing for mastership. Here are some specs we might write up.
- Two agent arbiter.
- Active high asynchronous reset. 高电平异步复位
- Fixed priority, with agent 0 having priority over agent 1 优先级
- Grant will be asserted as long as request is asserted. 发出请求时输出grant断言
Once we have the specs, we can draw the block diagram, which is basically an abstraction of the data flow through a system (what goes into or comes out of the black boxes?). Since the example that we have taken is a simple one, we can have a block diagram as shown below. We don't worry about what's inside the magical black boxes just yet.
2.3Block diagram of arbiter
- Now, if we were designing this machine without Verilog, the standard procedure would dictate that we draw a state machine. From there, we'd make a truth table with state transitions for each flip-flop. And after that we'd draw Karnaugh maps, and from K-maps we could get the optimized circuit. This method works just fine for small designs, but with large designs this flow becomes complicated and error prone. This is where Verilog comes in and shows us another way.从顶层模块直接设计状态机容易出错,将顶层模块划分为若干子模块可以简化设计
2.4Low level design
Each of the circles represents a state that the machine can be in. Each state corresponds to an output. The arrows between the states are state transitions, labeled by the event that causes the transition. For instance, the leftmost orange arrow means that if the machine is in state GNT0 (outputting the signal that corresponds to GNT0) and receives an input of !req_0, the machine moves to state IDLE and outputs the signal that corresponds to that. This state machine describes all the logic of the system that you'll need. The next step is to put it all in Verilog.
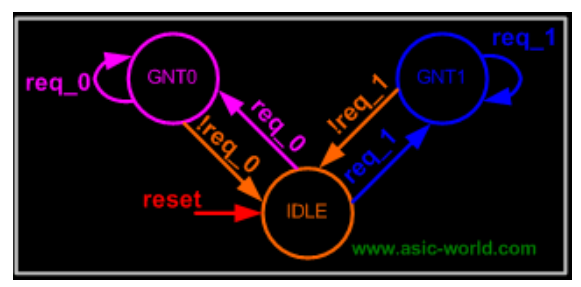
Each of the circles represents a state that the machine can be in. Each state corresponds to an output. The arrows between the states are state transitions, labeled by the event that causes the transition. For instance, the leftmost orange arrow means that if the machine is in state GNT0 (outputting the signal that corresponds to GNT0) and receives an input of !req_0, the machine moves to state IDLE and outputs the signal that corresponds to that. This state machine describes all the logic of the system that you'll need.* The next step is to put it all in Verilog.*=详细的介绍看网站,=)
2.5两种设计方法
- 第一种设计方法是采用状态机设计
// 方法2 采用状态机实现

module arbiter_1 (

	input clk,

	input reset,//high activate asynchronous

	input req_0,req_1,//agent 0 having priority over agent 1

	output reg gnt_0,gnt_1

);

reg [2:0] state,next_state;

parameter IDLE = 3'b001,GNT0 = 3'b010,GNT1 = 3'b100;

always @(posedge clk or posedge reset) begin

	if (reset) begin

		state <= IDLE;

	end

	else begin

		state <= next_state;

	end

end

always @(*) begin

	case (state)

		IDLE: begin if(req_0==1'b1) next_state = GNT0;

			  else if(req_1==1'b1) next_state = GNT1;

			  else next_state = IDLE; end

		GNT0:begin if(req_0==1'b1) next_state = GNT0;

			//  else if(req_1==1'b1) next_state = GNT1;

			 else next_state = IDLE;end

		GNT1:begin if(req_1==1'b1) next_state = GNT1;

			//  else if(req_1==1'b1) next_state = GNT1;

			 else next_state = IDLE;end

		default:begin next_state = IDLE; end

	endcase

end

always @(*) begin

	if(state == GNT0)begin

		gnt_0 = 1'b1;

		gnt_1 = 1'b0;

	end

	else if(state == GNT1)begin

		gnt_1 = 1'b1;

		gnt_0 = 1'b0;

	end

	else begin

		gnt_0 = 1'b0;

		gnt_1 = 1'b0;

	end

end

endmodule
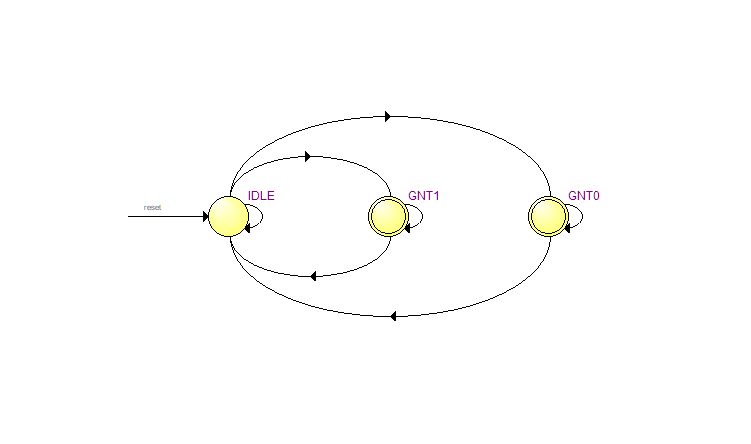
- 在quartus II里面生成的状态图
- 第二种采用普通写法
// 方法2
module arbiter (

	input clk,

	input reset,//high activate asynchronous

	input req_0,req_1,//agent 0 having priority over agent 1

	output reg gnt_0,gnt_1

);

always @(posedge clk or posedge reset) begin

	if (reset==1'b1) begin

		gnt_0 <= 1'b0;

		gnt_1 <= 1'b0;

	end

	else if(req_0==1'b1)begin

		gnt_0 = 1'b1;

		gnt_1 = 1'b0;

	end

	else if(req_1 == 1'b1)begin

		gnt_1= 1'b1;

		gnt_0= 1'b0;

	end

	else begin

	   		gnt_1= 1'b0;

            gnt_0= 1'b0;

	end

end

endmodule
verification——TestBench
- 使用网站上写好的code去测试设计结果。测试就是对输入施加特定激励,看输出是满足期望
`timescale 1ns / 1ps

module arbiter_tb;

// 输入采用寄存器reg类型,输入采用线网类型wire

reg clock, reset, req0,req1;

wire gnt0,gnt1;

// 初始化输入

initial begin

  $monitor ("req0=%b,req1=%b,gnt0=%b,gnt1=%b", req0,req1,gnt0,gnt1);//检测信号

  clock = 0;

  reset = 0;

  req0 = 0;

  req1 = 0;

  #5 reset = 1;

  #15 reset = 0;

  #10 req0 = 1;

  #10 req0 = 0;

  #10 req1 = 1;

  #10 req1 = 0;

  #10 {req0,req1} = 2'b11;

  #10 {req0,req1} = 2'b00;

  #10 $finish;//执行到此处结束 运行90ns停止仿真

end

//周期为10ns的时钟

always begin

 #5 clock = !clock;

end

//例化 将驱动添加到对应模块上的输入

arbiter U0 (

.clock (clock),

.reset (reset),

.req_0 (req0),

.req_1 (req1),

.gnt_0 (gnt0),

.gnt_1 (gnt1)

);

endmodule
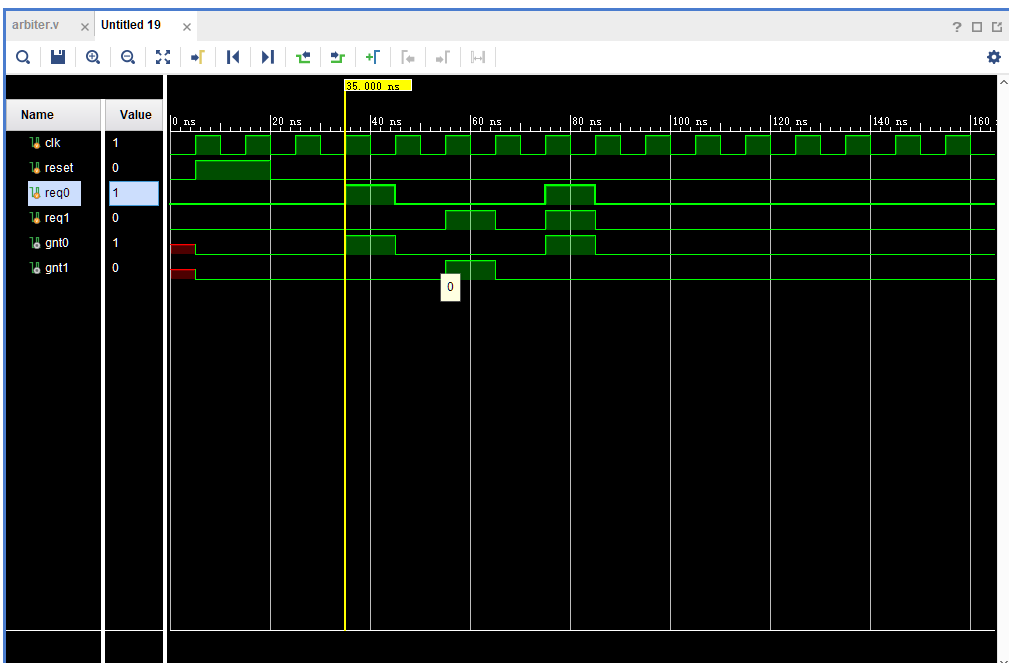
- 仿真图:两种写法一致
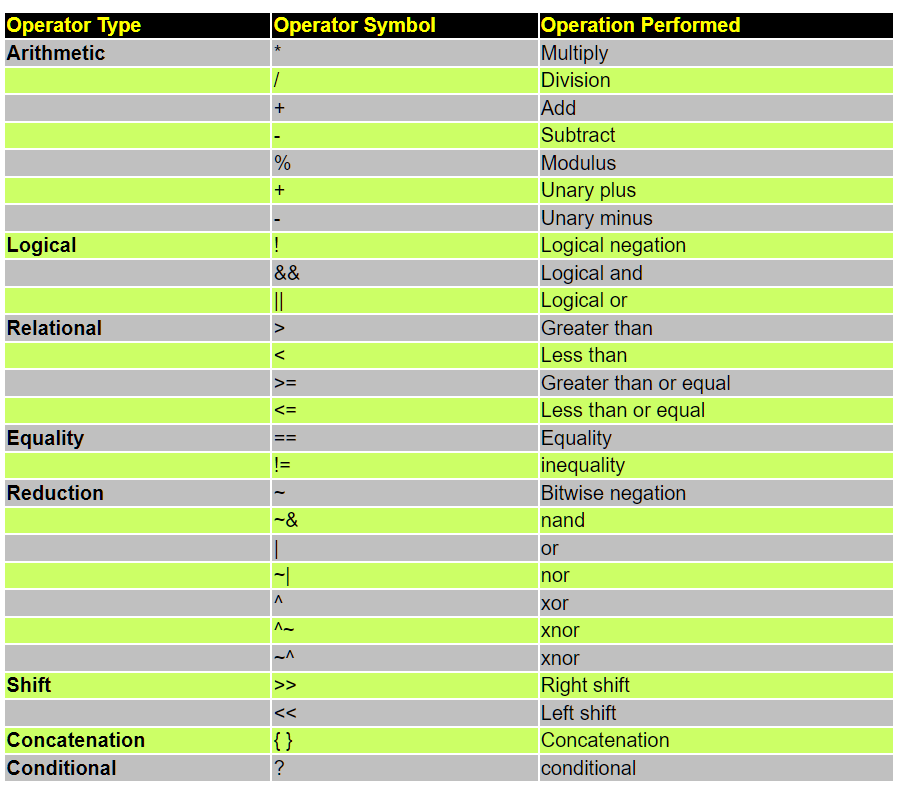
- 附录:Verilog里面的操作符号 Operator symbol,和C很相似!
SystemVerilog Tutorial的更多相关文章
- SystemVerilog搭建验证平台使用DPI时遇到的问题及解决方案
本文目的在于分享一下把DPI稿能用了的过程,主要说一下平台其他部分搭建好之后,在完成DPI相关工作阶段遇到的问题,以及解决的办法. 工作环境:win10 64bit, Questasim 10.1b ...
- SystemVerilog搭建APB_I2C IP 层次化验证平台
一.前言 近期疫情严重,身为社畜的我只能在家中继续钻研技术了.之前写过一篇关于搭建FIFO验证平台的博文,利用SV的OOP特性对FIFO进行初步验证,但有很多不足之处,比如结构不够规范.验证组件类不独 ...
- systemverilog 字符串类型
转载:https://blog.csdn.net/Holden_Liu/article/details/100727957 传统的Veriog仅仅支持文字表述上的字符串, 而SystemVerilog ...
- [翻译+山寨]Hangfire Highlighter Tutorial
前言 Hangfire是一个开源且商业免费使用的工具函数库.可以让你非常容易地在ASP.NET应用(也可以不在ASP.NET应用)中执行多种类型的后台任务,而无需自行定制开发和管理基于Windows ...
- Django 1.7 Tutorial 学习笔记
官方教程在这里 : Here 写在前面的废话:)) 以前学习新东西,第一想到的是找本入门教程,按照书上做一遍.现在看了各种网上的入门教程后,我觉得还是看官方Tutorial靠谱.书的弊端一说一大推 本 ...
- thrift 服务端linux C ++ 与客户端 windows python 环境配置(thrift 自带tutorial为例)
关于Thrift文档化的确是做的不好.摸索了很久才终于把跨linux与windows跨C++与python语言的配置成功完成.以下是步骤: 1) Linux下环境配置 ...
- Hive Tutorial(上)(Hive 入门指导)
用户指导 Hive 指导 Hive指导 概念 Hive是什么 Hive不是什么 获得和开始 数据单元 类型系统 内置操作符和方法 语言性能 用法和例子(在<下>里面) 概念 Hive是什么 ...
- Home / Python MySQL Tutorial / Calling MySQL Stored Procedures in Python Calling MySQL Stored Procedures in Python
f you are not familiar with MySQL stored procedures or want to review it as a refresher, you can fol ...
- Using FreeMarker templates (FTL)- Tutorial
Lars Vogel, (c) 2012, 2016 vogella GmbHVersion 1.4,06.10.2016 Table of Contents 1. Introduction to F ...
- Oracle Forms 10g Tutorial Ebook Download - Oracle Forms Blog
A step by step tutorial for Oracle Forms 10g development. This guide is helpful for freshers in Orac ...
随机推荐
- JavaScript:变量:声明和赋值变量时,内存结构是什么样的?
这里只是大概画出内存结构的模型图,方便理解当我们声明变量和赋值变量时,到底在干嘛. 如上图所示,a赋值一个对象{},b赋值字符串hello: 于是内存里划了三个区域给我们,一个存储我们声明的变量表,即 ...
- GitHub上的一个Latex模板
代码下载:GitHub的项目地址或者在LATEX项目报告模板下载. 编译环境:Latex的编译器,如Ctex软件. 把源码clone或者下载到本地后,根据他的说明 如何开始 使用report.tex开 ...
- 解决MySQL Connector/ODBC驱动无法安装Error1918
1.问题描述 我在一台windows服务器上安装好mysql之后,再安装mysql的ODBC连接驱动时,报错如下: 2.解决方法 之所以出现安装失败是由于缺少Miscrosoft Visual C++ ...
- 使用IDEA创建一个maven的web项目并部署到tomcat上
目录 1.创建一个maven项目 2.为项目添加配置文件 3.创建一些类和jsp页面 4.将项目部署到tomcat 1.创建一个maven项目 打开IDEA,File--New--Project 选择 ...
- B. Quick Sort【Codeforces Round #842 (Div. 2)】
B. Quick Sort You are given a permutation[排列]† \(p\) of length \(n\) and a positive integer \(k≤n\). ...
- JavaBean为何物?
JavaBean为何物? 摘要:初学SSM框架之后,我对JavaBean这个东西开始有了简单的接触,在很久以前听见JavaBean这个词一直以为是一个非常高大上的东西,但是在仔细研究之后发现其本质 ...
- Coolify系列02-从0到1超详细手把手教你上手Coolify
接着上集(Coolify系列01- 从0到1超详细手把手教你上手Heroku 和 Netlify 的开源替代方案 ),此时我们已经运行成功,如果没有成功,可以参考我的Coolify系列其他文章来解决问 ...
- 图文并茂基于阿里云linux服务器部署nodejs项目并添加pm2守护nodejs项目运行进程(Linux version 4.19.81-17.1.al7.x86_64)
首先你要有一台LINIX服务器,登入以后按下面步骤执行命令,可查看系统版本以及配置 查看Linux 内核 通过 uname -a 命令查看系统位数是64位 x86_64表示64位系统, i686 i3 ...
- angular 父组件调用子组件方法---以及组件跨模块使用方法
如果要在父组件调用子组件 可以这样子 @ViewChild('mySun', { static: false }) mySun: MySunComponent; 使用方法: let res=this. ...
- Linux基础介绍
Linux基础介绍 一.运维的本质 运维:运行维护应用程序 岗位需求:自动化运维.DBA.docker+K8s 运维的本质: 1.尽可能保证应用程序24小时不间断运行 2.尽可能保证数据的安全 3.尽 ...