
CentOS Install NMP
NMP = Nginx/MySQL/PHP
Installation steps of the Nginx
我这里使用 v1.4.4
wget -c http://nginx.org/download/nginx-1.4.4.tar.gz
install
tar -zxvf nginx-1.7.4.tar.gz

cd nginx-1.7.4

./configure

make && make install
run
/usr/local/nginx/sbin/nginx
查看nginx是否正常:
$ /usr/local/nginx/sbin/nginx -t

# 出现如下信息,表示安装成功!

nginx: the configuration file /usr/local/nginx/conf/nginx.conf syntax is ok nginx: configuration file /usr/local/nginx/conf/nginx.conf test is successful

默认安装路径
如果什么都不设置,那么默认路径为 /usr/local/nginx/
vim configure
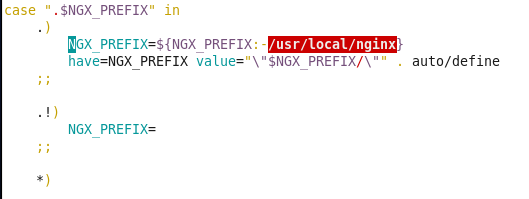
指定安装目录
查看安装包带configure文件的话,

使用下面的命令:
./configure --prefix=安装目录

# Exmaple

./configure --prefix=/home/Mysticbinary/usr/local/nginx-1.4.4
注意:指定的安装目录和安装包路径不要是同一个,会报错。
Installation steps of the MySQL
参考:
https://zhangjh.me/2017/03/14/linux-install-mysql/
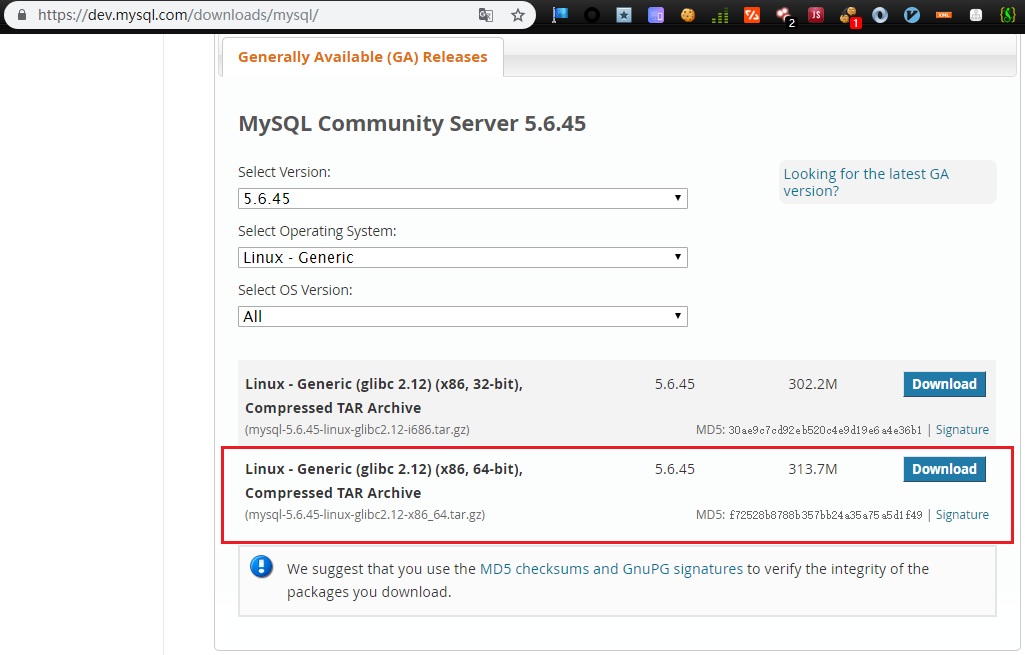
下载源码包
https://dev.mysql.com/downloads/mysql/
解压并拷贝到/usr/local
tar -xvf mysql-5.6.45-linux-glibc2.12-x86_64.tar.gz

mv mysql-5.6.26-linux-glibc2.5-x86_64 mysql

sudo mv mysql /usr/local/mysql
创建用户和用户组
groupadd mysql

useradd -r -g mysql mysql

# 账号mysql  组mysql 密码mysql

# 给账号创建密码的方法

passwd 输入用户名

# 输入密码
改变目录权限
chown -R mysql:mysql *
╭─Mysticbinary@CentOSv64 /usr/local/mysql

╰─$ sudo chown -R mysql:mysql *                                             9 ↵

╭─Mysticbinary@CentOSv64 /usr/local/mysql

╰─$ ll

total 68K

drwxrwxr-x.  2 mysql mysql 4.0K Aug  8 15:11 bin

-rw-r--r--.  1 mysql mysql  18K Jun 10 18:25 COPYING

drwxrwxr-x.  3 mysql mysql 4.0K Aug  8 15:11 data

drwxrwxr-x.  2 mysql mysql 4.0K Aug  8 15:11 docs

drwxrwxr-x.  3 mysql mysql 4.0K Aug  8 15:11 include

drwxrwxr-x.  3 mysql mysql 4.0K Aug  8 15:11 lib

drwxrwxr-x.  4 mysql mysql 4.0K Aug  8 15:11 man

drwxrwxr-x. 10 mysql mysql 4.0K Aug  8 15:11 mysql-test

-rw-r--r--.  1 mysql mysql 2.5K Jun 10 18:25 README

drwxrwxr-x.  2 mysql mysql 4.0K Aug  8 15:11 scripts

drwxrwxr-x. 28 mysql mysql 4.0K Aug  8 15:11 share

drwxrwxr-x.  4 mysql mysql 4.0K Aug  8 15:11 sql-bench

drwxrwxr-x.  2 mysql mysql 4.0K Aug  8 15:11 support-files
安装
新手推荐使用默认的/uer/local/mysql安装路径,自定义安装目录需要了解多一些信息。
先了解安装的参数:
用法:/ usr / local / mysql / bin / mysql_install_db [OPTIONS]

  --basedir = path MySQL安装目录的路径。

  --cross-bootstrap供内部使用。在构建MySQL系统时使用

                       与目标不同的主机上的表。

  --datadir = path MySQL数据目录的路径。

  --force即使DNS没有,也会使mysql_install_db运行

                       工作。在这种情况下,通常授予表条目

                       使用主机名将使用IP地址。

  --ldata = path MySQL数据目录的路径。

  --rpm供内部使用。 RPM文件使用此选项

                       在MySQL安装过程中。

  --skip-name-resolve创建时使用IP地址而不是主机名

                       授予表条目。如果,此选项非常有用

                       你的DNS不起作用。

  --srcdir = path供内部使用。目录下的

                       mysql_install_db查找支持文件,如

                       错误消息文件和用于popoulating的文件

                       帮助表。

  --user = user_name用于运行mysqld的登录用户名。

                       由mysqld创建的目录将由此拥有

                       用户。您必须是root才能使用此选项。默认情况下

                       mysqld使用您当前的登录名和文件运行

                       它创建的目录将归您所有。

所有其他选项都传递给mysqld程序
启动安装命令
./scripts/mysql_install_db --user=mysql --basedir=/usr/local/mysql --datadir=/usr/local/mysql/data
╭─Mysticbinary@CentOSv64 /usr/local/mysql

╰─$ ./scripts/mysql_install_db --user=mysql --basedir=/usr/local/mysql --datadir=/usr/local/mysql/data

WARNING: The host 'CentOSv64' could not be looked up with /usr/local/mysql/bin/resolveip.

This probably means that your libc libraries are not 100 % compatible

with this binary MySQL version. The MySQL daemon, mysqld, should work

normally with the exception that host name resolving will not work.

This means that you should use IP addresses instead of hostnames

when specifying MySQL privileges !

Installing MySQL system tables...2019-08-08 15:33:18 0 [Warning] TIMESTAMP with implicit DEFAULT value is deprecated. Please use --explicit_defaults_for_timestamp server option (see documentation for more details).

2019-08-08 15:33:18 0 [Note] Ignoring --secure-file-priv value as server is running with --bootstrap.

2019-08-08 15:33:18 0 [Note] /usr/local/mysql/bin/mysqld (mysqld 5.6.45) starting as process 5975 ...

2019-08-08 15:33:18 5975 [Warning] Can't create test file /usr/local/mysql/data/CentOSv64.lower-test

2019-08-08 15:33:18 5975 [Warning] Can't create test file /usr/local/mysql/data/CentOSv64.lower-test

2019-08-08 15:33:18 5975 [Warning] Buffered warning: Changed limits: max_open_files: 1024 (requested 5000)

2019-08-08 15:33:18 5975 [Warning] Buffered warning: Changed limits: table_open_cache: 431 (requested 2000)

2019-08-08 15:33:18 5975 [Note] InnoDB: Using atomics to ref count buffer pool pages

2019-08-08 15:33:18 5975 [Note] InnoDB: The InnoDB memory heap is disabled

2019-08-08 15:33:18 5975 [Note] InnoDB: Mutexes and rw_locks use GCC atomic builtins

2019-08-08 15:33:18 5975 [Note] InnoDB: Memory barrier is not used

2019-08-08 15:33:18 5975 [Note] InnoDB: Compressed tables use zlib 1.2.11

2019-08-08 15:33:18 5975 [Note] InnoDB: Using Linux native AIO

2019-08-08 15:33:18 5975 [Note] InnoDB: Using CPU crc32 instructions

2019-08-08 15:33:18 5975 [Note] InnoDB: Initializing buffer pool, size = 128.0M

2019-08-08 15:33:18 5975 [Note] InnoDB: Completed initialization of buffer pool

2019-08-08 15:33:18 7fbde70ed720  InnoDB: Operating system error number 13 in a file operation.

InnoDB: The error means mysqld does not have the access rights to

InnoDB: the directory.

2019-08-08 15:33:18 7fbde70ed720  InnoDB: Operating system error number 13 in a file operation.

InnoDB: The error means mysqld does not have the access rights to

InnoDB: the directory.

# 报错了!

2019-08-08 15:33:18 5975 [ERROR] InnoDB: Creating or opening ./ibdata1 failed!

2019-08-08 15:33:18 5975 [ERROR] InnoDB: Could not open or create the system tablespace. If you tried to add new data files to the system tablespace, and it failed here, you should now edit innodb_data_file_path in my.cnf back to what it was, and remove the new ibdata files InnoDB created in this failed attempt. InnoDB only wrote those files full of zeros, but did not yet use them in any way. But be careful: do not remove old data files which contain your precious data!

2019-08-08 15:33:18 5975 [ERROR] Plugin 'InnoDB' init function returned error.

2019-08-08 15:33:18 5975 [ERROR] Plugin 'InnoDB' registration as a STORAGE ENGINE failed.

2019-08-08 15:33:18 5975 [ERROR] Unknown/unsupported storage engine: InnoDB

2019-08-08 15:33:18 5975 [ERROR] Aborting

2019-08-08 15:33:18 5975 [Note] Binlog end

2019-08-08 15:33:18 5975 [Note] /usr/local/mysql/bin/mysqld: Shutdown complete
解决:
发现是没有加sudo,没有权限导致的,加上就搞定了;
╭─Mysticbinary@CentOSv64 /usr/local/mysql

╰─$ sudo ./scripts/mysql_install_db --user=mysql --basedir=/usr/local/mysql --datadir=/usr/local/mysql/data

# ......

2019-08-08 15:54:51 6263 [Note] Binlog end

2019-08-08 15:54:51 6263 [Note] InnoDB: FTS optimize thread exiting.

2019-08-08 15:54:51 6263 [Note] InnoDB: Starting shutdown...

2019-08-08 15:54:53 6263 [Note] InnoDB: Shutdown completed; log sequence number 1625987

OK

To start mysqld at boot time you have to copy

support-files/mysql.server to the right place for your system

PLEASE REMEMBER TO SET A PASSWORD FOR THE MySQL root USER !

To do so, start the server, then issue the following commands:

  /usr/local/mysql/bin/mysqladmin -u root password 'new-password'

  /usr/local/mysql/bin/mysqladmin -u root -h CentOSv64 password 'new-password'

Alternatively you can run:

  /usr/local/mysql/bin/mysql_secure_installation

which will also give you the option of removing the test

databases and anonymous user created by default.  This is

strongly recommended for production servers.

See the manual for more instructions.

You can start the MySQL daemon with:

  cd . ; /usr/local/mysql/bin/mysqld_safe &

You can test the MySQL daemon with mysql-test-run.pl

  cd mysql-test ; perl mysql-test-run.pl

Please report any problems at http://bugs.mysql.com/

The latest information about MySQL is available on the web at

  http://www.mysql.com

Support MySQL by buying support/licenses at http://shop.mysql.com

WARNING: Found existing config file /usr/local/mysql/my.cnf on the system.

Because this file might be in use, it was not replaced,

but was used in bootstrap (unless you used --defaults-file)

and when you later start the server.

The new default config file was created as /usr/local/mysql/my-new.cnf,

please compare it with your file and take the changes you need.
启动
sudo ./bin/mysqld &   # 启动

sudo ./bin/mysqld_safe &  # 安全模式启动

# mysql还有其他启动方式,这里不做过多研究,能启动就行;
The Difference Between mysqld and sqld_safe
参数:https://www.cnblogs.com/kerrycode/p/5687791.html
人们会纠结mysqld与mysqld_safe的区别. 其实mysqld_safe是一个脚本,一个非常安全的启动、关闭MySQL服务的脚本。它实际上也是调用mysqld来启动、关闭MySQL服务。
关于mysqld_safe,可以参考官方文档 mysqld_safe — MySQL Server Startup Script。
添加mysql为系统服务
sudo cp support-files/mysql.server /etc/init.d/mysql
之后就可以使用/etc/init.d/mysql start|stop|restart来管理mysql了
添加环境变量
sudo vi /etc/profile

#修改PATH=$PATH:/usr/local/mysql/bin

source /etc/profile

# 重新加载profile
添加环境变量之后即可任意目录下直接输入mysql进行连接而不用在mysql/bin目录下了。
创建mysql用户
# 如给root添加密码

mysqladmin -u root password "you new password"

#添加新用户

mysql -u root -p

#name处用用户替换,passwd处用密码替换

mysql> GRANT USAGE ON *.* TO 'name'@'localhost' IDENTIFIED BY 'passwd' WITH GRANT OPTION;
连接mysql
mysql -uroot -p

#密码 root
Installation steps of the Nginx
参考: https://blog.csdn.net/snow_small/article/details/78674366
先安装一些依赖
避免报错 Cannot find OpenSSL's :
yum install openssl openssl-devel
安装yum编译必备的包:
yum -y install libxml2 libxml2-devel curl-devel libpng-devel freetype-devel libmcrypt-devel libjpeg-devel
下载安装包、解压
cd /home/Mysticbinary/Download

wget http://cn2.php.net/distributions/php-7.0.13.tar.gz
tar xzf php-7.0.13.tar.gz
install
./configure --prefix=/home/Mysticbinary/php7 --enable-fpm --enable-opcache --with-config-file-path=/home/Mysticbinary/php7/etc --with-mysqli=mysqlnd --with-pdo-mysql=mysqlnd --enable-static --enable-sockets --enable-wddx --enable-zip --enable-calendar --enable-bcmath --enable-soap --with-zlib --with-iconv --with-freetype-dir --with-gd --with-jpeg-dir --with-xmlrpc --enable-mbstring --with-sqlite3 --with-curl --enable-ftp --with-mcrypt --with-openssl --with-gettext --enable-pcntl
--prefix=/home/Mysticbinary/php7 = PHP将安装在哪个路径下
--with-config-file-path=/home/Mysticbinary/php7/etc = etc配置文件将解压到哪个路径下
--enable--with = 一些php.ini的配置,这些后期可以修改
# 等上面安装完后

make && make install
将安装包的一些配置文件拷贝到php7
#在安装包里面有php.ini-xxx,分别是开发模式和产品模式,根据自己的选择,开发选开发模式。

-rw-r--r--.  1 1000 1000   69692 Nov  8  2016 php.ini-development

-rw-r--r--.  1 1000 1000   69724 Nov  8  2016 php.ini-production

#...

cp /home/Mysticbinary/Downloads/php-7.0.13/php.ini-development /home/Mysticbinary/php7/etc/php.ini

cp /home/Mysticbinary/Downloads/php-7.0.13/sapi/fpm/php-fpm /home/Mysticbinary/php7/bin/
解决报错
这时/home/Mysticbinary/php7 就会出现我们指定的安装路径php7,不管了,直接进去运行
直接运行:
cd /home/Mysticbinary/php7

./sbin/php-fpm
发现报错了:

[root@CentOSv64 php7]# ./sbin/php-fpm

[31-Jul-2019 16:45:44] ERROR: failed to open configuration file '/home/Mysticbinary/php7/etc/php-fpm.conf': No such file or directory (2)

[31-Jul-2019 16:45:44] ERROR: failed to load configuration file '/home/Mysticbinary/php7/etc/php-fpm.conf'

[31-Jul-2019 16:45:44] ERROR: FPM initialization failed
解决:
cp php-fpm.conf.default php-fpm.conf
[root@CentOSv64 etc]# ls

pear.conf  php-fpm.conf.default  php-fpm.d  php.ini

[root@CentOSv64 etc]# cp php-fpm.conf.default php-fpm.conf

[root@CentOSv64 etc]# ls

pear.conf  php-fpm.conf  php-fpm.conf.default  php-fpm.d  php.ini
运行又报错:
./sbin/php-fpm

[31-Jul-2019 16:55:34] WARNING: Nothing matches the include pattern '/home/Mysticbinary/php7/etc/php-fpm.d/*.conf' from /home/Mysticbinary/php7/etc/php-fpm.conf at line 125.

[31-Jul-2019 16:55:34] ERROR: No pool defined. at least one pool section must be specified in config file

[31-Jul-2019 16:55:34] ERROR: failed to post process the configuration

[31-Jul-2019 16:55:34] ERROR: FPM initialization failed
解决:
cp www.conf.default www.conf
cd php-fpm.d

[root@CentOSv64 php-fpm.d]# ls

www.conf.default

[root@CentOSv64 php-fpm.d]# cp www.conf.default www.conf

[root@CentOSv64 php-fpm.d]# ls

www.conf  www.conf.default
最后解决完这些报错:
[root@CentOSv64 php7]# ./sbin/php-fpm

[root@CentOSv64 php7]# ./sbin/php-fpm -t

[31-Jul-2019 16:59:21] NOTICE: configuration file /home/Mysticbinary/php7/etc/php-fpm.conf test is successful
傻瓜式一键安装法
就想快速搭建个测试环境的话,Inmp了解一下,https://lnmp.org/
wget http://soft.vpser.net/lnmp/lnmp1.7.tar.gz -cO lnmp1.7.tar.gz && tar zxf lnmp1.7.tar.gz && cd lnmp1.7 && ./install.sh lnmp
CentOS Install NMP的更多相关文章
- centos install shutter (How to enable Nux Dextop repository on CentOS or RHEL)
http://ask.xmodulo.com/enable-nux-dextop-repository-centos-rhel.html Question: I would like to insta ...
- centos install redmine (项目管理工具)
安装环境:Centos.mysql.Ruby.Apache.Redmineyum updateyum -y groupinstall "Development Tools"yum ...
- centos Install Docker
安装必备软件 $ yum -y install iptables iptables-services net-tools vim wget $ wget -P ~ https://github.com ...
- docker学习笔记 --- centos install
Docker简介: Docker 是一个开源的应用容器引擎,基于 Go 语言 并遵从Apache2.0协议开源. Docker 可以让开发者打包他们的应用以及依赖包到一个轻量级.可移植的容器中,然后发 ...
- centos install rabbitmq
安装rabbitmq 需要环境上有erlang,没有安装的可以参照下面的内容进行安装: https://www.erlang-solutions.com/resources/download.html ...
- centos install docker setup centos7 安装docker
centos7 安装docker 1: 安装必要的一些系统工具sudo yum install -y yum-utils device-mapper-persistent-data lvm2 2: 添 ...
- CentOS install GCC-4.8.5
1. 下载源码:http://ftp.gnu.org/gnu/gcc 2. cd gcc-4.8.5 ./contrib/download_prerequisites //下载资源包 3. ...
- centos install(160112更新)
centos安装之后: 更新 yum update 新增用户: useradd myuser passwd myuser 添加sudo: usermod -a -G wheel myuser //vi ...
- Fedora、CentOS install TTF/otf fonts
Step 1:切换至字体下载目录: [Richard@localhost Downloads]$ ll | grep otf -rw-rw-r--. Richard Richard 7月 RBNo2L ...
随机推荐
- 2019 沈阳网络赛 D Fish eating fruit ( 树形DP)
题目传送门 题意:求一颗树中所有点对(a,b)的路径长度,路径长度按照模3之后的值进行分类,最后分别求每一类的和 分析:树形DP \(dp[i][j]\) 表示以 i 为根的子树中,所有子节点到 i ...
- AC自动机(转载)
ac自动机学习博客 本来以为是很高级的算法 其实理解以后并不难 只是在字典树的基础上用fail数组标记一下回朔的位置 加速查找 就可以实现多模式串的匹配查找 模版如下: #include<cst ...
- Educational Codeforces Round 43
Educational Codeforces Round 43 A. Minimum Binary Number 显然可以把所有\(1\)合并成一个 注意没有\(1\)的情况 view code / ...
- P2805 [NOI2009]植物大战僵尸 (拓扑排序 + 最小割)
题意:N*M的矩阵 每个点上都有一颗植物 僵尸只能从每一行的最右边向左进攻 每个植物有攻击范围 可以保护在攻击范围内的植物 同时每一颗植物也保护他左边的植物 摧毁每个植物能获得价值 如果这个植物被保护 ...
- 【洛谷 p3376】模板-网络最大流(图论)
题目:给出一个网络图,以及其源点和汇点,求出其网络最大流. 解法:网络流Dinic算法. 1 #include<cstdio> 2 #include<cstdlib> 3 #i ...
- 【poj 1962】Corporative Network(图论--带权并查集 模版题)
P.S.我不想看英文原题的,但是看网上题解的题意看得我 炒鸡辛苦&一脸懵 +_+,打这模版题的代码也纠结至极了......不得已只能自己翻译了QwQ . 题意:有一个公司有N个企业,分成几个网 ...
- L2-013 红色警报 (25分) 并查集复杂度
代码: 1 /* 2 这道题也是简单并查集,并查集复杂度: 3 空间复杂度为O(N),建立一个集合的时间复杂度为O(1),N次合并M查找的时间复杂度为O(M Alpha(N)), 4 这里Alpha是 ...
- 6.Header交换机之模拟验证用户身份
标题 : 6.Header交换机之模拟验证用户身份 目录 : RabbitMQ 序号 : 6 var channel = connection.CreateModel(); //设置服务质量 ch ...
- 数字千万别用puts!
为了图省事我好几次都习惯的用puts输出一些确定答案,比如直接puts("-1"); 每次都wa到心态崩溃才想起来数字不能用puts...
- rrweb 用户操作录制和还原
rrweb 用户操作录制和还原 demos https://www.rrweb.io/replay refs https://www.rrweb.io/ xgqfrms 2012-2020 www.c ...