在ASP.NET Core中创建自定义端点可视化图
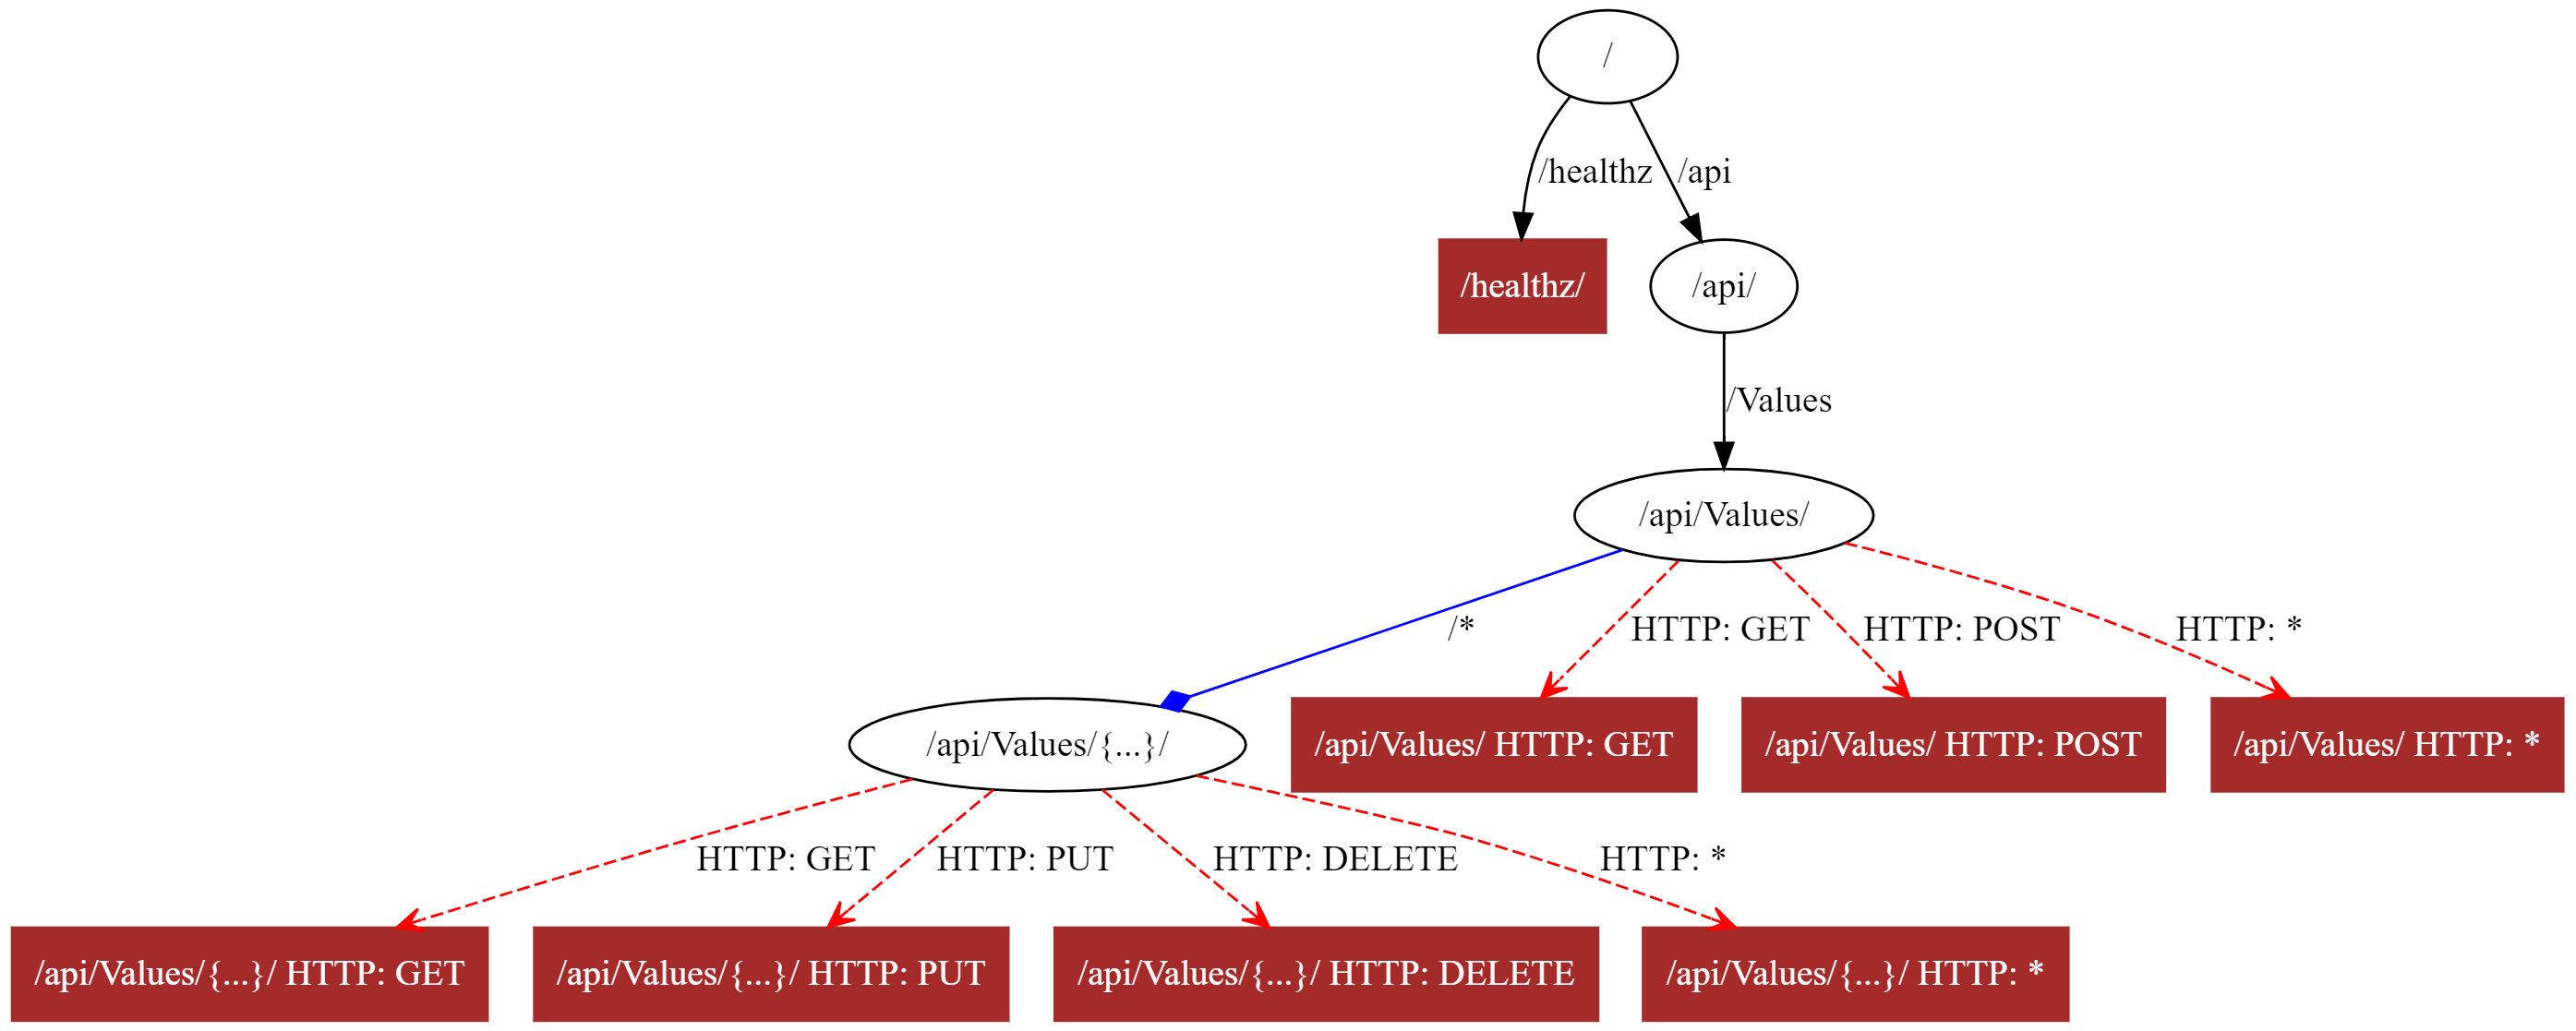
在上篇文章中,我为构建自定义端点可视化图奠定了基础,正如我在第一篇文章中展示的那样。该图显示了端点路由的不同部分:文字值,参数,动词约束和产生结果的端点:

在本文中,我将展示如何通过创建一个自定义的DfaGraphWriter来为自己的应用程序创建一个端点图。
这篇文章使用了本系列前几篇文章中的技巧和类,因此我强烈建议在继续之前先阅读这些技巧和类。
作者:依乐祝
原文链接:https://andrewlock.net/creating-a-custom-endpoint-visualization-graph/
为端点图添加配置
我们首先要看的是如何配置最终端点图的外观。我们将为两种类型的节点和四种类型的边缘添加配置。边是:
- 文字边缘:路线部分,例如
api和values中的文字匹配api/values/{id}。 - 参数边缘:路线的参数化部分,例如
{id}route中api/values/{id}。 - 捕获所有边:与“全部捕获”路由参数相对应的边,例如
{**slug}。 - 策略边缘:与URL以外的其他约束相对应的边缘。例如,图中的基于HTTP谓词的边
HTTP: GET。
节点是:
- 匹配节点:与端点匹配关联的节点,因此将生成响应。
- 默认节点:不与端点匹配关联的节点。
每个节点和边都可以具有任意数量的Graphviz属性来控制其显示。下面的GraphDisplayOptions显示了我在本文开始时用于生成图形的默认值:
public class GraphDisplayOptions

{

    /// <summary>

    /// Additional display options for literal edges

    /// </summary>

    public string LiteralEdge { get; set; } = string.Empty;

    /// <summary>

    /// Additional display options for parameter edges

    /// </summary>

    public string ParametersEdge { get; set; } = "arrowhead=diamond color=\"blue\"";

    /// <summary>

    /// Additional display options for catchall parameter edges

    /// </summary>

    public string CatchAllEdge { get; set; } = "arrowhead=odot color=\"green\"";

    /// <summary>

    /// Additional display options for policy edges

    /// </summary>

    public string PolicyEdge { get; set; } = "color=\"red\" style=dashed arrowhead=open";

    /// <summary>

    /// Additional display options for node which contains a match

    /// </summary>

    public string MatchingNode { get; set; } = "shape=box style=filled color=\"brown\" fontcolor=\"white\"";

    /// <summary>

    /// Additional display options for node without matches

    /// </summary>

    public string DefaultNode { get; set; } = string.Empty;

}
我们现在可以使用这个对象来控制显示,并使用上一篇文章中所示的ImpromptuInterface“代理”技术来创建我们的自定义图形编写器。
创建自定义的DfaGraphWriter
我们的自定义图形编辑器(巧妙地称为CustomDfaGraphWriter)在很大程度上基于包含在ASP.NET Core中的DfaGraphWriter。该类的主体与原始类相同,但有以下更改:
- 将
GraphDisplayOptions注入类中以自定义显示。 - 使用ImpromptuInterface库来处理内部
DfaMatcherBuilder和DfaNode类,如上一篇文章中所示。 - 自定义
WriteNode函数以使用我们的自定义样式。 - 添加一个
Visit函数来处理IDfaNode接口,而不是在内部DfaNode类上使用Visit()方法。
CustomDfaGraphWriter的全部代码如下所示,重点是主Write()功能。我保持了与原始版本几乎相同的实现,只是更新了我们必须更新的部分。
public class CustomDfaGraphWriter

{

    // Inject the GraphDisplayOptions

    private readonly IServiceProvider _services;

    private readonly GraphDisplayOptions _options;

    public CustomDfaGraphWriter(IServiceProvider services, GraphDisplayOptions options)

    {

        _services = services;

        _options = options;

    }

    public void Write(EndpointDataSource dataSource, TextWriter writer)

    {

        // Use ImpromptuInterface to create the required dependencies as shown in previous post

        Type matcherBuilder = typeof(IEndpointSelectorPolicy).Assembly

            .GetType("Microsoft.AspNetCore.Routing.Matching.DfaMatcherBuilder");

        // Build the list of endpoints used to build the graph

        var rawBuilder = _services.GetRequiredService(matcherBuilder);

        IDfaMatcherBuilder builder = rawBuilder.ActLike<IDfaMatcherBuilder>();

        // This is the same logic as the original graph writer

        var endpoints = dataSource.Endpoints;

        for (var i = 0; i < endpoints.Count; i++)

        {

            if (endpoints[i] is RouteEndpoint endpoint && (endpoint.Metadata.GetMetadata<ISuppressMatchingMetadata>()?.SuppressMatching ?? false) == false)

            {

                builder.AddEndpoint(endpoint);

            }

        }

        // Build the raw tree from the registered routes

        var rawTree = builder.BuildDfaTree(includeLabel: true);

        IDfaNode tree = rawTree.ActLike<IDfaNode>();

        // Store a list of nodes that have already been visited

        var visited = new Dictionary<IDfaNode, int>();

        // Build the graph by visiting each node, and calling WriteNode on each

        writer.WriteLine("digraph DFA {");

        Visit(tree, WriteNode);

        writer.WriteLine("}");

        void WriteNode(IDfaNode node)

        {

            /* Write the node to the TextWriter */

            /* Details shown later in this post*/

        }

    }

    static void Visit(IDfaNode node, Action<IDfaNode> visitor)

    {

        /* Recursively visit each node in the tree. */

        /* Details shown later in this post*/

    }

}
为了简洁起见,我在这里省略了Visit和 WriteNode函数,但是我们会尽快对其进行研究。我们将从Visit函数开始,因为该函数最接近原始函数。
更新Visit函数以与IDfaNode一起使用
正如我在上一篇文章中所讨论的,创建自定义DfaGraphWriter的最大问题之一是它对内部类的使用。为了解决这个问题,我使用ImpromptuInterface创建了包装原始对象的代理对象:
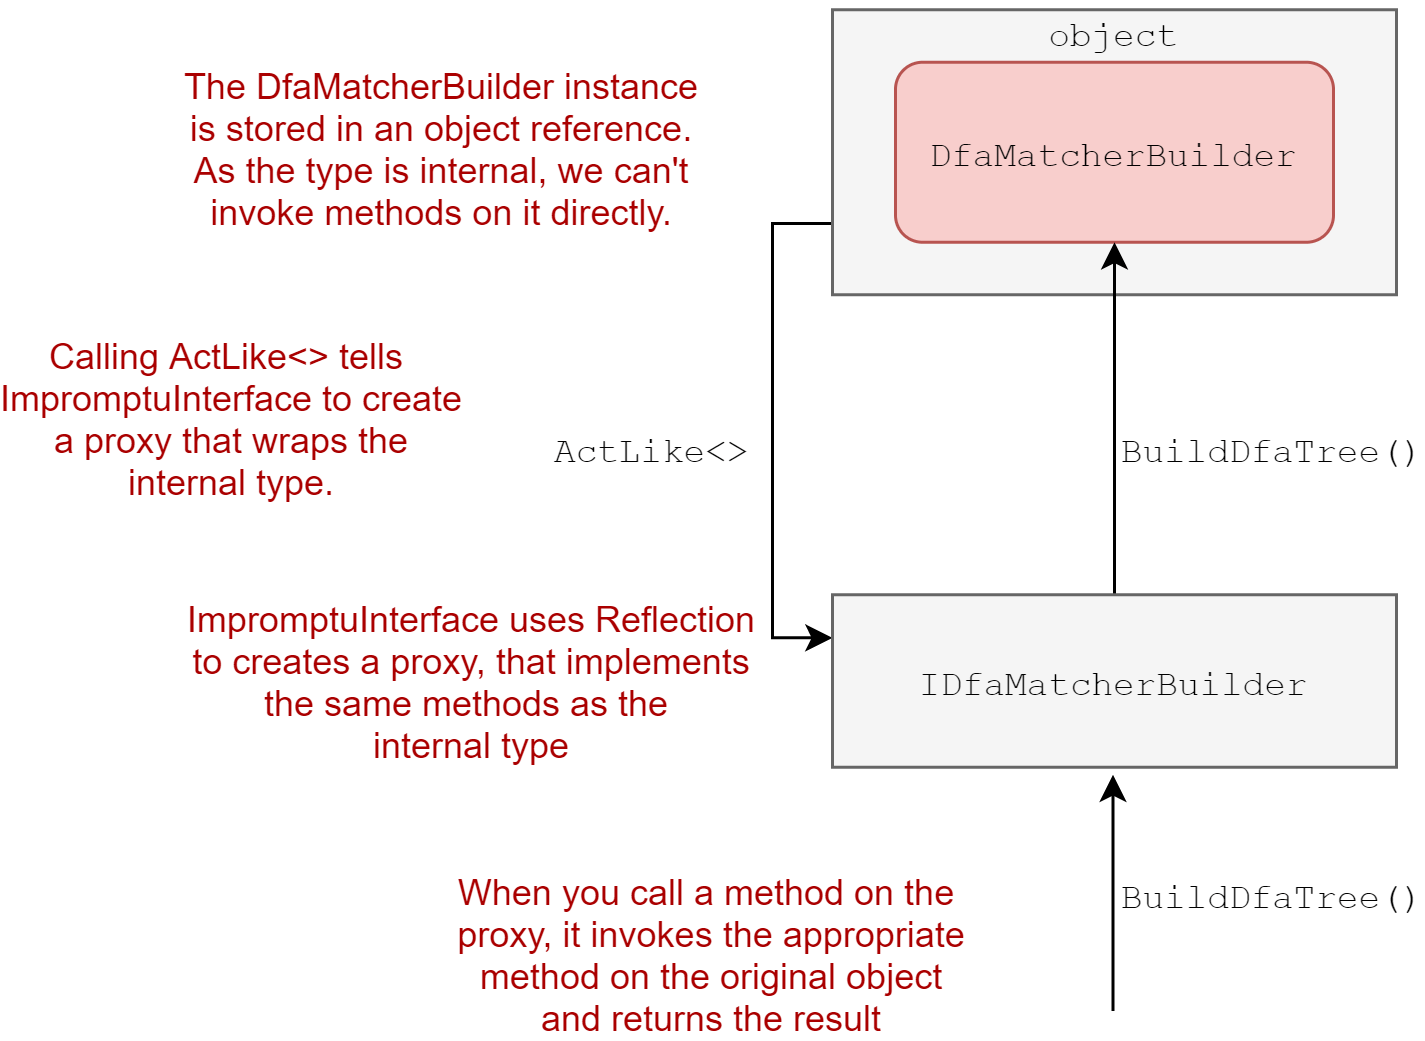
原始的Visit()方法是DfaNode类中的方法。它递归地访问端点树中的每个节点,为每个节点调用一个提供的Action<>函数。
由于
DfaNode是internal,我在CustomDfaGraphWriter中实现了一个静态的Visit来代替。
我们的定制实现大体上与原始实现相同,但是我们必须在“原始”DfaNodes和我们的IDfaNode代理之间进行一些有点困难的转换。更新后的方法如下所示。该方法接受两个参数,即被检查的节点,以及在每个参数上运行的Action<>。
static void Visit(IDfaNode node, Action<IDfaNode> visitor)

{

    // Does the node of interest have any nodes connected by literal edges?

    if (node.Literals?.Values != null)

    {

        // node.Literals is actually a Dictionary<string, DfaNode>

        foreach (var dictValue in node.Literals.Values)

        {

            // Create a proxy for the child DfaNode node and visit it

            IDfaNode value = dictValue.ActLike<IDfaNode>();

            Visit(value, visitor);

        }

    }

    // Does the node have a node connected by a parameter edge?

    // The reference check breaks any cycles in the graph

    if (node.Parameters != null && !ReferenceEquals(node, node.Parameters))

    {

        // Create a proxy for the DfaNode node and visit it

        IDfaNode parameters = node.Parameters.ActLike<IDfaNode>();

        Visit(parameters, visitor);

    }

    // Does the node have a node connected by a catch-all edge?

    // The refernece check breaks any cycles in the graph

    if (node.CatchAll != null && !ReferenceEquals(node, node.CatchAll))

    {

        // Create a proxy for the DfaNode node and visit it

        IDfaNode catchAll = node.CatchAll.ActLike<IDfaNode>();

        Visit(catchAll, visitor);

    }

    // Does the node have a node connected by a policy edges?

    if (node.PolicyEdges?.Values != null)

    {

        // node.PolicyEdges is actually a Dictionary<object, DfaNode>

        foreach (var dictValue in node.PolicyEdges.Values)

        {

            IDfaNode value = dictValue.ActLike<IDfaNode>();

            Visit(value, visitor);

        }

    }

    // Write the node using the provided Action<>

    visitor(node);

}
Visit函数使用post-order遍历,因此在使用visitor函数编写节点之前,它首先“深入”地遍历节点的子节点。这与原始DfaNode.Visit()功能相同。
我们现在快到了。我们有一个类,它构建端点节点树,遍历树中的所有节点,并为每个节点运行一个函数。剩下的就是定义访问者函数WriteNode()。
定义自定义WriteNode函数
我们终于到了最重要的部分,控制了端点图的显示方式。到目前为止,所有自定义和努力都是使我们能够自定义WriteNode功能。
WriteNode()是一个局部函数,它使用点图描述语言将一个节点连同任何连接的边一起写入TextWriter输出。
我们的自定义WriteNode()函数与原始函数几乎相同。有两个主要区别:
- 原始的图形编写器使用
DfaNodes,我们必须转换为使用IDfaNode代理。 - 原始图形编写器对所有节点和边使用相同的样式。我们根据配置的
GraphDisplayOptions定制节点和边的显示。
由于
WriteNode是一个局部函数,它可以从封闭函数访问变量。这包括writer参数(用于将图形写入输出)和以前写入节点的已访问字典。
下面显示了我们的方法(已被大量注释)的自定义版本WriteNode()。
void WriteNode(IDfaNode node)

{

    // add the node to the visited node dictionary if it isn't already

    // generate a zero-based integer label for the node

    if (!visited.TryGetValue(node, out var label))

    {

        label = visited.Count;

        visited.Add(node, label);

    }

    // We can safely index into visited because this is a post-order traversal,

    // all of the children of this node are already in the dictionary.

    // If this node is linked to any nodes by a literal edge

    if (node.Literals != null)

    {

        foreach (DictionaryEntry dictEntry in node.Literals)

        {

            // Foreach linked node, get the label for the edge and the linked node

            var edgeLabel = (string)dictEntry.Key;

            IDfaNode value = dictEntry.Value.ActLike<IDfaNode>();

            int nodeLabel = visited[value];

            // Write an edge, including our custom styling for literal edges

            writer.WriteLine($"{label} -> {nodeLabel} [label=\"/{edgeLabel}\" {_options.LiteralEdge}]");

        }

    }

    // If this node is linked to a nodes by a parameter edge

    if (node.Parameters != null)

    {

        IDfaNode parameters = node.Parameters.ActLike<IDfaNode>();

        int nodeLabel = visited[catchAll];

        // Write an edge labelled as /* using our custom styling for parameter edges

        writer.WriteLine($"{label} -> {nodeLabel} [label=\"/**\" {_options.CatchAllEdge}]");

    }

    // If this node is linked to a catch-all edge

    if (node.CatchAll != null && node.Parameters != node.CatchAll)

    {

        IDfaNode catchAll = node.CatchAll.ActLike<IDfaNode>();

        int nodeLabel = visited[catchAll];

        // Write an edge labelled as /** using our custom styling for catch-all edges

        writer.WriteLine($"{label} -> {nodelLabel} [label=\"/**\" {_options.CatchAllEdge}]");

    }

    // If this node is linked to any Policy Edges

    if (node.PolicyEdges != null)

    {

        foreach (DictionaryEntry dictEntry in node.PolicyEdges)

        {

            // Foreach linked node, get the label for the edge and the linked node

            var edgeLabel = (object)dictEntry.Key;

            IDfaNode value = dictEntry.Value.ActLike<IDfaNode>();

            int nodeLabel = visited[value];

            // Write an edge, including our custom styling for policy edges

            writer.WriteLine($"{label} -> {nodeLabel} [label=\"{key}\" {_options.PolicyEdge}]");

        }

    }

    // Does this node have any associated matches, indicating it generates a response?

    var matchCount = node?.Matches?.Count ?? 0;

    var extras = matchCount > 0

        ? _options.MatchingNode // If we have matches, use the styling for response-generating nodes...

        : _options.DefaultNode; // ...otherwise use the default style

    // Write the node to the graph output

    writer.WriteLine($"{label} [label=\"{node.Label}\" {extras}]");

}
由于我们将节点从“叶”节点写回到树的根的方式,因此跟踪这些交互的流程可能会有些混乱。例如,如果我们看一下本文开头显示的基本应用程序的输出,您会看到“叶子”端点都被首先写入:healthz运行状况检查端点和终端匹配生成路径最长的端点:
digraph DFA {

  1 [label="/healthz/" shape=box style=filled color="brown" fontcolor="white"]

  2 [label="/api/Values/{...}/ HTTP: GET" shape=box style=filled color="brown" fontcolor="white"]

  3 [label="/api/Values/{...}/ HTTP: PUT" shape=box style=filled color="brown" fontcolor="white"]

  4 [label="/api/Values/{...}/ HTTP: DELETE" shape=box style=filled color="brown"  fontcolor="white"]

  5 [label="/api/Values/{...}/ HTTP: *" shape=box style=filled color="brown" fontcolor="white"]

  6 -> 2 [label="HTTP: GET" color="red" style=dashed arrowhead=open]

  6 -> 3 [label="HTTP: PUT" color="red" style=dashed arrowhead=open]

  6 -> 4 [label="HTTP: DELETE" color="red" style=dashed arrowhead=open]

  6 -> 5 [label="HTTP: *" color="red" style=dashed arrowhead=open]

  6 [label="/api/Values/{...}/"]

  7 [label="/api/Values/ HTTP: GET" shape=box style=filled color="brown" fontcolor="white"]

  8 [label="/api/Values/ HTTP: POST" shape=box style=filled color="brown" fontcolor="white"]

  9 [label="/api/Values/ HTTP: *" shape=box style=filled color="brown" fontcolor="white"]

  10 -> 6 [label="/*" arrowhead=diamond color="blue"]

  10 -> 7 [label="HTTP: GET" color="red" style=dashed arrowhead=open]

  10 -> 8 [label="HTTP: POST" color="red" style=dashed arrowhead=open]

  10 -> 9 [label="HTTP: *" color="red" style=dashed arrowhead=open]

  10 [label="/api/Values/"]

  11 -> 10 [label="/Values"]

  11 [label="/api/"]

  12 -> 1 [label="/healthz"]

  12 -> 11 [label="/api"]

  12 [label="/"]

}
即使首先将叶节点写入图形输出,但Graphviz可视化工具通常会以叶节点在底部,边缘朝下的方式绘制图形。您可以在https://dreampuf.github.io/GraphvizOnline/在线显示图形:
如果要更改图形的呈现方式,可以自定义GraphDisplayOptions。如果使用我在上一篇文章中描述的“测试”方法,则可以在生成图形时直接传递这些选项。如果使用的是“中间件”方法,则可以改为使用IOptions<>系统进行GraphDisplayOptions注册,并使用配置系统控制显示。
摘要
在这篇文章中,我展示了如何创建自定义的DfaGraphWriter来控制如何生成应用程序的端点图。为了与internal内部类进行互操作,我们使用了ImpromptuInterface,如在上篇文章所示,创建代理,我们可以互动。然后,我们必须编写一个自定义Visit()函数来使用IDfaNode代理。最后,我们创建了一个自定义WriteNode函数,该函数使用在GraphDisplayOptions对象中定义的自定义设置来显示不同类型的节点和边。
在ASP.NET Core中创建自定义端点可视化图的更多相关文章
- ASP.NET Core中显示自定义错误页面-增强版
之前的博文 ASP.NET Core中显示自定义错误页面 中的方法是在项目中硬编码实现的,当有多个项目时,就会造成不同项目之间的重复代码,不可取. 在这篇博文中改用middleware实现,并且放在独 ...
- ASP.NET Core中使用自定义MVC过滤器属性的依赖注入
除了将自己的中间件添加到ASP.NET MVC Core应用程序管道之外,您还可以使用自定义MVC过滤器属性来控制响应,并有选择地将它们应用于整个控制器或控制器操作. ASP.NET Core中常用的 ...
- ASP.NET Core中使用自定义路由
上一篇文章<ASP.NET Core中使用默认MVC路由>提到了如何使用默认的MVC路由配置,通过这个配置,我们就可以把请求路由到Controller和Action,通常情况下我们使用默认 ...
- 在ASP.NET Core中创建基于Quartz.NET托管服务轻松实现作业调度
在这篇文章中,我将介绍如何使用ASP.NET Core托管服务运行Quartz.NET作业.这样的好处是我们可以在应用程序启动和停止时很方便的来控制我们的Job的运行状态.接下来我将演示如何创建一个简 ...
- ASP.NET Core中显示自定义错误页面
在 ASP.NET Core 中,默认情况下当发生500或404错误时,只返回http状态码,不返回任何内容,页面一片空白. 如果在 Startup.cs 的 Configure() 中加上 app. ...
- Asp.Net Core中创建多DbContext并迁移到数据库
在我们的项目中我们有时候需要在我们的项目中创建DbContext,而且这些DbContext之间有明显的界限,比如系统中两个DbContext一个是和整个数据库的权限相关的内容而另外一个DbConte ...
- 【半译】在ASP.NET Core中创建内部使用作用域服务的Quartz.NET宿主服务
在我的上一篇文章中,我展示了如何使用ASP.NET Core创建Quartz.NET托管服务并使用它来按计划运行后台任务.不幸的是,由于Quartz.NET API的工作方式,在Quartz作业中使用 ...
- 在 ASP.NET MVC 中创建自定义 HtmlHelper
在ASP.NET MVC应用程序的开发中,我们常碰到类似Html.Label或Html.TextBox这样的代码,它将在网页上产生一个label或input标记.这些HtmlHelper的扩展方法有些 ...
- asp.net core中写入自定义中间件
首先要明确什么是中间件?微软官方解释:https://docs.microsoft.com/zh-cn/aspnet/core/fundamentals/middleware/?tabs=aspnet ...
随机推荐
- 入门大数据---Flink学习总括
第一节 初识 Flink 在数据激增的时代,催生出了一批计算框架.最早期比较流行的有MapReduce,然后有Spark,直到现在越来越多的公司采用Flink处理.Flink相对前两个框架真正做到了高 ...
- node+ajax实战案例(2)
2.静态资源渲染 2.1.创建http服务器 var http = require('http'); var url = require('url'); var app = http.createSe ...
- 019.Kubernetes二进制集群存储longhorn
一 Longhorn存储部署 1.1 Longhorn概述 Longhorn是用于Kubernetes的开源分布式块存储系统. 提示:更多介绍参考:https://github.com/longhor ...
- .NET Core 选项模式【Options】的使用
ASP.NET Core引入了Options模式,使用类来表示相关的设置组.简单的来说,就是用强类型的类来表达配置项,这带来了很多好处.利用了系统的依赖注入,并且还可以利用配置系统.它使我们可以采用依 ...
- 注解式HTTP请求Feign (F版)
Spring Cloud 为开发者提供了在分布式系统中的一些常用的组件(例如配置管理,服务发现,断路器,智能路由,微代理,控制总线,一次性令牌,全局锁定,决策竞选,分布式会话集群状态).使用Sprin ...
- API测试之Postman使用全指南(原来使用 Postman测试API如此简单)
Postman Postman是一个可扩展的API开发和测试协同平台工具,可以快速集成到CI/CD管道中.旨在简化测试和开发中的API工作流. Postman 工具有 Chrome 扩展和独立客户端, ...
- 实现 React Hooks
实现 React Hooks UI 开发有两个问题: 展示复用 逻辑复用 展示复用目前基本使用组件化来解决,逻辑复用一直以来都没有特别好的解决方案.React 从一开始的 mixin ,到 高阶组件 ...
- [NOI2003]逃学的小孩 (贪心+树的直径+暴力枚举)
Input 第一行是两个整数N(3 <= N <= 200000)和M,分别表示居住点总数和街道总数.以下M行,每行给出一条街道的信息.第i+1行包含整数Ui.Vi.Ti(1<=Ui ...
- Numerical Sequence(hard version),两次二分
题目: 题意: 已知一个序列: 112123123412345123456123456712345678123456789123456789101234567891011... 求这个序列第k个数是多 ...
- mac篇---mac安装jupyter
1.Jupyter搭建 pip install --user jupyter 如果是在python3中,则用如下命令: pip3 install --user jupyter 如下图所示: 2. Ju ...