Qt 绘制平滑曲线
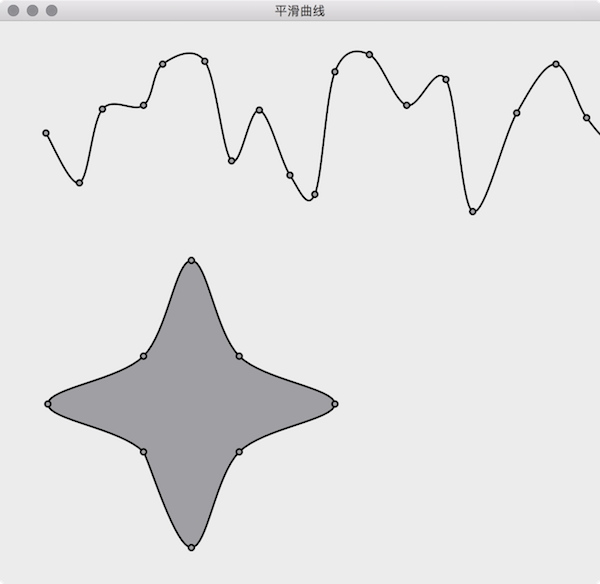
本文介绍在 Qt 中绘制平滑曲线的实现,调用下面的函数 SmoothCurveGenerator::generateSmoothCurve(points) 即可。默认曲线的 2 个顶点之间被分割为 16 个小线段来拟合曲线,下图展示了 tension 为 0.5(默认值) 的曲线效果,tension 并不是越大越好,默认的 0.5 大多数时候就不错。
算法来自于 How to draw smooth curve through N points using javascript HTML5 canvas?
SmoothCurveGenerator
|
1
2
3
4
5
6
7
8
9
10
11
12
13
14
15
16
17
18
19
20
21
22
23
24
25
26
27
28
29
|
// 文件名: SmoothCurveGenerator.h
#ifndef SMOOTHCURVEGENERATOR_H
#define SMOOTHCURVEGENERATOR_H
#include <QList>
#include <QPainterPath>
class SmoothCurveGenerator {
public:
/**
* @brief generateSmoothCurve 的重载函数
*/
static QPainterPath generateSmoothCurve(QList<QPointF> points, bool closed = false, double tension = 0.5, int numberOfSegments = 16);
/**
* @brief 使用传入的曲线顶点坐标创建平滑曲线。
*
* @param points 曲线顶点坐标数组,
* points[i+0] 是第 i 个点的 x 坐标,
* points[i+1] 是第 i 个点的 y 坐标
* @param closed 曲线是否封闭,默认不封闭
* @param tension 密集程度,默认为 0.5
* @param numberOfSegments 平滑曲线 2 个顶点间的线段数,默认为 16
* @return 平滑曲线的 QPainterPath
*/
static QPainterPath generateSmoothCurve(QList<double>points, bool closed = false, double tension = 0.5, int numberOfSegments = 16);
};
#endif // SMOOTHCURVEGENERATOR_H
|
|
1
2
3
4
5
6
7
8
9
10
11
12
13
14
15
16
17
18
19
20
21
22
23
24
25
26
27
28
29
30
31
32
33
34
35
36
37
38
39
40
41
42
43
44
45
46
47
48
49
50
51
52
53
54
55
56
57
58
59
60
61
62
63
64
65
66
67
68
69
70
71
72
73
74
75
76
77
78
79
80
81
|
// 文件名: SmoothCurveGenerator.cpp
#include "SmoothCurveGenerator.h"
#include <QtMath>
QPainterPath SmoothCurveGenerator::generateSmoothCurve(QList<QPointF> points, bool closed, double tension, int numberOfSegments) {
QList<double> ps;
foreach (QPointF p, points) {
ps << p.x() << p.y();
}
return SmoothCurveGenerator::generateSmoothCurve(ps, closed, tension, numberOfSegments);
}
QPainterPath SmoothCurveGenerator::generateSmoothCurve(QList<double> points, bool closed, double tension, int numberOfSegments) {
QList<double> ps(points); // clone array so we don't change the original points
QList<double> result; // generated smooth curve coordinates
double x, y;
double t1x, t2x, t1y, t2y;
double c1, c2, c3, c4;
double st;
// The algorithm require a previous and next point to the actual point array.
// Check if we will draw closed or open curve.
// If closed, copy end points to beginning and first points to end
// If open, duplicate first points to befinning, end points to end
if (closed) {
ps.prepend(points[points.length() - 1]);
ps.prepend(points[points.length() - 2]);
ps.prepend(points[points.length() - 1]);
ps.prepend(points[points.length() - 2]);
ps.append(points[0]);
ps.append(points[1]);
} else {
ps.prepend(points[1]); // copy 1st point and insert at beginning
ps.prepend(points[0]);
ps.append(points[points.length() - 2]); // copy last point and append
ps.append(points[points.length() - 1]);
}
// 1. loop goes through point array
// 2. loop goes through each segment between the 2 points + 1e point before and after
for (int i = 2; i < (ps.length() - 4); i += 2) {
// calculate tension vectors
t1x = (ps[i + 2] - ps[i - 2]) * tension;
t2x = (ps[i + 4] - ps[i - 0]) * tension;
t1y = (ps[i + 3] - ps[i - 1]) * tension;
t2y = (ps[i + 5] - ps[i + 1]) * tension;
for (int t = 0; t <= numberOfSegments; t++) {
// calculate step
st = (double)t / (double)numberOfSegments;
// calculate cardinals
c1 = 2 * qPow(st, 3) - 3 * qPow(st, 2) + 1;
c2 = -2 * qPow(st, 3) + 3 * qPow(st, 2);
c3 = qPow(st, 3) - 2 * qPow(st, 2) + st;
c4 = qPow(st, 3) - qPow(st, 2);
// calculate x and y cords with common control vectors
x = c1 * ps[i] + c2 * ps[i + 2] + c3 * t1x + c4 * t2x;
y = c1 * ps[i + 1] + c2 * ps[i + 3] + c3 * t1y + c4 * t2y;
//store points in array
result << x << y;
}
}
// 使用的平滑曲线的坐标创建 QPainterPath
QPainterPath path;
path.moveTo(result[0], result[1]);
for (int i = 2; i < result.length() - 2; i += 2) {
path.lineTo(result[i+0], result[i+1]);
}
if (closed) {
path.closeSubpath();
}
return path;
}
|
Form
|
1
2
3
4
5
6
7
8
9
10
11
12
13
14
15
16
17
18
19
20
21
22
23
24
25
26
|
// 文件名: Form.h
#ifndef FORM_H
#define FORM_H
#include <QWidget>
#include <QList>
#include <QPainterPath>
class Form : public QWidget {
Q_OBJECT
public:
explicit Form(QWidget *parent = 0);
~Form();
protected:
void paintEvent(QPaintEvent *event) Q_DECL_OVERRIDE;
private:
QList<QPointF> points1; // 曲线一的顶点数组
QList<QPointF> points2; // 曲线二的顶点数组
QPainterPath smoothCurvePath1; // 平滑曲线一
QPainterPath smoothCurvePath2; // 平滑曲线二
};
#endif // FORM_H
|
|
1
2
3
4
5
6
7
8
9
10
11
12
13
14
15
16
17
18
19
20
21
22
23
24
25
26
27
28
29
30
31
32
33
34
35
36
37
38
39
40
41
42
43
44
45
46
47
48
49
50
51
52
|
// 文件名: Form.cpp
#include "Form.h"
#include "SmoothCurveGenerator.h"
#include <QDebug>
#include <QPainter>
#include <QDateTime>
Form::Form(QWidget *parent) : QWidget(parent) {
qsrand(QDateTime::currentDateTime().toTime_t());
// 随机生成曲线第一条曲线的坐标
int x = 0, y = 0;
for (int i = 0; i < 100; ++i) {
x += qrand() % 30 + 20;
y = qrand() % 180 + 30;
points1 << QPointF(x, y);
}
// 第二条星行曲线的坐标
points2 << QPointF(0, 150) << QPointF(50, 50) << QPointF(150, 0) << QPointF(50, -50)
<< QPointF(0, -150) << QPointF(-50, -50) << QPointF(-150, 0) << QPointF(-50, 50);
// 使用曲线的坐标生成平滑曲线
smoothCurvePath1 = SmoothCurveGenerator::generateSmoothCurve(points1); // 第一条曲线不封闭
smoothCurvePath2 = SmoothCurveGenerator::generateSmoothCurve(points2, true); // 第二条曲线是封闭的
}
Form::~Form() {
}
void Form::paintEvent(QPaintEvent *) {
QPainter painter(this);
painter.setRenderHint(QPainter::Antialiasing);
painter.setPen(QPen(Qt::black, 2));
// 绘制第一条平滑曲线和曲线上的顶点
painter.drawPath(smoothCurvePath1);
painter.setBrush(Qt::gray);
for (int i = 0; i < points1.length() ; i += 1) {
painter.drawEllipse(points1[i].x()-3, points1[i].y()-3, 6, 6);
}
// 绘制第二条平滑曲线和曲线上的顶点
painter.translate(200, 400);
painter.drawPath(smoothCurvePath2);
for (int i = 0; i < points2.length() ; i += 1) {
painter.drawEllipse(points2[i].x()-3, points2[i].y()-3, 6, 6);
}
}
|
Qt 绘制平滑曲线的更多相关文章
- QT绘制饼图
QT版本:QT5.6.1 QT绘制饼图,出问题的代码如下 void DrawPieDialog::paintEvent(QPaintEvent *event) { float startAngle=0 ...
- Qt 学习之路 2(24):Qt 绘制系统简介
Qt 学习之路 2(24):Qt 绘制系统简介 豆子 2012年10月30日 Qt 学习之路 2 77条评论 Qt 的绘图系统允许使用相同的 API 在屏幕和其它打印设备上进行绘制.整个绘图系统基于Q ...
- 【js类库Raphaël】使用raphael.js根据点坐标绘制平滑曲线
一.可供参考的文档资料. raphaeljs官网:http://raphaeljs.com/ w3c关于path的介绍:http://www.w3.org/TR/2003/REC-SVG11-200 ...
- Qt绘制异形窗体
异形窗体即不规则窗体,一般采用png图片,一般绘制异形窗体分两步: 1.设置遮罩区 2.绘制图片 使用png图片的透明部分作为遮罩区,然后绘制图片,这样我们就看到一个只绘制了非透明部分的图形,废话 ...
- Qt 学习之路 :Qt 绘制系统简介
Qt 的绘图系统允许使用相同的 API 在屏幕和其它打印设备上进行绘制.整个绘图系统基于QPainter,QPainterDevice和QPaintEngine三个类. QPainter用来执行绘制的 ...
- qt绘制设备
# -*- coding: utf-8 -*- # python:2.x __author__ = 'Administrator' from PyQt4.QtGui import * from Py ...
- QT绘制系统简介
#3个类:QPainter,QPainterDevice 和 QPaintEngine 三个类 #qpainter用于执行绘制操作 #QPainterDevice是一个二维空间抽象,允许qpainte ...
- QT 绘制按钮 paintEvent enterEvent leaseEvent mouseEvent
案例2:绘制按钮 main.cpp #include<QApplication> #include “demoWidget.h” int main(int args , int arg ...
- Qt绘制文本一
QPainterPath,使用 drawText且设置字体,再使用painter.drawText方式 效果图: void WgtText::paintEvent(QPaintEvent *event ...
随机推荐
- 使用boost::property_tree生成带attribute的xml
曾经写过一篇"使用Boost property tree来解析带attribute的xml", 但是还有姐妹篇一直没贴.看看前一篇贴了都快都快3年了,时间过的真快. 这一小篇就算是 ...
- GitHub的repository的相关操作
原文地址 https://www.jianshu.com/p/038e8ba10e45 1.准备工作 a.有自己的GitHub账号(https://github.com/)b.在自己本地有安装git软 ...
- 解决Eclipse中的卡死现象
解决Eclipse中的卡死现象 取消验证 windows–>perferences–>validation 把 除了manual 下面的全部点掉,build下只留 classpath de ...
- Windows Phone 8.1 数据处理
Windows Phone 8.1 应用的数据存储位置包括: Installation Folder ApplicationData Credential Locker Known Folders S ...
- 探讨jsp相对路径和绝对路径
原文链接:http://blog.csdn.net/qq_37936542/article/details/79076768 问题:当在jsp使用相对路径引入其他js文件的时候,通过浏览器访问该页面一 ...
- js进阶 11-2 jquery属性如何操作
js进阶 11-2 jquery属性如何操作 一.总结 一句话总结:jquery中的属性用attr方法表示.jquery中都是方法. 1.jquery中的属性的增删改查操作? 只需要两个方法, at ...
- Opencv Surf算子特征提取与最优匹配
Opencv中Surf算子提取特征,生成特征描述子,匹配特征的流程跟Sift是完全一致的,这里主要介绍一下整个过程中需要使用到的主要的几个Opencv方法. 1. 特征提取 特征提取使用SurfFea ...
- Thrift写RPC接口
Thrift总结(二)创建RPC服务 前面介绍了thrift 基础的东西,怎么写thrift 语法规范编写脚本,如何生成相关的语言的接口.不清楚的可以看这个<Thrift总结(一)介绍>. ...
- Methods and systems to control virtual machines
Methods and systems are provided to control the execution of a virtual machine (VM). A VM Monitor (V ...
- UE4.5.0的Kinect插件(Plugin)<一>
声明:所有权利保留. 转载必须说明出处:http://blog.csdn.net/cartzhang/article/details/43193431 UE4 Plugin,在UE4的官网,放出了有个 ...