Ubuntu下使用Git_4
在这个第四个文章中,我将练习GIT的高级阶段了,由于高级阶段的内容转的比较多,我自己的代码除了我自己可以看懂意外,大家可能看不懂,所以我将会按照
http://git.wiki.navisec.it/stepup/stepup2_1.html这里教程里面的内容进行一次截图演示
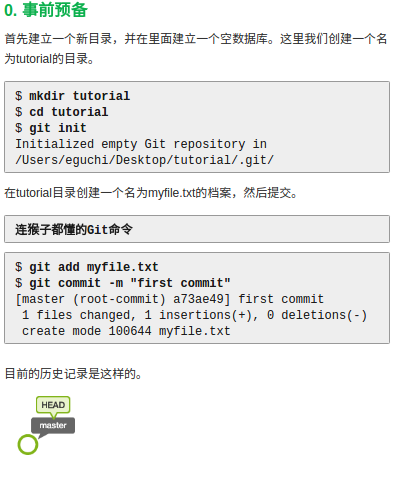
按照教程,我讲先新建一个文件夹,作为本地数据库
$ mkdir tutorial

$ cd tutorial

$ git init

本地数据初始化完毕
下一步就是新建一个文件

剩下步骤就是吧这个文件添加到git的索引下,并且提交
下一步就是建立分支
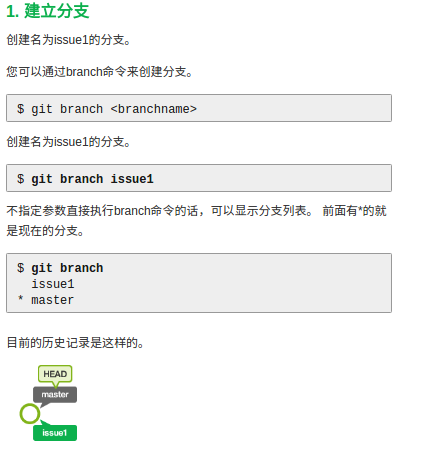
按照教程来
$ git branch issue1

$ git branch
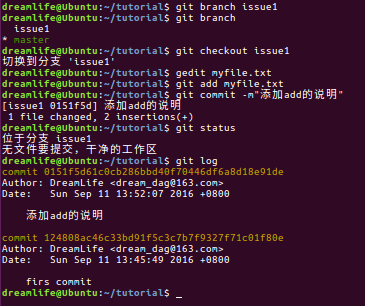
下一步,切换分支
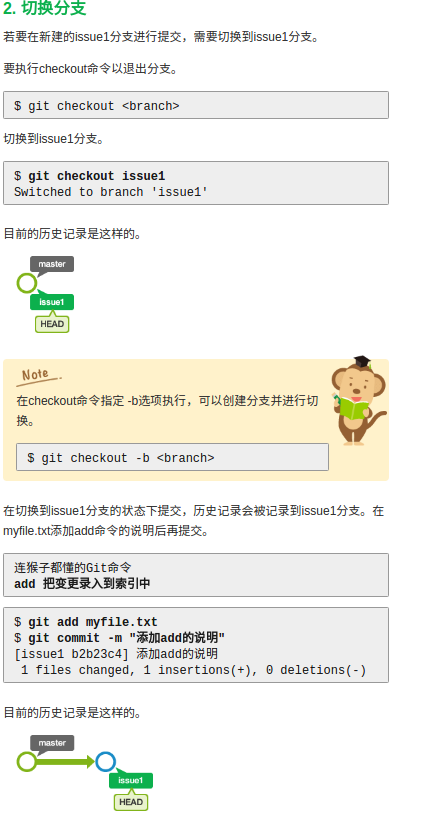
$ git branch issue1

$ git branch
$ git checkout issue1
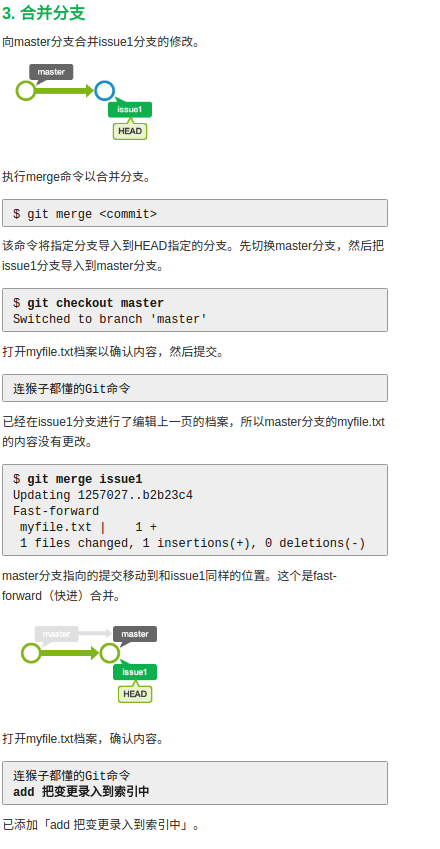
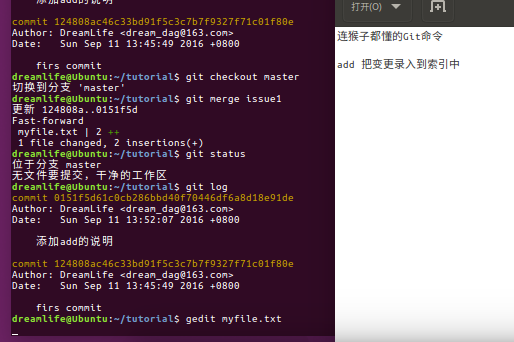
下一步合并分支
删除分支
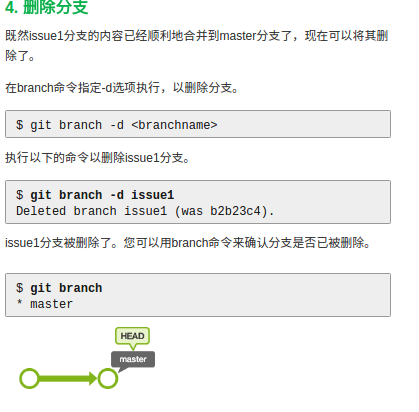

下面是最重要的了,就是两个人同时开发的时候,在合并分支的时候,出现合并冲突怎么解决了
和前面的差不多了
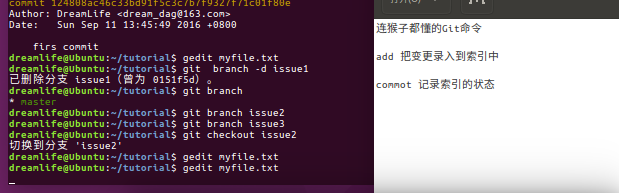
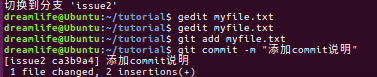
现在在issue2中编辑文件,切换到issue3中编辑文件
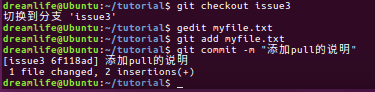
下面就是切换到 master分支下合并文件
可以看到,我们可以顺利合并issue2,但是在合并issue3的时候提示内容冲突
这里我们只需要打开文件,手动除了一下冲突就好

完成合并
还有一种合并方式,这里实践一下
还原issue3的合并

切换到issue3下面
合并的时候,会发现有冲突
下面直接打开就好
下面贴上我的所有操作记录
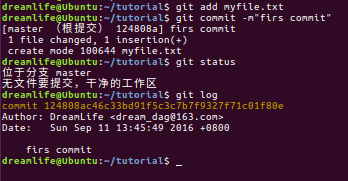
dreamlife@Ubuntu:~$ mkdir tutorial
dreamlife@Ubuntu:~$ cd tutorial
dreamlife@Ubuntu:~/tutorial$ git init
初始化空的 Git 仓库于 /home/dreamlife/tutorial/.git/
dreamlife@Ubuntu:~/tutorial$ gedit myfile.txt
dreamlife@Ubuntu:~/tutorial$ gedit myfile.txt
dreamlife@Ubuntu:~/tutorial$
dreamlife@Ubuntu:~/tutorial$
dreamlife@Ubuntu:~/tutorial$
dreamlife@Ubuntu:~/tutorial$ git add myfile.txt
dreamlife@Ubuntu:~/tutorial$ git commit -m"firs commit"
[master (根提交) 124808a] firs commit
1 file changed, 1 insertion(+)
create mode 100644 myfile.txt
dreamlife@Ubuntu:~/tutorial$ git status
位于分支 master
无文件要提交,干净的工作区
dreamlife@Ubuntu:~/tutorial$ git log
commit 124808ac46c33bd91f5c3c7b7f9327f71c01f80e
Author: DreamLife <dream_dag@163.com>
Date: Sun Sep 11 13:45:49 2016 +0800 firs commit
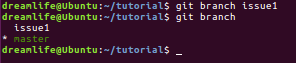
dreamlife@Ubuntu:~/tutorial$ git branch issue1
dreamlife@Ubuntu:~/tutorial$ git branch
issue1
* master
dreamlife@Ubuntu:~/tutorial$ git checkout issue1
切换到分支 'issue1'
dreamlife@Ubuntu:~/tutorial$ gedit myfile.txt
dreamlife@Ubuntu:~/tutorial$ git add myfile.txt
dreamlife@Ubuntu:~/tutorial$ git commit -m"添加add的说明"
[issue1 0151f5d] 添加add的说明
1 file changed, 2 insertions(+)
dreamlife@Ubuntu:~/tutorial$ git status
位于分支 issue1
无文件要提交,干净的工作区
dreamlife@Ubuntu:~/tutorial$ git log
commit 0151f5d61c0cb286bbd40f70446df6a8d18e91de
Author: DreamLife <dream_dag@163.com>
Date: Sun Sep 11 13:52:07 2016 +0800 添加add的说明 commit 124808ac46c33bd91f5c3c7b7f9327f71c01f80e
Author: DreamLife <dream_dag@163.com>
Date: Sun Sep 11 13:45:49 2016 +0800 firs commit
dreamlife@Ubuntu:~/tutorial$ git checkout master
切换到分支 'master'
dreamlife@Ubuntu:~/tutorial$ git merge issue1
更新 124808a..0151f5d
Fast-forward
myfile.txt | 2 ++
1 file changed, 2 insertions(+)
dreamlife@Ubuntu:~/tutorial$ git status
位于分支 master
无文件要提交,干净的工作区
dreamlife@Ubuntu:~/tutorial$ git log
commit 0151f5d61c0cb286bbd40f70446df6a8d18e91de
Author: DreamLife <dream_dag@163.com>
Date: Sun Sep 11 13:52:07 2016 +0800 添加add的说明 commit 124808ac46c33bd91f5c3c7b7f9327f71c01f80e
Author: DreamLife <dream_dag@163.com>
Date: Sun Sep 11 13:45:49 2016 +0800 firs commit
dreamlife@Ubuntu:~/tutorial$ gedit myfile.txt
dreamlife@Ubuntu:~/tutorial$ git branch -d issue1
已删除分支 issue1(曾为 0151f5d)。
dreamlife@Ubuntu:~/tutorial$ git branch
* master
dreamlife@Ubuntu:~/tutorial$ git branch issue2
dreamlife@Ubuntu:~/tutorial$ git branch issue3
dreamlife@Ubuntu:~/tutorial$ git checkout issue2
切换到分支 'issue2'
dreamlife@Ubuntu:~/tutorial$ gedit myfile.txt
dreamlife@Ubuntu:~/tutorial$ gedit myfile.txt
dreamlife@Ubuntu:~/tutorial$ git add myfile.txt
dreamlife@Ubuntu:~/tutorial$ git commit -m "添加commit说明"
[issue2 ca3b9a4] 添加commit说明
1 file changed, 2 insertions(+)
dreamlife@Ubuntu:~/tutorial$ git checkout issue3
切换到分支 'issue3'
dreamlife@Ubuntu:~/tutorial$ gedit myfile.txt
dreamlife@Ubuntu:~/tutorial$ git add myfile.txt
dreamlife@Ubuntu:~/tutorial$ git commit -m "添加pull的说明"
[issue3 6f118ad] 添加pull的说明
1 file changed, 2 insertions(+)
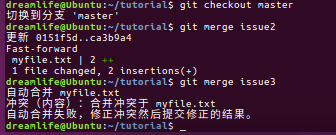
dreamlife@Ubuntu:~/tutorial$ git checkout master
切换到分支 'master'
dreamlife@Ubuntu:~/tutorial$ git merge issue2
更新 0151f5d..ca3b9a4
Fast-forward
myfile.txt | 2 ++
1 file changed, 2 insertions(+)
dreamlife@Ubuntu:~/tutorial$ git merge issue3
自动合并 myfile.txt
冲突(内容):合并冲突于 myfile.txt
自动合并失败,修正冲突然后提交修正的结果。
dreamlife@Ubuntu:~/tutorial$ gedit myfile.txt
dreamlife@Ubuntu:~/tutorial$ git add myfile.txt
dreamlife@Ubuntu:~/tutorial$ git commit -m "合并issue3分支"
[master c42c43a] 合并issue3分支
dreamlife@Ubuntu:~/tutorial$ git reset --hard HEAD`
> ^C
dreamlife@Ubuntu:~/tutorial$ git reset --hard HEAD~
HEAD 现在位于 ca3b9a4 添加commit说明
dreamlife@Ubuntu:~/tutorial$ gedit myfile.txt
dreamlife@Ubuntu:~/tutorial$ git che
checkout cherry cherry-pick
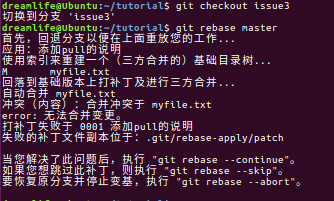
dreamlife@Ubuntu:~/tutorial$ git checkout issue3
切换到分支 'issue3'
dreamlife@Ubuntu:~/tutorial$ git rebase master
首先,回退分支以便在上面重放您的工作...
应用:添加pull的说明
使用索引来重建一个(三方合并的)基础目录树...
M myfile.txt
回落到基础版本上打补丁及进行三方合并...
自动合并 myfile.txt
冲突(内容):合并冲突于 myfile.txt
error: 无法合并变更。
打补丁失败于 0001 添加pull的说明
失败的补丁文件副本位于:.git/rebase-apply/patch 当您解决了此问题后,执行 "git rebase --continue"。
如果您想跳过此补丁,则执行 "git rebase --skip"。
要恢复原分支并停止变基,执行 "git rebase --abort"。 dreamlife@Ubuntu:~/tutorial$ gedit myfile.txt
dreamlife@Ubuntu:~/tutorial$ git add myfile.txt
dreamlife@Ubuntu:~/tutorial$ git rebase --continue
应用:添加pull的说明
dreamlife@Ubuntu:~/tutorial$ git checkout master
切换到分支 'master'
dreamlife@Ubuntu:~/tutorial$ git merge issue3
更新 ca3b9a4..15c5986
Fast-forward
myfile.txt | 4 ++++
1 file changed, 4 insertions(+)
dreamlife@Ubuntu:~/tutorial$
dreamlife@Ubuntu:~/tutorial$
在合并冲突这个地方,我联系了好多次,大家也可以多联系几次,这里还是希望大家看下链接中内容,真的写的很好
http://git.wiki.navisec.it/stepup/stepup2_8.html

Ubuntu下使用Git_4的更多相关文章
- 在Ubuntu下搭建ASP.NET 5开发环境
在Ubuntu下搭建ASP.NET 5开发环境 0x00 写在前面的废话 年底这段时间实在太忙了,各种事情都凑在这个时候,没时间去学习自己感兴趣的东西,所以博客也好就没写了.最近工作上有个小功能要做成 ...
- 在Ubuntu下搭建Spark群集
在前一篇文章中,我们已经搭建好了Hadoop的群集,接下来,我们就是需要基于这个Hadoop群集,搭建Spark的群集.由于前面已经做了大量的工作,所以接下来搭建Spark会简单很多. 首先打开三个虚 ...
- Ubuntu下开启php调试模式,显示报错信息
在Ubuntu下php的缺省设置是不显示错误信息的,如果程序出错会显示“无法处理此请求的错误提示”,这在开发环境下非常不方便. 其实我们只要编辑下apache的配置文件就好 1.我的apache 配置 ...
- 在Ubuntu下安装ovs-dpdk
在Ubuntu下安装ovs-dpdk 参考资料:https://software.intel.com/zh-cn/articles/using-open-vswitch-with-dpdk-on-ub ...
- Ubuntu 下安装QT
Ubuntu 下安装QT 本文使用的环境 QT Library: qt-everywhere-opensource-src-4.7.4.tar.gz QT Creator: qt-creator-li ...
- Torch7在Ubuntu下的安装与配置
Torch7的本系列教程的主要目的是介绍Torch的入门使用.今天首先分享一下Torch7的安装.(在Ubuntu14.04安装torch7) 为什么选择Torch Torch的目标是在建立科学算法的 ...
- Ubuntu 下ibus拼音输入法启用 (ubuntu 16.04
Ubuntu 下ibus拼音输入法启用 我安装的是英文版的ubuntu 16.04,打开只带英文,并没有中文. 设置输入法为iBus 从system settings 进入language suppo ...
- Ubuntu下git的安装与使用
Ubuntu下git的安装与使用 Ubuntu下git的安装与使用与Windows下的大致相同,只不过个人感觉在Ubuntu下使用git更方便. 首先,确认你的系统是否已安装git,可以通过git指令 ...
- 在ubuntu下安装google chrome
由于手上有两台电脑,再加上我那个选择困难症加上纠结劲.所以果断把其中一台电脑只装linux系统,另一台电脑只装windows了.免得我老纠结!于是linux便选择了ubuntu. 由于浏览器一直用的是 ...
随机推荐
- java线程池系列(1)-ThreadPoolExecutor实现原理
前言 做java开发的,一般都避免不了要面对java线程池技术,像tomcat之类的容器天然就支持多线程. 即使是做偏后端技术,如处理一些消息,执行一些计算任务,也经常需要用到线程池技术. 鉴于线程池 ...
- EF Ccore 主从配置 最简化
业务需要 配置一主多从数据库 读写分离 orm用的ef core , 把思路和代码写下 1. 配置2个数据库上下文 ETMasterContext ETSlaveContext(把增删改功能禁用掉 ...
- 五、设置 IntelliJ IDEA 主题和字体的方法
我们已经用 IntelliJ IDEA 创建了第一个 Java 项目 HelloWorld,如下图所示: 观察上图,大家有没有发现一些问题,例如,整个界面的字体是不是都太小了一点啊?不知道大家感受如何 ...
- SpringMVC学习记录二——非注解和注解的处理器映射器和适配器
3 非注解的处理器映射器和适配器 3.1 非注解的处理器映射器 处理器映射器: org.springframework.web.servlet.handler.BeanNameUr ...
- com.microsoft.sqlserver.jdbc.SQLServerException: Socket closed 或者 该连接已关闭
com.microsoft.sqlserver.jdbc.SQLServerException: Socket closed 或者 该连接已关闭 解决方案: DBUtil公共方法如下: package ...
- 【洛谷P2577】[ZJOI2005]午餐
午餐 题目链接 DP题都辣么毒瘤的么.. 首先,看一下题解 我们就有了思路: 贪心:显然,让吃饭慢的先打饭,sort一遍(证明?不存在的.. DP:f[i][j][k]表示前i个人,窗口1的打饭时间为 ...
- Android 滑动效果汇总
Android 滑动效果入门篇(一)—— ViewFlipper Android 滑动效果入门篇(二)—— Gallery Android 滑动效果基础篇(三)—— Gallery仿图像集浏览 And ...
- js标准对象
在JavaScript的世界里,一切都是对象. 但是某些对象还是和其他对象不太一样.为了区分对象的类型,我们用typeof操作符获取对象的类型,它总是返回一个字符串: typeof 123; //'n ...
- Linux下文件字符编码格式检测和转换
目前多数情况下, 我们遇到的非英文字符文件都是使用UTF-8编码的, 这时一般我们查看这些文件的内容都不会有问题. 不过有时, 我们有可能会遇到非UTF-8编码的文件, 比如中文的GBK编码, 或者俄 ...
- SpringBoot向outlook发送邮件
首先要登陆outlook邮箱,点击设置滑到最下面选择完整设置 进入后选择邮件->同步电子邮件 打开pop如上设置 下面是我的application.propertis设置 请填上自己的邮箱名与密 ...