
SpringBoot-整合Swagger2
swagger2是一个用于生成、并能直接调用的可是话restful风格的服务
下面贴出springboot整合swagger2代码
一、maven依赖
这里使用的spring-boot版本是2.1.1.RELEASE,swagger2使用的是2.9.2,我一开始用的springboot1.5.6.RELEASE,swagger从2.4到2.9.2都用了,结果又很多jar包冲突,springboot换成了2.*版本依旧,依然有jar冲突,无奈,只能把冲突的依赖找出来,有具体报错信息,把他exclude掉就行,而且idea的maven-helper插件帮助也蛮大
<!-- swagger -->

<dependency>

    <groupId>io.springfox</groupId>

    <artifactId>springfox-swagger2</artifactId>

    <version>2.9.2</version>

    <exclusions>

        <exclusion>

            <artifactId>spring-context</artifactId>

            <groupId>org.springframework</groupId>

        </exclusion>

        <exclusion>

            <artifactId>spring-beans</artifactId>

            <groupId>org.springframework</groupId>

        </exclusion>

        <exclusion>

            <artifactId>spring-aop</artifactId>

            <groupId>org.springframework</groupId>

        </exclusion>

    </exclusions>

</dependency>

<!-- swagger-ui -->

<dependency>

    <groupId>io.springfox</groupId>

    <artifactId>springfox-swagger-ui</artifactId>

    <version>2.9.2</version>

</dependency>
二、swagger2配置
package com.hy.other.config;

import org.springframework.context.annotation.Bean;

import org.springframework.context.annotation.Configuration;

import springfox.documentation.builders.ApiInfoBuilder;

import springfox.documentation.builders.PathSelectors;

import springfox.documentation.builders.RequestHandlerSelectors;

import springfox.documentation.service.ApiInfo;

import springfox.documentation.service.Contact;

import springfox.documentation.spi.DocumentationType;

import springfox.documentation.spring.web.plugins.Docket;

import springfox.documentation.swagger2.annotations.EnableSwagger2;

@Configuration

@EnableSwagger2

public class SwaggerConfiguration {

    @Bean

    public Docket createRestApi() {

        return new Docket(DocumentationType.SWAGGER_2)

                .apiInfo(apiInfo())

                .select()

                // 生成api的包路径(一般是我们controller包的路径)

                .apis(RequestHandlerSelectors.basePackage("com.hy.other.controller"))

                .paths(PathSelectors.any())

                .build();

    }

    // swagger ui 页面里面的一些信息

    private ApiInfo apiInfo() {

        return new ApiInfoBuilder()

                // 页面标题

                .title("spring boot swagger")

                // 创建人

                .contact(new Contact("hy", "https://www.cnblogs.com/xhy-shine", ""))

                // 版本号

                .version("1.0")

                // 描述

                .description("API接口文档")

                .build();

    }

}
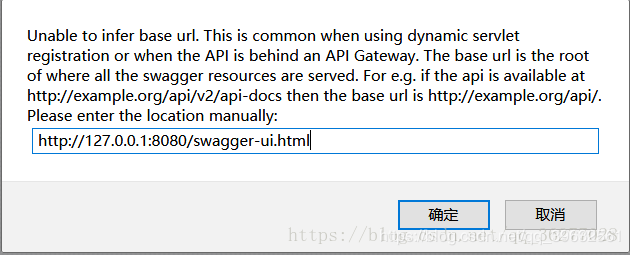
注意:@EnableSwagger2一定要加上,不然会无法访问swagger的ui界面,会报如下错误
三、代码(主要是swagger2的注解)
注解有挺多的,比较常用的就是@Api、@ApiOperation、@ApiImplicitParam、@ApiModel、@ApiModelProperty
@Api:包括下面的所有接口,有点类注释的意思
@ApiOperation:给接口增加说明
@ApiImplicitParams、@ApiImplicitParam:给接口参数添加说明
@ApiModel:描述对象类型的请求参数
@ApiModelProperty:描述对象的属性
注意:@ApiModelProperty注解的参数说明
paramType:指定参数放在哪个地方(header:request header中,使用@RequestHeader获取;query:使用@RequestParam获取;path:使用@PathVariable获取;body、form两者不常用)可参考:https://swagger.io/docs/specification/describing-parameters/
name:参数名
dataType:参数类型
required:是否必须
value:参数的意思
defaultValue:默认值
package com.hy.other.controller;

import io.swagger.annotations.Api;

import io.swagger.annotations.ApiImplicitParam;

import io.swagger.annotations.ApiOperation;

import org.springframework.amqp.rabbit.core.RabbitTemplate;

import org.springframework.beans.factory.annotation.Autowired;

import org.springframework.beans.factory.annotation.Value;

import org.springframework.web.bind.annotation.RequestBody;

import org.springframework.web.bind.annotation.RequestMapping;

import org.springframework.web.bind.annotation.RequestParam;

import org.springframework.web.bind.annotation.RestController;

@Api(description = "MQ接口")

@RestController

@RequestMapping("/messageQueue")

public class MessageQueueController {

    @Value("${rabbitmq.exchangeName}")

    private String exchangeName;

    @Value("${rabbitmq.queueName}")

    private String queueName;

    @Value("${rabbitmq.routeKey}")

    private String routeKey;

    @Autowired

    private RabbitTemplate rabbitTemplate;

    @ApiOperation(value = "send message to spin", notes = "发送消息到spin")

    @ApiImplicitParam(name = "message", value = "消息内容", required = true, paramType = "query")

    @RequestMapping("/sendWso2ToSpin")

    public String sendWso2ToSpin(@RequestParam("message") String message) {

        rabbitTemplate.convertAndSend(exchangeName, routeKey, message);

        return message;

    }

}
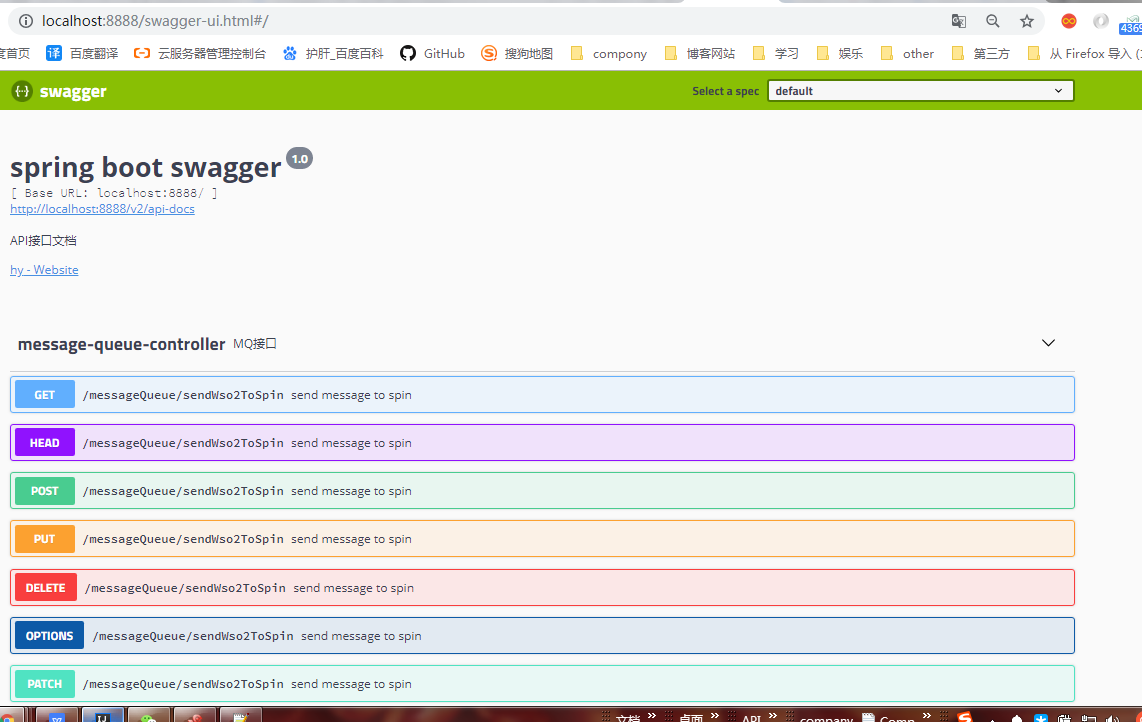
访问地址你的项目根路径加上swagger-ui.html就行
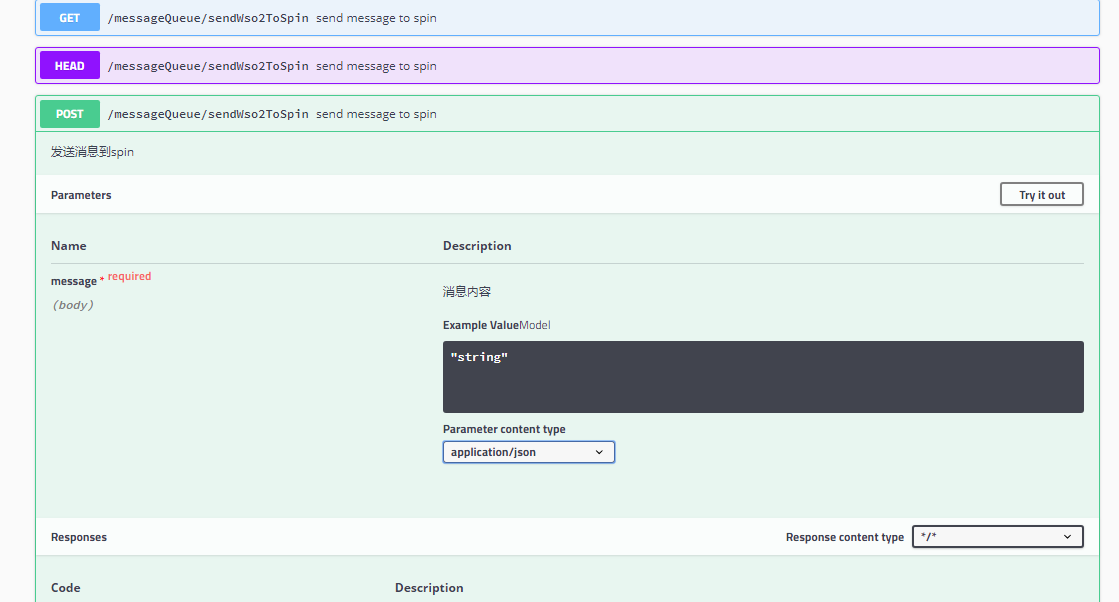
1、swagger会根据@RequestParam、@RequestBody注解来决定用form提交还是application/json格式(上图出现Parameter content type为application/json是因为我把请求参数前的注解改成了@RequestBody)
2、会根据@RequestMapping、@PostMapping、@GetMapping等注解生成对应的请求,如上,我写的@RequestMapping,他把所有请求格式都生成了
3、如果接收的是对象,可以使用@ApiModel结合@ApiModelProperty
SpringBoot-整合Swagger2的更多相关文章
- SpringBoot(七):SpringBoot整合Swagger2
原文地址:https://blog.csdn.net/saytime/article/details/74937664 手写Api文档的几个痛点: 文档需要更新的时候,需要再次发送一份给前端,也就是文 ...
- SpringBoot整合Swagger2
相信各位在公司写API文档数量应该不少,当然如果你还处在自己一个人开发前后台的年代,当我没说,如今为了前后台更好的对接,还是为了以后交接方便,都有要求写API文档. 手写Api文档的几个痛点: 文档需 ...
- SpringBoot整合Swagger2(Demo示例)
写在前面 由于公司项目采用前后端分离,维护接口文档基本上是必不可少的工作.一个理想的状态是设计好后,接口文档发给前端和后端,大伙按照既定的规则各自开发,开发好了对接上了就可以上线了.当然这是一种非常理 ...
- springboot 整合Swagger2的使用
Swagger2相较于传统Api文档的优点 手写Api文档的几个痛点: 文档需要更新的时候,需要再次发送一份给前端,也就是文档更新交流不及时. 接口返回结果不明确 不能直接在线测试接口,通常需要使用工 ...
- SpringBoot整合Swagger2案例,以及报错:java.lang.NumberFormatException: For input string: ""原因和解决办法
原文链接:https://blog.csdn.net/weixin_43724369/article/details/89341949 SpringBoot整合Swagger2案例 先说SpringB ...
- SpringBoot整合Swagger2详细教程
1. 简介 随着前后端分离开发模式越来越流行,编写接口文档变成了开发人员非常头疼的事.而Swagger是一个规范且完整的web框架,用于生成.描述.调用可视化的RESTful风格的在线接口文档,并 ...
- SpringBoot整合Swagger2及使用
简介 swagger是一个流行的API开发框架,这个框架以"开放API声明"(OpenAPI Specification,OAS)为基础, 对整个API的开发周期都提供了相应的解决 ...
- SpringBoot整合Swagger2,再也不用维护接口文档了!
前后端分离后,维护接口文档基本上是必不可少的工作.一个理想的状态是设计好后,接口文档发给前端和后端,大伙按照既定的规则各自开发,开发好了对接上了就可以上线了.当然这是一种非常理想的状态,实际开发中却很 ...
- SpringBoot学习笔记(16)----SpringBoot整合Swagger2
Swagger 是一个规范和完整的框架,用于生成,描述,调用和可视化RESTful风格的web服务 http://swagger.io Springfox的前身是swagger-springmvc,是 ...
- Spring Boot2 系列教程(十七)SpringBoot 整合 Swagger2
前后端分离后,维护接口文档基本上是必不可少的工作. 一个理想的状态是设计好后,接口文档发给前端和后端,大伙按照既定的规则各自开发,开发好了对接上了就可以上线了.当然这是一种非常理想的状态,实际开发中却 ...
随机推荐
- Scala API - 泛型
- TTL 传输中过期,内部网络环路
ping目标地址的时候,如果不是显示超时,而是很快出现TTL 传输中过期,很可能情况是内部网络出现环路 tracert一下目标地址,如果路由不断重复,说明是环路
- httpd配置Rewrite 301 302
在系统做一些大的.比较耗时的发布的时候,往往需要停服很长时间,这期间有用户访问的话,就需要展示一个升级说明的页面,这个页面放在反向代理服务器中:反向代理服务器如httpd有请求URL重写模块,通过它可 ...
- Python3 Selenium自动化web测试 ==> 第七节 WebDriver高级应用 -- 浮动框中,单击选择某个关键字选项
学习目的: 了解WebDriver的高级应用 正式步骤: 测试Python3代码 # -*- coding:utf-8 -*- from selenium import webdriver from ...
- Django:(04)状态保持和验证
一.Cookie 特点 Cookie是由服务器(网站)生成的,存储在浏览器端的 键值对数据(通常经过加密) 在响应请求时,服务器会把生成 Cookie数据 发给浏览器,浏览器会自动保存 (前提:浏 ...
- SpringBoot使用AOP获取请求参数
最近试了下拦截controller方法查看请求参数,方式如下: package com.*.aop; import com.alibaba.fastjson.JSON; import com.alib ...
- jQuery之替换节点
如果要替换节点,jQuery提供了两个方法:replaceWith()和replaceAll(). 两个方法的作用相同,只是操作颠倒了. 作用:将所有匹配的元素都替换成指定的HTML或者DOM元素.( ...
- ssm框架的小总结
一.mybatis框架 mybatis框架主要就是完成持久层的实现,简化了持久层的开发, 1.首先是配置文件的编写,我们这里就命名为mybatis-config.xml,先配置文件头,然后加载连接数据 ...
- 数据库连接池的sqlhelper
import pymysql import threading from DBUtils.PooledDB import PooledDB """ storage = { ...
- centos 秘钥登录
客户端系统:macOS 服务端系统:Centos7 另外:ip 为 172.25.11.182 用户名为 iamfine 1, 在客户端macOS上生成 rsa 对 ssh-keygen -t rsa ...