(2)Linux Java环境变量安装
- install default JRE/JDK
- Installing Java with
apt-getis easy. First, update the package index:- sudo apt-get update
- check if Java is not already installed:
- java -version
- If it returns "The program java can be found in the following packages", Java hasn't been installed yet, so execute the following command:
- sudo apt-get default-jre(This will install the Java Runtime Environment (JRE). )
- If you instead need the Java Development Kit (JDK), which is usually needed to compile Java applications (for example Apache Ant, Apache Maven, Eclipse and IntelliJ IDEA execute the following command:
- sudo apt-get install default-jdk
- That is everything that is needed to install Java.All other steps are optional and must only be executed when needed.
- Installing Java with
- Installing Oracle JDK (optional)
- The Oracle JDK is the official JDK; however, it is no longer provided by Oracle as a default installation for Ubuntu.
- You can still install it using apt-get.
- To install any version, first execute the following commands:
sudo apt-get install python-software-propertiessudo add-apt-repository ppa:webupd8team/javasudo apt-get update
- Then, depending on the version you want to install, execute one of the following commands:
- Oracle JDK6:This is an old version but still in use.
sudo apt-get install oracle-java6-installer
- Oracle JDK7:This is the latest stable version.
sudo apt-get install oracle-java7-installer
- Oracle JDK8:This is a developer preview, the general release is scheduled for March 2014. This external article about Java 8 may help you to understand what it's all about.
sudo apt-get install oracle-java8-installer
- Oracle JDK6:This is an old version but still in use.
- Managing Java (optional)(多版本环境下设置默认使用的版本)
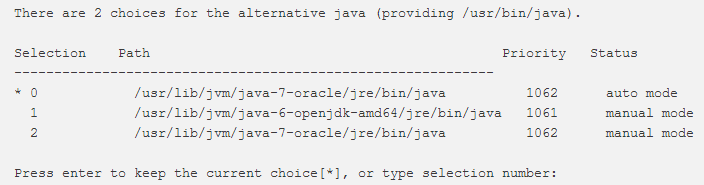
- When there are multiple Java installations on your Droplet, the Java version to use as default can be chosen. To do this, execute the following command:
sudo update-alternatives --config java
- It will usually return something like this if you have 2 installations (if you have more, it will of course return more):
- You can now choose the number to use as default. This can also be done for the Java compiler (
javac):sudo update-alternatives --config javac
- Setting the "JAVA_HOME" environment variable(取得Java安装路径,设置Java环境变量)
- To set the
JAVA_HOMEenvironment variable, which is needed for some programs, first find out the path of your Java installation:sudo update-alternatives --config java
- It returns something like:
- The path of the installation is for each:
/usr/lib/jvm/java-7-oracle/usr/lib/jvm/java-6-openjdk-amd64/usr/lib/jvm/java-7-oracle
- Copy the path from your preferred installation and then edit the file
/etc/environment:sudo nano /etc/environment
- In this file, add the following line (replacing YOUR_PATH by the just copied path):
JAVA_HOME="YOUR_PATH"
- That should be enough to set the environment variable. Now reload this file:
source /etc/environment
- Test it by executing:
echo $JAVA_HOME(If it returns the just set path, the environment variable has been set successfully. If it doesn't, please make sure you followed all steps correctly.)
- To set the
- When there are multiple Java installations on your Droplet, the Java version to use as default can be chosen. To do this, execute the following command:
- 通过URL链接安装jdk1.8
- wget --no-check-certificate --no-cookies --header "Cookie: oraclelicense=accept-securebackup-cookie" http://download.oracle.com/otn-pub/java/jdk/8u91-b14/jdk-8u91-linux-x64.tar.gz
sudo mkdir /usr/java
sudo tar zxf jdk-8u91-linux-x64.tar.gz -C /usr/java
sudo echo "export JAVA_HOME=/usr/java/jdk1.8.0_91" >> /etc/bashrc
sudo "export PATH=$PATH:$JAVA_HOME/bin" >> /etc/bashrc
sudo echo "export CLASSPATH=$JAVA_HOME/lib/dt.jar:$JAVA_HOME/lib/tools.jar" >> /etc/bashrc
source /etc/bashrc
- wget --no-check-certificate --no-cookies --header "Cookie: oraclelicense=accept-securebackup-cookie" http://download.oracle.com/otn-pub/java/jdk/8u91-b14/jdk-8u91-linux-x64.tar.gz

(2)Linux Java环境变量安装的更多相关文章
- [知了堂学习笔记]_牵线Eclipse和Tomcat第一篇 —— 配置Java环境变量&&安装eclipse
一.先给他们提供一个"浪漫的"环境,比如传说中的"鹊桥"--java环境变量.哈哈! 配置java环境变量. 下载jdk,根据自己电脑的版本和操作位数选择不同的 ...
- linux java环境变量设置
下载JRE或者JDK后解压,设置以下环境变量 JAVA_HOME=/home/zm/jdk1.8.0_181JRE_HOME=/home/zm/jdk1.8.0_181/jreCLASSPATH=.: ...
- JAVA环境变量安装
需配置的系统环境变量参数: JAVA_HOME:C:\Program Files\Java\jdk1.8.0_60 CLASS_PATH: ;%JAVA_HOME%\lib;%JAVA_HOME%\l ...
- Linux Java 环境变量设置
对整个机器:所有用户 1,在/etc/profile 文件末尾加入 export JAVA_HOME=/var/opt/jdk1.7.0_04 export PATH=$JAVA_HOME/bin:$ ...
- Linux中如何设置java环境变量
这里介绍Linux下如何设置java环境变量. 工具/原料 Linux java环境变量 方法/步骤 1 查看java的安装路径 查看java执行路径 配置java环境变量 java的安装 ...
- JDK的安装与配置java环境变量
JDK安装与配置java环境变量 安装JDK 1.百度搜索jdk8找到下载地址 下载地址:Java SE Development Kit 8 - Downloads (oracle.com) 2.点击 ...
- linux配置java环境变量(详细)
linux配置java环境变量(详细) 本文完全引用自: http://www.cnblogs.com/samcn/archive/2011/03/16/1986248.html 一. 解压安装jdk ...
- linux配置java环境变量
linux配置java环境变量(详细) 一. 解压安装jdk 在shell终端下进入jdk-6u14-linux-i586.bin文件所在目录, 执行命令 ./jdk-6u14-linux-i586. ...
- 14行脚本配置Linux下一个Java环境变量
供Java人们刚开始学习.多半Java它需要花费大量的精力在开发环境的配置,于Linux下一个,构造Java环境变量,很可能加入这一努力. 为此,我做了一个bash脚本来配置自己主动Java环境变量. ...
随机推荐
- linux零碎001
glibc:GNU发布的libc库,即c运行库.glibc是linux系统中最底层的api,几乎其它任何运行库都会依赖于glibc. uclibc:是一个面向嵌入式Linux系统的小型的C标准库.最初 ...
- artTemplate使用说明
普通使用 <script id="test" type="text/html"> {{if isAdmin}} <h1>{{title} ...
- 【C语言】利用递归函数求n的阶乘
递归实现n的阶乘 什么是阶乘:0!= 1,n!=n * (n - 1) * (n - 2)......3 * 2 * 1: 解题思路: 1> 分析题意,很明显0是递归出口: ...
- js面向过程 分页功能
<!DOCTYPE html> <html lang="en"> <head> <meta charset="UTF-8&quo ...
- css的多级分类
<!DOCTYPE html><html lang="en"><head> <meta charset="UTF-8" ...
- DataTable 数据批量写入数据库三种方法比较
DataTable数据批量写入数据库三种方法比较 1) insert循环插入: 2) sqldataadapter.update(dataset,tablename); 3) sqlbul ...
- sqli-libs(46-53关)
Less_46 补充知识:MySQL知识 SQL语句中,asc是指定列按升序排列,desc则是指定列 按降序排列: Select * from users order by 1 desc; 使用降序进 ...
- vue指令及组件
复习 """ vue: 为什么选择vue - 综合其他框架优点,轻量级,中文API,数据驱动,组件化开发,数据的双向绑定,虚拟DO 渐进式js框架 - 选择性控制 - 创 ...
- next路由跳转监听
next的路由跳转监听事件 { “routeChangeStart”, "beforeHisroryChange" "routeChangeComplete", ...
- 吴裕雄 python 机器学习——多项式贝叶斯分类器MultinomialNB模型
import numpy as np import matplotlib.pyplot as plt from sklearn import datasets,naive_bayes from skl ...