
TensorFlow——卷积神经网络的相关函数
在TensorFlow中,使用tr.nn.conv2d来实现卷积操作,使用tf.nn.max_pool进行最大池化操作。通过闯传入不同的参数,来实现各种不同类型的卷积与池化操作。
卷积函数tf.nn.conv2d
TensorFlow里使用tf.nn.conv2d函数来实现卷积,其格式如下:
tf.nn.conv2d(input, filter, strides, padding, use_cudnn_on_gpu=None, name=None),参数的含义如下:
input:需要进行卷积操作的图像,它要求是一个Tensor,具有[ batch, in_height, in_width, in_channels ]的形状,这是一个四维的数据,其中各个位置参数的具体含义是:训练时一个batch的图片数量,图片高度,图片宽度,图片通道数,数据的类型是float。
filter:相当于CNN中的卷积核,它要求是一个Tensor,具有[ filter_height,filter_width,in_channels,out_channels ]这样的shape,其中具体的含义是“卷积核的高度,卷积核宽度,图片的通道数,滤波器的个数”,要求类型与参数input相同。有一个地方需要关注意,第三维in_channels就是参数input的第四维。
strides:卷积是在图像每一位的步长,这是一个一维的向量,长度为4。
padding:定义元素边框与元素内容之间的空间。string类型的量,只能是SAME和VALID其中之一,这个值决定不同的卷积方式,padding的值VALID时,表示边缘不填充,当其为SAME时,表示填充
到滤波器可以到达图像边缘。
use_cudnn_on_gpu:bool类型,是否使用cudnn加速,默认为true。
返回值:函数的返回值仍然是一个Tensor,就是feature map。
import tensorflow as tf

import numpy as np

# [batch, im_height, im_weight, in_channels]

input = tf.Variable(tf.constant(1.0, shape=[1, 5, 5, 1]))

input2 = tf.Variable(tf.constant(1.0, shape=[1, 5, 5, 2]))

input3 = tf.Variable(tf.constant(1.0, shape=[1, 4, 4, 1]))

# [filter_height, filter_weight, in_channels, in_channels]

filter1 = tf.Variable(tf.constant([-1.0, 0, 0, -1], shape=[2, 2, 1, 1]))

filter2 = tf.Variable(tf.constant([-1.0, 0, 0, -1, -1, 0, 0, 1], shape=[2, 2, 1, 2]))

filter3 = tf.Variable(tf.constant([-1.0, 0, 0, -1,

                                   -1.0, 0, 0, -1,

                                   -1.0, 0, 0, -1], shape=[2, 2, 1, 3]))

filter4 = tf.Variable(tf.constant([-1.0, 0, 0, -1,

                                   -1.0, 0, 0, -1,

                                   -1.0, 0, 0, -1,

                                   -1.0, 0, 0, -1], shape=[2, 2, 2, 2]))

filter5 = tf.Variable(tf.constant([-1.0, 0, 0, -1, -1.0, 0, 0, -1], shape=[2, 2, 2, 1]))

op1 = tf.nn.conv2d(input, filter1, strides=[1, 2, 2, 1], padding='SAME')

op2 = tf.nn.conv2d(input, filter2, strides=[1, 2, 2, 1], padding='SAME')

op3 = tf.nn.conv2d(input, filter3, strides=[1, 2, 2, 1], padding='SAME')

op4 = tf.nn.conv2d(input2, filter4, strides=[1, 2, 2, 1], padding='SAME')

op5 = tf.nn.conv2d(input2, filter5, strides=[1, 2, 2, 1], padding='SAME')

vop1 = tf.nn.conv2d(input, filter1, strides=[1, 2, 2, 1], padding='VALID')

op6 = tf.nn.conv2d(input3, filter1, strides=[1, 2, 2, 1], padding='SAME')

vop6 = tf.nn.conv2d(input3, filter1, strides=[1, 2, 2, 1], padding='VALID')

init = tf.global_variables_initializer()

with tf.Session() as sess:

    sess.run(init)

    print('-op1:\n', sess.run([op1, filter1]))

    print('-------------------------------')

    print('-op2:\n', sess.run([op2, filter2]))

    print('-op3:\n', sess.run([op3, filter3]))

    print('-------------------------------')

    print('-op4:\n', sess.run([op4, filter4]))

    print('-op5:\n', sess.run([op5, filter5]))

    print('-------------------------------')

    print('-op1:\n', sess.run([op1, filter1]))

    print('-vop1:\n', sess.run([vop1, filter1]))

    print('-op6:\n', sess.run([op6, filter1]))

    print('-vop6:\n', sess.run([vop6, filter1]))

    print('-------------------------------')
根据上述程序的运行结果,仔细的分析就能理解卷积是如何的工作的,需要注意的是SAME padding补0的情况,
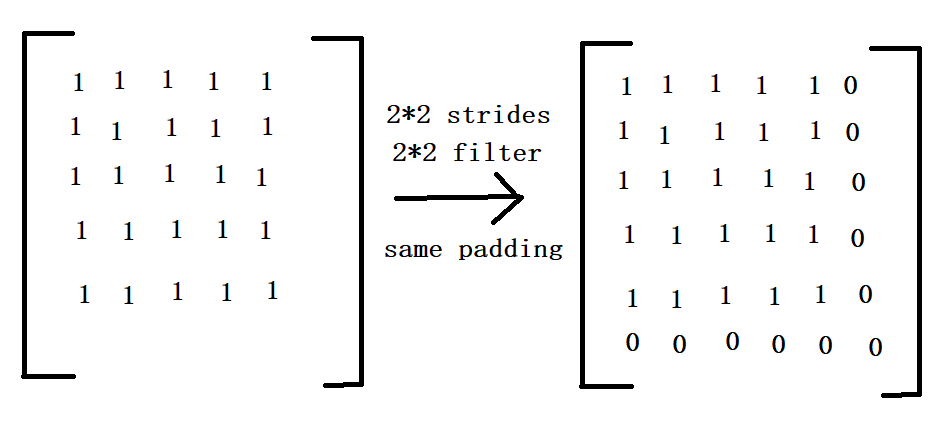
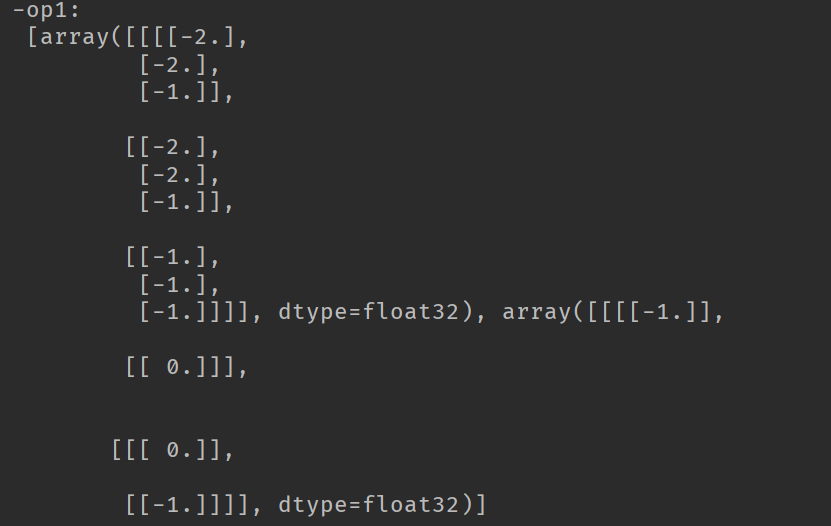
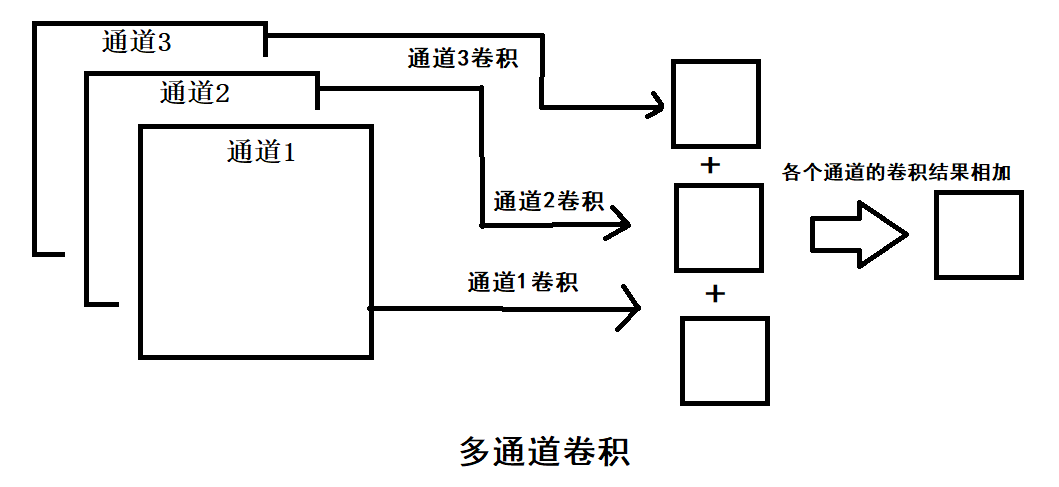
由于可知,op1的卷积操作的结果是3*3的feature map,其他的结果也是类似的情况。当图像是多通道的情况时,卷积操作的结果是将各个通道的feature map的结果相加,作为输出的一张feature map。
图像卷积示例
import tensorflow as tf

import numpy as np

import matplotlib.pyplot as plt

import matplotlib.image as mping

path = 'image/1.jpg'

img = mping.imread(path)

plt.imshow(img)

plt.axis('off')

plt.show()

print(img.shape)

full = np.reshape(img, [1, 374, 560, 3])

inputfull = tf.Variable(tf.constant(1.0, shape=[1, 374, 560, 3]))

filter = tf.Variable(tf.constant([[-1.0, -1.0, -1.0], [0, 0, 0], [1.0, 1.0, 1.0],

                                  [-2.0, -2.0, -2.0], [0, 0, 0], [2.0, 2.0, 2.0],

                                  [-1.0, -1.0, -1.0], [0, 0, 0], [1.0, 1.0, 1.0]], shape=[3, 3, 3, 1]))

op = tf.nn.conv2d(inputfull, filter, strides=[1, 1, 1, 1], padding='SAME')

o = tf.cast(((op - tf.reduce_min(op))/(tf.reduce_max(op)-tf.reduce_min(op)))*255, tf.uint8)

with tf.Session() as sess:

    sess.run(tf.global_variables_initializer())

    t, f = sess.run([o, filter], feed_dict={inputfull: full})

    t = np.reshape(t, [374, 560])

    plt.imshow(t, cmap='Greys_r')

    plt.axis('off')

    plt.show()


池化函数tf.nn.max_pool(avg_pool)
TensorFlow里的池化函数如下:
tf.nn.max_pool(input, ksize, strides, padding, name)
tf.nn.avg_pool(input, ksize, strides, padding, name)
上述的两个池化函数中,4个参数的意义如下:
input:进行池化操作的数据,一般的池化层是在卷积层之后,所以通常的输入是feature map,依然是[ batch, height, width, channels ]的形状。
ksize:池化窗口的大小,4维的向量,一般是[1, height, width, 1],在batch和channles通常是不做池化的。
strides:和卷积参数含义类似,窗口在每一个维度上面滑动,一般也是[1, strides,strides,1]
padding:和卷积参数含义一样,也是取VALID或者SAME。
返回的Tensor:类型不变,shape仍然是[ batch, height, width, channels ]的形状。
import tensorflow as tf

import numpy as np

import matplotlib.pyplot as plt

import matplotlib.image as mping

path = 'image/1.jpg'

img = mping.imread(path)

plt.imshow(img)

plt.axis('off')

plt.show()

print(img.shape)

full = np.reshape(img, [1, 374, 560, 3])

inputfull = tf.Variable(tf.constant(1.0, shape=[1, 374, 560, 3]))

pooling = tf.nn.max_pool(inputfull, [1, 2, 2, 1], [1, 2, 2, 1], padding='SAME')

pooling1 = tf.nn.max_pool(inputfull, [1, 2, 2, 1], [1, 1, 1, 1], padding='SAME')

pooling2 = tf.nn.max_pool(inputfull, [1, 4, 4, 1], [1, 1, 1, 1], padding='SAME')

pooling3 = tf.nn.max_pool(inputfull, [1, 4, 4, 1], [1, 4, 4, 1], padding='SAME')

pooling4 = tf.nn.max_pool(inputfull, [1, 2, 2, 1], [1, 2, 2, 1], padding='SAME')

o = tf.cast(((pooling - tf.reduce_min(pooling))/(tf.reduce_max(pooling)-tf.reduce_min(pooling)))*255, tf.uint8)

with tf.Session() as sess:

    sess.run(tf.global_variables_initializer())

    t = sess.run(o, feed_dict={inputfull: full})

    print(t.shape)

    t = np.reshape(t, [187, 280, 3])

    plt.imshow(t)

    plt.axis('off')

    plt.show()
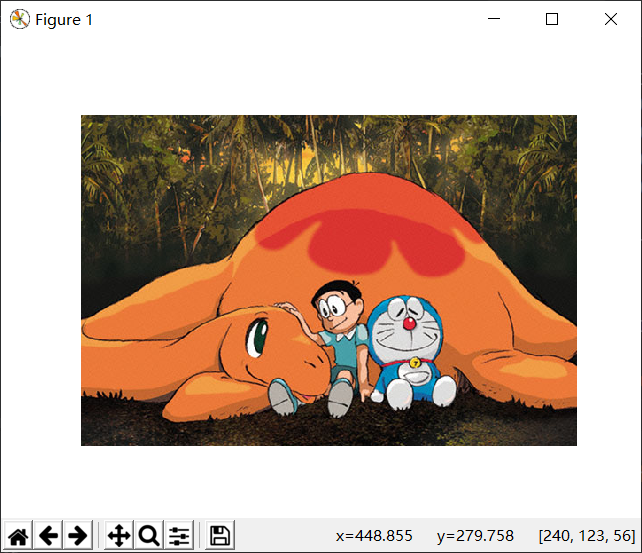
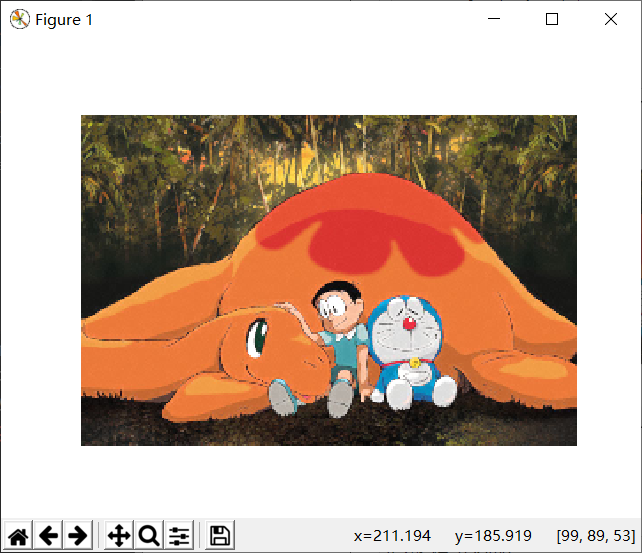
池化操作的作用是将特征图中的信息进行放大,使得特性信息更加的明显。
TensorFlow——卷积神经网络的相关函数的更多相关文章
- Tensorflow卷积神经网络[转]
Tensorflow卷积神经网络 卷积神经网络(Convolutional Neural Network, CNN)是一种前馈神经网络, 在计算机视觉等领域被广泛应用. 本文将简单介绍其原理并分析Te ...
- 深度学习原理与框架-Tensorflow卷积神经网络-cifar10图片分类(代码) 1.tf.nn.lrn(局部响应归一化操作) 2.random.sample(在列表中随机选值) 3.tf.one_hot(对标签进行one_hot编码)
1.tf.nn.lrn(pool_h1, 4, bias=1.0, alpha=0.001/9.0, beta=0.75) # 局部响应归一化,使用相同位置的前后的filter进行响应归一化操作 参数 ...
- TensorFlow 卷积神经网络实用指南 | iBooker·ApacheCN
原文:Hands-On Convolutional Neural Networks with TensorFlow 协议:CC BY-NC-SA 4.0 自豪地采用谷歌翻译 不要担心自己的形象,只关心 ...
- AI相关 TensorFlow -卷积神经网络 踩坑日记之一
上次写完粗浅的BP算法 介绍 本来应该继续把 卷积神经网络算法写一下的 但是最近一直在踩 TensorFlow的坑.所以就先跳过算法介绍直接来应用场景,原谅我吧. TensorFlow 介绍 TF是g ...
- Tensorflow卷积神经网络
卷积神经网络(Convolutional Neural Network, CNN)是一种前馈神经网络, 在计算机视觉等领域被广泛应用. 本文将简单介绍其原理并分析Tensorflow官方提供的示例. ...
- tensorflow卷积神经网络-【老鱼学tensorflow】
前面我们曾有篇文章中提到过关于用tensorflow训练手写2828像素点的数字的识别,在那篇文章中我们把手写数字图像直接碾压成了一个784列的数据进行识别,但实际上,这个图像是2828长宽结构的,我 ...
- 深度学习原理与框架-Tensorflow卷积神经网络-卷积神经网络mnist分类 1.tf.nn.conv2d(卷积操作) 2.tf.nn.max_pool(最大池化操作) 3.tf.nn.dropout(执行dropout操作) 4.tf.nn.softmax_cross_entropy_with_logits(交叉熵损失) 5.tf.truncated_normal(两个标准差内的正态分布)
1. tf.nn.conv2d(x, w, strides=[1, 1, 1, 1], padding='SAME') # 对数据进行卷积操作 参数说明:x表示输入数据,w表示卷积核, stride ...
- tensorflow卷积神经网络与手写字识别
1.知识点 """ 基础知识: 1.神经网络(neural networks)的基本组成包括输入层.隐藏层.输出层.而卷积神经网络的特点在于隐藏层分为卷积层和池化层(po ...
- TensorFlow卷积神经网络实现手写数字识别以及可视化
边学习边笔记 https://www.cnblogs.com/felixwang2/p/9190602.html # https://www.cnblogs.com/felixwang2/p/9190 ...
随机推荐
- iptables command 常用命令列表
命令 -A, --append 范例 iptables -A INPUT ... 说明 新增规则到某个规则链中,该规则将会成为规则链中的最后一条规则. 命令 -D, --delete 范例 iptab ...
- linux虚拟机设置固定IP并实现联网,主机与虚拟机实现互ping
ifconfig eth0 up 启用第一块网卡 onboot=yes 自动启动 service network restart 重启网络服务 使用虚拟机添加一块桥接网卡 cp eth0 eth1 复 ...
- linux 选择 ioctl 命令
在为 ioctl 编写代码之前, 你需要选择对应命令的数字. 许多程序员的第一个本能的反 应是选择一组小数从0或1 开始, 并且从此开始向上. 但是, 有充分的理由不这样做. ioctl 命令数字应当 ...
- 【codeforces 749B】Parallelogram is Back
time limit per test1 second memory limit per test256 megabytes inputstandard input outputstandard ou ...
- dotnet 动态代理魔法书
看到标题的小伙伴是不是想知道什么是魔法书,如果你需要写一段代码,这段代码是在做神奇的业务,只有你查询到了魔法书你才能找到这个对象,同时你还需要实现自己的接口,通过自己实现的接口调用才能用到有趣的方法 ...
- HDU - 3530 Subsequence (单调队列)
Subsequence Time Limit: 2000/1000 MS (Java/Others) Memory Limit: 65536/32768 K (Java/Others)Total ...
- Trie 树的一些题
Trie 树的一些题 牛客练习赛11 假的字符串 (Trie树+拓扑找环) 链接:https://ac.nowcoder.com/acm/problem/15049 来源:牛客网 给定n个字符串,互不 ...
- F5 LTM旁路配置四层负载
网络拓扑图如下: 如上图所示,其中LTM和web1,web2处于同一网络中,外部的client访问请求后端的服务的时候,通过F5 LTM的VS地址,将实际的请求分配到后端两台服务web1和web2上 ...
- 学习Java第五周
通过这一段时间的学习发现Java和C++虽然都是面向对象的编程语言,有相似之处也有不同之处,相似的地方总会感觉易于接受,不同之处或者新接触的有些知识不是很好理解和掌握. 前一段时间学的内部类和接口便是 ...
- 用sublime 3搭建php 运行环境
1.首先把php加入到环境变量中 2.第二步是打开sblime tools->build system->build new system 然后在打开的文件写上 { "cmd&q ...