
本次我们使用idea构建springmvc项目
该案例的github地址:https://github.com/zhouyanger/demo/tree/master/springmvcdemo1
1.首先我们可以创建maven项目,file-> new ->project->maven,现则createa form archetype,这样可以生成maven的一些构建插件
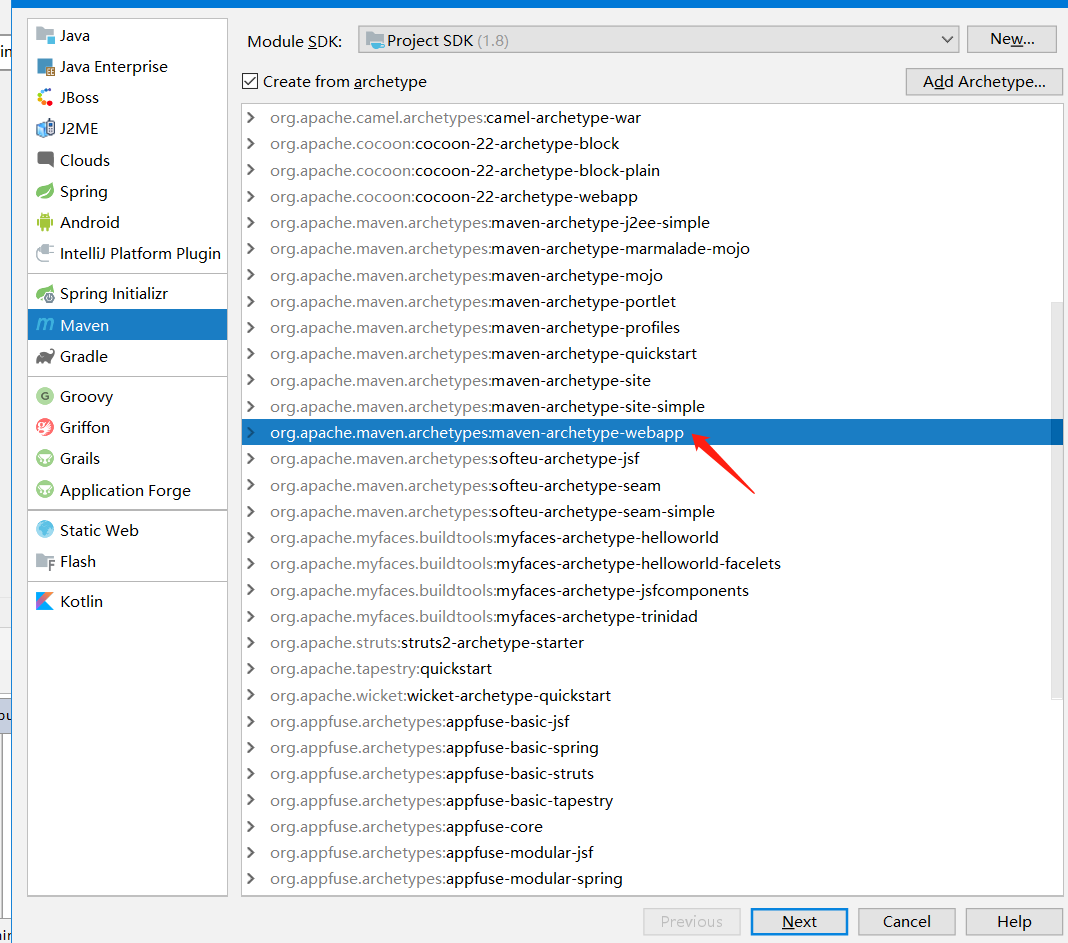
2.写项目名,finish即可

3.项目结构整体如下
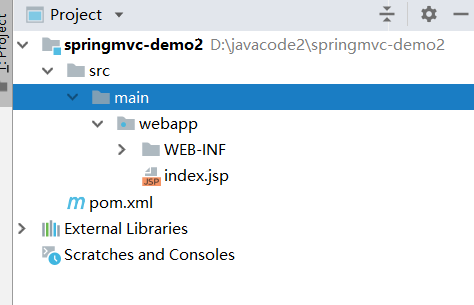
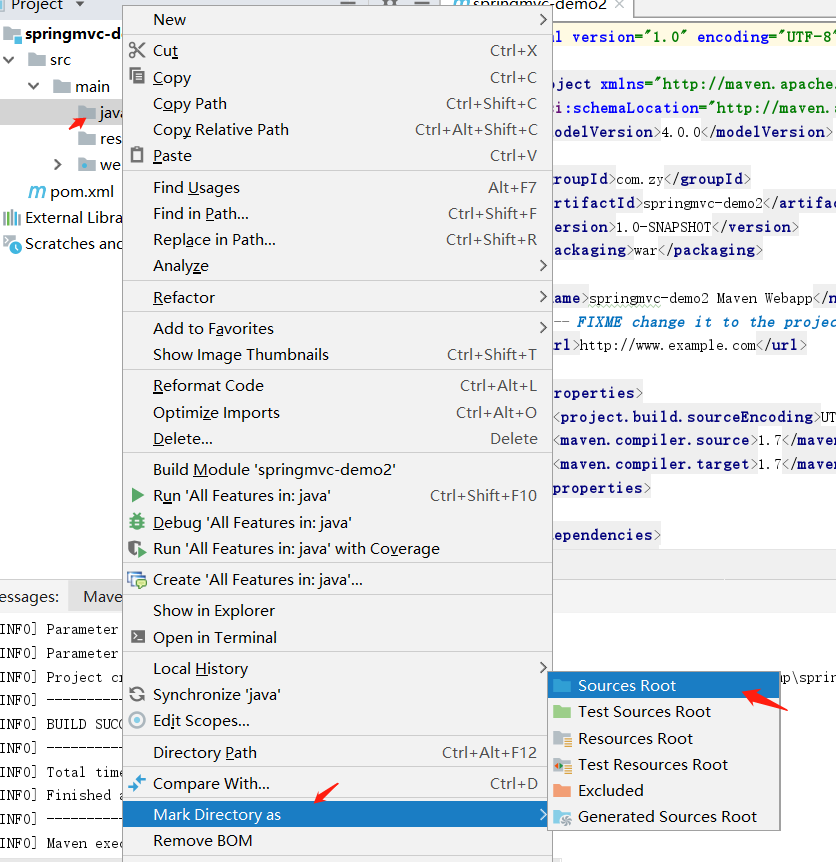
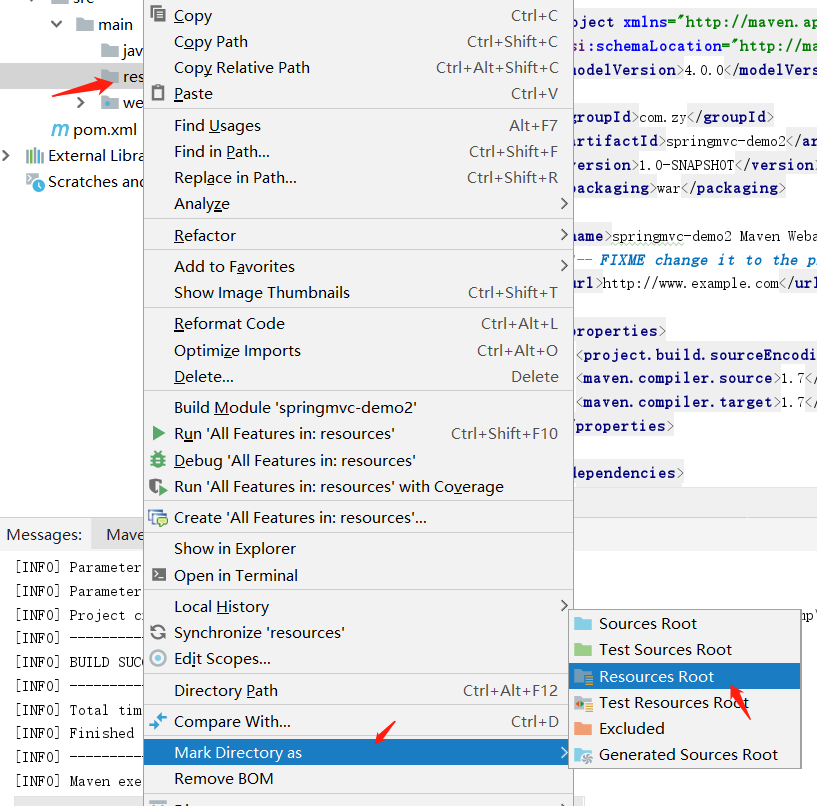
4.改造成我们常用的maven结构,在main下新建java包和resources包,把java包标记成根路径,resources标记成资源根路径包
4.导入springmvc的pom,整体pom如下

<?xml version="1.0" encoding="UTF-8"?>

<project xmlns="http://maven.apache.org/POM/4.0.0" xmlns:xsi="http://www.w3.org/2001/XMLSchema-instance"

  xsi:schemaLocation="http://maven.apache.org/POM/4.0.0 http://maven.apache.org/xsd/maven-4.0.0.xsd">

  <modelVersion>4.0.0</modelVersion>

  <groupId>com.zy</groupId>

  <artifactId>springmvc-demo2</artifactId>

  <version>1.0-SNAPSHOT</version>

  <packaging>war</packaging>

  <name>springmvc-demo2 Maven Webapp</name>

  <!-- FIXME change it to the project's website -->

  <url>http://www.example.com</url>

  <properties>

    <project.build.sourceEncoding>UTF-8</project.build.sourceEncoding>

    <maven.compiler.source>1.7</maven.compiler.source>

    <maven.compiler.target>1.7</maven.compiler.target>

    <spring.version>5.1.6.RELEASE</spring.version>

  </properties>

  <dependencies>

    <!--spring 核心包-->

    <!-- spring start -->

    <dependency>

      <groupId>org.springframework</groupId>

      <artifactId>spring-webmvc</artifactId>

      <version>${spring.version}</version>

    </dependency>

    <dependency>

      <groupId>org.springframework</groupId>

      <artifactId>spring-test</artifactId>

      <version>${spring.version}</version>

    </dependency>

    <!-- spring end -->

    <dependency>

      <groupId>junit</groupId>

      <artifactId>junit</artifactId>

      <version>4.11</version>

      <scope>test</scope>

    </dependency>

    <!--日志-->

    <!-- https://mvnrepository.com/artifact/org.slf4j/slf4j-log4j12 -->

    <dependency>

      <groupId>org.slf4j</groupId>

      <artifactId>slf4j-log4j12</artifactId>

      <version>1.8.0-alpha0</version>

      <scope>test</scope>

    </dependency>

    <!--j2ee相关包 servlet、jsp、jstl-->

    <dependency>

      <groupId>javax.servlet.jsp</groupId>

      <artifactId>jsp-api</artifactId>

      <version>2.2</version>

    </dependency>

    <dependency>

      <groupId>javax.servlet</groupId>

      <artifactId>jstl</artifactId>

      <version>1.2</version>

    </dependency>

    <dependency>

      <groupId>javax.servlet</groupId>

      <artifactId>javax.servlet-api</artifactId>

      <version>3.1.0</version>

    </dependency>

  </dependencies>

  <build>

    <finalName>springmvc-demo2</finalName>

    <pluginManagement><!-- lock down plugins versions to avoid using Maven defaults (may be moved to parent pom) -->

      <plugins>

        <plugin>

          <artifactId>maven-clean-plugin</artifactId>

          <version>3.1.0</version>

        </plugin>

        <!-- see http://maven.apache.org/ref/current/maven-core/default-bindings.html#Plugin_bindings_for_war_packaging -->

        <plugin>

          <artifactId>maven-resources-plugin</artifactId>

          <version>3.0.2</version>

        </plugin>

        <plugin>

          <artifactId>maven-compiler-plugin</artifactId>

          <version>3.8.0</version>

        </plugin>

        <plugin>

          <artifactId>maven-surefire-plugin</artifactId>

          <version>2.22.1</version>

        </plugin>

        <plugin>

          <artifactId>maven-war-plugin</artifactId>

          <version>3.2.2</version>

        </plugin>

        <plugin>

          <artifactId>maven-install-plugin</artifactId>

          <version>2.5.2</version>

        </plugin>

        <plugin>

          <artifactId>maven-deploy-plugin</artifactId>

          <version>2.8.2</version>

        </plugin>

      </plugins>

    </pluginManagement>

  </build>

</project>
4.1这里我们只导入了 spring-mvc的依赖,他会自动导入spring的相关包,打开maven导图你可以看到springmvc会自动依赖spring相关的jar,也就是说导入了mvc的包,他会自动把spring相关的包也导入进来,这就是maven的依赖管理的好处
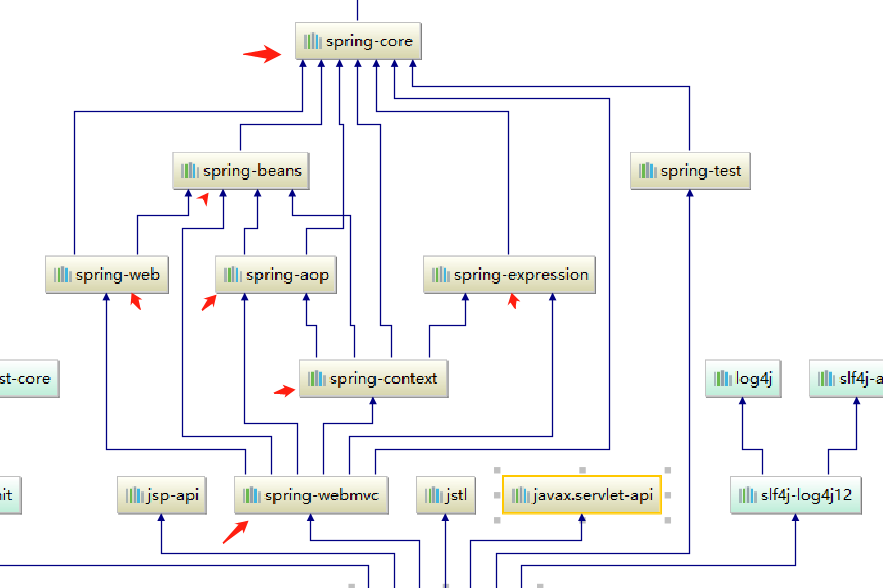
5.在web.xml中写DispatcherServlet,这是springmvc的servlet,指定了springmvc的配置文件地址在classpath:spring-mvc.xml,spring容器使用ContextLoaderListener制定了spring配置文件在classpath:applicationContext.xml
<!DOCTYPE web-app PUBLIC

 "-//Sun Microsystems, Inc.//DTD Web Application 2.3//EN"

 "http://java.sun.com/dtd/web-app_2_3.dtd" >

<web-app>

  <display-name>Archetype Created Web Application</display-name>
<!--spring的配置文件地址-->

    <context-param>

        <param-name>contextConfigLocation</param-name>

        <param-value>classpath:applicationContext.xml</param-value>

    </context-param>

    <listener>

        <listener-class>org.springframework.web.context.ContextLoaderListener</listener-class>

    </listener>

    <servlet>

        <servlet-name>dispatcher</servlet-name>

        <servlet-class>org.springframework.web.servlet.DispatcherServlet</servlet-class>
<!--springmvc的配置文件地址-->

        <init-param>

            <param-name>contextConfigLocation</param-name>

            <param-value>classpath:spring-mvc.xml</param-value>

        </init-param>
<!--启动时间,跟服务器一起启动-->

        <load-on-startup>1</load-on-startup>

    </servlet>

    <servlet-mapping>

        <servlet-name>dispatcher</servlet-name>
<!--拦截所有请求-->

        <url-pattern>/*</url-pattern>

    </servlet-mapping>

</web-app>
6.springmvc得配置文件
<?xml version="1.0" encoding="UTF-8"?>

<beans xmlns="http://www.springframework.org/schema/beans"

       xmlns:xsi="http://www.w3.org/2001/XMLSchema-instance" xmlns:mvc="http://www.springframework.org/schema/mvc"

       xmlns:context="http://www.springframework.org/schema/context"

       xsi:schemaLocation="http://www.springframework.org/schema/beans http://www.springframework.org/schema/beans/spring-beans.xsd http://www.springframework.org/schema/mvc http://www.springframework.org/schema/mvc/spring-mvc.xsd http://www.springframework.org/schema/context http://www.springframework.org/schema/context/spring-context.xsd">

    <!--此文件负责整个mvc中的配置-->

    <!-- 配置注解驱动 可以将request参数与绑定到controller参数上 -->

    <mvc:annotation-driven/>

    <!--静态资源映射-->

    <!--本项目把静态资源放在了webapp的statics目录下,资源映射如下-->

    <!--<mvc:resources mapping="/css/**" location="/static/css/"/>-->

    <!--<mvc:resources mapping="/js/**" location="/static/js/"/>-->

    <!--<mvc:resources mapping="/image/**" location="/static/images/"/>-->

    <mvc:default-servlet-handler />  <!--这句要加上,要不然可能会访问不到静态资源,具体作用自行百度-->

    <!-- 对模型视图名称的解析,即在模型视图名称添加前后缀(如果最后一个还是表示文件夹,则最后的斜杠不要漏了) 使用JSP-->

    <!-- 默认的视图解析器 在上边的解析错误时使用 (默认使用html)- -->

    <bean id="defaultViewResolver" class="org.springframework.web.servlet.view.InternalResourceViewResolver">

        <property name="prefix" value="/WEB-INF/views/"/><!--设置JSP文件的目录位置-->

        <property name="suffix" value=".jsp"/>

    </bean>

    <!-- 自动扫描装配,扫描controller包的注解,加入到容器中 -->

    <context:component-scan base-package="com.zy.controller"/>

</beans>
7.application配置文件
<?xml version="1.0" encoding="UTF-8"?>

<beans xmlns="http://www.springframework.org/schema/beans"

       xmlns:xsi="http://www.w3.org/2001/XMLSchema-instance"

       xmlns:context="http://www.springframework.org/schema/context"

       xsi:schemaLocation="http://www.springframework.org/schema/beans http://www.springframework.org/schema/beans/spring-beans.xsd http://www.springframework.org/schema/context http://www.springframework.org/schema/context/spring-context.xsd">

    <context:component-scan base-package="com.zy">

        <!--application父容器不扫描controller注解,这样两个配置文件各自各负责各自的-->

        <context:exclude-filter type="annotation" expression="org.springframework.stereotype.Controller"/>

    </context:component-scan>

</beans>
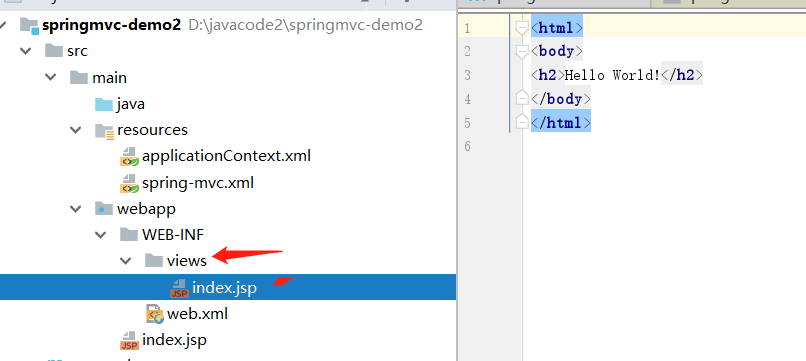
8.根据springmvc.xml配置文件,在WEB-INF下新建views包和index.jsp
9.新建com.zy.controller包,并写一个controller类进行

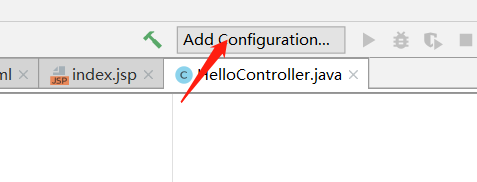
10.配置tomcat服务器
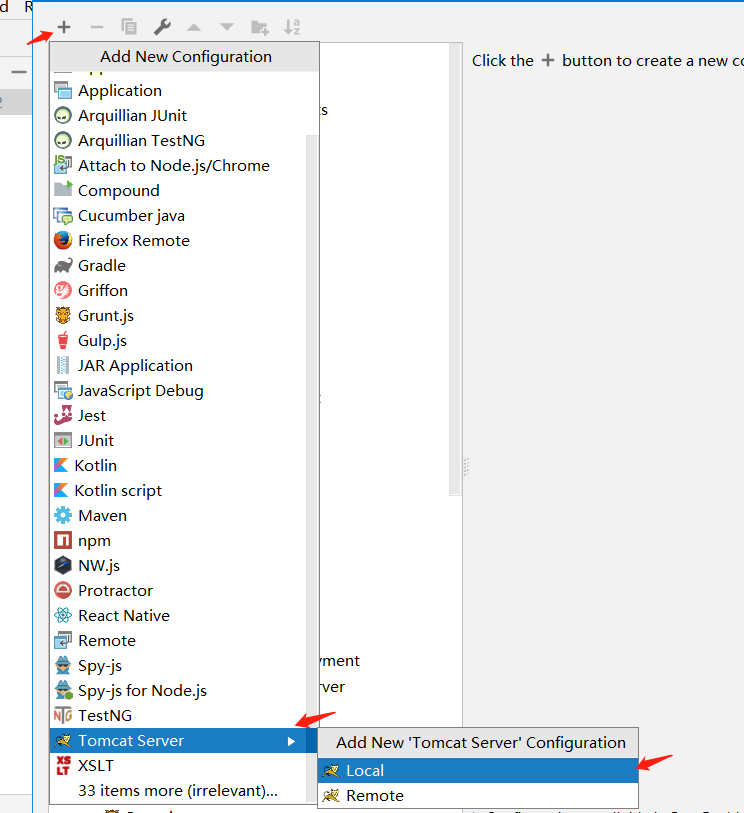
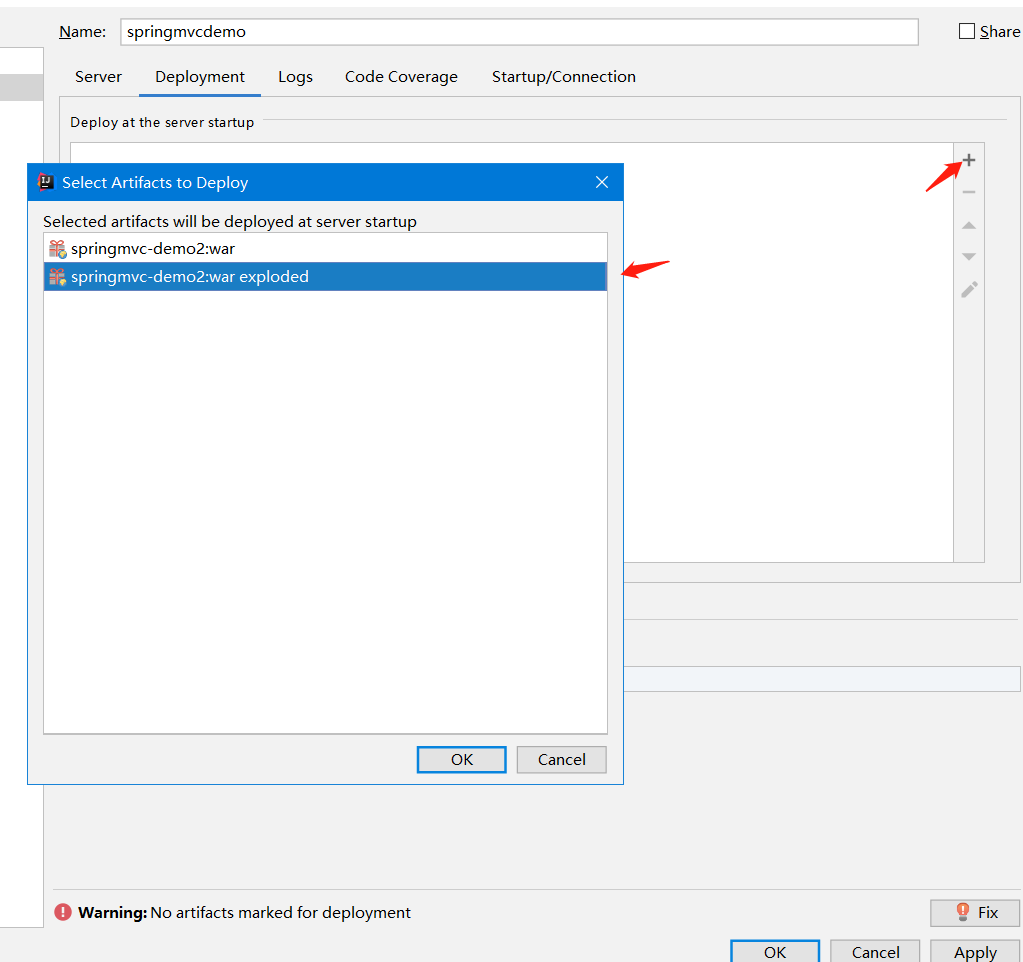
11.启动tomcat服务器,http://localhost:8080/hello,这是测试jsp页面的,进行测试

12.在浏览器输入刚才controller的请求地址,看结果
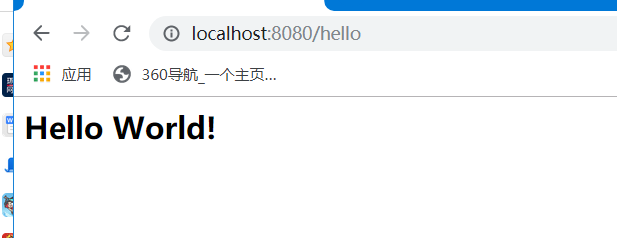
12.顺利完成springmcx基于xml配置的构建。
该案例的github地址:https://github.com/zhouyanger/demo/tree/master/springmvcdemo1
本次我们使用idea构建springmvc项目的更多相关文章
- Eclipse的maven构建一个web项目,以构建SpringMVC项目为例
http://www.cnblogs.com/javaTest/archive/2012/04/28/2589574.html springmvc demo实例教程源代码下载:http://zuida ...
- 使用Eclipse maven构建springmvc项目
Eclipse maven构建springmvc项目 Listener 监听器 架构 使用Log4J监控系统日志邮件警报 2014-12-16 13:09:16 控制器在完成逻辑处理后,通常会产生一些 ...
- maven构建springmvc项目
1.Eclipse中 NEW ->OTHER->Maven->maven project 2.选择项目路径 3.选择项目类型->next->输入groupid和artif ...
- 利用Eclipse构建SpringMVC项目
简述 SpringBoot对Spring的的使用做了全面的封装,使用SpringBoot大大加快了开发进程,但是如果不了解Spring的特性,使用SpringBoot时会有不少问题 目前网上流传使用I ...
- SpringMVC拓展——利用maven构建springMVC项目
一.构建项目结构 首先需要构建一个符合目录结构的maven项目 file->new->maven project,勾选 create a simple project->next / ...
- Eclipse maven构建springmvc项目
原文地址: http://www.cnblogs.com/fangjins/archive/2012/05/06/2485459.html 一.背景介绍 对于初学者,用maven构建项目并不是一件容易 ...
- 在Eclipse中使用Maven构建SpringMVC项目
环境搭建 安装JDK, Eclipse, Tomcat等 – 请参考网上常见攻略. 安装Maven: 下载需要的Maven 版本( http://maven.apache.org/download.c ...
- JavaWeb之Eclipse中使用Maven构建SpringMVC项目
为了学习spring和maven我这也是拼了老命了,光使用maven配置springmvc我花了上周一周的时间,下班回来就搞,一直有bug,一个bug接着一个,昨天一整天都在解决配置的问题,让大学同学 ...
- 使用Myeclipse2015构建SpringMVC项目
1.新建web project 2.右键项目,给项目添加spring框架如图,不需要勾选任何一个选项. 3.在WebRoot/WEB-INF目录下添加web.xml内容如下: <?xml ver ...
随机推荐
- AcWing 275. 传纸条
#include<iostream> using namespace std ; ; *N][N][N]; int w[N][N]; int n,m; int main() { cin&g ...
- 算法竞赛入门经典第二版 TeX中的引号 P47
#include<bits/stdc++.h> using namespace std; int main(){ ; while( (c = getchar()) !=EOF) //get ...
- 广度优先搜索(Breadth First Search, BFS)
广度优先搜索(Breadth First Search, BFS) BFS算法实现的一般思路为: // BFS void BFS(int s){ queue<int> q; // 定义一个 ...
- 对象Bean与Map互转问题
一.摘要 在实际开发过程中,经常碰到需要进行对象与map之间互转的问题,其实对于对象.Map 之间进行互转有很多种方式,下面我们一起来梳理一下: 利用 JSON 工具包,将对象转成字符串,之后再转成 ...
- style.display = "inline或inline";和style.display = "";的区别
function a(){ if($('#b').attr('checked')){ $('.c').css("display",""); //"di ...
- java基础(五)之static关键词的作用
static关键词的作用 1.静态成员变量的语法特定2.静态函数的语法特定3.静态代码块的语法特定 定义静态成员变量 Person.java class Person{ static int a; } ...
- ISCC2018_leftleftrightright-Writeup
leftleftrightright(150) 这个题学到了不少东西,值得认真写一下 下载好文件后发现是upx的壳,upx -d直接脱掉后运行,发现是经典的check输入的题目(作为一个linuxer ...
- 《Java程序设计》第十一周学习总结
20175334 <Java程序设计>第十一周学习总结 教材学习内容总结 第十三章 URL类 一个URL对象通常包含最基本的三部分信息:协议.地址.资源. URL对象调用 InputStr ...
- FastDFS :java.lang.Exception: getStoreStorage fail, errno code: 28
FastDFS 服务正常,突然报错:java.lang.Exception: getStoreStorage fail, errno code: 28 答:错误代码28表示 No space left ...
- Apache Kafka(二)- Kakfa 安装与启动
安装并启动Kafka 1.下载最新版Kafka(当前为kafka_2.12-2.3.0)并解压: > wget http://mirror.bit.edu.cn/apache/kafka/2.3 ...