day36 爬虫+http请求+高性能
爬虫
参考博客:http://www.cnblogs.com/wupeiqi/articles/5354900.html
http://www.cnblogs.com/wupeiqi/articles/6283017.html
- 基本操作
概要:
- 发送Http请求,Python Http请求,requests
- 提取指定信息,Python 正则表达式,beautifulsoup
- 数据持久化,
Python两个模块
- requests
- beautifulsoup
Http请求相关知识
- 请求:
请求头:
- cookie
请求体:
- 发送内容
- 响应:
响应头
- 浏览器读取
响应体
- 看到的内容
特殊:
- cookie
- csrftoken
- content-type:
content-type:application/url-form....
name=alex&age=18
content-type:application/json
{name:'alex',age:18}
- 性能相关
- 串行: 1个人,一个任务一个任务,空余时间,玩。
- 线程: 10个人,一个任务一个任务,空余时间,玩。
- 进程: 10个家庭,一个任务一个任务,空余时间,玩。
- 【协程】异步非阻塞:1个人,充分利用时间。
- scrapy框架
- 规则
- redis-scrapy组件
内容详细:
- 基本操作,python伪造浏览器发送请求并或者指定内容
pip3 install requests
response = requests.get('http://www.baidu.com')
response.text
pip3 install beautifulsoup4
from bs4 import Beautifulsoup
soup = Beautifulsoup(response.text,'html.parser')
soup.find(name='h3',attrs={'class':'t'})
soup.find_all(name='h3')
示例:爬取汽车之家新闻
- 模块
requests
GET:
requests.get(url="http://www.oldboyedu.com")
# data="http GET / http1.1\r\nhost:oldboyedu.com\r\n....\r\n\r\n"
requests.get(url="http://www.oldboyedu.com/index.html?p=1")
# data="http GET /index.html?p=1 http1.1\r\nhost:oldboyedu.com\r\n....\r\n\r\n"
requests.get(url="http://www.oldboyedu.com/index.html",params={'p':1})
# data="http GET /index.html?p=1 http1.1\r\nhost:oldboyedu.com\r\n....\r\n\r\n"
POST:
requests.post(url="http://www.oldboyedu.com",data={'name':'alex','age':18}) # 默认请求头:url-formend....
data="http POST / http1.1\r\nhost:oldboyedu.com\r\n....\r\n\r\nname=alex&age=18"
requests.post(url="http://www.oldboyedu.com",json={'name':'alex','age':18}) # 默认请求头:application/json
data="http POST / http1.1\r\nhost:oldboyedu.com\r\n....\r\n\r\n{"name": "alex", "age": 18}"
requests.post(
url="http://www.oldboyedu.com",
params={'p':1},
json={'name':'alex','age':18}
) # 默认请求头:application/json
data="http POST /?p=1 http1.1\r\nhost:oldboyedu.com\r\n....\r\n\r\n{"name": "alex", "age": 18}"
补充:
request.body,永远有值
request.POST,可能没有值
beautifulsoup
soup = beautifulsoup('HTML格式字符串','html.parser')
tag = soup.find(name='div',attrs={})
tags = soup.find_all(name='div',attrs={})
tag.find('h3').text
tag.find('h3').get('属性名称')
tag.find('h3').attrs
HTTP请求:
GET请求:
data="http GET /index?page=1 http1.1\r\nhost:baidu.com\r\n....\r\n\r\n"
POST请求:
data="http POST /index?page=1 http1.1\r\nhost:baidu.com\r\n....\r\n\r\nname=alex&age=18"
socket.sendall(data)
示例【github和抽屉】:任何一个不用验证码的网站,通过代码自动登录
1. 按理说
r1 = requests.get(url='https://github.com/login')
s1 = beautifulsoup(r1.text,'html.parser')
val = s1.find(attrs={'name':'authenticity_token'}).get('value')
r2 = requests.post(
url= 'https://github.com/session',
data={
'commit': 'Sign in',
'utf8': '✓',
'authenticity_token': val,
'login':'xxxxx',
'password': 'xxxx',
}
)
r2_cookie_dict = r2.cookies.get_dict() # {'session_id':'asdfasdfksdfoiuljksdf'}
保存登录状态,查看任意URL
r3 = requests.get(
url='xxxxxxxx',
cookies=r2_cookie_dict
)
print(r3.text) # 登录成功之后,可以查看的页面
2. 不按理说
r1 = requests.get(url='https://github.com/login')
s1 = beautifulsoup(r1.text,'html.parser')
val = s1.find(attrs={'name':'authenticity_token'}).get('value')
# cookie返回给你
r1_cookie_dict = r1.cookies.get_dict()
r2 = requests.post(
url= 'https://github.com/session',
data={
'commit': 'Sign in',
'utf8': '✓',
'authenticity_token': val,
'login':'xxxxx',
'password': 'xxxx',
},
cookies=r1_cookie_dict
)
# 授权
r2_cookie_dict = r2.cookies.get_dict() # {}
保存登录状态,查看任意URL
r3 = requests.get(
url='xxxxxxxx',
cookies=r1_cookie_dict
)
print(r3.text) # 登录成功之后,可以查看的页面
- requests
"""
1. method
2. url
3. params
4. data
5. json
6. headers
7. cookies
8. files
9. auth
10. timeout
11. allow_redirects
12. proxies
13. stream
14. cert
================ session,保存请求相关信息(不推荐)===================
import requests
session = requests.Session()
i1 = session.get(url="http://dig.chouti.com/help/service")
i2 = session.post(
url="http://dig.chouti.com/login",
data={
'phone': "8615131255089",
'password': "xxooxxoo",
'oneMonth': ""
}
)
i3 = session.post(
url="http://dig.chouti.com/link/vote?linksId=8589523"
)
print(i3.text)
"""
- beautifulsoup
- find()
- find_all()
- get()
- attrs
- text
内容:
1. 示例:汽车之家
2. 示例:github和chouti
3. requests和beautifulsoup
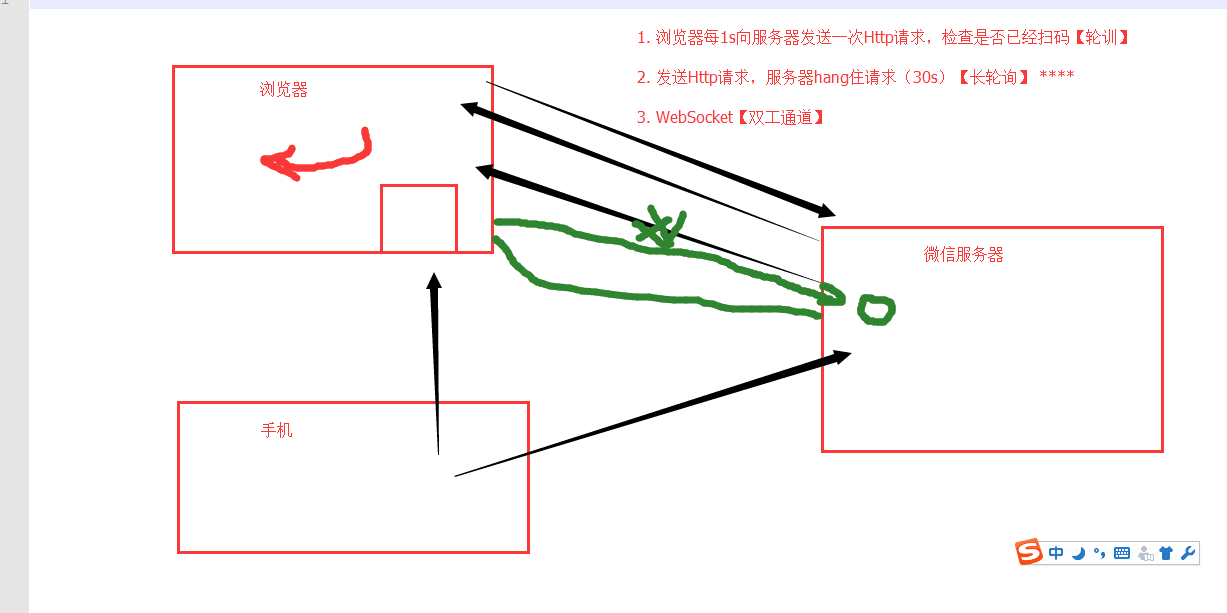
4. 轮询和长轮询
5. Django
request.POST
request.body
# content-type:xxxx
作业:web微信
功能:
1. 二维码显示
2. 长轮询:check_login
3.
- 检测是否已经扫码
- 扫码之后201,头像: base64:.....
- 点击确认200,response.text redirect_ur=....
4. 可选,获取最近联系人信息
安装:
twsited
scrapy框架
课堂代码:https://github.com/liyongsan/git_class/tree/master/day36
day36 爬虫+http请求+高性能的更多相关文章
- Python3 网络爬虫(请求库的安装)
Python3 网络爬虫(请求库的安装) 爬虫可以简单分为几步:抓取页面,分析页面和存储数据 在页面爬取的过程中我们需要模拟浏览器向服务器发送请求,所以需要用到一些python库来实现HTTP的请求操 ...
- 爬虫 Http请求,urllib2获取数据,第三方库requests获取数据,BeautifulSoup处理数据,使用Chrome浏览器开发者工具显示检查网页源代码,json模块的dumps,loads,dump,load方法介绍
爬虫 Http请求,urllib2获取数据,第三方库requests获取数据,BeautifulSoup处理数据,使用Chrome浏览器开发者工具显示检查网页源代码,json模块的dumps,load ...
- HTTP请求中的User-Agent 判断浏览器类型的各种方法 网络爬虫的请求标示
我们知道,当用户发送一个http请求的时候,浏览的的版本信息也包含在了http请求信息中: 如上图所示,请求 google plus 请求头就包含了用户的浏览器信息: User-Agent:Mozil ...
- fake-useragent,python爬虫伪装请求头
在编写爬虫进行网页数据的时候,大多数情况下,需要在请求是增加请求头,下面介绍一个python下非常好用的伪装请求头的库:fake-useragent,具体使用说明如下: 1.在scrapy中的使用 第 ...
- 爬虫、请求库selenium
阅读目录 一 介绍 二 安装 三 基本使用 四 选择器 五 等待元素被加载 六 元素交互操作 七 其他 八 项目练习 一 介绍 selenium最初是一个自动化测试工具,而爬虫中使用它主要是为了解决r ...
- 爬虫、请求库requests
阅读目录 一 介绍 二 基于GET请求 三 基于POST请求 四 响应Response 五 高级用法 一 介绍 #介绍:使用requests可以模拟浏览器的请求,比起之前用到的urllib,req ...
- python爬虫#网络请求requests库
中文文档 http://docs.python-requests.org/zh_CN/latest/user/quickstart.html requests库 虽然Python的标准库中 urlli ...
- python 爬虫001-http请求过程
HTTP 请求流程 一次完整的HTTP请求过程从TCP三次握手建立连接成功后开始,客户端按照指定的格式开始向服务端发送HTTP请求,服务端接收请求后,解析HTTP请求,处理完业务逻辑,最后返回一个HT ...
- python爬虫添加请求头和请求主体
添加头部信息有两种方法 1.通过添加urllib.request.Request中的headers参数 #先把要用到的信息放到一个字典中 headers = {} headers['User-Agen ...
随机推荐
- C++必知必会
C++ Common knowledge Essential Intermediate Programming C++必知必会 [美] StephenC.Dewhurst 著 荣耀 译 人民邮电出 ...
- Mac下Jmeter快速安装与入门-模拟测试Post请求及设置Http头
[1]去Apache官网下载 Binaries系列的最新Jmeter.gz包 [2]下载到本地之后解压缩,进入到解压之后的目录然后,找到apache-jmeter-4.0/bin/jmeter.sh ...
- 2018.9 ECNU ICPC/CCPC Trial Round #2 Query On Tree (树链剖分+线段树维护)
传送门:https://acm.ecnu.edu.cn/contest/105/problem/Q/ 一棵树,支持两种操作:给一条路径上的节点加上一个等差数列;求两点路径上节点和. 很明显,熟练剖分. ...
- 【1】Kali Linux的安装及配置
爱生活就得够GEEK. ---------------------------------------------------------------完美的分割线------------------- ...
- SparkStreaming程序设计
一个简单的 Streamin wordCount object StreamingWordCount { def main(args: Array[String]): Unit = { val spa ...
- CentOS 相关软件安装 与 Siege压测
1.登录linux机器 a.打开mac的钥匙串 b.ssl root@ip c.输入密码 常用命令: cat /proc/version 查看系统版本 cat /etc/issue control ...
- 异常信息 Exception
void GetExceptionMsg(Exception ex, StringBuilder sb, string Prefix = "") { sb.AppendLine(P ...
- ABP官方文档翻译 2.1 依赖注入
依赖注入 什么是依赖注入 传统方式的问题 解决方案 构造函数注入模式 属性注入模式 依赖注入框架 ABP依赖注入基础设施 注册依赖注入 传统注册 帮助接口 自定义/直接注册 使用IocManager ...
- JS的魅力
一.初探JavaScript魅力 基本知识: JavaScript是什么 网页特效原理 -JavaScript就是修改样式 编写JS流程 - 布局:HTML + CSS - 属性:确定修改哪些属性 - ...
- Http:UTF-8与GB2312之间的关系
UTF-8里包括GB2312.UTF-8是国际通用的标准(包括世界所有的语言),而GB2312(只是简体中文)只适合做中文的网站.假设你想做个中文网页,但是还可以翻成英文的话,就得用UTF-8.如果用 ...