
uni-app自定义app端的扫码界面
记得当时是在西班牙有这样的一个需求,需要自定义扫码页面,还需要加上西班牙文,当时是在一个组件里面找到了这样的一个方法,全文大部分使用的app端的Native里面的方法,记录一下,跑路了项目代码要删库了
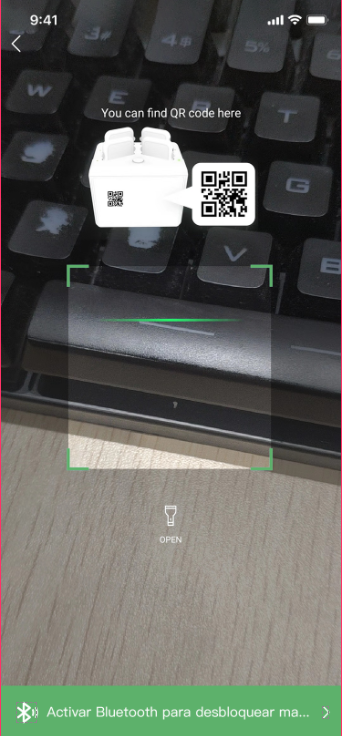
效果图大概是这样的
以下是vue页面代码
<template>
<view></view>
</template>
<script>
import { mapState, mapMutations } from 'vuex';
var barcode = null;
export default {
data() {
return {
name: 'PUEDES ENCONTRAR EL QR AQUÍ', //要在扫码界面自定义的内容
flash: false, //是否打开摄像头
type: 'scan-listener'
};
},
onLoad(d) {
var pages = getCurrentPages();
var page = pages[pages.length - 1];
// #ifdef APP-PLUS
plus.navigator.setFullscreen(true); //全屏
var currentWebview = page.$getAppWebview();
this.createBarcode(currentWebview); //创建二维码窗口
this.createView(currentWebview); //创建操作按钮及tips界面
// #endif
},
computed: {
...mapState(['token', 'user', 'powerBank', 'rackData', 'orderNum', 'slotId']),
i18n() {
return this.$t('richScan');
}
},
methods: {
...mapMutations(['tokenStorage', 'powerBankStorage']),
// 扫码成功回调
onmarked(type, result) {
var text = '未知: ';
console.log('内容' + JSON.stringify(result));
switch (type) {
case plus.barcode.QR:
text = 'QR: ';
break;
case plus.barcode.EAN13:
text = 'EAN13: ';
break;
case plus.barcode.EAN8:
text = 'EAN8: ';
break;
}
plus.navigator.setFullscreen(false);
let results = result.match(/WXXH.*/gi) + '';
this.powerBankStorage(results);
console.log(typeof this.powerBank);
uni.redirectTo({
url: '/pages/money/paydeposit'
});
// this.$eventHub.$emit(this.type, {
// result: result
// });
barcode.close();
},
// 创建二维码窗口
createBarcode(currentWebview) {
barcode = plus.barcode.create('barcode', [plus.barcode.QR], {
top: '0',
left: '0',
width: '100%',
height: '100%',
scanbarColor: '#1DA7FF',
position: 'static',
frameColor: '#1DA7FF'
});
barcode.onmarked = this.onmarked;
barcode.setFlash(this.flash);
currentWebview.append(barcode);
barcode.start();
},
// 创建操作按钮及tips
createView(currentWebview) {
// 顶部指引
var guide = new plus.nativeObj.View(
'guide',
{
top: '12%',
left: '20%',
height: '150px',
width: '218px'
},
[
{
tag: 'img',
id: 'backBar',
src: 'https://upower-spain.oss-eu-central-1.aliyuncs.com/spain/app/prompt.png',
position: {
top: '0',
left: '0',
width: '235px',
height: '161px'
}
}
]
);
// 创建返回原生按钮
var backVew = new plus.nativeObj.View(
'backVew',
{
top: '0px',
left: '0px',
height: '40px',
width: '100%'
},
[
{
tag: 'img',
id: 'backBar',
src: 'https://upower-spain.oss-eu-central-1.aliyuncs.com/spain/app/backBar.png',
position: {
top: '2px',
left: '3px',
width: '35px',
height: '35px'
}
}
]
);
// 创建打开手电筒的按钮
var scanBarVew = new plus.nativeObj.View(
'scanBarVew',
{
top: '70%',
left: '40%',
height: '10%',
width: '20%'
},
[
{
tag: 'img',
id: 'scanBar',
src: 'https://upower-spain.oss-eu-central-1.aliyuncs.com/spain/app/scanBar.png',
position: {
width: '28%',
left: '36%',
height: '30%'
}
},
{
tag: 'font',
id: 'font',
text: this.i18n.open,
textStyles: {
size: '10px',
color: '#ffffff'
},
position: {
width: '80%',
left: '10%'
}
}
]
);
// 创建展示类内容组件
var content = new plus.nativeObj.View(
'content',
{
top: '0px',
left: '0px',
height: '100%',
width: '100%'
},
[
{
tag: 'font',
id: 'scanTitle',
text: '',
textStyles: {
size: '18px',
color: '#ffffff'
},
position: {
top: '0px',
left: '0px',
width: '100%',
height: '40px'
}
},
{
tag: 'font',
id: 'scanTips',
text: this.i18n.name,
textStyles: {
size: '14px',
color: '#ffffff',
whiteSpace: 'normal'
},
position: {
top: '90px',
left: '10%',
width: '80%',
height: 'wrap_content'
}
}
]
);
if (this.$i18n.locale == 'en-US') {
// 打开蓝牙指引
var SpiderGuideIcon = new plus.nativeObj.View(
'SpiderGuideIcon',
{
left: '0%',
right: '0',
bottom: '0',
height: '60px'
},
[
{
tag: 'img',
id: 'backBar',
src: 'https://upower-spain.oss-eu-central-1.aliyuncs.com/spain/app/bluetooth.png',
position: {
left: '0',
right: '0',
bottom: '0',
height: '60px'
}
}
]
);
} else {
// 打开蓝牙指引
var SpiderGuideIcon = new plus.nativeObj.View(
'SpiderGuideIcon',
{
left: '0%',
right: '0',
bottom: '0',
height: '60px'
},
[
{
tag: 'img',
id: 'backBar',
src: 'https://upower-spain.oss-eu-central-1.aliyuncs.com/spain/app/hybrid/lanyas.png',
position: {
left: '0',
right: '0',
bottom: '0',
height: '60px'
}
}
]
);
}
backVew.interceptTouchEvent(true);
scanBarVew.interceptTouchEvent(true);
currentWebview.append(guide); // 顶部指引
currentWebview.append(content);
currentWebview.append(scanBarVew);
currentWebview.append(backVew);
currentWebview.append(SpiderGuideIcon);
backVew.addEventListener(
'click',
function(e) {
//返回按钮
uni.navigateBack({
delta: 1
});
barcode.close();
plus.navigator.setFullscreen(false);
},
false
);
var temp = this;
scanBarVew.addEventListener(
'click',
function(e) {
//点击按钮点亮手电筒
temp.flash = !temp.flash;
if (temp.flash) {
scanBarVew.draw([
{
tag: 'img',
id: 'scanBar',
src: 'https://upower-spain.oss-eu-central-1.aliyuncs.com/spain/app/yellow-scanBar.png',
position: {
width: '28%',
left: '36%',
height: '30%'
}
},
{
tag: 'font',
id: 'font',
text: temp.i18n.close,
textStyles: {
size: '10px',
color: '#ffffff'
},
position: {
width: '80%',
left: '10%'
}
}
]);
} else {
scanBarVew.draw([
{
tag: 'img',
id: 'scanBar',
src: 'https://upower-spain.oss-eu-central-1.aliyuncs.com/spain/app/scanBar.png',
position: {
width: '28%',
left: '36%',
height: '30%'
}
},
{
tag: 'font',
id: 'font',
text: temp.i18n.open,
textStyles: {
size: '10px',
color: '#ffffff'
},
position: {
width: '80%',
left: '10%'
}
}
]);
}
if (barcode) {
barcode.setFlash(temp.flash);
}
},
false
);
}
},
onBackPress() {
// #ifdef APP-PLUS
// 点击返回时退出全屏
barcode.close();
plus.navigator.setFullscreen(false);
// #endif
},
onUnload() {
plus.navigator.setFullscreen(false);
}
};
</script>
<style scoped>
//@import '../../common/uni.css';
</style>
uni-app自定义app端的扫码界面的更多相关文章
- PHP PC端支付宝扫码支付
前面的文章已经描述过在蚂蚁金服开放平台创建应用签约等流程,详见:PHP App端支付宝支付,这里就不多说了,剩下的分两步,第一步是支付前的准备工作,也就是整合支付类文件,我已经整合好可以直接用,代码开 ...
- uni-app 自定义扫码界面
二维码扫描,已经成为当下一款应用不可或缺,同时也是用户习以为常的功能了.uni-app 为我们提供了扫码 API ,直接调用即可. 需求场景 在实际开发中,平台提供的默认扫码界面,并不能满足一些自定义 ...
- PC 端微信扫码注册和登录
一.前言 先声明一下,本文所注重点为实现思路,代码及数据库设计主要为了展现思路,如果对代码效率有着苛刻要求的项目切勿照搬. 相信做过微信开发的人授权这块都没少做过,但是一般来说我们更多的是为移动端的网 ...
- 【微信开发】PC端 微信扫码支付成功之后自动跳转
场景: PC端 微信扫码支付 结果: 支付成功 自动跳转 实现思路: 支付二维码页面,写ajax请求支付状态,请求到结果,无论成功还是失败,都跳转到相应的结果页面 具体实现方法: html部分: ...
- PC电脑端支付宝扫码付款出现编码错误提示原因
给这家公司做各大场景的支付 涉及到微信内置H5支付 其他浏览器唤醒微信客户端支付 PC扫码支付 和支付宝相应的支付,但今天进行PC扫码支付时遇到一些编码问题,流程能走通. 调试错误,请回到请求来源地, ...
- PHP PC端微信扫码支付【模式二】详细教程-附带源码(转)
博主写这破玩意儿的时候花了大概快两天时间才整体的弄懂逻辑,考虑了一下~还是把所有代码都放出来给大家~抱着开源大无私的精神!谁叫我擅长拍黄片呢?同时也感谢我刚入行时候那些无私帮过我的程序员们! 首先还是 ...
- PC端微信扫码支付和支付宝跳转支付
import java.io.BufferedOutputStream; import java.io.BufferedReader; import java.io.IOException; impo ...
- FNScanner二维码接口openView自定义扫码Demo
本文出自APICloud官方论坛 FNScanner 模块是一个二维码/条形码扫描器,是 scanner 模块的优化升级版.在 iOS 平台上本模块底层集成了 Zbar 和系统自带的条形码/二维码分析 ...
- Java SpringMVC实现PC端网页微信扫码支付完整版
一:前期微信支付扫盲知识 前提条件是已经有申请了微信支付功能的公众号,然后我们需要得到公众号APPID和微信商户号,这个分别在微信公众号和微信支付商家平台上面可以发现.其实在你申请成功支付功能之后,微 ...
随机推荐
- scss--函数 (Functions)--unit
(Sass::Script::Value::String) unit($number) Returns the unit(s) associated with a number. Complex un ...
- SpringBoot系列之集成Thymeleaf用法手册
目录 1.模板引擎 2.Thymeleaf简介 2.1).Thymeleaf定义 2.2).适用模板 3.重要知识点 3.1).th:text和th:utext 3.2).标准表达式 3.3).Thy ...
- day01_爬虫和数据
1.什么是爬虫 1.1.爬虫的定义 脚本,程序--->自动抓取万维网上信息的程序. 1.2.爬虫的分类 2.1.通用爬虫 通用网络爬虫 是 捜索引擎抓取系统(Baidu.Google ...
- 手把手教你优雅的编写第一个SpringMVC程序
可能之前写的文章走进SpringMVC世界,从SpringMVC入门到SpringMVC架构中的第一个springMVC入门程序讲解的不是那么优雅.细致.精巧,因此特地写这篇稍微优雅.细致.精巧一些的 ...
- 4sql
在 MySQL 中,有三种主要的类型:文本.数字和日期/时间类型. Text 类型:CHAR(size)VARCHAR(size)TINYTEXTTEXT 存放最大长度为 65,535 个字符的字符串 ...
- Java 大小端转换(基于ByteBuffer)
大小端的基础知识: 小端( little-endian):低位字节在前,高位字节在后.大端( Big-Endian),则反之.具体而言,就是为了说清楚,CPU架构1 字(word)中byte的存储顺序 ...
- easywechat微信开发SDK之小微商户进件(一)
微信本身不提供小微商户进件的SDK,偶然发现easywechat这么个东西,官网地址是https://www.easywechat.com/ 整合了微信开发中常用的接口,包括微信公众号相关接口,微信 ...
- P1087 FBI树
题目描述 我们可以把由“00”和“11”组成的字符串分为三类:全“00”串称为BB串,全“11”串称为I串,既含“00”又含“11”的串则称为F串. FBIFBI树是一种二叉树,它的结点类型也包括FF ...
- centos 7 MysSQL 5.7.23 二进制安装
MySQL 5.7.23 二进制安装 CentOS 7 将默认数据库MySQL替换成了Mariadb. 这里会从系统的环境准备开始一步一步安装. 环境准备 系统版本 内核版本 IP地址 Centos ...
- Kafka 0.10.0.1 consumer get earliest partition offset from Kafka broker cluster - scala code
Return: Map[TopicPartition, Long] Code: val props = new Properties() props.put(ConsumerConfig.BOOTST ...