three.js运动
<!DOCTYPE html> <html> <head>
<title>Example 01.04 - Materials, light and animation</title>
<script type="text/javascript" src="../libs/three.js"></script>
<script type="text/javascript" src="../libs/jquery-1.9.0.js"></script>
<script type="text/javascript" src="../libs/stats.js"></script>
<style>
body{
/* set margin to 0 and overflow to hidden, to go fullscreen */
margin: 0;
overflow: hidden;
}
</style>
</head>
<body> <div id="Stats-output">
</div>
<!-- Div which will hold the Output -->
<div id="WebGL-output">
</div> <!-- Javascript code that runs our Three.js examples -->
<script type="text/javascript"> // once everything is loaded, we run our Three.js stuff.
$(function () { var stats = initStats(); // create a scene, that will hold all our elements such as objects, cameras and lights.
var scene = new THREE.Scene(); // create a camera, which defines where we're looking at.
var camera = new THREE.PerspectiveCamera(45, window.innerWidth / window.innerHeight, 0.1, 1000); // create a render and set the size
var renderer = new THREE.WebGLRenderer(); renderer.setClearColorHex(0xEEEEEE, 1.0);
renderer.setSize(window.innerWidth, window.innerHeight);
renderer.shadowMapEnabled = true; // create the ground plane
var planeGeometry = new THREE.PlaneGeometry(60,20,1,1);
var planeMaterial = new THREE.MeshLambertMaterial({color: 0xffffff});
var plane = new THREE.Mesh(planeGeometry,planeMaterial);
plane.receiveShadow = true; // rotate and position the plane
plane.rotation.x=-0.5*Math.PI;
plane.position.x=15
plane.position.y=0
plane.position.z=0 // add the plane to the scene
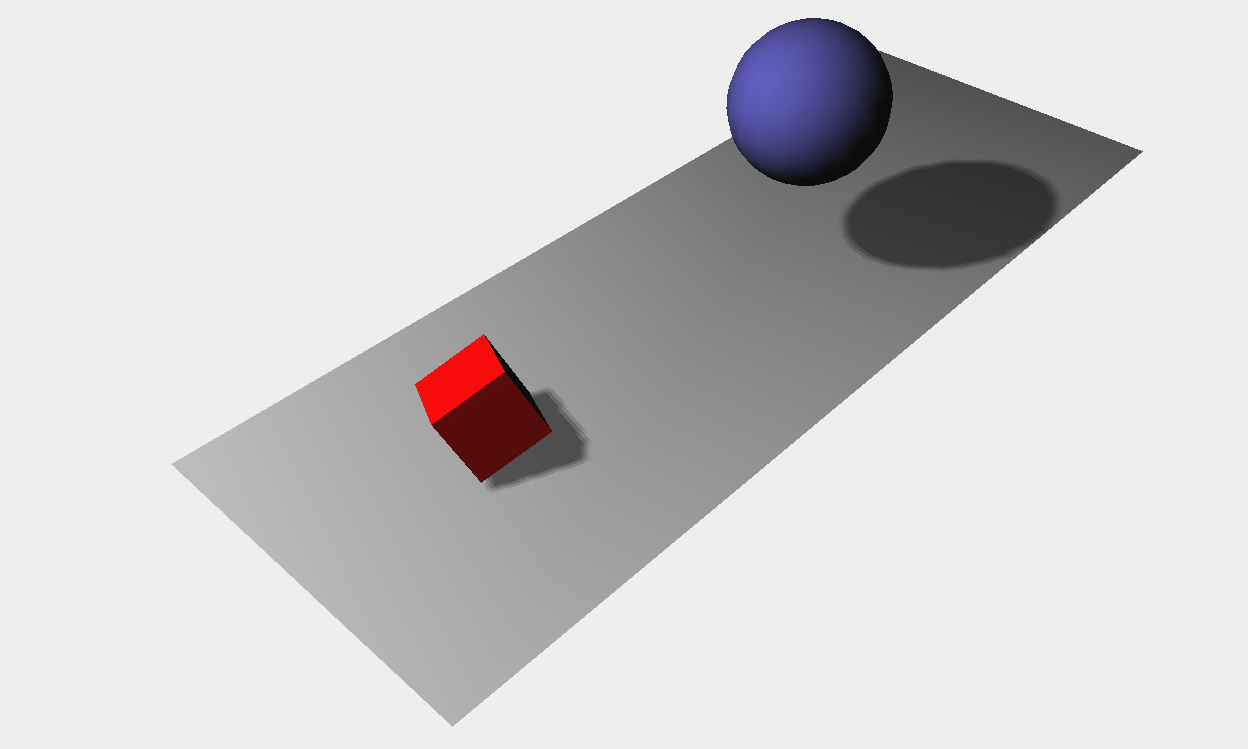
scene.add(plane); // create a cube
var cubeGeometry = new THREE.CubeGeometry(4,4,4);
var cubeMaterial = new THREE.MeshLambertMaterial({color: 0xff0000});
var cube = new THREE.Mesh(cubeGeometry, cubeMaterial);
cube.castShadow = true; // position the cube
cube.position.x=-4;
cube.position.y=3;
cube.position.z=0; // add the cube to the scene
scene.add(cube); var sphereGeometry = new THREE.SphereGeometry(4,20,20);
var sphereMaterial = new THREE.MeshLambertMaterial({color: 0x7777ff});
var sphere = new THREE.Mesh(sphereGeometry,sphereMaterial); // position the sphere
sphere.position.x=20;
sphere.position.y=0;
sphere.position.z=2;
sphere.castShadow=true; // add the sphere to the scene
scene.add(sphere); // position and point the camera to the center of the scene
camera.position.x = -30;
camera.position.y = 40;
camera.position.z = 30;
camera.lookAt(scene.position); // add subtle ambient lighting
var ambientLight = new THREE.AmbientLight(0x0c0c0c);
scene.add(ambientLight); // add spotlight for the shadows
var spotLight = new THREE.SpotLight( 0xffffff );
spotLight.position.set( -40, 60, -10 );
spotLight.castShadow = true;
scene.add( spotLight ); // add the output of the renderer to the html element
$("#WebGL-output").append(renderer.domElement); // call the render function
var step=0;
render(); function render() {
stats.update();//拓展render()函数
// rotate the cube around its axes 绕坐标轴转动的红色方块
cube.rotation.x += 0.02;
cube.rotation.y += 0.02;
cube.rotation.z += 0.02; // bounce the sphere up and down 球体弹跳
step+=0.04;//step+=0.04定义了球体弹跳的速度
sphere.position.x = 20+( 10*(Math.cos(step)));//Math.cos()和Math.sin()函数通过使用step变量帮我们创建了平滑的轨迹
sphere.position.y = 2 +( 10*Math.abs(Math.sin(step))); // render using requestAnimationFrame
requestAnimationFrame(render);//调用requestAnimationFrame()方法使得动画能持续进行
renderer.render(scene, camera);//调用renderScene()来启动动画
} function initStats() { var stats = new Stats(); stats.setMode(0); // 0: fps, 1: ms // Align top-left
stats.domElement.style.position = 'absolute';
stats.domElement.style.left = '0px';
stats.domElement.style.top = '0px'; $("#Stats-output").append( stats.domElement ); return stats;
}
}); </script>
</body>
</html>
控制运动
<!DOCTYPE html>

<html>

<head>

    <title>Example 01.05 - Control gui</title>

    <script type="text/javascript" src="../libs/three.js"></script>

    <script type="text/javascript" src="../libs/jquery-1.9.0.js"></script>

    <script type="text/javascript" src="../libs/stats.js"></script><!--渲染出一个小图形来显示来自动画的每秒的帧数(FPS)-->

    <script type="text/javascript" src="../libs/dat.gui.js"></script><!--用户界面组件来修改代码中的参数-->

    <style>

        body{

            /* set margin to 0 and overflow to hidden, to go fullscreen */

            margin: 0;

            overflow: hidden;

        }

    </style>

</head>

<body>

<div id="Stats-output"><!--增加一个<div>元素用来呈现统计画面-->

</div>

<!-- Div which will hold the Output -->

<div id="WebGL-output">

</div>

<!-- Javascript code that runs our Three.js examples -->

<script type="text/javascript">

    // once everything is loaded, we run our Three.js stuff.

    $(function () {//在匿名函数的一开始调用该函数,使场景有了统计的功能

        var stats = initStats();

        // create a scene, that will hold all our elements such as objects, cameras and lights.

        var scene = new THREE.Scene();

        // create a camera, which defines where we're looking at.

        var camera = new THREE.PerspectiveCamera(45, window.innerWidth / window.innerHeight, 0.1, 1000);

        // create a render and set the size

        var renderer = new THREE.WebGLRenderer();

        renderer.setClearColorHex(0xEEEEEE, 1.0);

        renderer.setSize(window.innerWidth, window.innerHeight);

        renderer.shadowMapEnabled = true;

        // create the ground plane

        var planeGeometry = new THREE.PlaneGeometry(60,20,1,1);

        var planeMaterial =    new THREE.MeshLambertMaterial({color: 0xffffff});

        var plane = new THREE.Mesh(planeGeometry,planeMaterial);

        plane.receiveShadow  = true;

        // rotate and position the plane

        plane.rotation.x=-0.5*Math.PI;

        plane.position.x=15

        plane.position.y=0

        plane.position.z=0

        // add the plane to the scene

        scene.add(plane);

        // create a cube

        var cubeGeometry = new THREE.CubeGeometry(4,4,4);

        var cubeMaterial = new THREE.MeshLambertMaterial({color: 0xff0000});

        var cube = new THREE.Mesh(cubeGeometry, cubeMaterial);

        cube.castShadow = true;

        // position the cube

        cube.position.x=-4;

        cube.position.y=3;

        cube.position.z=0;

        // add the cube to the scene

        scene.add(cube);

        var sphereGeometry = new THREE.SphereGeometry(4,20,20);

        var sphereMaterial = new THREE.MeshLambertMaterial({color: 0x7777ff});

        var sphere = new THREE.Mesh(sphereGeometry,sphereMaterial);

        // position the sphere

        sphere.position.x=20;

        sphere.position.y=0;

        sphere.position.z=2;

        sphere.castShadow=true;

        // add the sphere to the scene

        scene.add(sphere);

        // position and point the camera to the center of the scene

        camera.position.x = -30;

        camera.position.y = 40;

        camera.position.z = 30;

        camera.lookAt(scene.position);

        // add subtle ambient lighting

        var ambientLight = new THREE.AmbientLight(0x0c0c0c);

        scene.add(ambientLight);

        // add spotlight for the shadows

        var spotLight = new THREE.SpotLight( 0xffffff );

        spotLight.position.set( -40, 60, -10 );

        spotLight.castShadow = true;

        scene.add( spotLight );

        // add the output of the renderer to the html element

        $("#WebGL-output").append(renderer.domElement);

        // call the render function

        var step=0;

        var controls = new function() {

            this.rotationSpeed = 0.02;//控制立方体的旋转

            this.bouncingSpeed = 0.03;//控制球的弹跳速度

        }

        var gui = new dat.GUI();//当我们通过dat.GUI改变变量的值,它会立即影响到我们创建的物体的旋转和弹跳速度

        gui.add(controls, 'rotationSpeed',0,0.5);//取值范围0-0.5

        gui.add(controls, 'bouncingSpeed',0,0.5);

        render();

        function render() {

            stats.update();//在render函数里调用stats.update()方法

            // rotate the cube around its axes

            cube.rotation.x += controls.rotationSpeed;

            cube.rotation.y += controls.rotationSpeed;

            cube.rotation.z += controls.rotationSpeed;

            // bounce the sphere up and down

            step+=controls.bouncingSpeed;

            sphere.position.x = 20+( 10*(Math.cos(step)));

            sphere.position.y = 2 +( 10*Math.abs(Math.sin(step)));

            // render using requestAnimationFrame

            requestAnimationFrame(render);

            renderer.render(scene, camera);

        }

        function initStats() {//初始化统计对象

            var stats = new Stats();

            stats.setMode(0); // 如果设置为0,监测fps, 设置为1监测渲染时间 ms

            // Align top-left

            stats.domElement.style.position = 'absolute';

            stats.domElement.style.left = '0px';

            stats.domElement.style.top = '0px';

            $("#Stats-output").append( stats.domElement );

            return stats;

        }

    });

</script>

</body>

</html>

three.js运动的更多相关文章
- 带无缝滚动的轮播图(含JS运动框架)
今天学习了一下轮播图的写作,想到前一阵学过的无缝滚动得思想,所以就把轮播与滚动结合了一下.不过我的代码的神逻辑我自己都不敢恭维,在没网没参照的情况下,只能硬着头皮往下写,希望跟大家共勉吧. js运动框 ...
- js运动框架之一条乱跑的虫子
克隆与运动框架的联合应用 效果:点击元素块后,元素块开始随机的向任何方向移动,并附带一堆颜色随机的"尾巴".每个方向运动3秒后改变方向,同时笑脸变哭脸. 如图所示: 朝某个方向运动 ...
- JS运动从入门到兴奋1
hello,我是沐晴,一个充满了才华,却靠了照骗走江湖的前端妹子.在这个充满PS的年代,这你们都信,哈哈,废话不多说,今天要分享的是关注JS运动的知识.楼主一直认为,不管学习什么,核心思想才是王道,掌 ...
- 关于js运动的一些总结
js运动实现,有两种.一种是速度版,另一种是时间版. 速度版是通过对速度的加减乘除,得出元素的运动数据.时间版是通过对时间进行Tween公式运算,得出元素的运动数据. 速度版运动优点:容易在运动过程中 ...
- JS运动学习笔记 -- 任意值的运动框架(高/宽度,背景颜色,文本内容,透明度等)
<!DOCTYPE html> <html lang="en"> <head> <meta charset="UTF-8&quo ...
- js运动动画
原文:js运动动画 今天简单的学了一下js运动动画,再此感谢慕课网的这位老师http://www.imooc.com/view/167,讲的很不错. 下面是我整理出来的结果. 知识点一:速度动画. 1 ...
- 第八节 JS运动基础
运动基础 让Div运动起来 速度——物体运动的快慢 运动中的Bug 不会停止 速度取某些值会无法停止 到达位置后再点击还会运动 重复点击速度加快 匀速运动(速度不变) 运动框架及应用: 运动框架: 在 ...
- JS运动 - 无缝滚动和缓动动画
JS运动 - 无缝滚动和缓动动画 无缝滚动原理:首先先复制两张图片(第一张和第二张)放到最后面;ul绝对定位,如果ul的left值大于等于4张图片的宽度,就应该快速复原为0. html <!DO ...
- 解析JS运动
解析JS运动 物体运动原理:通过改变物体的位置,而发生移动变化. 任何运动都是相对的,就像物理中的运动公式:s(要达到的)=s0(当前的样式值)+vt. 方法: 1.运动的物体使用绝对定位 ...
- move.js运动插件
move.js 运动插件是一款针对元素动画效果的插件.可以运用此插件制作出各类元素效果. 插件GitHub地址:https://github.com/visionmedia/move.js 下面整理学 ...
随机推荐
- August 27th 2016 Week 35th Saturday
Life is a series of commas, not periods. 人生是一系列的逗号,而不是句号. Sometimes I would rather life to be like a ...
- JNDI 和JDBC的区别
1.JNDI 和JDBC的区别和联系.两者都是API,是一个标准.并不是什么产品或方法.JDBC 全称:Java Database Connectivity 以一种统一的方式来对各种各样的数据库进行存 ...
- XMPP框架下微信项目总结(6)刷新好友列表(删除,添加好友)
原理:1 服务器(openfire)添加/删除 好友,会向客户端(app)发送消息, 2 代理(xmppStreamDelegate)监听到添加/删除消息后,花名册模块(RosterModule)会在 ...
- iOS真机调试
备注:本阶段之前的修改配置文件.准备脚本等,只需要做一次.但本阶段的操作,对每个需要真机调试的工程都要做一遍. ① 禁用Xcode自动的签名操作 将工程配置“Build Settings”中所有的Co ...
- wifi基础知识整理
转自 :http://blog.chinaunix.net/uid-9525959-id-3326047.html WIFI基本知识整理 这里对wifi的802.11协议中比较常见的知识做一个基本的总 ...
- 网站性能测试工具--MS Web Application Stress Tool
MS Web Applicaion Stress Tool 是一款网页测试的性能工具,具体的使用可以参考下面这篇博客文章 http://cuisuqiang.iteye.com/blog/193640 ...
- 图结构练习——最短路径(dijkstra算法(迪杰斯拉特))
图结构练习——最短路径 Time Limit: 1000ms Memory limit: 65536K 有疑问?点这里^_^ 题目描述 给定一个带权无向图,求节点1到节点n的最短路径. ...
- C#调用ArcGIS REST服务
ArcGIS REST API提供了简单.开放的接口来访问和使用ArcGIS Server发布的服务.使用ArcGIS REST API通过URL可以获取和操作每一个服务中的所有资源和操作. 1.使用 ...
- shell test 數值 字符串 文件比較
數值比較 描述 n1 –eq n2 等於 n1 –gt n2 大於 n1 –ge n2 大於等於 n1 –lt n2 小於 n1 –le n2 小於等於 n1 –ne n2 不等於 字符串比較 ...
- linux常用命令和选项
(1)比较两个文件. diff filename1 filename2 -y -W number; -y 并列格式输出 -W 并列格式输出时指定的列宽 (2)linux下抓包 tcpdump有三类关键 ...