Android拼图-变形金刚
开篇
学了几个月的Android开发,动手做了一个简单的拼图小游戏,没有使用游戏框架,名字也纯属娱乐,比较粗糙请大家一笑别骂。
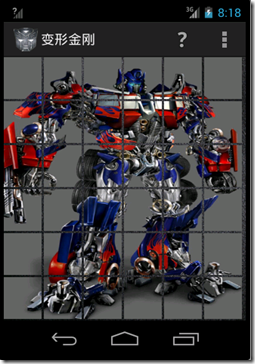
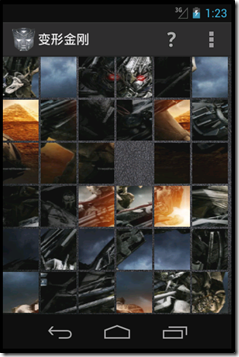
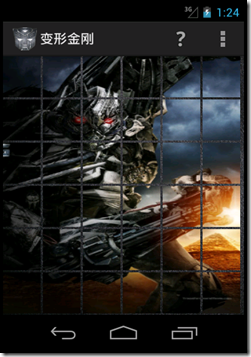
游戏界面是一张图片切割的6*6的小图片,并将其中一块拿走,玩家通过不同的操作将所有小图片归到正确的位置便算过关,玩家可以进行的操作有
- 空位所在行和列的小图片都可以左右上下移动,如图(2,3)为空位,那么第2行的所有图片都可以左右移动,如把(2,0)往右移动,那么(2,0),(2,1),(2,2)就会往右顺移一格,(2,0)变为空位。列位置同理
- 如果一行没有空位,那么这行可以左右旋转,比如往右旋转那么所有小图片都会往右移动,右边出界的图片会移动带左边
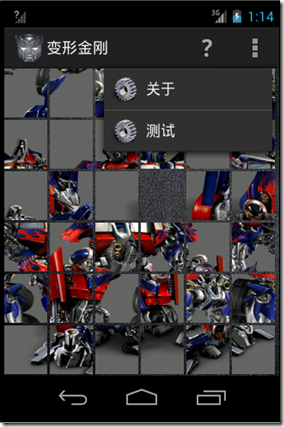
有图有真相,下面是前两关的截图,取了正反派两位大佬擎天柱和威震天的英姿,我自己对起来过,但太费时间,所以写了一个菜单函数一键还原

游戏的实现思路
- 游戏界面的布局使用了AbsoluteLayout,以便与自己控制移动和对齐,整个界面可以想象成一个6*6的单元格,每次移动或旋转后,每块小图片肯定在一个单元格内。每块小的图片都是一个button。button是动态添加到layout里的,每一关游戏开始时都会切割图片并将其设置为button的背景图片。切割图片的代码如下:


切割图片public class ImageSplitter {

    /*

    xPiece:横向几片

    yPiece:竖向几片

    */

    public static List<ImagePiece> split(Bitmap bitmap, int xPiece, int yPiece) {

        List<ImagePiece> pieces = new ArrayList<ImagePiece>(xPiece * yPiece);

        int width = bitmap.getWidth();

        int height = bitmap.getHeight();

        int pieceWidth = width / xPiece;

        int pieceHeight = height / yPiece;

        for (int i = 0; i < yPiece; i++) {

            for (int j = 0; j < xPiece; j++) {

                ImagePiece piece = new ImagePiece();

                piece.index = j + i * xPiece;

                int xValue = j * pieceWidth;

                int yValue = i * pieceHeight;

                piece.bitmap = Bitmap.createBitmap(bitmap, xValue, yValue,

                        pieceWidth, pieceHeight);

                pieces.add(piece);

            }

        }

        return pieces;

    }

}
计算每个Button的width和height,使生成的6*6个button填满屏幕。这里屏幕可能无法完整填满,由于屏幕宽度除以button的宽度会有余数,另外高度方面程序启动时没有办法获取layout区域的高度
计算Button的width和heightprivate void setWidthAndHeightUnit() {

       //ScreenMetrics是一个获取屏幕width和height的帮助类

       ScreenMetrics metrics = new ScreenMetrics(this);

        int widthPx = metrics.GetWidth();

        int heightPx = metrics.GetHeight();

        ctrlWidth = (int) ((widthPx - (COL - 1) * SPACE) / COL);

        //buttong宽度,SPACE是两个button的间隙

        layoutXUnit = ctrlWidth + SPACE;

        //去除actionbar,状态栏的高度

        ctrlHeight = (int) ((heightPx- 15-(ROW - 1) * SPACE) / (ROW+1));

        //button高度

        layoutYUnit = ctrlHeight + SPACE;

    }
每一关初始界面的代码,里面用了一个生成不重复的随机数的算法,将切割后的图片放到不同的位置
初始代码 private void GenerateRandomCtrl() {

        //每一关重新为missbutton 赋值

        missButton = null;

        //清楚所有控件

        absoluteLayout.removeAllViews();

        grid = new Button[ROW][COL];

        grid[2][3]=null;

        //获取当前是List<Transformer>中的第几个transformer

        currentIndex=preferences.getInt(TRANSFORMERID,0);

        Bitmap bitmap = BitmapFactory.decodeResource(getResources(), transformers.get(currentIndex).getDrawableId());

        imagePieceList=ImageSplitter.split(bitmap,COL,ROW);

        int[] rows = generateArray(ROW);

        int site1 = ROW;

        for (int i = 0; i < ROW; i++) {

            int ran1 = random.nextInt(site1);

            int site2 = COL;

            int[] cols = generateArray(COL);

            for (int j = 0; j < COL; j++) {

                int ran2 = random.nextInt(site2);

                initImageCtrl(rows[ran1], cols[ran2], i * COL + j);

                cols[ran2] = cols[site2 - 1];

                site2--;

            }

            rows[ran1] = rows[site1 - 1];

            site1--;

        }

        //启动监控线程,如果picture 已经组好,就发送消息,退出线程

        new ListenThread().start();

    }

//第x行,第y列

    private void initImageCtrl(int x, int y, int backgroundId) {

        Button imageButton = new Button(this);

        //动态设置Id

        imageButton.setId(imagePieceList.get(backgroundId).index);

        //   imageButton.setBackgroundResource(colors[backgroudId]);

        BitmapDrawable bitmapDrawable = new BitmapDrawable(imagePieceList.get(backgroundId).bitmap);

        imageButton.setBackground(bitmapDrawable);

        if (x == 2 && y == 3) {

            //第2行3列为blank,属于该位置的button保存到missButton中

            missButton = imageButton;

            return;

        }

        imageButton.setOnTouchListener(this);

        addButtonLayout(imageButton, x, y);

    }

//初始化数组,用于选取随机数

    private int[] generateArray(int dim) {

        int[] arr = new int[dim];

        for (int i = 0; i < dim; i++) {

            arr[i] = i;

        }

        return arr;

} - 使用SharedPreferences保存当前是哪一关,当程序重新打开时可以显示正确的图片
- 移动和旋转的逻辑
- 移动:要判断哪个方向移动,代码里的isMoveTo***函数,以isMoveToLeft为例,Touch事件ACTION_MOVE发生时横坐标的移动距离大于一个自己设定的常量并且往左移动的距离大于上下方向的移动就认为是往左移动,这个方法不够精确,大家有好的方法在评论里告诉我. MoveToLeft函数就会把空位与当前button之间的所有button往左一起移动,当弹起手指出发生ACTION_UP事件时就会把移动的位置放置到相应的对齐的位置,可以把整个布局想像成一个grid,每次移动后Button的位置都会在格子内,保证对齐效果
- 旋转:本行没有空位时可以旋转这一行以改变每个button的列值,功能函数是rotationRow
移动和旋转  //OnTouchListener接口的函数

    @Override

    public boolean onTouch(View v, MotionEvent event) {

        Log.i(getClass().getName(), "onTouch-----" + getActionName(event.getAction()));

        gestureDetector.onTouchEvent(event);

        Button eventBtn;

        Class aClass = v.getClass();

        if (v instanceof Button) {

            eventBtn = (Button) v;

        } else {

            return true;

        }

        Point pos = getRowAndColumn(eventBtn);

        switch (event.getAction()) {

            case MotionEvent.ACTION_DOWN: {

                break;

            }

            case MotionEvent.ACTION_MOVE: {

                //往左挪动 或者往左旋转

                if (isMoveToLeft(event)) {

                    if (isFillEntireRow(pos.x)) {

                        isLeftRotation = true;

                        rotationRow(event, eventBtn);

                    } else {

                        moveLeft(eventBtn);

                    }

                    break;

                }

                //往右挪动 或者 往右旋转

                if (isMoveToRight(event)) {

                   if(isFillEntireRow(pos.x)) {

                        isRightRotation = true;

                        rotationRow(event, eventBtn);

                    }

                    else {

                       moveRight(eventBtn);

                   }

                    break;

                }

                //往上挪动

                if (isMoveToTop(event) && getTopBlankRow(pos)!=-1 && isRightRotation ==false && isLeftRotation==false) {

                    moveTop(eventBtn);

                    break;

                }

                //往下挪动

                if (isMoveToDown(event) && getDownBlankRow(pos)!=-1 && isRightRotation ==false && isLeftRotation==false) {

                    moveDown(eventBtn);

                    break;

                }

                //Import: 如果去掉break,移动的时候出界的card不用等到ACTION_UP事件也会自动排列

                //因为没有break 后面会接着执行,switch条件只判断一次,如果有break那么会在ACTION_UP事件时

                //触发自动排列

              // break;

            }

            case MotionEvent.ACTION_UP: {

                //获取手指弹起时控件的位置

               if (isFillEntireRow(pos.x) && (isRightRotation || isLeftRotation)) {

                   //使btn的位置是ctrlWidth的倍数

                   HashMap<Button, Point> map = adjustButtonLayoutAfterRotation(eventBtn);

                   if(map == null)

                       break;

                   Iterator iterator = map.entrySet().iterator();

                   while (iterator.hasNext()) {

                       Map.Entry entry = (Map.Entry) iterator.next();

                       Button key = (Button) entry.getKey();

                       Point value = (Point) entry.getValue();

                       grid[value.x][value.y] = key;

                   }

                   break;

               }

                break;

            }

        }

        return true;

    }

    private boolean isMoveToLeft(MotionEvent event) {

        return event.getX() < LEFT_LIMIT && Math.abs(event.getX()) > Math.abs(event.getY());

    }

    //移到左边空位

    //pos:button现在的位置

    private void moveLeft(Button btn) {

        Point pos = getRowAndColumn(btn);

        int blankCol=getLeftBlankColumn(pos);

        if(blankCol == -1)

            return;

       for(int i=blankCol+1;i<=pos.y;i++) {

           Button button = grid[pos.x][i];

           int x = (i- 1) * layoutXUnit;

           int y = pos.x * layoutYUnit;

           AbsoluteLayout.LayoutParams params = new AbsoluteLayout.LayoutParams(ctrlWidth, ctrlHeight, x, y);

           button.setLayoutParams(params);

           grid[pos.x][i- 1] = button;

       }

        grid[pos.x][pos.y] = null;

    }

    private boolean isMoveToRight(MotionEvent event) {

        return event.getX() > RIGHT_LIMIT && Math.abs(event.getX()) > Math.abs(event.getY());

    }

    //移到右边空位

    //pos:button现在的位置

    private void moveRight(Button btn) {

        Point pos = getRowAndColumn(btn);

        int blankCol= getRightBlankColumn(pos);

        if(blankCol == -1)

            return;

        for(int i=blankCol-1;i>=pos.y;i--) {

            Button button = grid[pos.x][i];

            int x = (i+1) * layoutXUnit;

            int y = pos.x * layoutYUnit;

            AbsoluteLayout.LayoutParams params = new AbsoluteLayout.LayoutParams(ctrlWidth, ctrlHeight, x, y);

            button.setLayoutParams(params);

            grid[pos.x][i + 1] = button;

        }

        grid[pos.x][pos.y] = null;

    }

    private int getLeftBlankColumn(Point pos)

    {

        for(int i=0;i<pos.y;i++)

        {

            if(grid[pos.x][i] == null)

                return  i;

        }

        return  -1;

    }

    private int getRightBlankColumn(Point pos)

    {

        for(int i=pos.y;i< COL;i++)

        {

            if(grid[pos.x][i] == null)

                return  i;

        }

        return  -1;

    }

    private int getTopBlankRow(Point pos)

    {

        for(int i=0;i<pos.x;i++)

        {

            if(grid[i][pos.y] == null)

                return  i;

        }

        return  -1;

    }

    private int getDownBlankRow(Point pos)

    {

        for(int i=pos.x;i< ROW;i++)

        {

            if(grid[i][pos.y] == null)

                return  i;

        }

        return  -1;

    }

    private boolean isMoveToTop(MotionEvent event) {

        return event.getY() < TOP_LIMIT && Math.abs(event.getY()) > Math.abs(event.getX());

    }

    //移到上边空位

    //pos:button现在的位置

    private void moveTop(Button btn) {

        Point pos = getRowAndColumn(btn);

        int blankRow = getTopBlankRow(pos);

        if(blankRow == -1)

            return;

       for(int i=blankRow+1;i<=pos.x;i++) {

           Button button=grid[i][pos.y];

           int x = pos.y * layoutXUnit;

           int y = (i-1) * layoutYUnit;

           AbsoluteLayout.LayoutParams params = new AbsoluteLayout.LayoutParams(ctrlWidth, ctrlHeight, x, y);

           button.setLayoutParams(params);

           grid[i-1][pos.y] = button;

       }

        grid[pos.x][pos.y] = null;

    }

    private boolean isMoveToDown(MotionEvent event) {

        return event.getY() > DOWN_LIMIT && Math.abs(event.getY()) > Math.abs(event.getX());

    }

    //移到下边空位

    //pos:button现在的位置

    private void moveDown(Button btn){

        Point pos = getRowAndColumn(btn);

        int rowBlank = getDownBlankRow(pos);

        for(int i=rowBlank-1;i>=pos.x;i--) {

            Button button=grid[i][pos.y];

            int x = pos.y * layoutXUnit;

            int y = (i + 1) * layoutYUnit;

            AbsoluteLayout.LayoutParams params = new AbsoluteLayout.LayoutParams(ctrlWidth, ctrlHeight, x, y);

            button.setLayoutParams(params);

            grid[i+1][pos.y] = button;

        }

        grid[pos.x][pos.y] = null;

    }

    private boolean isBlank(int x, int y) {

        if (x >= ROW || y >= COL || x < 0 || y < 0) {

            return false;

        }

        return grid[x][y] == null;

    }

    //设置一个按钮的位置,x表示行,y表示列

    private void addButtonLayout(Button button, int x, int y){

        AbsoluteLayout.LayoutParams layoutParams = new AbsoluteLayout.LayoutParams(ctrlWidth, ctrlHeight, y * layoutXUnit, x * layoutYUnit);

        absoluteLayout.addView(button, layoutParams);

        grid[x][y]=button;

    }

    //该行是否有空位

    private boolean isFillEntireRow(int row){

        for(int j=0;j< COL;j++)

        {

            if(grid[row][j] == null)

                return false;

        }

        return true;

    }

    //手指抬起时,确保按钮所在的位置是ctrlWidth的倍数

    //btn:事件作用的按钮

    private HashMap<Button, Point> adjustButtonLayoutAfterRotation(Button eventButton) {

        //pos:按钮的横坐标和纵坐标

        Point pos=getRowAndColumn(eventButton);

        HashMap<Button, Point> map = new HashMap<Button, Point>();

        //本行中每一列的按钮都要重设位置

        for (int j = 0; j < COL; j++) {

            Button eachButton = grid[pos.x][j];

            if (eachButton == null)

                continue;

            Point point = new Point();

            if (isRightRotation) {

                point = getRowAndColumn(eachButton);

            }

            if (isLeftRotation) {

                point = getRowAndColumnForLeftRotation(eachButton);

           }

            //对纵坐标小于大于col的情况进行处理

            point.y = point.y < 0 ? point.y + COL : point.y;

            point.y = point.y % COL;

            int x = point.y * layoutXUnit;

            int y = point.x * layoutYUnit;

            map.put(eachButton, new Point(point.x, point.y));

            Log.e(eachButton.getText() + ": After adjust Y:" + Integer.toString(y) + " X:" + Integer.toString(x), " Row:" + Integer.toString(point.x) + " Column:" + Integer.toString(point.y));

            AbsoluteLayout.LayoutParams params = new AbsoluteLayout.LayoutParams(ctrlWidth, ctrlHeight, x, y);

            eachButton.setLayoutParams(params);

        }

        isLeftRotation = false;

        isRightRotation =false;

        return map;

    }

    //button:事件作用于的button

    private void rotationRow(MotionEvent event, Button button) {

        Point pos = getRowAndColumn(button);

        for (int j = 0; j < COL; j++) {

            Button btn = grid[pos.x][j];

            if (btn == null) {

                continue;

            }

            btn.offsetLeftAndRight((int) event.getX());

        }

    }

    //往左旋转时,取right的位置 判定card应在哪个单元格

    private Point getRowAndColumnForLeftRotation(View view) {

        //取card的右上角坐标

        int x, y;

        x = view.getRight();

        y = view.getTop();

        Point point = new Point();

        point.x = y / layoutYUnit;

        point.y = x / layoutXUnit;

        if (x % layoutXUnit == 0 || x < 0) {

            point.y--;

        }

        return point;

    }

    //判断控件在第几行,第几列

    private Point getRowAndColumn(Button view) {

        int x = view.getLeft();

        int y = view.getTop();

        Point point = new Point();

        point.x = y / layoutYUnit;

        point.y = x / layoutXUnit;

        return point;

    }
- 每一关开始时都会使用一个线程监控本关是否完成,如果完成则进入下一关
监控线程 public class ListenThread extends Thread
{
public void run() {
while (true) {
if(threadfunc())
{
Message msg=new Message();
msg.what=COMPLETE;
handler.sendMessage(msg);
break;
}
else
{
try
{
Thread.sleep(1000);
}
catch (InterruptedException ex)
{
ex.printStackTrace();
}
}
}
}
private boolean threadfunc() {
synchronized (grid) {
for (int i = 0; i < ROW; i++)
for (int j = 0; j < COL; j++) { if ( grid[i][j]!=null && grid[i][j].getId() != i * ROW + j)
return false;
}
return true;
}
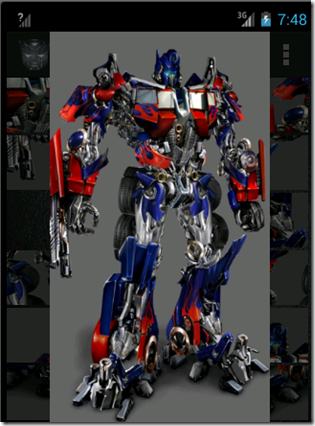
} } - ActionBar上添加了一个帮助菜单用于查看整张图片完整的样子,另外让ActionBar能显示OverflowMenu
显示overflowmenu   //设置显示overflow按钮

   // sHasPermanentMenuKey 用于判断手机又没有物理Menu键,Android 3.0后手机可以没有物理menu

    private void setOverflowShowingAlways() {

        try {

            ViewConfiguration config = ViewConfiguration.get(this);

            Field menuKeyField = ViewConfiguration.class.getDeclaredField("sHasPermanentMenuKey");

            menuKeyField.setAccessible(true);

            menuKeyField.setBoolean(config, false);

        } catch (Exception e) {

            e.printStackTrace();

        }

    }
菜单命令public boolean onOptionsItemSelected(MenuItem item) {

        // Handle action bar item clicks here. The action bar will

        // automatically handle clicks on the Home/Up button, so long

        // as you specify a parent activity in AndroidManifest.xml.

        int id = item.getItemId();

        if (id == R.id.help) {

            LinearLayout layout = (LinearLayout) getLayoutInflater().inflate(R.layout.help_layout, null);

            ImageView imageView = (ImageView) layout.findViewById(R.id.helpView);

            imageView.setImageResource(transformers.get(currentIndex).getDrawableId());

            AlertDialog.Builder helpDialogBuilder = new AlertDialog.Builder(this);

            final AlertDialog helpDialog = helpDialogBuilder.create();

            imageView.setOnClickListener(new View.OnClickListener() {

                @Override

                public void onClick(View view) {

                    helpDialog.dismiss();

                }

            });

            helpDialog.show();

            helpDialog.setContentView(layout);

        }

        if (id == R.id.about) {

            final AlertDialog.Builder aboutDialogBuilder = new AlertDialog.Builder(this);

            aboutDialogBuilder.setNegativeButton("返回", new DialogInterface.OnClickListener() {

                @Override

                public void onClick(DialogInterface dialogInterface, int i) {

                    dialogInterface.dismiss();

                }

            });

            AlertDialog aboutDialog = aboutDialogBuilder.setTitle("关于变形金刚").setMessage("图片来自网络,如有侵权请联系\r\n开发者:哨兵\r\n" +

                    "QQ:**********").create();

            aboutDialogBuilder.show();

        }

        //用于测试,当点击ActionBar的测试菜单时会自动对好图片进入下一关

      /*  if(id == R.id.test) {

            List<Button> list=new ArrayList<Button>() ;

            for(int i=0;i<ROW;i++)

                for(int j=0;j<COL;j++)

                {

                    list.add(grid[i][j]);

                }

            for(Button btn:list) {

                if(btn!=null) {

                    grid=new Button[ROW][COL];

                    int row = btn.getId() / ROW;

                    int col = btn.getId() % ROW;

                    grid[row][col] = btn;

                    absoluteLayout.removeView(btn);

                    addButtonLayout(btn,row,col);

                }

            }

        }*/

        return super.onOptionsItemSelected(item);

    }
Android拼图-变形金刚的更多相关文章
- Android拼图游戏的设计逻辑,从切图到交互动画,从关卡到倒计时,实例提高!
Android拼图游戏的设计逻辑,从切图到交互动画,从关卡到倒计时,实例提高! 群英传的最后一章,我大致的看了一下这个例子,发现鸿洋大神也做过,就参考两个人的设计逻辑,感觉都差不多,就这样实现起来了 ...
- Android拼图游戏
效果如下 游戏的设计 首先我们分析下如何设计这款游戏: 1.我们需要一个容器,可以放这些图片的块块,为了方便,我们准备使用RelativeLayout配合addRule实现 2.每个图片的块块,我们准 ...
- android指纹识别、拼图游戏、仿MIUI长截屏、bilibili最美创意等源码
Android精选源码 一个动画效果的播放控件,播放,暂停,停止之间的动画 用 RxJava 实现 Android 指纹识别代码 Android仿滴滴打车(滴滴UI)源码 Android高仿哔哩哔哩动 ...
- 转--2014年最新810多套android源码2.46GB免费一次性打包下载
转载自:http://www.eoeandroid.com/thread-497046-1-1.html 感谢该博客主人无私奉献~~ 下面的源码是从今年3月份开始不断整理源码区和其他网站上的安卓例子源 ...
- 2014年最新720多套Android源码2.0GB免费一次性打包下载
之前发过一个帖子,但是那个帖子有点问题我就重新发一个吧,下面的源码是我从今年3月份开始不断整理源码区和其他网站上的android源码,目前总共有720套左右,根据实现的功能被我分成了100多个类,总共 ...
- ym——android源代码大放送(实战开发必备)
转载请注明本文出自Cym的博客(http://blog.csdn.net/cym492224103),谢谢支持! 目录 PATH 列表 卷序列号为 000A-8F50 E:. │ javaapk.c ...
- Android群英传帝落篇——程序人生,路漫漫其修远兮,吾将上下而求索!
Android群英传帝落篇--程序人生,路漫漫其修远兮,吾将上下而求索! 当写这篇博客的时候,自2016-02-22到现在5.2号,一晃眼,也㓟两个多月就过去了,我才将这本书看完,虽然写笔记花了很大的 ...
- Android源码50例汇总,欢迎各位下载(转载)
下载中心好资料很多,藏在各个角落,小弟在此帮大家做了一个整理,做了一个下载目录,方便大家选择性下载. 源码实例如下: <Android应用开发揭秘>源代码推荐 http://down.51 ...
- 2012Android开发热门资料(110个)
下载中心完整附件下载地址:http://down.51cto.com/data/412494 附件内容部分预览: 专题推荐: Android控:平板电脑HD精品游戏软件合集(共32个) http:// ...
随机推荐
- google浏览器 打印A4 最大宽度和高度px
width: 1563px;(max) + = 分页了 + = 分页了 + = 没有分页 / ViewBag.results[].Count)); <td width="15%&quo ...
- node jsonwebtoken
jsonwebtoken是node版本的JWT(JSON Web Tokens)的实现.1.什么是JWT?Json web token (JWT), 是为了在网络应用环境间传递声明而执行的一种基于J ...
- centos7网卡重命名为ethx格式
参考:https://www.cnblogs.com/zyd112/p/8143464.html CentOS 7 使用 eth0 这样的传统名称,那么在安装启动(pxe)时,按Tab键在下方输入以下 ...
- XML的解析方式
//解析和输出XML public void showXml() { string filepath = Application.dataPath + @"/my.xml"; if ...
- windows7下搭建HTTP服务器
打开控制面板,选择并进入“程序”,双击“打开或关闭Windows服务”,在弹出的窗口中选择“Internet信息服务”下面所有地选项,点击确定后,开始更新服务. 2 更新完成后,打开浏览器,输入“ ...
- apicloud 注意事项
页面布局时头部和内容一定要分开,状态栏寖入式要用.可以用api.sendEvent广播出去,api.addlisterten监听. api.openWin打开页面会有黑色闪屏,加bgColor:'#f ...
- 自编码器----Autoencoder
一.自编码器:降维[无监督学习] PCA简介:[线性]原矩阵乘以过渡矩阵W得到新的矩阵,原矩阵和新矩阵是同样的东西,只是通过W换基. 自编码: 自动编码器是一种无监督的神经网络模型,它可以学习到输入数 ...
- swift-自动计算字符串的宽高
写一个方法来继承String //自动控制文字换行及宽度 extension String { func textSizeWithFont(font: UIFont, constrainedToSiz ...
- 挑战程序设计第二版PDF高清完整版免费下载
挑战程序设计pdf 网上有些地方的资源获取比较麻烦,本着共享的原则将此书pdf发出来,希望有条件的同学支持正版. 链接:https://pan.baidu.com/s/16S-5QOjoNxSGQx- ...
- [Ynoi2011]D1T1
题目大意: 给定一个序列$a_1,a_2,\dots,a_n$,进行$m$次操作,每次操作如下: 1. 给定$x,y,z$,对所有下标为$y,y+x,y+2x,\dots$的元素加上$z$(保证$y\ ...