26.QT颜色与布局
dialog.h
 #ifndef PALETTE_H

 #define PALETTE_H

 #include <QDialog>

 #include <QComboBox>

 #include <QLabel>

 #include <QTextEdit>

 #include <QPushButton>

 #include <QLineEdit>

 class Palette : public QDialog

 {

     Q_OBJECT

 public:

     Palette(QWidget *parent = );

     ~Palette();

     //创建左边布局

     void createCtrlFrame();

     //创建右边布局

     void createContentFrame();

     //给下拉框填充颜色

     void fillColorList(QComboBox *);

 private slots:

     void showWindow();

     void showWindowText();

     void showButton();

     void showButtonText();

     void showBase();

 private:

     QFrame *ctrlFrame;

     QLabel *windowLabel;

     QComboBox *windowComboBox;

     QLabel *windowTextLabel;

     QComboBox *windowTextComboBox;

     QLabel *buttonLabel;

     QComboBox *buttonComboBox;

     QLabel *buttonTextLabel;

     QComboBox *buttonTextComboBox;

     QLabel *baseLabel;

     QComboBox *baseComboBox;

     QFrame *contentFrame;

     QLabel *label1;

     QComboBox *comboBox1;

     QLabel *label2;

     QLineEdit *lineEdit2;

     QTextEdit *textEdit;

     QPushButton *okBtn;

     QPushButton *cancelBtn;

 };

 #endif // PALETTE_H
dialog.cpp
#include "dialog.h"
#include <QHBoxLayout>
#include <QGridLayout>
#include <QPalette>
#include <QBoxLayout> Palette::Palette(QWidget *parent)
: QDialog(parent)
{
createCtrlFrame();
createContentFrame();
QHBoxLayout *mainLayout = new QHBoxLayout(this);
mainLayout->addWidget(ctrlFrame);
mainLayout->addWidget(contentFrame);
} //创建左边布局
void Palette::createCtrlFrame()
{
//创建框架
ctrlFrame = new QFrame; //窗口背景色
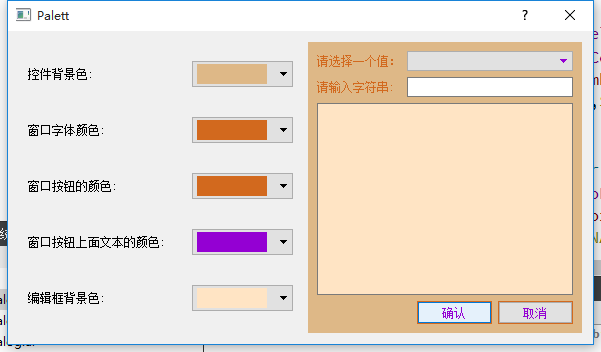
windowLabel = new QLabel(tr("控件背景色: "));
windowComboBox = new QComboBox;
fillColorList(windowComboBox);
//控件与时间绑定
connect(windowComboBox,SIGNAL(activated(int)),this,SLOT(showWindow())); //窗口前景色
windowTextLabel = new QLabel(tr("窗口字体颜色: "));
windowTextComboBox = new QComboBox;
fillColorList(windowTextComboBox);
connect(windowTextComboBox,SIGNAL(activated(int)),this,SLOT(showWindowText())); //窗口按钮的颜色
buttonLabel = new QLabel(tr("窗口按钮的颜色: "));
buttonComboBox = new QComboBox;
fillColorList(buttonComboBox);
connect(buttonComboBox,SIGNAL(activated(int)),this,SLOT(showButton())); //窗口按钮上面文本的颜色
buttonTextLabel = new QLabel(tr("窗口按钮上面文本的颜色: "));
buttonTextComboBox = new QComboBox;
fillColorList(buttonTextComboBox);
connect(buttonTextComboBox,SIGNAL(activated(int)),this,SLOT(showButtonText())); //编辑框背景色
baseLabel = new QLabel(tr("编辑框背景色: "));
baseComboBox = new QComboBox;
fillColorList(baseComboBox);
connect(baseComboBox,SIGNAL(activated(int)),this,SLOT(showBase())); //创建网格布局,框架是ctrFrame
QGridLayout *mainLayout = new QGridLayout(ctrlFrame);
//设置间距
mainLayout->setSpacing();
mainLayout->addWidget(windowLabel,,);
mainLayout->addWidget(windowComboBox,,); mainLayout->addWidget(windowTextLabel,,);
mainLayout->addWidget(windowTextComboBox,,); mainLayout->addWidget(buttonLabel,,);
mainLayout->addWidget(buttonComboBox,,); mainLayout->addWidget(buttonTextLabel,,);
mainLayout->addWidget(buttonTextComboBox,,); mainLayout->addWidget(baseLabel,,);
mainLayout->addWidget(baseComboBox,,); } //创建右边布局
void Palette::createContentFrame()
{
contentFrame = new QFrame;
label1 = new QLabel(tr("请选择一个值:"));
comboBox1 = new QComboBox; label2 = new QLabel(tr("请输入字符串: "));
lineEdit2 = new QLineEdit; textEdit = new QTextEdit; //创建网格布局
QGridLayout *topLayout = new QGridLayout;
topLayout->addWidget(label1,,);
topLayout->addWidget(comboBox1,,);
topLayout->addWidget(label2,,);
topLayout->addWidget(lineEdit2,,);
topLayout->addWidget(textEdit,,,,); okBtn = new QPushButton(tr("确认"));
cancelBtn = new QPushButton(tr("取消")); //创建水平布局
QHBoxLayout *bottomLayout = new QHBoxLayout;
//设置伸缩性
bottomLayout->addStretch();
bottomLayout->addWidget(okBtn);
bottomLayout->addWidget(cancelBtn); //创建垂直布局,把两个布局加入,框架是contentFrame
QVBoxLayout *mainlayout = new QVBoxLayout(contentFrame);
mainlayout->addLayout(topLayout);
mainlayout->addLayout(bottomLayout); //允许自动填充
okBtn->setAutoFillBackground(true);
cancelBtn->setAutoFillBackground(true);
//设置可以填充
contentFrame->setAutoFillBackground(true);
} //用于控制背景颜色的显示
void Palette::showWindow()
{
QStringList colorList = QColor::colorNames();
QColor color = QColor(colorList[windowComboBox->currentIndex()]); QPalette p = contentFrame->palette();
p.setColor(QPalette::Window, color);
contentFrame->setPalette(p); contentFrame->update();
} //对窗体的前景色进行设置
void Palette::showWindowText()
{
QStringList colorList = QColor::colorNames();
QColor color = colorList[windowTextComboBox->currentIndex()]; QPalette p = contentFrame->palette();
p.setColor(QPalette::WindowText, color);
contentFrame->setPalette(p);
} //按钮文字颜色设置
void Palette::showButtonText()
{
QStringList colorList = QColor::colorNames();
QColor color = QColor(colorList[buttonTextComboBox->currentIndex()]); QPalette p = contentFrame->palette();
p.setColor(QPalette::ButtonText , color);
contentFrame->setPalette(p);
} //edit背景颜色设置
void Palette::showBase()
{
QStringList colorList = QColor::colorNames();
QColor color = QColor(colorList[baseComboBox->currentIndex()]); QPalette p = contentFrame->palette();
p.setColor(QPalette::Base , color);
contentFrame->setPalette(p);
} //控件添加颜色
void Palette::fillColorList(QComboBox *comboBox)
{
QStringList colorList = QColor::colorNames();
QString color; foreach (color, colorList)
{
QPixmap pix(QSize(,));
pix.fill(QColor(color));
comboBox->addItem(QIcon(pix), NULL);
comboBox->setIconSize(QSize(,));
comboBox->setSizeAdjustPolicy(QComboBox::AdjustToContents);
}
} //按钮颜色设置
void Palette::showButton()
{
QStringList colorList = QColor::colorNames();
QColor color = QColor(colorList[buttonComboBox->currentIndex()]); //contentFrame->setAutoFillBackground(true); QPalette p = contentFrame->palette();
p.setColor(QPalette::Button , color);
contentFrame->setPalette(p); contentFrame->update(); } Palette::~Palette()
{ }
26.QT颜色与布局的更多相关文章
- (Android UI)Android应用程序中资源:图片、字符串、颜色、布局等
Android系统设计采用代码和布局分离的设计模式,因此在设计Android应用程序时需要遵循该设计模式. “把非代码资源(如图片和字符串常量)和代码分离开来始终是一种很好的做法.”---<An ...
- qt坐标系统与布局的简单入门
qt坐标系统 qt坐标系统比較简单 ); 上面的代码把button显示为父窗体的20,20处宽度为100,高度为100 接下去是布局 qt里面布局须要增加<QLayout.h>这个头 ...
- QT设置centralWidget布局
QT设置centralWidget布局 设置之前是这样的,这时候即使设置了控件的布局,实际上控件大小还是不会跟这变,因为centralWidget没有设置布局. 需要在没有控件的空白区域,点击右键在布 ...
- Qt中的布局浅析与弹簧的使用,以及Qt居中的两种方法
1. 布局 为什么要布局: 布局之后窗口的排列是有序的 布局之后窗口的大小发生变化, 控件的大小也会对应变化 如果不对控件布局, 窗口显示出来之后有些控件的看不到的 布局是可以嵌套使用 常用的布局方式 ...
- (一)Qt界面设计布局
Qt提供四种布局: 这种布局生成的格局比较单一,这时候需要另外两个填充控件,来生成整行或整列的格式. 注意:使用Spacers控件时,必须要放在layouts中的布局中,否则无法保存. 示例: 1.往 ...
- Qt入门(6)——Qt的界面布局
Qt提供四种布局: VBoxLayout:垂直布局 HBoxLayout:水平布局 GridLayout:二维布局. FormLayout: 窗体布局
- Qt颜色下拉框
上周为了用Qt写一个类似颜色下拉框的东西,查阅了网上的多数相关资料,依然没有我想要的.终于在周四的时候下定决心重写QCombobox类来实现功能,现在把它贴出来,望看到的人,批评指正.废话不多说,先上 ...
- qt——常用的布局方法
布局相关对象及简介 窗体上的所有的控件必须有一个合适的尺寸和位置.Qt提供了一些类负责排列窗体上的控件,主要有:QHBoxLayout,QVBoxLayout,QGridLayout,QStackLa ...
- QT的组件布局
在QT的IDE下,编写一个自定义布局. #include<QApplication> #include<QWidget> #include<QSpinBox> #i ...
随机推荐
- TensorFlow-正弦函数拟合
MNIST的代码还是有点复杂,一大半内容全在搞数据,看了半天全是一滩烂泥.最关键的是最后输出就是一个accuracy,我根本就不关心你准确率是0.98还是0.99好吗?我就想看到我手写一个5,你程序给 ...
- RabbitMQ学习笔记(5)----RabbitMQ整合Spring
在Spring AMQP项目中Spring也提供了对RabbitMQ的支持,这里在之前学习SpringBoot的时候也整合过,但是今天这里使用的Spring的xml配置来整个rabbit. Sprin ...
- Python代码块缓存、小数据池
引子 前几天遇到了这样一道Python题目:a='123',b='123',下列哪个是正确的? A. a != b B. a is b C. a==123 D. a + b =246 正确答案是B 是 ...
- sass揭秘之@if,@for,@each(转载)
因为文章内含有很多sass代码,如需自己动手查看编译结果,推荐使用sassmeister这款在线编译工具,方便你阅读学习. 经过上两篇揭秘,大家心里对sass应该有了很好的认知感了,这篇文章基于前面两 ...
- android学习路线总结
感谢安辉作者,学习路线 https://www.cnblogs.com/yishaochu/p/5436094.html https://www.cnblogs.com/jycboy/p/60666 ...
- mysql备份脚本二(带日志)
#!/bin/bashdb_PATH='/shareSAN/mysqldata/ocs/mysql_back_wjf' #备份文件保存的路径#db_DBNAME='sz_ocs' #备份的数据库名db ...
- 元素隐藏的方式之--hidden,display,visibility
<html lang="en"> <head> <meta charset="UTF-8"> <title>标签 ...
- RESTful API设计方法
1.如果已经开始逐步的接触到了RESTful API设计方法的朋友,首先要对HTTP/HTTPS有一个大致的了解,虽然本身和RESTful API没有什么关系.但是对于增加网站的安全性还是十分重要的, ...
- Bonjour/Zeroconf with Arduino
转自:http://gkaindl.com/software/arduino-ethernet/bonjour Bonjour/Zeroconf with Arduino DownloadVersio ...
- react阻止无效重渲染的多种方式
在开发React组件的过程中,我们经常会遇到这个问题:什么情况下组件会重新渲染? 当内部data发生改变,state发生改变(通过调用this.setState()) 以及父组件传过来的props发生 ...