在winform下实现左右布局多窗口界面的方法(二)
可视化设计部份:
1.父窗口:ParentForm的IsMdiContainer 设置为 true,即:this.IsMdiContainer=true;
2.在父窗口中添加一个顶部菜单:menuStrip1,并新增一个菜单项:Windows,且将menuStrip1的MdiWindowListItem设置为该Windows菜单对象,即: this.menuStrip1.MdiWindowListItem = this.windowsToolStripMenuItem;
3.在父窗口中添加一个树形菜单:treeView1,并将其Dock设为左靠齐,即:this.treeView1.Dock = System.Windows.Forms.DockStyle.Left;且将margin设为0;
4.在父窗口中添加一个Panel:panel1,且将其width设为3;
以下是设计后自动生成的代码:
namespace WinFormTest

{

partial class ParentForm

{

/// <summary>

/// 必需的设计器变量。

/// </summary>

private System.ComponentModel.IContainer components = null;

/// <summary>

/// 清理所有正在使用的资源。

/// </summary>

/// <param name="disposing">如果应释放托管资源,为 true;否则为 false。</param>

protected override void Dispose(bool disposing)

{

if (disposing && (components != null))

{

components.Dispose();

}

base.Dispose(disposing);

}

#region Windows 窗体设计器生成的代码

/// <summary>

/// 设计器支持所需的方法 - 不要

/// 使用代码编辑器修改此方法的内容。

/// </summary>

private void InitializeComponent()

{

this.menuStrip1 = new System.Windows.Forms.MenuStrip();

this.windowsToolStripMenuItem = new System.Windows.Forms.ToolStripMenuItem();

this.treeView1 = new System.Windows.Forms.TreeView();

this.panel1 = new System.Windows.Forms.Panel();

this.menuStrip1.SuspendLayout();

this.SuspendLayout();

//

// menuStrip1

//

this.menuStrip1.Items.AddRange(new System.Windows.Forms.ToolStripItem[] {

this.windowsToolStripMenuItem});

this.menuStrip1.Location = new System.Drawing.Point(0, 0);

this.menuStrip1.MdiWindowListItem = this.windowsToolStripMenuItem;

this.menuStrip1.Name = "menuStrip1";

this.menuStrip1.Size = new System.Drawing.Size(684, 25);

this.menuStrip1.TabIndex = 0;

this.menuStrip1.Text = "menuStrip1";

//

// windowsToolStripMenuItem

//

this.windowsToolStripMenuItem.Name = "windowsToolStripMenuItem";

this.windowsToolStripMenuItem.Size = new System.Drawing.Size(73, 21);

this.windowsToolStripMenuItem.Text = "Windows";

//

// treeView1

//

this.treeView1.Dock = System.Windows.Forms.DockStyle.Left;

this.treeView1.Location = new System.Drawing.Point(0, 25);

this.treeView1.Margin = new System.Windows.Forms.Padding(0);

this.treeView1.Name = "treeView1";

this.treeView1.Size = new System.Drawing.Size(228, 380);

this.treeView1.TabIndex = 3;

this.treeView1.NodeMouseDoubleClick += new System.Windows.Forms.TreeNodeMouseClickEventHandler(this.treeView1_NodeMouseDoubleClick);

//

// panel1

//

this.panel1.Anchor = ((System.Windows.Forms.AnchorStyles)(((System.Windows.Forms.AnchorStyles.Top | System.Windows.Forms.AnchorStyles.Bottom)

| System.Windows.Forms.AnchorStyles.Left)));

this.panel1.BackColor = System.Drawing.Color.Red;

this.panel1.BorderStyle = System.Windows.Forms.BorderStyle.FixedSingle;

this.panel1.Cursor = System.Windows.Forms.Cursors.VSplit;

this.panel1.Location = new System.Drawing.Point(230, 28);

this.panel1.Margin = new System.Windows.Forms.Padding(0);

this.panel1.Name = "panel1";

this.panel1.Size = new System.Drawing.Size(3, 100);

this.panel1.TabIndex = 5;

//

// Form1

//

this.AutoScaleDimensions = new System.Drawing.SizeF(6F, 12F);

this.AutoScaleMode = System.Windows.Forms.AutoScaleMode.Font;

this.ClientSize = new System.Drawing.Size(684, 405);

this.Controls.Add(this.panel1);

this.Controls.Add(this.treeView1);

this.Controls.Add(this.menuStrip1);

this.IsMdiContainer = true;

this.MainMenuStrip = this.menuStrip1;

this.Name = "Form1";

this.Text = "Form1";

this.Load += new System.EventHandler(this.Form1_Load);

this.Resize += new System.EventHandler(this.Form1_Resize);

this.menuStrip1.ResumeLayout(false);

this.menuStrip1.PerformLayout();

this.ResumeLayout(false);

this.PerformLayout();

}

#endregion

private System.Windows.Forms.MenuStrip menuStrip1;

private System.Windows.Forms.ToolStripMenuItem windowsToolStripMenuItem;

private System.Windows.Forms.TreeView treeView1;

private System.Windows.Forms.Panel panel1;

}

}
编码部份:
其实上面的设计后,如果通过以下定义的方法打开一个子窗口,则直接实现了左右布局且包含多子窗口的界面。
private void ShowChildForm<TForm>() where TForm : Form, new()

{

Form childForm = new TForm();

childForm.MdiParent = this;

childForm.Name = "ChildForm - " + DateTime.Now.Millisecond.ToString();

childForm.Text = childForm.Name;

childForm.Show();

}
当然仍然有不完美的地方,那就是左边菜单栏宽度不能动态调整,而又没有用到splitContainer,故我们只有自己来实现,其实也很简单,步骤如下:
1.在父窗口构造函数中加入初始化panel1(用作分割器)位置及订阅相关事件,代码如下:
public ParentForm()

{

InitializeComponent();

panel1.MouseDown += panel1_MouseDown;

panel1.MouseUp += panel1_MouseUp;

panel1.MouseMove += panel1_MouseMove;

panel1.Top = menuStrip1.Height;

panel1.Left = treeView1.Left + treeView1.Width;

panel1.Height = panel1.Parent.Height;

}
上述代码的作用是:1.保证panel1的高度与位置与左侧树形菜单控件相匹配;2.订阅的三个Mouse事件主要是为了后面实现移动panel1。
2.实现订阅的三个Mouse事件所对应的方法,分别为鼠标按下、鼠标移动、鼠标松开,代码如下:
private bool startMove = false; //用于标记是否在移动中

void panel1_MouseMove(object sender, MouseEventArgs e)

{

if (startMove)

{

panel1.Left += e.X;

}

}

void panel1_MouseUp(object sender, MouseEventArgs e)

{

if (startMove)

{

panel1.Left += e.X;

startMove = false;

this.treeView1.Width = panel1.Left;

}

}

void panel1_MouseDown(object sender, MouseEventArgs e)

{

startMove = true;

}
上述代码作用:按下鼠标标记为开始移动,然后移动鼠标,若是标记移动中,说明是要移动panel1,故直接将鼠标当前的X坐标位置累加到panel1.Left属性上,从而实现移动,当鼠标弹起后,则将树形菜单的宽度设置为panel1.Left,从而实现树形菜单随panel1的移动而改变大小。
同时为了保证panel1的高度始终与树形菜单相同,在父窗口的Resize方法加入动态调整panel1的高度,代码如下:
private void ParentForm_Resize(object sender, EventArgs e)

{

panel1.Height = panel1.Parent.Height;

}
到此就完成了整个的实现方案,为了便于模拟在树形菜单中双击打开子窗口的效果,同时也添加了如下代码:
private void ParentForm_Load(object sender, EventArgs e)

{

LoadMenuNodes();

}

private void LoadMenuNodes() //实现情况应该是从数据库及用户权限来进行动态创建菜单项

{

this.treeView1.Nodes.Clear();

var root = this.treeView1.Nodes.Add("Root");

for (int i = 1; i <= 10; i++)

{

var section = root.Nodes.Add("Section-" + i);

int maxNodes = new Random(i).Next(1, 10);

for (int n = 1; n <= maxNodes; n++)

{

section.Nodes.Add(string.Format("Level-{0}-{1}", i, n));

}

}

}

private void treeView1_NodeMouseDoubleClick(object sender, TreeNodeMouseClickEventArgs e)

{

if (e.Node.Nodes.Count <= 0)//当非父节点(即:实际的功能节点)

{

ShowChildForm<ChildForm>();

}

}
附上完整的实现代码:
using System;

using System.Collections.Generic;

using System.ComponentModel;

using System.Data;

using System.Drawing;

using System.Linq;

using System.Text;

using System.Threading.Tasks;

using System.Windows.Forms;

namespace WinFormTest

{

public partial class ParentForm : Form

{

private bool startMove = false;

public ParentForm()

{

InitializeComponent();

panel1.MouseDown += panel1_MouseDown;

panel1.MouseUp += panel1_MouseUp;

panel1.MouseMove += panel1_MouseMove;

panel1.Top = menuStrip1.Height;

panel1.Left = treeView1.Left + treeView1.Width;

panel1.Height = panel1.Parent.Height;

}

void panel1_MouseMove(object sender, MouseEventArgs e)

{

if (startMove)

{

panel1.Left += e.X;

}

}

void panel1_MouseUp(object sender, MouseEventArgs e)

{

if (startMove)

{

panel1.Left += e.X;

startMove = false;

this.treeView1.Width = panel1.Left;

}

}

void panel1_MouseDown(object sender, MouseEventArgs e)

{

startMove = true;

}

private void ParentForm_Load(object sender, EventArgs e)

{

LoadMenuNodes();

}

private void treeView1_NodeMouseDoubleClick(object sender, TreeNodeMouseClickEventArgs e)

{

if (e.Node.Nodes.Count <= 0)//当非父节点(即:实际的功能节点)

{

ShowChildForm<ChildForm>();

}

}

private void ParentForm_Resize(object sender, EventArgs e)

{

panel1.Height = panel1.Parent.Height;

}

private void LoadMenuNodes() //实现情况应该是从数据库及用户权限来进行动态创建菜单项

{

this.treeView1.Nodes.Clear();

var root = this.treeView1.Nodes.Add("Root");

for (int i = 1; i <= 10; i++)

{

var section = root.Nodes.Add("Section-" + i);

int maxNodes = new Random(i).Next(1, 10);

for (int n = 1; n <= maxNodes; n++)

{

section.Nodes.Add(string.Format("Level-{0}-{1}", i, n));

}

}

}

private void ShowChildForm<TForm>() where TForm : Form, new()

{

Form childForm = new TForm();

childForm.MdiParent = this;

childForm.Name = "ChildForm - " + DateTime.Now.Millisecond.ToString();

childForm.Text = childForm.Name;

childForm.Show();

}

}

}
最终效果如下图示:

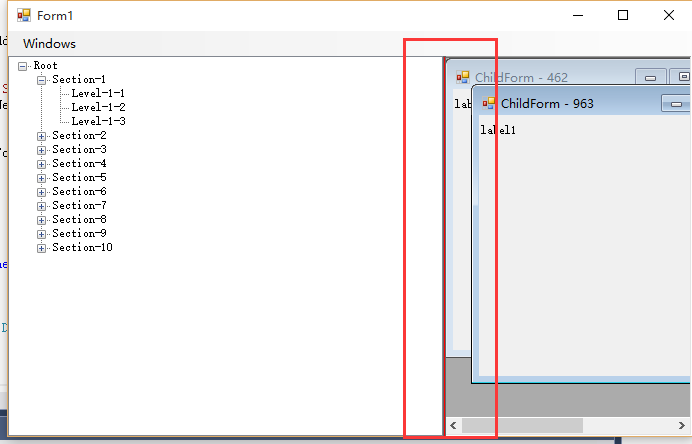
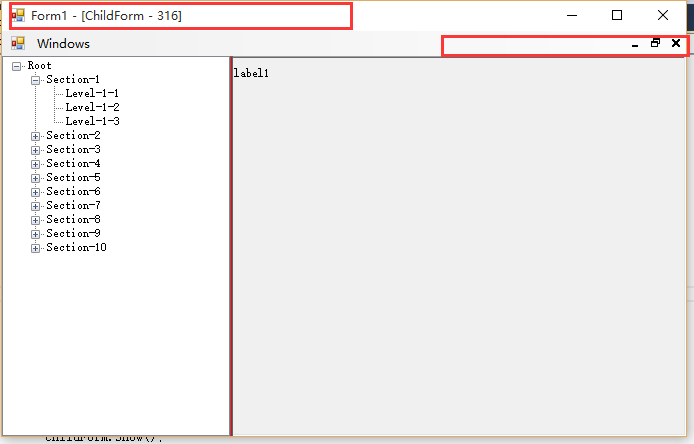
说明:我这里为了体现分割器,故将其背景色设为红色,便于大家观察,这种解决方案与之前的解决方案功能上是相同的,但有一点小小区别,之前的解决方案中子窗口的标题栏是在父窗口的容器内,而本文的解决方案中子窗口在最大化后,子窗口的标题栏会与父窗口合并,如下图示,至于大家用哪种依实际场景。
关于在winform下实现左右布局多窗口界面的方法之续篇的相关知识就给大家介绍到这里,后续时间我会继续研究winform关于插件式编程(近期工作任务要求),到时候同样会分享给大家,也欢迎大家一起交流,当然高手可以无视。
出处:http://www.jb51.net/article/80196.htm
在winform下实现左右布局多窗口界面的方法(二)的更多相关文章
- 在winform下实现左右布局多窗口界面的方法(一)
在web页面上我们可以通过frameset,iframe嵌套框架很容易实现各种导航+内容的布局界面,而在winform.WPF中实现其实也很容易,通过本文给大家介绍在winform下实现左右布局多窗口 ...
- 分享在winform下实现左右布局多窗口界面-续篇
之前的这篇文章<分享在winform下实现左右布局多窗口界面>已经实现了左右布局多窗口界面,今天本来是研究基于winform的插件编程,没想到顺便又找到了另一种实现方案,这种实现方案更简单 ...
- 分享在winform下实现左右布局多窗口界面
在web页面上我们可以通过frameset,iframe嵌套框架很容易实现各种导航+内容的布局界面,而在winform.WPF中实现其实也很容易,我这里就分享一个:在winform下实现左右布局多窗口 ...
- Win10下PB停在欢迎窗口界面
问题:Win10下不能打开PB12.5,PB12.6,一直停在欢迎窗口界面. 解决方法:把服务"Touch Keyboard and Handwriting Panel Service&qu ...
- 分享在winform下实现模块化插件编程
其实很早之前我就已经了解了在winform下实现插件编程,原理很简单,主要实现思路就是:先定一个插件接口作为插件样式及功能的约定,然后具体的插件就去实现这个插件接口,最后宿主(应用程序本身)就利用反射 ...
- linux-shell-screen后台调用-后台运行脚本和命令-仿start命令-伪窗口界面
序 我比较熟练bat.cmd脚本.刚接触使用shell时,总会习惯想用windows窗口界面来套用shell脚本.于是找到screen后台命令,它可以交互shell脚本,保持后台运行.但是在批处理ba ...
- 用vsstudio 设计Winform 高分屏上布局错乱的问题
在使用win10高分辨率150%,200%系统进行winform开发时, 会有布局错乱的现象,比如之前定义的300px的宽度,往往被设置成600px (200%分辨率下). 这个问题vs2015的解决 ...
- Winform下CefSharp的引用、配置、实例与报错排除(源码)
Winform下CefSharp的引用.配置.实例与报错排除 本文详细介绍了CefSharp在vs2013..net4.0环境下,创建Winfrom项目.引用CefSharp的方法,演示了winfro ...
- 分享在winform下实现模块化插件编程-优化版
上一篇<分享在winform下实现模块化插件编程>已经实现了模块化编程,但我认为不够完美,存在以下几个问题: 1.IAppContext中的CreatePlugInForm方法只能依据完整 ...
随机推荐
- mongodb简单用法
修改器: $inc: 增加已有的键值,如果键值不存在就创建一个 数据库中存在这样的数据:{ , "url": "www.example.com", }db.fz ...
- 【转载】iptables、tc和ip命令
2.3 CommandListener中的命令 CL一共定义了11个命令,这些命令充分反映了Netd在Android系统中网络管理和控制方面的职责.本节首先介绍Linux系统中常用的三个网络管理工具, ...
- [NOI2008]奥运物流
题目 洛谷 BZOJ 做法 单环有向图毒瘤题 不考虑环和改变后继:\(\sum\limits{i=1}^n C_i\cdot K^{dep(i)}\) 考虑环无穷等比求极m:\(R(1)=\sum\l ...
- linux下安装LAMP环境,也就是PHP+linux的开发运行环境(centos7)
注:整理至http://blog.51cto.com/afterdawn/1923139 LAMP(linux.apache.mysql.php),是四个套件的合成,简单讲就是要把php运行在linu ...
- Go sqlx库
sqlx is a library which provides a set of extensions on go's standard database/sql library. sqlx sup ...
- kubernetes 核心对象
Pods Pod是Kubernetes的基本操作单元,也是应用运行的载体.整个Kubernetes系统都是围绕着Pod展开的,比如如何部署运行Pod.如何保证Pod的数量.如何访问Pod等.另外,Po ...
- 设置 IntelliJ IDEA 主题和字体的方法
1 前言 在博文「IntelliJ IDEA 之 HelloWorld 项目创建及相关配置文件介绍」中,我们已经用 IntelliJ IDEA 创建了第一个 Java 项目 HelloWorld,如下 ...
- How to Delete using INNER JOIN with SQL Server?
https://stackoverflow.com/questions/16481379/how-to-delete-using-inner-join-with-sql-server You need ...
- MSER最稳定极值区域源码分析
最稳定极值区域介绍 如把灰度图看成高低起伏的地形图,其中灰度值看成海平面高度的话,MSER的作用就是在灰度图中找到符合条件的坑洼.条件为坑的最小高度,坑的大小,坑的倾斜程度,坑中如果已有小坑时大坑与小 ...
- 泛型学习第一天:List与IList的区别 (三)
已经有很多人讨论过IList和List的区别,恩,我也赞同其中的一些观点,其实他们二者也是有优有劣的,看你着重用在哪个方面,先贴一下我赞同的意见,基本上也都是网友们总结的. 首先IList 泛型接口是 ...