
opencv实现数据增强(图片+标签)平移,翻转,缩放,旋转
面试问到了,让手撕数据增强,图片+标签。这里整理一下,直接上代码。
import math

import cv2

import numpy as np

def pan(img, anns, size=(50, 100)):

    '''

    :param img: np.ndarray[h,w,c]

    :param anns: np.ndarray[n,4]

    :param size: list[shift_x, shift_y]

    '''

    shift_x, shift_y = size

    h, w, _ = img.shape

    M = np.array([[1, 0, shift_x], [0, 1, shift_y]], dtype=np.float32)  # 平移矩阵

    img_change = cv2.warpAffine(img, M, (w, h))

    anns_change = anns + np.array([shift_x, shift_y, shift_x, shift_y])

    return img_change, anns_change

def flip(img, anns, flip_code=0):

    # flip_code: 1:水平翻转, 0:垂直翻转, -1:水平垂直翻转

    h, w, _ = img.shape

    img_change = cv2.flip(img, flipCode=flip_code)

    anns_change = anns.copy()

    if flip_code == 1:

        anns_change[:, 0], anns_change[:, 2] = w - anns_change[:, 2], w - anns_change[:, 0]

    elif flip_code == 0:

        anns_change[:, 1], anns_change[:, 3] = h - anns_change[:, 3], h - anns_change[:, 1]

    else:

        anns_change[:, 0], anns_change[:, 2] = w - anns_change[:, 2], w - anns_change[:, 0]

        anns_change[:, 1], anns_change[:, 3] = h - anns_change[:, 3], h - anns_change[:, 1]

    anns_change = np.int32(anns_change)

    return img_change, anns_change

def resize(img, anns, scale=(2, 1)):

    h, w, _ = img.shape

    scale_x, scale_y = scale

    anns_change = anns.copy()

    M = np.array([[scale_x, 0, 0], [0, scale_y, 0]], dtype=np.float32)  # 缩放矩阵

    img_change = cv2.warpAffine(img, M, (int(w * scale_x), int(h * scale_y)))

    anns_change[:, 0], anns_change[:, 2] = anns_change[:, 0] * scale_x, anns_change[:, 2] * scale_x

    anns_change[:, 1], anns_change[:, 3] = anns_change[:, 1] * scale_y, anns_change[:, 3] * scale_y

    anns_change = np.int32(anns_change)

    return img_change, anns_change

def rotate(img, anns, center=(0, 0), angle=-45, scale=1):

    # scale为缩放比例,默认为1,也就是不缩放。 图像旋转+缩放,bboxes对不上,暂时不知道怎么解决。有人知道的话,请评论区告诉我,感谢。

    angle_pi = -angle * math.pi / 180.0  # 弧度

    h, w, _ = img.shape

    M = cv2.getRotationMatrix2D(center, angle, scale)

    img_change = cv2.warpAffine(img, M, (w, h))

    anns_change = anns.copy() * scale

    x1, y1, x2, y2 = anns_change[:, 0], anns_change[:, 1], anns_change[:, 2], anns_change[:, 3]

    x3, y3, x4, y4 = x1, y2, x2, y1

    x1_ = (x1 - center[0]) * math.cos(angle_pi) - (y1 - center[1]) * math.sin(angle_pi) + center[0]

    y1_ = (x1 - center[0]) * math.sin(angle_pi) + (y1 - center[1]) * math.cos(angle_pi) + center[1]

    x2_ = (x2 - center[0]) * math.cos(angle_pi) - (y2 - center[1]) * math.sin(angle_pi) + center[0]

    y2_ = (x2 - center[0]) * math.sin(angle_pi) + (y2 - center[1]) * math.cos(angle_pi) + center[1]

    x3_ = (x3 - center[0]) * math.cos(angle_pi) - (y3 - center[1]) * math.sin(angle_pi) + center[0]

    y3_ = (x3 - center[0]) * math.sin(angle_pi) + (y3 - center[1]) * math.cos(angle_pi) + center[1]

    x4_ = (x4 - center[0]) * math.cos(angle_pi) - (y4 - center[1]) * math.sin(angle_pi) + center[0]

    y4_ = (x4 - center[0]) * math.sin(angle_pi) + (y4 - center[1]) * math.cos(angle_pi) + center[1]

    xs, ys = np.array([x1_, x2_, x3_, x4_]), np.array([y1_, y2_, y3_, y4_])

    xmin, xmax = np.amin(xs, axis=0), np.amax(xs, axis=0)

    ymin, ymax = np.amin(ys, axis=0), np.amax(ys, axis=0)

    anns_change = np.array(list(zip(xmin, ymin, xmax, ymax)))  # 4个[2] ---》 [2, 4]

    anns_change = np.int32(anns_change)

    return img_change, anns_change

if __name__ == '__main__':

    img = cv2.imread("head.jpg")		# 测试图片

    anns = np.array([[180, 100, 250, 150], [340, 100, 380, 150]])	# 测试bbox

    for i in anns:

        cv2.rectangle(img, (i[0], i[1]), (i[2], i[3]), (0, 0, 255), 2)

    cv2.imshow("origin", img)

    # 移动

    img1, anns1 = pan(img, anns)

    for i in anns1:

        cv2.rectangle(img1, (i[0], i[1]), (i[2], i[3]), (0, 0, 255), 2)

    cv2.imshow("pan", img1)

    # 翻转

    img2, anns2 = flip(img, anns)

    for i in anns2:

        cv2.rectangle(img2, (i[0], i[1]), (i[2], i[3]), (0, 0, 255), 2)

    cv2.imshow("flip", img2)

    # 缩放

    img3, anns3 = resize(img, anns)

    for i in anns3:

        cv2.rectangle(img3, (i[0], i[1]), (i[2], i[3]), (0, 0, 255), 2)

    cv2.imshow("resize", img3)

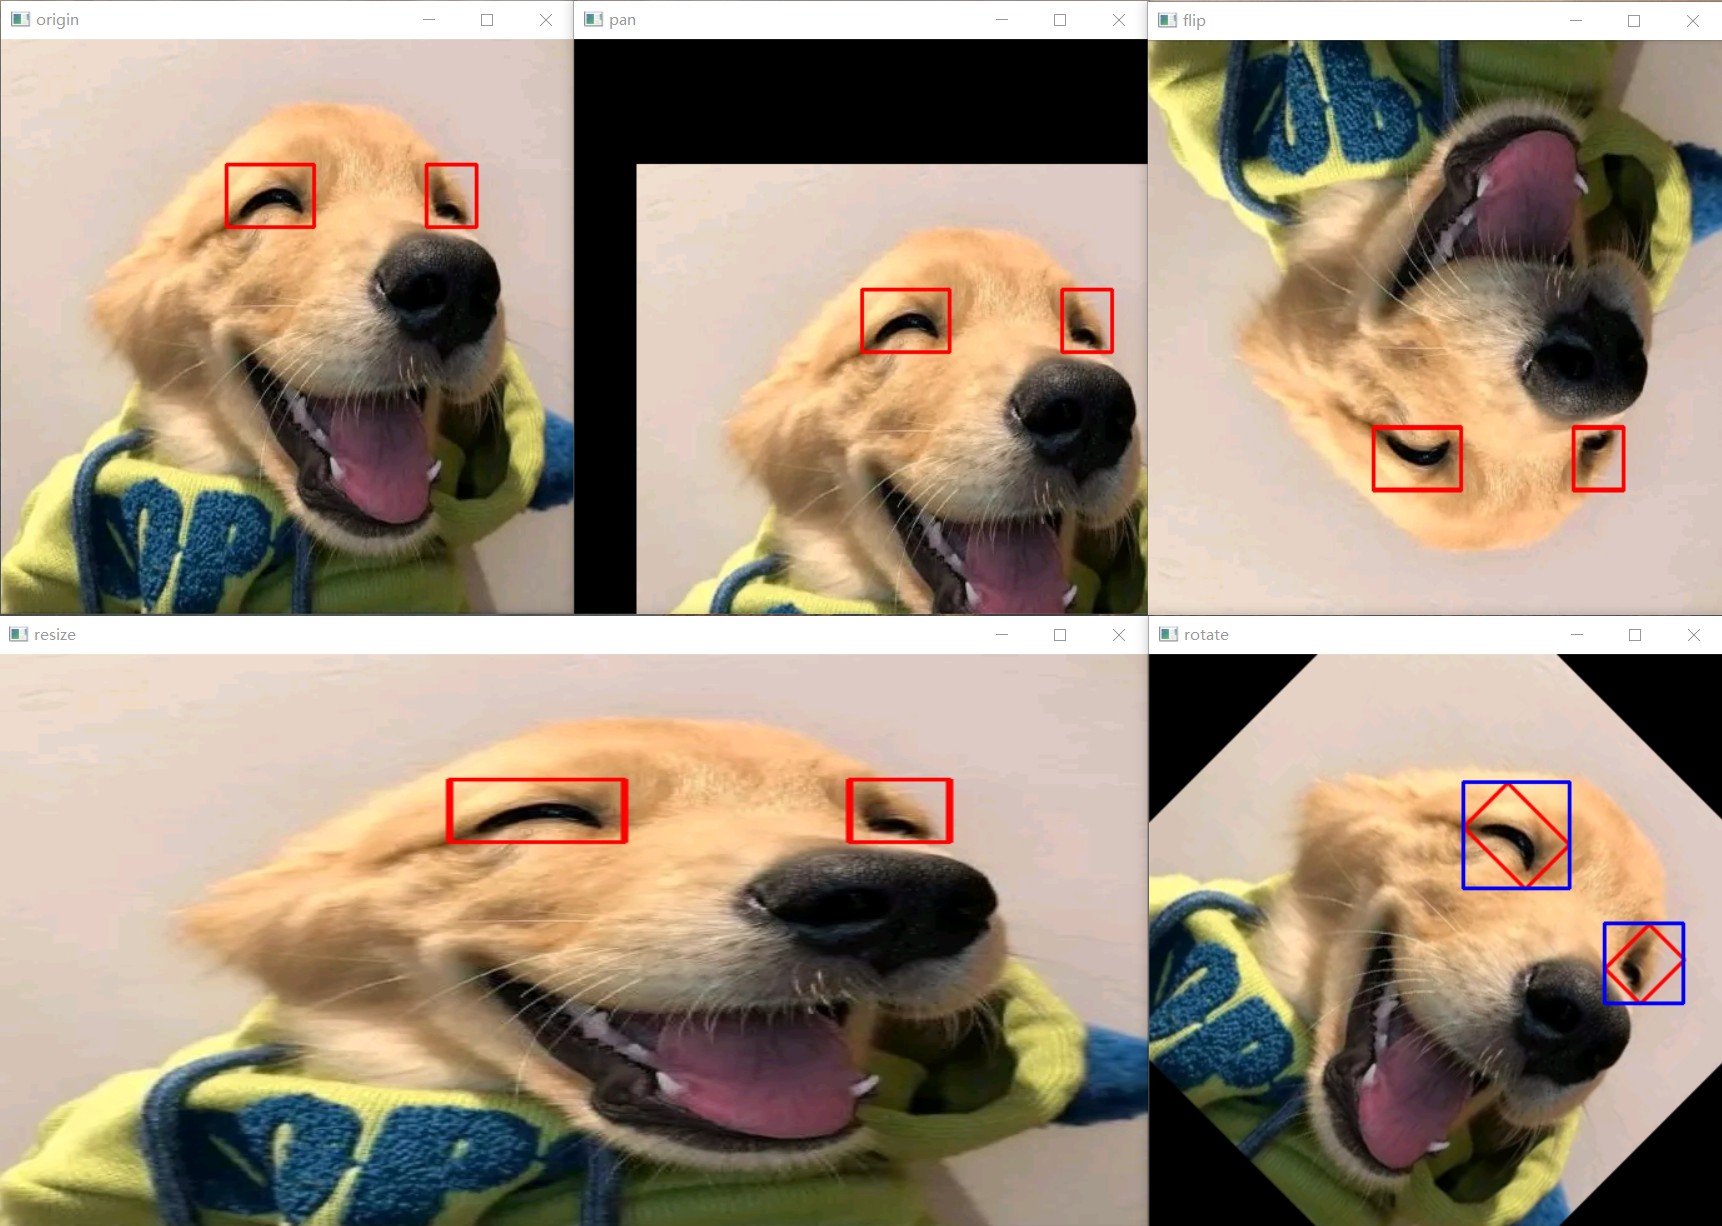
    # 旋转,anns4是下面可视化中蓝色框

    img4, anns4 = rotate(img, anns, center=(img.shape[1] // 2, img.shape[0] // 2))  # 中心旋转

    # img4, anns4 = rotate(img, anns)                                               # 左上角旋转

    for i in anns4:

        cv2.rectangle(img4, (i[0], i[1]), (i[2], i[3]), (255, 0, 0), 2)

    cv2.imshow("rotate", img4)

    cv2.waitKey(0)
结果展示:
opencv实现数据增强(图片+标签)平移,翻转,缩放,旋转的更多相关文章
- 数据增强(每10度进行旋转,进行一次增强,然后对每张图片进行扩充10张patch,最后得到原始图片数*37*10数量的图片)
# -*- coding: utf-8 -*-"""Fourmi Editor This is a temporary script file.""& ...
- Java图片缩略图裁剪水印缩放旋转压缩转格式-Thumbnailator图像处理
前言 java开发中经常遇到对图片的处理,JDK中也提供了对应的工具类,不过处理起来很麻烦,Thumbnailator是一个优秀的图片处理的开源Java类库,处理效果远比Java API的好,从API ...
- 【C#/WPF】Image图片的Transform变换:平移、缩放、旋转
WPF中图像控件Image的变换属性Transform: 平移 缩放 旋转 即要想实现图片的平移.缩放.旋转,是修改它所在的Image控件的Transform变换属性. 下面在XAML中定义了Imag ...
- Python库 - Albumentations 图片数据增强库
Python图像处理库 - Albumentations,可用于深度学习中网络训练时的图片数据增强. Albumentations 图像数据增强库特点: 基于高度优化的 OpenCV 库实现图像快速数 ...
- (转)如何用TensorLayer做目标检测的数据增强
数据增强在机器学习中的作用不言而喻.和图片分类的数据增强不同,训练目标检测模型的数据增强在对图像做处理时,还需要对图片中每个目标的坐标做相应的处理.此外,位移.裁剪等操作还有可能使得一些目标在处理后只 ...
- 图像数据增强 (Data Augmentation in Computer Vision)
1.1 简介 深层神经网络一般都需要大量的训练数据才能获得比较理想的结果.在数据量有限的情况下,可以通过数据增强(Data Augmentation)来增加训练样本的多样性, 提高模型鲁棒性,避免过拟 ...
- Deep Learning -- 数据增强
数据增强 在图像的深度学习中,为了丰富图像训练集,更好的提取图像特征,泛化模型(防止模型过拟合),一般都会对数据图像进行数据增强,数据增强,常用的方式,就是旋转图像,剪切图像,改变图像色差,扭曲图像特 ...
- 【Tool】Augmentor和imgaug——python图像数据增强库
Augmentor和imgaug--python图像数据增强库 Tags: ComputerVision Python 介绍两个图像增强库:Augmentor和imgaug,Augmentor使用比较 ...
- data argumentation 数据增强汇总
几何变换 flip:水平翻转,也叫镜像:垂直翻转 rotation:图片旋转一定的角度,这个可以通过opencv来操作,各个框架也有自己的算子 crop:随机裁剪,比如说,在ImageNet中可以将输 ...
- YoloV4当中的Mosaic数据增强方法(附代码详细讲解)码农的后花园
上一期中讲解了图像分类和目标检测中的数据增强的区别和联系,这期讲解数据增强的进阶版- yolov4中的Mosaic数据增强方法以及CutMix. 前言 Yolov4的mosaic数据增强参考了CutM ...
随机推荐
- python使用selenium适配谷歌浏览器插件, chromedriver与chrome各版本及下载地址
python selenium使用,需要谷歌chromedriver.exe插件 chromedriver.exe插件是放在python的安装目录下(亲测,其它的都不对) 以下是chromedrive ...
- TLS原理与实践(四)国密TLS
主页 个人微信公众号:密码应用技术实战 个人博客园首页:https://www.cnblogs.com/informatics/ 引言 TLS作为保证网络通信安全的关键技术和基石被广泛应用,但目前主流 ...
- mikumikudance 和 pmxEditor 都可以打开 pmx
mikumikudance 和 pmxEditor 都可以打开 pmx 模型下载 https://www.bilibili.com/blackboard/activity-5hkwDIRkBv.htm ...
- Spring boot返回时间与MySql数据库中不相同问题及解决方法
最近做项目测试的发现,访问Url返回的时间与数据库中的不相同,环境是Spring boot+MyBatis+Mysql(阿里云服务器),经过一番折腾,得到了解决 问题描述 我是直接使用IDEA的数据库 ...
- [.NET项目实战] Elsa开源工作流组件应用(一): Elsa工作流简介
Elsa工作流简介 工作流是什么? 引用维基百科中对工作流的解释: 是对工作流程及其各操作步骤之间业务规则的抽象.概括.描述.工作流建模,即将工作流程中的工作如何前后组织在一起的逻辑和规则在计算机中以 ...
- MediaCodec硬解流程
一 MediaCodec概述 MediaCodec是Android 4.1(api 16)版本引入的低层编解码接口,同时支持音视频的编码和解码.通常与MediaExtractor.MediaMuxer ...
- Locust 断言的实现?
一.检查点的方式有哪些: 主要是python 内置的assert 断言(自动断言)还有locust 中的catch_response 断言(手动断言):那么这两者之间有什么区别呢? 其实主要区别在与生 ...
- 记录-VueJs中如何使用Teleport组件
这里给大家分享我在网上总结出来的一些知识,希望对大家有所帮助 在DOM结构相对比较复杂,层级嵌套比较深的组件内,需要根据相对应的模块业务处理一些逻辑,该逻辑属于当前组件 但是从整个页面应用的视图上看, ...
- nginx root 和 alias 的区别
区别: alias 含有rewrite的意思,可以重写掉不存在的路径.( nginx rewrite请看这里) 比如正常访问的地址是: http://ip:port 当我想让 http://ip:po ...
- KingbaseES V8R6 等待事件之CLogControlLock
前言 Kingbase数据库的tuple行头部来标识这条记录的事务结束状态(未知.已提交.已回滚),在事务提交时如果并发更新100万行记录,需要对多个page的tuple进行更改,这种繁重的操作会对数 ...