
YOLOV3目标检测模型训练实例
YOLOV3目标检测
从零开始学习使用keras-yolov3进行图片的目标检测,比较详细地记录了准备以及训练过程,提供一个信号灯的目标检测模型训练实例,并提供相关代码与训练集。
DEMO测试
YOLO提供了模型以及源码,首先使用YOLO训练好的权重文件进行快速测试,首先下载权重文件
https://pjreddie.com/media/files/yolov3.weights
将yolo3的版本库clone到本地,本次测试的commit id为e6598d1
git clone git@github.com:qqwweee/keras-yolo3.git
安装各种依赖,缺啥就安啥,注意依赖版本对应,以下版本仅供参考
Keras==2.2.4

numpy==1.16.0

tensorflow==1.12.0

...
执行convert.py文件,将darknet的yolo转换为可以用于keras的h5文件,生成的文件被保存在model_data下,此外convert.py和yolov3.vfg在git clone后的根目录已经给出,不需要单独下载。
python convert.py yolov3.cfg yolov3.weights model_data/yolo.h5
使用python yolo_video.py -h获取help内容
usage: yolo_video.py [-h] [--model MODEL] [--anchors ANCHORS]

                     [--classes CLASSES] [--gpu_num GPU_NUM] [--image]

                     [--input [INPUT]] [--output [OUTPUT]]

optional arguments:

  -h, --help         show this help message and exit

  --model MODEL      path to model weight file, default model_data/yolo.h5

  --anchors ANCHORS  path to anchor definitions, default

                     model_data/yolo_anchors.txt

  --classes CLASSES  path to class definitions, default

                     model_data/coco_classes.txt

  --gpu_num GPU_NUM  Number of GPU to use, default 1

  --image            Image detection mode, will ignore all positional

                     arguments

  --input [INPUT]    Video input path

  --output [OUTPUT]  [Optional] Video output path
本次测试是进行图片的目标检测,注意当参数为--image时会忽略所有位置参数,也就是说当进行图片检测时每次都需要手动输入位置,当然这可以以后通过自行构建代码修改
python yolo_video.py --image
之后会出现Input image filename:我是放到./img/3.jpg下,于是就直接将路径输入
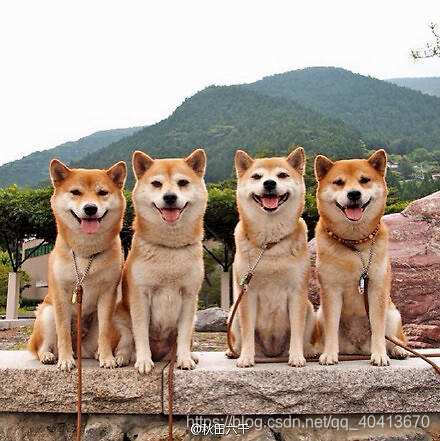
稍等一会就可以识别完成
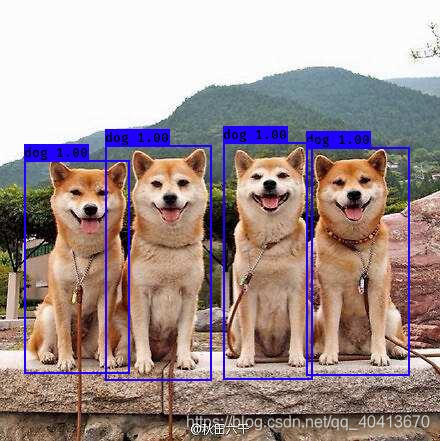
模型训练
准备数据集
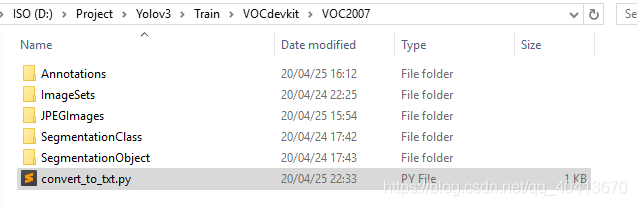
首先需要准备好目录结构,可以在 http://host.robots.ox.ac.uk/pascal/VOC/voc2007/ 中下载VOC2007数据集,然后删除其中所有的文件,仅保留目录结构,也可以手动建立如下目录结构
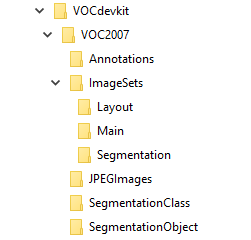
然后将所有的图片放置在JPEGImages目录下,然后在
https://github.com/tzutalin/labelImg 下载labelImg标注工具,此工具是为了将图片框选标注后生成XML文件,使用labelImg打开图片,标注好后将图片生成的XML文件放置于Annotations文件夹内,保存的名字就是图片的名字。
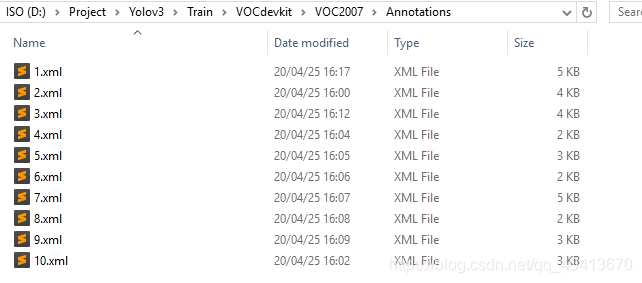
准备训练文件
在VOCdevkit/VOC2007下建立一个python文件,将代码写入并运行,即会在VOCdevkit/VOC2007/ImageSets/Main下生成四个txt文件
import os

import random

trainval_percent = 0

train_percent = 1 # 全部划分为训练集,因为yolo3在训练时依旧会划分训练集与测试集,不需要在此划分

xmlfilepath = 'Annotations'

txtsavepath = 'ImageSets/Main'

total_xml = os.listdir(xmlfilepath)

num = len(total_xml)

list = range(num)

tv = int(num * trainval_percent)

tr = int(tv * train_percent)

trainval = random.sample(list, tv)

train = random.sample(trainval, tr)

ftrainval = open('ImageSets/Main/trainval.txt', 'w')

ftest = open('ImageSets/Main/test.txt', 'w')

ftrain = open('ImageSets/Main/train.txt', 'w')

fval = open('ImageSets/Main/val.txt', 'w')

for i in list:

    name = total_xml[i][:-4] + '\n'

    if i in trainval:

        ftrainval.write(name)

        if i in train:

            ftest.write(name)

        else:

            fval.write(name)

    else:

        ftrain.write(name)

ftrainval.close()

ftrain.close()

fval.close()

ftest.close()
在VOCdevkit的上层目录,我目前的目录结构为Train下,建立python文件并运行,生成三个txt文件,注意,此处代码需要将classes更改成需要训练的类别,我只需要训练person一类,所以此处数组中只有person类别

import xml.etree.ElementTree as ET

from os import getcwd

sets=[('2007', 'train'), ('2007', 'val'), ('2007', 'test')]

classes = ["person"]

def convert_annotation(year, image_id, list_file):

    in_file = open('VOCdevkit/VOC%s/Annotations/%s.xml'%(year, image_id),'rb')

    tree=ET.parse(in_file)

    root = tree.getroot()

    for obj in root.iter('object'):

        difficult = obj.find('difficult').text

        cls = obj.find('name').text

        if cls not in classes or int(difficult)==1:

            continue

        cls_id = classes.index(cls)

        xmlbox = obj.find('bndbox')

        b = (int(xmlbox.find('xmin').text), int(xmlbox.find('ymin').text), int(xmlbox.find('xmax').text), int(xmlbox.find('ymax').text))

        list_file.write(" " + ",".join([str(a) for a in b]) + ',' + str(cls_id))

wd = getcwd()

for year, image_set in sets:

    image_ids = open('VOCdevkit/VOC%s/ImageSets/Main/%s.txt'%(year, image_set)).read().strip().split()

    list_file = open('%s.txt'%(image_set), 'w')

    for image_id in image_ids:

        list_file.write('VOCdevkit/VOC%s/JPEGImages/%s.jpg'%(year, image_id))

        convert_annotation(year, image_id, list_file)

        list_file.write('\n')

    list_file.close()
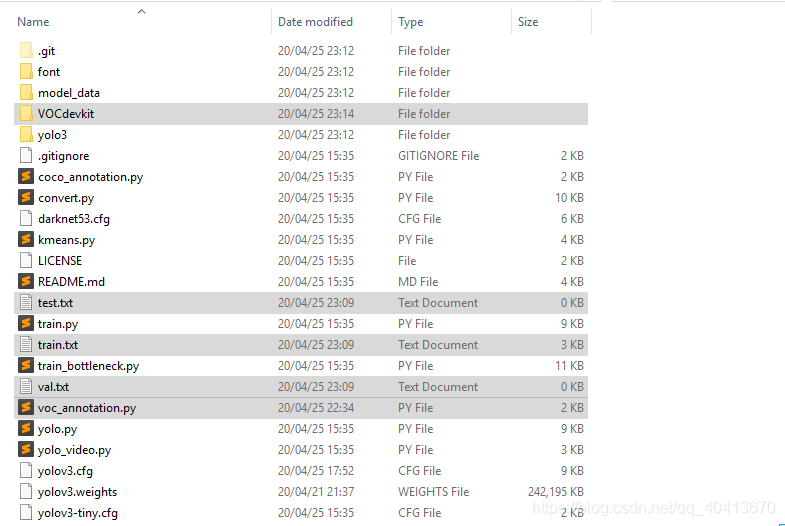
接下来将Train目录下所有的文件复制到git clone后的目录下,此时的文件目录结构是这样的
修改参数
此时需要修改model_data/coco_classes.txt与voc_classes.txt文件,这两个文件都是需要存放训练类别的,同样我只是训练person类别,此处只有一行person。
接下来修改yolov3.cfg,假如你不需要加载预训练的权重,那么此文件是没有必要修改的,此文件是为生成yolo_weights.h5作配置的,在此文件中搜索yolo,会有三处匹配,都是相同的更改方式,以第一次匹配举例,三处注释位置,也就是共需改动9行
...

[convolutional]

size=1

stride=1

pad=1

filters=18  # 3*(5+len(classes)) # 我训练一种类别 即 3*(5+1) = 18

activation=linear

[yolo]

mask = 6,7,8

anchors = 10,13,  16,30,  33,23,  30,61,  62,45,  59,119,  116,90,  156,198,  373,326

classes=1 # 一种类别

num=9

jitter=.3

ignore_thresh = .5

truth_thresh = 1

random=1 # 显存小就改为0

...
运行python convert.py -w yolov3.cfg yolov3.weights model_data/yolo_weights.h5生成model_data / yolo_weights.h5用于加载预训练的权重。
训练模型
之后就可以开始训练了,因为我一开始暂时没有数据,就随便找了几张图片标注后试了一下,因为不足十张,外加我在构建VOC数据集时又划分了一下数据集与训练集,而train.py又默认将数据划分了0.1的训练集,不足十张乘0.1取整就是0,导致我一直报错,此处一定要注意,一定要有验证集,也就是至少需要有两张图片,一张作为训练集一张作为验证集,否则运行train.py时会报错KeyError: 'val_loss',运行train_bottleneck.py会报错IndexError: list index out of range,此外还需要注意的是需要手动建立logs/000/目录,防止保存模型时无法找到目录而抛出异常。训练一般使用train.py就可以了,对于出现的问题多多去看看github的issue与README,很多问题都会有讨论与解决,对于train.py我略微做了一些更改以适应我的训练目的,对于一些更改的地方有注释
"""

Retrain the YOLO model for your own dataset.

"""

import numpy as np

import keras.backend as K

from keras.layers import Input, Lambda

from keras.models import Model

from keras.optimizers import Adam

from keras.callbacks import TensorBoard, ModelCheckpoint, ReduceLROnPlateau, EarlyStopping

from yolo3.model import preprocess_true_boxes, yolo_body, tiny_yolo_body, yolo_loss

from yolo3.utils import get_random_data

def _main():

    annotation_path = 'train.txt'

    log_dir = 'logs/000/'

    classes_path = 'model_data/voc_classes.txt'

    anchors_path = 'model_data/yolo_anchors.txt'

    class_names = get_classes(classes_path)

    num_classes = len(class_names)

    anchors = get_anchors(anchors_path)

    input_shape = (416,416) # multiple of 32, hw

    # 此处去掉了 create_tiny_model 的判断 # load_pretrained 为False即不加载预训练的权重,为True则加载预训练的权重

    model = create_model(input_shape, anchors, num_classes,load_pretrained=False,

            freeze_body=2, weights_path='model_data/yolo_weights.h5') # make sure you know what you freeze

    logging = TensorBoard(log_dir=log_dir)

    # ModelCheckpoint 回调检查模型周期 更改为每10次检查

    checkpoint = ModelCheckpoint(log_dir + 'ep{epoch:03d}-loss{loss:.3f}-val_loss{val_loss:.3f}.h5',

        monitor='val_loss', save_weights_only=True, save_best_only=True, period=10)

    reduce_lr = ReduceLROnPlateau(monitor='val_loss', factor=0.1, patience=3, verbose=1)

    early_stopping = EarlyStopping(monitor='val_loss', min_delta=0, patience=6000, verbose=1)

    # 对输入划分训练集与测试集的比重

    val_split = 0.3

    with open(annotation_path) as f:

        lines = f.readlines()

    np.random.seed(10101)

    np.random.shuffle(lines)

    np.random.seed(None)

    num_val = int(len(lines)*val_split)

    num_train = len(lines) - num_val

    # Train with frozen layers first, to get a stable loss.

    # Adjust num epochs to your dataset. This step is enough to obtain a not bad model.

    if True:

        model.compile(optimizer=Adam(lr=1e-3), loss={

            # use custom yolo_loss Lambda layer.

            'yolo_loss': lambda y_true, y_pred: y_pred})

        # batch_size 需要针对显存更改数量

        batch_size = 10

        print('Train on {} samples, val on {} samples, with batch size {}.'.format(num_train, num_val, batch_size))

        # epochs 即训练次数

        model.fit_generator(data_generator_wrapper(lines[:num_train], batch_size, input_shape, anchors, num_classes),

                steps_per_epoch=max(1, num_train//batch_size),

                validation_data=data_generator_wrapper(lines[num_train:], batch_size, input_shape, anchors, num_classes),

                validation_steps=max(1, num_val//batch_size),

                epochs=50,

                initial_epoch=0,

                callbacks=[logging, checkpoint])

        model.save_weights(log_dir + 'trained_weights_stage_1.h5')

    # Unfreeze and continue training, to fine-tune.

    # Train longer if the result is not good.

    if True:

        for i in range(len(model.layers)):

            model.layers[i].trainable = True

        model.compile(optimizer=Adam(lr=1e-4), loss={'yolo_loss': lambda y_true, y_pred: y_pred}) # recompile to apply the change

        print('Unfreeze all of the layers.')

        # batch_size 需要针对显存更改数量

        batch_size = 10 # note that more GPU memory is required after unfreezing the body

        print('Train on {} samples, val on {} samples, with batch size {}.'.format(num_train, num_val, batch_size))

        # epochs即训练次数

        model.fit_generator(data_generator_wrapper(lines[:num_train], batch_size, input_shape, anchors, num_classes),

            steps_per_epoch=max(1, num_train//batch_size),

            validation_data=data_generator_wrapper(lines[num_train:], batch_size, input_shape, anchors, num_classes),

            validation_steps=max(1, num_val//batch_size),

            epochs=50,

            initial_epoch=50)

        model.save_weights(log_dir + 'trained_weights_final.h5')

    # Further training if needed.

def get_classes(classes_path):

    '''loads the classes'''

    with open(classes_path) as f:

        class_names = f.readlines()

    class_names = [c.strip() for c in class_names]

    return class_names

def get_anchors(anchors_path):

    '''loads the anchors from a file'''

    with open(anchors_path) as f:

        anchors = f.readline()

    anchors = [float(x) for x in anchors.split(',')]

    return np.array(anchors).reshape(-1, 2)

def create_model(input_shape, anchors, num_classes, load_pretrained=True, freeze_body=2,

            weights_path='model_data/yolo_weights.h5'):

    '''create the training model'''

    K.clear_session() # get a new session

    image_input = Input(shape=(None, None, 3))

    h, w = input_shape

    num_anchors = len(anchors)

    y_true = [Input(shape=(h//{0:32, 1:16, 2:8}[l], w//{0:32, 1:16, 2:8}[l], \

        num_anchors//3, num_classes+5)) for l in range(3)]

    model_body = yolo_body(image_input, num_anchors//3, num_classes)

    print('Create YOLOv3 model with {} anchors and {} classes.'.format(num_anchors, num_classes))

    if load_pretrained:

        model_body.load_weights(weights_path, by_name=True, skip_mismatch=True)

        print('Load weights {}.'.format(weights_path))

        if freeze_body in [1, 2]:

            # Freeze darknet53 body or freeze all but 3 output layers.

            num = (185, len(model_body.layers)-3)[freeze_body-1]

            for i in range(num): model_body.layers[i].trainable = False

            print('Freeze the first {} layers of total {} layers.'.format(num, len(model_body.layers)))

    model_loss = Lambda(yolo_loss, output_shape=(1,), name='yolo_loss',

        arguments={'anchors': anchors, 'num_classes': num_classes, 'ignore_thresh': 0.5})(

        [*model_body.output, *y_true])

    model = Model([model_body.input, *y_true], model_loss)

    return model

def create_tiny_model(input_shape, anchors, num_classes, load_pretrained=True, freeze_body=2,

            weights_path='model_data/tiny_yolo_weights.h5'):

    '''create the training model, for Tiny YOLOv3'''

    K.clear_session() # get a new session

    image_input = Input(shape=(None, None, 3))

    h, w = input_shape

    num_anchors = len(anchors)

    y_true = [Input(shape=(h//{0:32, 1:16}[l], w//{0:32, 1:16}[l], \

        num_anchors//2, num_classes+5)) for l in range(2)]

    model_body = tiny_yolo_body(image_input, num_anchors//2, num_classes)

    print('Create Tiny YOLOv3 model with {} anchors and {} classes.'.format(num_anchors, num_classes))

    if load_pretrained:

        model_body.load_weights(weights_path, by_name=True, skip_mismatch=True)

        print('Load weights {}.'.format(weights_path))

        if freeze_body in [1, 2]:

            # Freeze the darknet body or freeze all but 2 output layers.

            num = (20, len(model_body.layers)-2)[freeze_body-1]

            for i in range(num): model_body.layers[i].trainable = False

            print('Freeze the first {} layers of total {} layers.'.format(num, len(model_body.layers)))

    model_loss = Lambda(yolo_loss, output_shape=(1,), name='yolo_loss',

        arguments={'anchors': anchors, 'num_classes': num_classes, 'ignore_thresh': 0.5})(

        [*model_body.output, *y_true])

    model = Model([model_body.input, *y_true], model_loss)

    return model

def data_generator(annotation_lines, batch_size, input_shape, anchors, num_classes):

    '''data generator for fit_generator'''

    n = len(annotation_lines)

    i = 0

    while True:

        image_data = []

        box_data = []

        for b in range(batch_size):

            if i==0:

                np.random.shuffle(annotation_lines)

            image, box = get_random_data(annotation_lines[i], input_shape, random=True)

            image_data.append(image)

            box_data.append(box)

            i = (i+1) % n

        image_data = np.array(image_data)

        box_data = np.array(box_data)

        y_true = preprocess_true_boxes(box_data, input_shape, anchors, num_classes)

        yield [image_data, *y_true], np.zeros(batch_size)

def data_generator_wrapper(annotation_lines, batch_size, input_shape, anchors, num_classes):

    n = len(annotation_lines)

    if n==0 or batch_size<=0: return None

    return data_generator(annotation_lines, batch_size, input_shape, anchors, num_classes)

if __name__ == '__main__':

    _main()
测试模型
当模型训练完成后,就可以加载模型进行图片测试了
import sys

import argparse

from yolo import YOLO, detect_video

from PIL import Image

if __name__ == '__main__':

    config = {

        "model_path": "logs/000/trained_weights_final.h5", # 加载模型

        "score": 0.1, # 超出这个值的预测才会被显示

        "iou": 0.5, # 交并比

    }

    yolo = YOLO(**config)

    image = Image.open("./img/1.jpg")

    r_image = yolo.detect_image(image)

    r_image.save("./img/2.jpg")
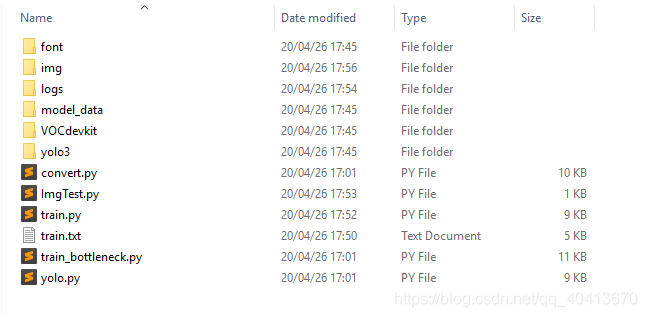
此后就需要不断开始优化参数并训练了,其实在目录中有很多文件是用不到的或者是使用一次后就一般不会再用到了,可以备份一下代码后适当精简目录结构。
模型训练实例
从百度下载了50张信号灯的图片作训练集,实例仅为模型训练的Demo,数据集比较小,相关信息仅供参考。
运行环境
cuda 8.0

python 3.6

keras 2.1.5

tensorflow-gpu 1.4.0
相关配置
val_split = 0.1 # 训练集与测试集划分比例

batch_size = 5 # 每次训练选择样本数

epochs = 300 # 训练三百次
运行结果
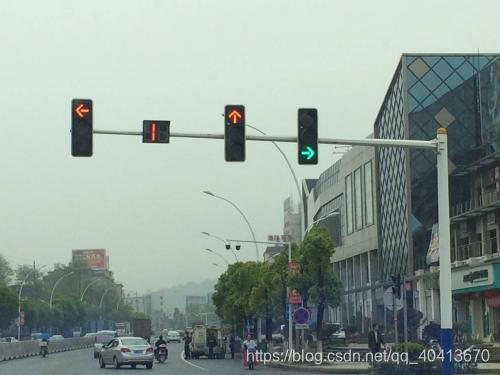
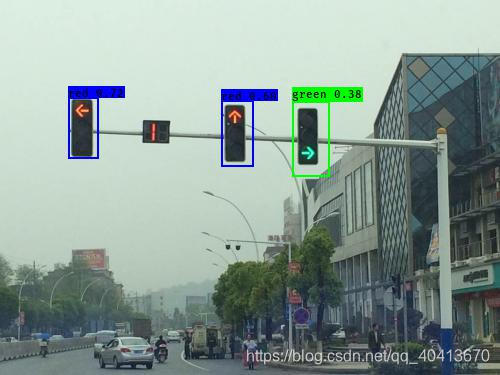
数据集中的红灯比较多,所以训练结果中红灯的置信度为0.60和0.72,绿灯样本较少,识别的绿灯的置信度为0.38,整体效果还算可以。
loss: 25.8876 - val_loss: 38.1282
原图
识别
实例代码
如果觉得不错,点个star吧

https://github.com/WindrunnerMax/Example
YOLOV3目标检测模型训练实例的更多相关文章
- 平均精度均值(mAP)——目标检测模型性能统计量
在机器学习领域,对于大多数常见问题,通常会有多个模型可供选择.当然,每个模型会有自己的特性,并会受到不同因素的影响而表现不同. 每个模型的好坏是通过评价它在某个数据集上的性能来判断的,这个数据集通常被 ...
- 谷歌大脑提出:基于NAS的目标检测模型NAS-FPN,超越Mask R-CNN
谷歌大脑提出:基于NAS的目标检测模型NAS-FPN,超越Mask R-CNN 朱晓霞发表于目标检测和深度学习订阅 235 广告关闭 11.11 智慧上云 云服务器企业新用户优先购,享双11同等价格 ...
- PyTorch专栏(八):微调基于torchvision 0.3的目标检测模型
专栏目录: 第一章:PyTorch之简介与下载 PyTorch简介 PyTorch环境搭建 第二章:PyTorch之60分钟入门 PyTorch入门 PyTorch自动微分 PyTorch神经网络 P ...
- 微调torchvision 0.3的目标检测模型
微调torchvision 0.3的目标检测模型 本文将微调在 Penn-Fudan 数据库中对行人检测和分割的已预先训练的 Mask R-CNN 模型.它包含170个图像和345个行人实例,说明如何 ...
- 目标检测模型的性能评估--MAP(Mean Average Precision)
目标检测模型中性能评估的几个重要参数有精确度,精确度和召回率.本文中我们将讨论一个常用的度量指标:均值平均精度,即MAP. 在二元分类中,精确度和召回率是一个简单直观的统计量,但是在目标检测中有所不同 ...
- K210,yolo,face_mask口罩检测模型训练及其在K210,kd233上部署
前段时间考研,再加上工作,时间很紧,一直没有更新博客,这几天在搞k210的目标检测模型,做个记录,遇到问题可以添加qq522414928或添加微信13473465975,共同学习 首先附上github ...
- 第三十二节,使用谷歌Object Detection API进行目标检测、训练新的模型(使用VOC 2012数据集)
前面已经介绍了几种经典的目标检测算法,光学习理论不实践的效果并不大,这里我们使用谷歌的开源框架来实现目标检测.至于为什么不去自己实现呢?主要是因为自己实现比较麻烦,而且调参比较麻烦,我们直接利用别人的 ...
- Yolov5——训练目标检测模型
项目的克隆 打开yolov5官网(GitHub - ultralytics/yolov5 at v5.0),下载yolov5的项目: 环境的安装(免额外安装CUDA和cudnn) 打开anaconda ...
- 旷世提出类别正则化的域自适应目标检测模型,缓解场景多样的痛点 | CVPR 2020
论文基于DA Faster R-CNN系列提出类别正则化框架,充分利用多标签分类的弱定位能力以及图片级预测和实例级预测的类一致性,从实验结果来看,类该方法能够很好地提升DA Faster R-CNN系 ...
- 目标检测模型的评价标准-AP与mAP
目录 目录 目录 前言 一,精确率.召回率与F1 1.1,准确率 1.2,精确率.召回率 1.3,F1 分数 1.4,PR 曲线 1.4.1,如何理解 P-R 曲线 1.5,ROC 曲线与 AUC 面 ...
随机推荐
- Laravel - 使用 DB facade 实现CURD
<?php namespace App\Http\Controllers; use Illuminate\Http\Request; use Illuminate\Support\Facades ...
- ONVIF网络摄像头(IPC)客户端开发—ONVIF介绍
1.前言: 网上已经有很多关于ONVIF开发的资料,这里概括介绍一下ONVIF协议以及介绍一下我自己在开发ONVIF网络摄像头的一些流程和经验,做个开发记录和经验总结,以备将来查看,也可供他人参考 ...
- [转帖]TiDB BR 备份至 MinIO S3 实战
https://tidb.net/blog/3a31d41d#3.%E9%83%A8%E7%BD%B2%20MinIO%20S3%20%E5%8F%8A%E5%A4%87%E4%BB%BD%E6%81 ...
- [转帖]python中input()、print()用法
https://www.cnblogs.com/lei3082195861/p/16967109.html 1.input()函数常涉及的强制类型转换 第一种是在键入时进行转换,例如:a = int( ...
- [转帖]jemalloc内存分配算法
https://www.cnblogs.com/xiaojiesir/p/15450732.html jemalloc内存分配算法简介 jemalloc 是由 Jason Evans 在 FreeBS ...
- [转帖]一起来体验96核心、192线程CPU——第四代AMD EPYC处理器独家测试
http://k.sina.com.cn/article_1882475282_70344b12027010s1x.html 与第三代EPYC 7003系列处理器相比,新一代EPYC 9004系列处理 ...
- Arthas 超简单离线使用教程
简介 Arthas 是阿里巴巴开源的一套监控java应用的工具 官网的文档地址: https://arthas.aliyun.com/doc/ 官方的简介说明: Arthas 是Alibaba开源的J ...
- linux中如何统计千万个文件总和
很简单.很简单.很简单.重要事情说三遍 命令:ls | grep '匹配信息' | wc -l ls查看该目录下的所有文件,果然隐藏文件也要匹配上的话,需要:ls -a grep匹配,如查看文件中有. ...
- Spring Cloud 系列:基于Seata 实现 XA模式
https://seata.io/zh-cn/docs/user/mode/xa https://seata.io/zh-cn/docs/dev/mode/xa-mode XA 规范 是 X/Open ...
- bean的一生
你曾读spring源码 "不知所云"."绞尽脑汁"."不知所措"嘛 那这篇文章可能会对你有所帮助,小编尝试用简单.易懂的例子来模拟sprin ...