android AlertDialog控件使用
1、先创建activity_alert_dialog.xml
<?xml version="1.0" encoding="utf-8"?>

<androidx.constraintlayout.widget.ConstraintLayout xmlns:android="http://schemas.android.com/apk/res/android"

    xmlns:app="http://schemas.android.com/apk/res-auto"

    xmlns:tools="http://schemas.android.com/tools"

    android:layout_width="match_parent"

    android:layout_height="match_parent"

    tools:context=".AlertDialogActivity">

    <androidx.constraintlayout.widget.Guideline

        android:id="@+id/guideline6"

        android:layout_width="wrap_content"

        android:layout_height="wrap_content"

        android:orientation="horizontal"

        app:layout_constraintGuide_percent="0.08" />

    <Button

        android:id="@+id/button7"

        android:layout_width="wrap_content"

        android:layout_height="wrap_content"

        android:text="@string/btn5"

        app:layout_constraintBottom_toTopOf="@+id/guideline6"

        app:layout_constraintEnd_toEndOf="parent"

        app:layout_constraintStart_toStartOf="parent"

        app:layout_constraintTop_toTopOf="@+id/guideline6" />

    <androidx.constraintlayout.widget.Guideline

        android:id="@+id/guideline7"

        android:layout_width="wrap_content"

        android:layout_height="wrap_content"

        android:orientation="horizontal"

        app:layout_constraintGuide_percent="0.17920657" />

    <Button

        android:id="@+id/button9"

        android:layout_width="wrap_content"

        android:layout_height="wrap_content"

        android:text="@string/btn6"

        app:layout_constraintBottom_toTopOf="@+id/guideline7"

        app:layout_constraintEnd_toEndOf="parent"

        app:layout_constraintStart_toStartOf="parent"

        app:layout_constraintTop_toTopOf="@+id/guideline7" />

    <androidx.constraintlayout.widget.Guideline

        android:id="@+id/guideline8"

        android:layout_width="wrap_content"

        android:layout_height="wrap_content"

        android:orientation="horizontal"

        app:layout_constraintGuide_percent="0.30779755" />

    <Button

        android:id="@+id/button10"

        android:layout_width="wrap_content"

        android:layout_height="wrap_content"

        android:text="@string/btn7"

        app:layout_constraintBottom_toTopOf="@+id/guideline8"

        app:layout_constraintEnd_toEndOf="parent"

        app:layout_constraintHorizontal_bias="0.498"

        app:layout_constraintStart_toStartOf="parent"

        app:layout_constraintTop_toTopOf="@+id/guideline8" />

    <androidx.constraintlayout.widget.Guideline

        android:id="@+id/guideline9"

        android:layout_width="wrap_content"

        android:layout_height="wrap_content"

        android:orientation="horizontal"

        app:layout_constraintGuide_percent="0.44" />

    <Button

        android:id="@+id/button11"

        android:layout_width="wrap_content"

        android:layout_height="wrap_content"

        android:text="@string/btn8"

        app:layout_constraintBottom_toTopOf="@+id/guideline9"

        app:layout_constraintEnd_toEndOf="parent"

        app:layout_constraintHorizontal_bias="0.498"

        app:layout_constraintStart_toStartOf="parent"

        app:layout_constraintTop_toTopOf="@+id/guideline9" />

</androidx.constraintlayout.widget.ConstraintLayout>
2、AlertDialogActivity.java
package com.example.myapplication; import androidx.appcompat.app.AlertDialog;
import androidx.appcompat.app.AppCompatActivity; import android.app.DatePickerDialog;
import android.content.DialogInterface;
import android.os.Bundle;
import android.view.View;
import android.widget.Button;
import android.widget.Toast; public class AlertDialogActivity extends AppCompatActivity { private Button btn7,btn9,btn10,btn11;
@Override
protected void onCreate(Bundle savedInstanceState) {
super.onCreate(savedInstanceState);
setContentView(R.layout.activity_alert_dialog); btn7 = findViewById(R.id.button7);
btn9 = findViewById(R.id.button9);
btn10 = findViewById(R.id.button10);
btn11 = findViewById(R.id.button11); btn7.setOnClickListener(new View.OnClickListener() {
@Override
public void onClick(View view) {
AlertDialog.Builder bulder = new AlertDialog.Builder(AlertDialogActivity.this); bulder.setTitle("问卷调查").setIcon(R.drawable.p2).setMessage("感觉地球气温有上升吗?")
.setPositiveButton("没有", new DialogInterface.OnClickListener() {
@Override
public void onClick(DialogInterface dialogInterface, int i) {
Toast.makeText(AlertDialogActivity.this, "气温没有上升", Toast.LENGTH_SHORT).show();
}
}).setNeutralButton("不知道", new DialogInterface.OnClickListener() {
@Override
public void onClick(DialogInterface dialogInterface, int i) {
Toast.makeText(AlertDialogActivity.this, "不知道", Toast.LENGTH_SHORT).show(); }
}).setNegativeButton("上升好多", new DialogInterface.OnClickListener() {
@Override
public void onClick(DialogInterface dialogInterface, int i) {
Toast.makeText(AlertDialogActivity.this, "上升好多", Toast.LENGTH_SHORT).show();
}
}).show();
}
}); btn9.setOnClickListener(new View.OnClickListener() {
@Override
public void onClick(View view) {
AlertDialog.Builder bulder = new AlertDialog.Builder(AlertDialogActivity.this);
final String[] array = {"男","女"};
bulder.setTitle("请选择性别").setItems(array, new DialogInterface.OnClickListener() {
@Override
public void onClick(DialogInterface dialogInterface, int i) {
Toast.makeText(AlertDialogActivity.this, array[i], Toast.LENGTH_SHORT).show();
}
}).show();
}
}); btn10.setOnClickListener(new View.OnClickListener() {
@Override
public void onClick(View view) {
AlertDialog.Builder bulder = new AlertDialog.Builder(AlertDialogActivity.this);
final String[] array = {"男","女"};
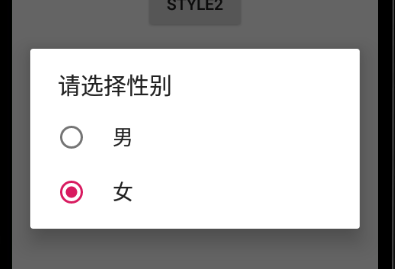
bulder.setTitle("请选择性别").setSingleChoiceItems(array, 1, new DialogInterface.OnClickListener(){ @Override
public void onClick(DialogInterface dialogInterface, int i) {
Toast.makeText(AlertDialogActivity.this, array[i], Toast.LENGTH_SHORT).show();
}
}).show();
}
}); btn11.setOnClickListener(new View.OnClickListener() {
@Override
public void onClick(View view) {
AlertDialog.Builder bulder = new AlertDialog.Builder(AlertDialogActivity.this);
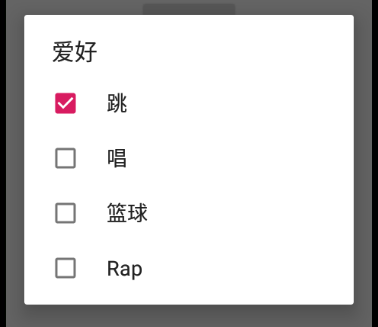
final String[] array = {"跳","唱","篮球","Rap"};
final boolean[] isSelected = { true,false,false,false};
bulder.setTitle("爱好").setMultiChoiceItems(array, isSelected, new DialogInterface.OnMultiChoiceClickListener() {
@Override
public void onClick(DialogInterface dialogInterface, int i, boolean b) {
Toast.makeText(AlertDialogActivity.this, array[i]+b, Toast.LENGTH_SHORT).show();
}
}).show();
}
}); }
}
3、效果:

android AlertDialog控件使用的更多相关文章
- android:AlertDialog控件
AlertDialog 可以在当前的界面弹出一个对话框,这个对话框是置顶于所有界面元素之上 的,能够屏蔽掉其他控件的交互能力,因此一般 AlertDialog 都是用于提示一些非常重要的 内容或者警告 ...
- 【Android开发日记】之入门篇(十三)——Android的控件解析
Android的控件都派生自android.view.View类,在android.widget包中定义了大量的系统控件供开发者使用,开发者也可以从View类及其子类中,派生出自定义的控件. 一.An ...
- 一个Demo让你掌握Android所有控件
原文:一个Demo让你掌握Android所有控件 本文是转载收藏,侵删,出处:"安卓巴士" 下面给出实现各个组件的源代码: 1.下拉框实现--Spinner packag ...
- android 基础控件(EditView、SeekBar等)的属性及使用方法
android提供了大量的UI控件,本文将介绍TextView.ImageView.Button.EditView.ProgressBar.SeekBar.ScrollView.WebView ...
- Android基本控件之Menus
在我们的手机中有很多样式的菜单,比如:我们的短信界面,每条短信,我们长按都会出现一个菜单,还有很多的种类.那么现在,我们就来详细的讨论一下安卓中的菜单 Android的控件中就有这么一个,叫做Menu ...
- Android:控件布局(相对布局)RelativeLayout
RelativeLayout是相对布局控件:以控件之间相对位置或相对父容器位置进行排列. 相对布局常用属性: 子类控件相对子类控件:值是另外一个控件的id android:layout_above-- ...
- Android:控件布局(线性布局)LinearLayout
LinearLayout是线性布局控件:要么横向排布,要么竖向排布 决定性属性:必须有的! android:orientation:vertical (垂直方向) .horizontal(水平方向) ...
- 矩阵, 矩阵 , Android基础控件之ImageView
天下文章大家抄,以下所有内容,有来自copy,有来自查询,亦有自己的总结(目的是总结出自己的东西),所以说原创,不合适,说是转载也不恰当,所以我称之为笔记,可惜没有此分类选项,姑且不要脸一点,选择为原 ...
- Android给控件添加触摸回调
Android给控件添加触摸回调 脑补一个场景,一个页面点击某个按钮会弹出PopupWindow,然后点击PopupWindow以外的任意位置关闭 效果图 实现方法 可以在布局的最外层容器监听触摸事件 ...
随机推荐
- IDEA文件查找功能失效(ctrl+shift+N)
由于断电.蓝屏引起的强制关机等情况,会导出IDEA文件查找功能失效,Enter file name窗口输入的文字显示红色,无法查出需要的文件. 解决方法: 可以点击File,选择Invalidate ...
- arcgis python 获得硬件id
import time import wmi, zlib def get_cpu_info(): tmpdict = {} tmpdict["CpuCores"] = 0 c = ...
- axios 文件下载代码 片段
<script type="text/javascript"> axios({ method:'post', url: 'url', // 最好qs.stringify ...
- jmeter cookie管理器
jmeter cookie管理器 不能用正则表达式获取登录接口生成的cookie 因为cookies并不是在登录的响应结果中生成的,而是在response header中携带的,所以不能用正则表达式提 ...
- Java多个线程顺序打印数字
要求 启动N个线程, 这N个线程要不间断按顺序打印数字1-N. 将问题简化为3个线程无限循环打印1到3 方法一: 使用synchronized 三个线程无序竞争同步锁, 如果遇上的是自己的数字, 就打 ...
- Spring MVC -- 表达式于语言(EL)
JSP 2.0最重要的特性之一就是表达式语言(EL),JSP用户可以用它来访问应用程序数据.由于受到ECMAScript和XPath表达式语言的启发,EL也设计成可以轻松地编写免脚本(就是不用在jsp ...
- RedisTemplate 获取redis中以某些字符串为前缀的KEY列表
// *号 必须要加,否则无法模糊查询 String prefix = "ofc-pincode-"+ pincode + "-*"; // 获取所有的key ...
- servlet 标红的错误笔记
错误原因,没有添加来自Tomcat服务器的jar包依赖. 解决方法
- [07]Go设计模式:过滤器模式(FilterPattern)
目录 过滤器模式 一.简介 二.代码 三.参考链接 过滤器模式 一.简介 过滤器模式(Filter Pattern)或标准模式(Criteria Pattern)是一种设计模式,这种模式允许开发人员使 ...
- Burp Suite 如何抓取HTTPS请求
1,下载安装burp suite工具 https://portswigger.net/burp/communitydownload 如果是windows系统,选择windows点击Download下载 ...