How to Set Up an Rsync Daemon on Your Linux Server
Introduction
This tutorial will take you through setting up an rsync daemon on your Linux server. You might want an rsync daemon if you have files that you want available so anyone (or just yourself) can download existing files or upload new files. This guide will review both running rsync as its own daemon and running it via xinetd.
Prerequisites
– A Linux server with rsync installed – if you do not have a server already, why not spin up a robust and reliable Cloud Server in under 30 seconds.
– (Optional) Xinetd installed.
– Appropriate permissions to read and/or write on the rsync daemon (this tutorial will show commands run as the root user).
Setting up an Rsync Daemon
First, using your preferred text editor, you’ll need to create the configuration file /etc/rsyncd.conf, if you do not have one already. Below is an example of our basic configuration parameters and explanations of each one.
pid file = /var/run/rsyncd.pid

lock file = /var/run/rsync.lock

log file = /var/log/rsync.log

port = 12000

[files]

path = /home/public_rsync

comment = RSYNC FILES

read only = true

timeout = 300
pid file: The process id file the daemon uses.
lock file: The daemon lock file.
log file: The location of the log file.
port: If you do not want the rsync daemon to run on its default port (873) then you may specify a new port here. Make sure this port is open in your firewall. Rsync uses the TCP protocol for its transfers.
[files]: This is the module name. The name used here is what you’ll be putting in the rsync pull command as the first part of the source (/files/../..). You can name it what you’d like and can have as many as you’d like.
path: The file path for files associated with this module.
comment: Descriptive comment for this module.
read only: This tells the daemon the directory for this module is read-only. You cannot upload to it. For upload only, use upload only = true.
timeout: Time, in seconds, the rsync daemon will wait before terminating a dead conenction.
This is just a basic configuration. For a more detailed list of options, see the manual page.
Running Rsync as a Daemon
Now with this basic configuration we can start the daemon by itself by running the below:
rsync --daemon
You can verify the daemon is running with:
ps x | grep rsync
If you have anything weird in the output, such as a statement stating unconfined, you may have SELinux blocking the daemon. You will need to work to add rsync to be accepted by SELinux in order for you to run the daemon.
.
Now that the rsync daemon is running, it’s ready to accept connections. If you are unsure how to do connect from an rsync client, review our guide on connecting with rsync.
To stop the daemon you can run a kill command.
kill `cat /var/run/rsyncd.pid`
.
Running Rsync Via Xinetd
If you are already using xinetd to manage services, you can add rsync daemon control as well. While xinetd provides greater central control over running processes, note that it doesn’t necessarily mean greater security.
First, edit the xinet.d file for rsync, if it already exists (if not, you can create it and use the example configuration below). Change the disabled line to no. You will also want to add the port line with either the default (873) or your custom port.
Note: If you are using a custom port, you will also need to edit the rsync port in the service file (
/etc/services) to your custom port.
.
Using your preferred text editor, create or edit /etc/xinetd.d/rsync as below:
# default: off

# description: The rsync server is a good addition to an ftp server, as it \

# allows crc checksumming etc.

service rsync

{

disable = no

flags = IPv6

socket_type = stream

port = 12000

wait = no

user = root

server = /usr/bin/rsync

server_args = --daemon

log_on_failure += USERID

}
Now you just need to restart xinetd, and the rsync daemon should run.
/etc/init.d/xinetd restart
.
Testing the Rysnc Directories
To test your connection to the rsync daemon and find which paths are available to you, simply connect from your client to the rsync host using the following method. This method runs only part of a pull command but will reveal paths for you.
rsync -rdt rsync://IPADDR:RsyncPort/

Find file path
This command will show which directories are open to you. If you do not know the file name you can repeat the process (adding onto the file path) until you find the intended file(s).
rsync -rdt rsync://IPADDR:RsyncPort/DirectoryName

More file paths discovered
And once you find the file, you can complete the command and pull it in.
rsync -rdt rsync://IPADDR:RsyncPort/DirectoryName/File /DestinationDirectory/

Full path found
Adding Usernames and Passwords to the Rsync Daemon
You can make your rsync daemon more secure by adding a username and password requirement in its configuration file. Open /etc/rsyncd.conf with your preferred text editor, and enter these parameters under the module.
[files]

path = /home/public_rsync

comment = RSYNC FILES

read only = true

timeout = 300

auth users = rsync1,rsync2

secrets file = /etc/rsyncd.secrets
auth users: List of users, seperated by commas. They do not necessarily need to exist on the system, but they do need to exist in the secrets file.
secrets file: File path to your secrets file that contains the list of usernames and passwords.
Then, again using your preferred text editor, open or create your /etc/rsyncd.secrets file. Use the following format username:password.
rsync1:9$AZv2%5D29S740k

rsync2:Xyb#vbfUQR0og0$6

rsync3:VU&A1We5DEa8M6^8
Once you have saved this file, secure it so only the root user can read or edit it.
chmod 600 /etc/rsyncd.secrets
Note that we added an rsync3 user which we did not specify in the auth users parameter in /etc/rsyncd.conf. You’ll see why below.
Now, when connecting to this rsync daemon, you’ll need to be sure to use the appropriate username.

Valid rsync user
If you try to connect with a user not permitted in the auth users, you will get the below error.
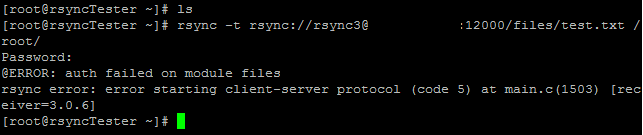
Invalid rsync user
Just remember that authorized users must appear in both the /etc/rsyncd.conf and the /etc/rsyncd.secrets files.
.
And that’s it for the basics of an rsync daemon. You should now be able to create a basic rsync daemon and have directories specified for uploading, downloading, or both! Please check back here for more updates, and to consider a market-leading cloud server from Atlantic.Net.
How to Set Up an Rsync Daemon on Your Linux Server的更多相关文章
- centos6.5下部署sersync+rsync --daemon同步数据
rsync --daemon端配置 [root@rsync-daemon etc]# /etc/init.d/iptables stop [root@rsync-daemon ~]# dos2unix ...
- rsync在windows和linux同步数据的配置过程
centos7.0安装rsync3.0.9-17.el7 yum install rsync ===================================================== ...
- rsync命令 续集 、linux系统日志、screen工具
1.rsync 通过服务进行监听同步: 开启服务:rsync --daemon (默认开启873端口) 需要编辑配制文件:/etc/rsyncd.conf port=873log file=/var ...
- rsync推送备份服务器(Linux)
rsync推送备份服务器备份服务器操作需被备份的服务器操作批处理shell备份服务器操作#编辑配置文件vi /etc/rsyncd.conf uid = root #运行RSYNC守护进程的用户gid ...
- 用rsync备份一台linux服务器上的数据
rsync是安装完linux后都会自带的,在机器上运行rsync命令看是否有安装即可 备份到远程服务器 这里介绍的rsync的用途是备份一台linux服务器上的数据到另外一台机器 环境 将需要备份机器 ...
- CHECK_NRPE: Received 0 bytes from daemon. Check the remote server logs for error messages.
今天,在用icinga服务器端测试客户端脚本时,报如下错误: [root@mysql-server1 etc]# /usr/local/icinga/libexec/check_nrpe -H 192 ...
- Server Data Synchronization Via Linux rsync、rsync+inotify Between Load Balance Server
目录 . 远程文件同步的应用场景 . rsync+crontab . rsync+inotify 1. 远程文件同步的应用场景 在负载均衡集群的应用场景中,往往在多台web server的前端有一个提 ...
- Linux下rsync daemon模式下的错误汇总
一.前言:最近学习服务环境搭建,遇到了许多大大小小的问题,不过还好,经过我的一通努力终于都解决了,所以分享出来给自己留个纪念,同时也希望能帮助学习中的朋友. 二.环境:两台服务器环境相同 1 [roo ...
- rsync从windows到linux的同步备份
名称 角色 IP地址 Windows server 2003 服务器 Eth0:192.168.1.1 RHEL5.5 客户端 Eth0:192.168.1.2 一.cwRsyncServer服务 ...
随机推荐
- Spring AOP的总结
- 建造者模式(Builder)
Separate the construction of a complex object form its representation so that the same construction ...
- Java面向对象之抽象类
内容: 1.抽象类的产生 2.抽象类和抽象方法的定义与使用 3.抽象类和抽象方法的注意事项 4.实例分析 1.抽象类的产生 当编写一个类时,我们往往会为该类定义一些方法,这些方法是用来描述该类的功能具 ...
- python入门-异常
1 报错的例子 print(5/0) 2跳过报错的例子 try: print(5/0) except ZeroDivisionError: print("You can't divide b ...
- mock单测
mockMvc执行流程总结: 整个过程:1.mockMvc.perform执行一个请求:2.MockMvcRequestBuilders.get("/user/1")构造一个请求3 ...
- linux7安装teamViewer
参考网站:http://blog.sina.com.cn/s/blog_15308c8290102x72u.html 下载网站:https://www.teamviewer.com/zhCN/down ...
- 反射(hasattr , getattr, setattr) 输入的字符串用来运行程序
当用户输入字符串时,不能够用来运行程序 1.使用 hasattr 找出输入的字符串是否在程序内 2.使用 getattr 返回找出字符串对应的函数的内存地址或者变量 3. 使用setattr 添加新的 ...
- Winform 窗体关闭事件
//窗体关闭前事件 private void FrmMain_FormClosing(object sender, FormClosingEventArgs e) { DialogResult res ...
- ntohs, ntohl, htons,htonl的比较和详解【转】
ntohs =net to host short int 16位 htons=host to net short int 16位 ntohs =net to host long int 32位 hto ...
- mongodb基础学习14-mapReduce操作
mapReduce随着大数据的兴起而流行,相当于传统数据库的group操作,强项在于分布式计算. map:将一组记录的相关信息映射到一个数组 reduce:对map得到的数组数据进行处理得到一个结果 ...