UITabBarController的创建与自定义TarBar---学习笔记三
代码如下:
#import <UIKit/UIKit.h> @interface BSJTabBarViewController : UITabBarController @end
#import "BSJTabBarViewController.h"
#import "BSJTabBar.h"
@interface BSJTabBarViewController () @end @implementation BSJTabBarViewController #pragma mark --- life cycle
- (void)viewDidLoad {
[super viewDidLoad];
// Do any additional setup after loading the view.
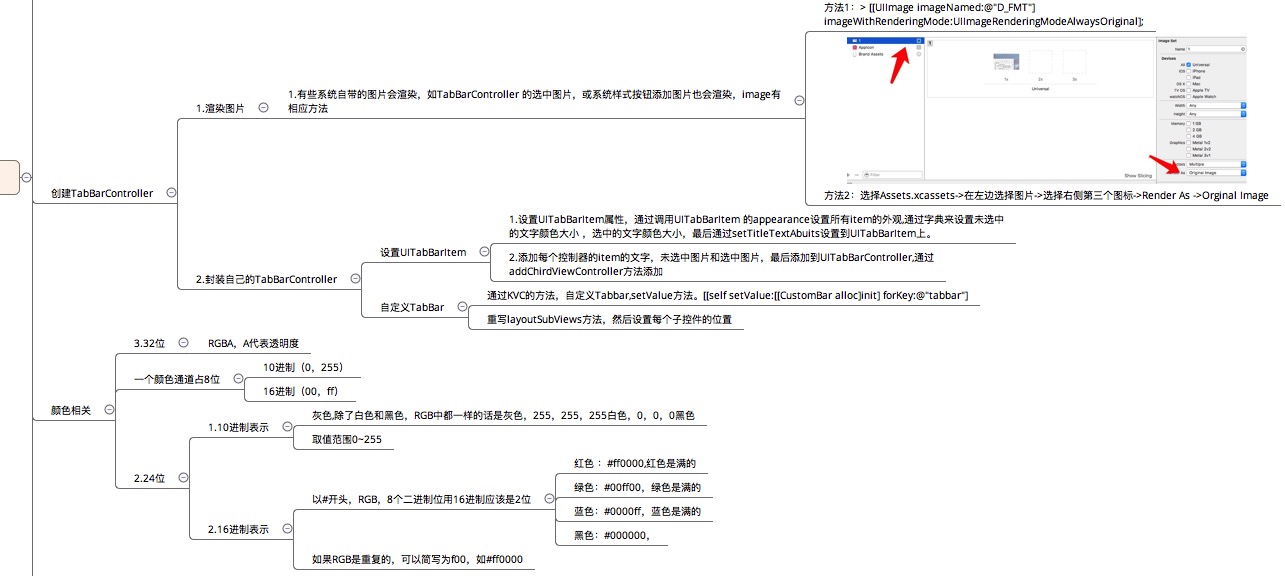
// self.tabBarItem = [UITabBarItem application]
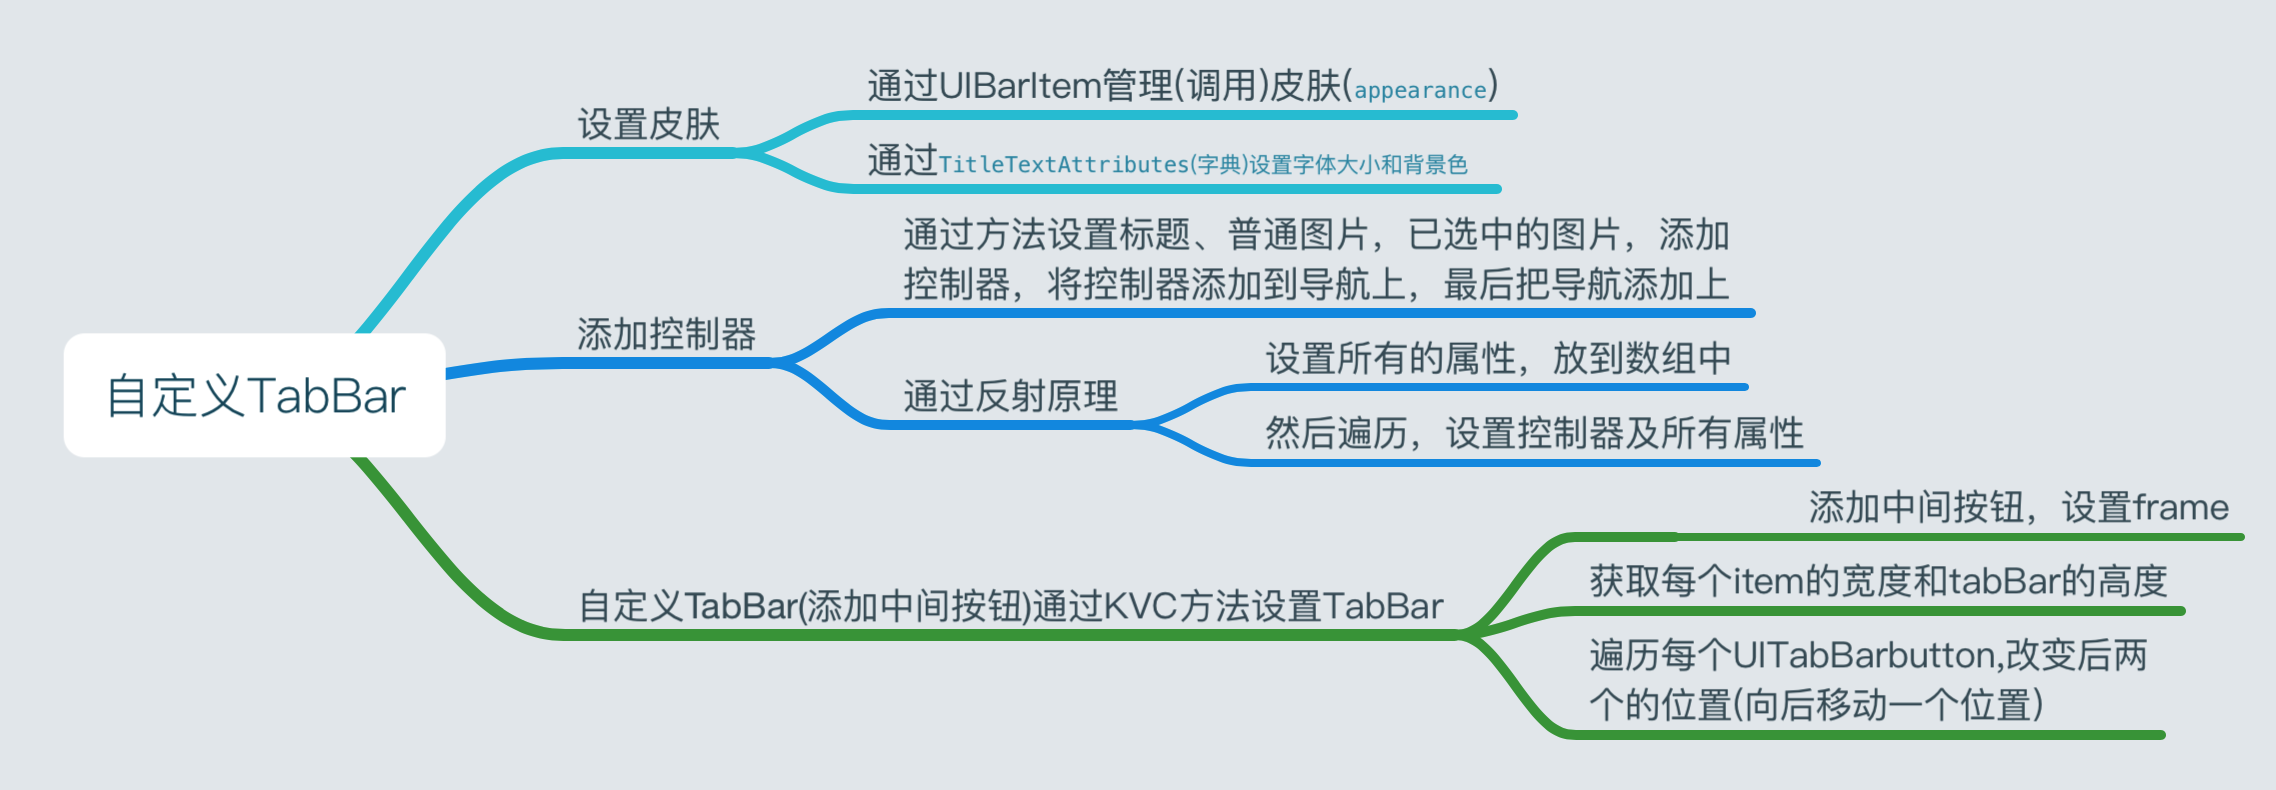
UITabBarItem *tabBarItem = [UITabBarItem appearance];
//未选中的
NSMutableDictionary *norAttri = [NSMutableDictionary dictionary];
norAttri[NSFontAttributeName] = [UIFont systemFontOfSize:14];
norAttri[NSForegroundColorAttributeName] = [UIColor grayColor];
[tabBarItem setTitleTextAttributes:norAttri forState:UIControlStateNormal];
//选中的
NSMutableDictionary *selectAttri = [NSMutableDictionary dictionary];
selectAttri[NSForegroundColorAttributeName] = [UIColor darkGrayColor];
[tabBarItem setTitleTextAttributes:selectAttri forState:UIControlStateSelected]; //精华
[self setupChridViewController:[[UITableViewController alloc] init] title:NSLocalizedString(@"精华", nil) normalImage:@"tabBar_essence_icon" selectedImage:@"tabBar_essence_click_icon"];
[self setupChridViewController:[[UIViewController alloc] init] title:NSLocalizedString(@"关注", nil) normalImage:@"tabBar_friendTrends_icon" selectedImage:@"tabBar_friendTrends_click_icon"];
[self setupChridViewController:[[UITableViewController alloc] init] title:NSLocalizedString(@"新帖", nil) normalImage:@"tabBar_new_icon" selectedImage:@"tabBar_new_click_icon"];
[self setupChridViewController:[[UITableViewController alloc] init] title:NSLocalizedString(@"我", nil) normalImage:@"tabBar_me_icon" selectedImage:@"tabBar_me_click_icon"];
// 通过KVC,可以改变属性为readOnly,改变它的Key,也就是通过它的value找到它的key
[self setValue:[[BSJTabBar alloc] init] forKey:@"tabBar"];
} - (void)setupChridViewController:(UIViewController *)vc title:(NSString *)title normalImage:(NSString *)normalImage selectedImage:(NSString *)selectedImage{ vc.title = title;
if (normalImage.length && selectedImage.length )
{ vc.tabBarItem.image = [UIImage imageNamed:normalImage];
vc.tabBarItem.selectedImage = [UIImage imageNamed:selectedImage]; }
[self addChildViewController:vc]; } //tabBar #import <UIKit/UIKit.h>
@interface BSJTabBar : UITabBar
@end #import "BSJTabBar.h" @interface BSJTabBar() @property (nonatomic, weak)UIButton *publicButton; @end
@implementation BSJTabBar
- (void)layoutSubviews{ [super layoutSubviews]; // BSJLogFunc CGFloat buttonW = self.frame.size.width/5;
CGFloat buttonH = self.frame.size.height;
CGFloat buttonY = 0;
CGFloat i = 0;
for (UIView *subView in self.subviews)
{ BSJLog(@"%@",NSStringFromClass(subView.class));
// if (![subView.class isSubclassOfClass:[NSClassFromString(@"UITabBarButton") class]]) continue; if (![@"UITabBarButton" isEqualToString:NSStringFromClass(subView.class)]) continue; CGFloat buttonX = i*buttonW; if (i >= 2) { buttonX += buttonW; } subView.frame = CGRectMake(buttonX, buttonY, buttonW, buttonH); i++; }
// [
self.publicButton setFrame:CGRectMake(0, 0, self.frame.size.width/5, self.frame.size.height)];
//
self.publicButton.center = CGPointMake(self.center.x, self.center.y);
}
#pragma mark --- response methods
- (void)buttonClick:(UIButton *)sender{
} #pragma mark --- setters and getters
- (UIButton *)publicButton{
if (!_publicButton)
{ UIButton *button = [UIButton buttonWithType:UIButtonTypeCustom];
[button setImage:[UIImage imageNamed:@"tabBar_publish_icon"] forState:UIControlStateNormal];
[button setImage:[UIImage imageNamed:@"tabBar_publish_click_icon"] forState:UIControlStateHighlighted];
[button addTarget:self action:@selector(buttonClick:) forControlEvents:UIControlEventTouchUpInside];
[self addSubview:button]; _publicButton = button; } return _publicButton;
}
@end
UITabBarController的创建与自定义TarBar---学习笔记三的更多相关文章
- [Firefly引擎][学习笔记三][已完结]所需模块封装
原地址:http://www.9miao.com/question-15-54671.html 学习笔记一传送门学习笔记二传送门 学习笔记三导读: 笔记三主要就是各个模块的封装了,这里贴 ...
- angular学习笔记(三十)-指令(6)-transclude()方法(又称linker()方法)-模拟ng-repeat指令
在angular学习笔记(三十)-指令(4)-transclude文章的末尾提到了,如果在指令中需要反复使用被嵌套的那一坨,需要使用transclude()方法. 在angular学习笔记(三十)-指 ...
- openresty 学习笔记三:连接redis和进行相关操作
openresty 学习笔记三:连接redis和进行相关操作 openresty 因其非阻塞的调用,令服务器拥有高性能高并发,当涉及到数据库操作时,更应该选择有高速读写速度的redis进行数据处理.避 ...
- Oracle学习笔记三 SQL命令
SQL简介 SQL 支持下列类别的命令: 1.数据定义语言(DDL) 2.数据操纵语言(DML) 3.事务控制语言(TCL) 4.数据控制语言(DCL)
- JSP学习笔记(三):简单的Tomcat Web服务器
注意:每次对Tomcat配置文件进行修改后,必须重启Tomcat 在E盘的DATA文件夹中创建TomcatDemo文件夹,并将Tomcat安装路径下的webapps/ROOT中的WEB-INF文件夹复 ...
- VSTO学习笔记(三) 开发Office 2010 64位COM加载项
原文:VSTO学习笔记(三) 开发Office 2010 64位COM加载项 一.加载项简介 Office提供了多种用于扩展Office应用程序功能的模式,常见的有: 1.Office 自动化程序(A ...
- Java IO学习笔记三
Java IO学习笔记三 在整个IO包中,实际上就是分为字节流和字符流,但是除了这两个流之外,还存在了一组字节流-字符流的转换类. OutputStreamWriter:是Writer的子类,将输出的 ...
- 学习笔记(三)--->《Java 8编程官方参考教程(第9版).pdf》:第十章到十二章学习笔记
回到顶部 注:本文声明事项. 本博文整理者:刘军 本博文出自于: <Java8 编程官方参考教程>一书 声明:1:转载请标注出处.本文不得作为商业活动.若有违本之,则本人不负法律责任.违法 ...
- muduo网络库学习笔记(三)TimerQueue定时器队列
目录 muduo网络库学习笔记(三)TimerQueue定时器队列 Linux中的时间函数 timerfd简单使用介绍 timerfd示例 muduo中对timerfd的封装 TimerQueue的结 ...
随机推荐
- Java程序员必须掌握的8大排序算法
分类: 1)插入排序(直接插入排序.希尔排序)2)交换排序(冒泡排序.快速排序)3)选择排序(直接选择排序.堆排序)4)归并排序5)分配排序(基数排序) 所需辅助空间最多:归并排序所需辅助空间最少:堆 ...
- Python爬取代理ip
# -*- coding:utf-8 -*- #author : willowj import urllib import urllib2 from bs4 import BeautifulSoup ...
- Hibernate-chapter two
又见面啦!!!经过上一章的学习,我们大概对Hibernate框架有所了解.接下来进入我们的第二阶段——实战! ======准备数据库====== 这里使用MySQL作为示范. 创建一个名为Hibern ...
- c#模拟js escape方法
public static string Escape(string s) { StringBuilder sb = new StringBuilder(); byte[] ba = System.T ...
- Java基础知识回顾
Java回顾之I/O Java回顾之网络通信 Java回顾之多线程 Java回顾之多线程同步 Java回顾之集合 Java回顾之序列化 Java回顾之反射 Java回顾之一些基础概念 Java回顾之J ...
- js无限级树菜单
以前做网站,树形菜单一般都很简单,自己定义风格样式,简单的js控制,后来原来网上很多文章都在讨论Js树型菜单,看了几个实例,发现这个树比较简单好用. http://hovertree.com/texi ...
- arcgis arcengine Using environment settings
In this topic About using environment settings Environment settings summary table About using enviro ...
- 发布有礼!2015 Autodesk程序商店有奖发布活动拉开序幕
您是不是有希望您的 Autodesk 产品应用程序有更多的用户?您是不是正在寻求更广阔的市场机会?您是不是在激荡人心的云时代大潮中有许多奇思妙想没有小试身手? 来吧,来参加Autodesk应用程序发布 ...
- 【原】iOS动态性(五)一种可复用且解耦的用户统计实现(运行时Runtime)
声明:本文是本人 编程小翁 原创,转载请注明. 为了达到更好的阅读效果,强烈建议跳转到这里查看文章. iOS动态性是我的关于iOS运行时的系列文章,由浅入深,从理论到实践.本文是第5篇.有兴趣可以看看 ...
- Android 第一http请求访问慢,以后就快了的问题
android的服务端是用MVC+ef,第一次访问特别慢,第一次以后就快了. 在网上找了很多原因,解决不了.后来发现是应用程序池的问题,准确说是ef的问题,应用程序池被回收了,请求就慢了,