[iOS基础控件 - 4.4] 进一步封装"APP列表”,初见MVC模式
之前的代码中,View的数据加载逻辑放在了总的ViewController中,增加了耦合性,应该对控制器ViewController隐藏数据加载到View的细节。
封装View的创建逻辑
封装View的数据加载逻辑到自定义的UIView中


1 // 在Controller和View之间传输的Model数据

2 @property(nonatomic, strong) App *appData;
1 - (void)setAppData:(App *)appData {

2     _appData = appData;

3

4     // 1.设置图片

5     self.iconView.image = [UIImage imageNamed:appData.icon];

6     // 2.设置名字

7     self.nameLabel.text = appData.name;

8 }
1 // 自定义将Model数据加载到View的构造方法

2 - (instancetype) initWithApp:(App *) appData;

3 // 自定义构造的类方法

4 + (instancetype) appViewWithApp:(App *) appData;

5 // 返回一个不带Model数据的类构造方法

6 + (instancetype) appView;
 1 // 自定义将Model数据加载到View的构造方法

 2 - (instancetype) initWithApp:(App *) appData {

 3     // 1.从NIB取得控件

 4     UINib *nib = [UINib nibWithNibName:@"app" bundle:[NSBundle mainBundle]];

 5     NSArray *viewArray = [nib instantiateWithOwner:nil options:nil];

 6     AppView *appView = [viewArray lastObject];

 7

 8     // 2.加载Model

 9     appView.appData = appData;

10

11     return appView;

12 }

13

14 // 自定义构造的类方法

15 + (instancetype) appViewWithApp:(App *) appData {

16     return [[self alloc] initWithApp:appData];

17 }

18

19 // 返回一个不带Model数据的类构造方法

20 + (instancetype) appView {

21     return [self appViewWithApp:nil];

22 }
 1         // 1.创建View

 2         AppView *appView = [AppView appViewWithApp:appData];

 3

 4         // 2.定义每个app的位置、尺寸

 5         CGFloat appX = marginX + column * (marginX + APP_WIDTH);

 6         CGFloat appY = marginY + row * (marginY + APP_HEIGHT);

 7         appView.frame = CGRectMake(appX, appY, APP_WIDTH, APP_HEIGHT);

 8

 9

10         // 3.加入此app信息到总view

11         [self.view addSubview:appView];
  1 ViewController.m

  2 #import "ViewController.h"

  3 #import "App.h"

  4 #import "AppView.h"

  5

  6 #define ICON_KEY @"icon"

  7 #define NAME_KEY @"name"

  8 #define APP_WIDTH 85

  9 #define APP_HEIGHT 90

 10 #define MARGIN_HEAD 20

 11 #define ICON_WIDTH 50

 12 #define ICON_HEIGHT 50

 13 #define NAME_WIDTH APP_WIDTH

 14 #define NAME_HEIGHT 20

 15 #define DOWNLOAD_WIDTH (APP_WIDTH - 20)

 16 #define DOWNLOAD_HEIGHT 20

 17

 18 @interface ViewController ()

 19

 20 /** 存放应用信息 */

 21 @property(nonatomic, strong) NSArray *apps; // 应用列表

 22

 23 @end

 24

 25 @implementation ViewController

 26

 27 - (void)viewDidLoad {

 28     [super viewDidLoad];

 29     // Do any additional setup after loading the view, typically from a nib.

 30

 31     [self loadApps];

 32 }

 33

 34 - (void)didReceiveMemoryWarning {

 35     [super didReceiveMemoryWarning];

 36     // Dispose of any resources that can be recreated.

 37 }

 38

 39 #pragma mark 取得应用列表

 40 - (NSArray *) apps {

 41     if (nil == _apps) {

 42         // 1.获得plist的全路径

 43         NSString *path = [[NSBundle mainBundle] pathForResource:@"app.plist" ofType:nil];

 44

 45         // 2.加载数据

 46         NSArray *dictArray  = [NSArray arrayWithContentsOfFile:path];

 47

 48         // 3.将dictArray里面的所有字典转成模型,放到新数组中

 49         NSMutableArray *appArray = [NSMutableArray array];

 50         for (NSDictionary *dict in dictArray) {

 51             // 3.1创建模型对象

 52             App *app = [App appWithDictionary:dict];

 53

 54             // 3.2 添加到app数组中

 55             [appArray addObject:app];

 56         }

 57

 58         _apps = appArray;

 59     }

 60

 61     return _apps;

 62 }

 63

 64 #pragma mark 加载全部应用列表

 65 - (void) loadApps {

 66     int appColumnCount = [self appColumnCount];

 67     int appRowCount = [self appRowCount];

 68

 69     CGFloat marginX = (self.view.frame.size.width - APP_WIDTH * appColumnCount) / (appColumnCount + 1);

 70     CGFloat marginY = (self.view.frame.size.height - APP_HEIGHT * appRowCount) / (appRowCount + 1) + MARGIN_HEAD;

 71

 72     int column = 0;

 73     int row = 0;

 74     for (int index=0; index<self.apps.count; index++) {

 75         App *appData = self.apps[index];

 76

 77         // 1.创建View

 78         AppView *appView = [AppView appViewWithApp:appData];

 79

 80         // 2.定义每个app的位置、尺寸

 81         CGFloat appX = marginX + column * (marginX + APP_WIDTH);

 82         CGFloat appY = marginY + row * (marginY + APP_HEIGHT);

 83         appView.frame = CGRectMake(appX, appY, APP_WIDTH, APP_HEIGHT);

 84

 85

 86         // 3.加入此app信息到总view

 87         [self.view addSubview:appView];

 88

 89         column++;

 90         if (column == appColumnCount) {

 91             column = 0;

 92             row++;

 93         }

 94     }

 95 }

 96

 97

 98 #pragma mark 计算列数

 99 - (int) appColumnCount {

100     int count = 0;

101     count = self.view.frame.size.width / APP_WIDTH;

102

103     if ((int)self.view.frame.size.width % (int)APP_WIDTH == 0) {

104         count--;

105     }

106

107     return count;

108 }

109

110 #pragma mark 计算行数

111 - (int) appRowCount {

112     int count = 0;

113     count = (self.view.frame.size.height - MARGIN_HEAD) / APP_HEIGHT;

114

115     if ((int)(self.view.frame.size.height - MARGIN_HEAD) % (int)APP_HEIGHT == 0) {

116         count--;

117     }

118

119     return count;

120 }

121

122 @end
1 #import "AppView.h"
2 #import "App.h"
3
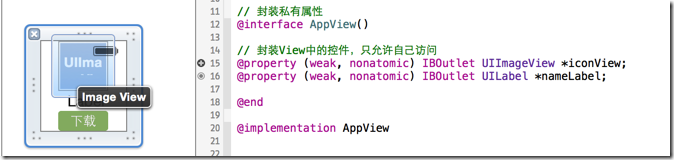
4 // 封装私有属性
5 @interface AppView()
6
7 // 封装View中的控件,只允许自己访问
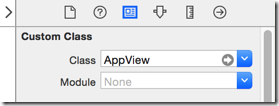
8 @property (weak, nonatomic) IBOutlet UIImageView *iconView;
9 @property (weak, nonatomic) IBOutlet UILabel *nameLabel;
10
11 @end
12
13 @implementation AppView
14
15 - (void)setAppData:(App *)appData {
16 // 1.赋值Medel成员
17 _appData = appData;
18
19 // 2.设置图片
20 self.iconView.image = [UIImage imageNamed:appData.icon];
21 // 3.设置名字
22 self.nameLabel.text = appData.name;
23 }
24
25 // 自定义将Model数据加载到View的构造方法
26 - (instancetype) initWithApp:(App *) appData {
27 // 1.从NIB取得控件
28 UINib *nib = [UINib nibWithNibName:@"app" bundle:[NSBundle mainBundle]];
29 NSArray *viewArray = [nib instantiateWithOwner:nil options:nil];
30 AppView *appView = [viewArray lastObject];
31
32 // 2.加载Model
33 appView.appData = appData;
34
35 return appView;
36 }
37
38 // 自定义构造的类方法
39 + (instancetype) appViewWithApp:(App *) appData {
40 return [[self alloc] initWithApp:appData];
41 }
42
43 // 返回一个不带Model数据的类构造方法
44 + (instancetype) appView {
45 return [self appViewWithApp:nil];
46 }
47
48 @end
 1 #import "App.h"

 2

 3 #define ICON_KEY @"icon"

 4 #define NAME_KEY @"name"

 5

 6 @implementation App

 7

 8 - (instancetype) initWithDictionary:(NSDictionary *) dictionary {

 9     if (self = [super init]) {

10         self.name = dictionary[NAME_KEY];

11         self.icon = dictionary[ICON_KEY];

12     }

13

14     return self;

15 }

16

17

18 + (instancetype) appWithDictionary:(NSDictionary *) dictionary {

19     // 使用self代表类名代替真实类名,防止子类调用出错

20     return [[self alloc] initWithDictionary:dictionary];

21 }

22

23 @end
[iOS基础控件 - 4.4] 进一步封装"APP列表”,初见MVC模式的更多相关文章
- [iOS基础控件 - 6.9.3] QQ好友列表Demo TableView
A.需求 1.使用plist数据,展示类似QQ好友列表的分组.组内成员显示缩进功能 2.组名使用Header,展示箭头图标.组名.组内人数和上线人数 3.点击组名,伸展.缩回好友组 code so ...
- [iOS基础控件 - 5.5] 代理设计模式 (基于”APP列表"练习)
A.概述 在"[iOS基础控件 - 4.4] APP列表 进一步封装,初见MVC模式”上进一步改进,给“下载”按钮加上效果.功能 1.按钮点击后,显示为“已下载”,并且不 ...
- iOS 基础控件(下)
上篇介绍了UIButton.UILabel.UIImageView和UITextField,这篇就简短一点介绍UIScrollView和UIAlertView. UIScrollView 顾名思义也知 ...
- [iOS基础控件 - 7.0] UIWebView
A.基本使用 1.概念 iOS内置的浏览器控件 Safari浏览器就是通过UIWebView实现的 2.用途:制作简易浏览器 (1)基本请求 创建请求 加载请求 (2)代理监听webView加载, ...
- [iOS基础控件 - 6.11.3] 私人通讯录Demo 控制器的数据传递、存储
A.需求 1.搭建一个"私人通讯录"Demo 2.模拟登陆界面 账号 密码 记住密码开关 自动登陆开关 登陆按钮 3.退出注销 4.增删改查 5.恢复数据(取消修改) 这个代码 ...
- [iOS基础控件 - 6.10.2] PickerView 自定义row内容 国家选择Demo
A.需求 1.自定义一个UIView和xib,包含国家名和国旗显示 2.学习row的重用 B.实现步骤 1.准备plist文件和国旗图片 2.创建模型 // // Flag.h // Co ...
- [iOS基础控件 - 6.9] 聊天界面Demo
A.需求 做出一个类似于QQ.微信的聊天界面 1.每个cell包含发送时间.发送人(头像).发送信息 2.使用对方头像放在左边,我方头像在右边 3.对方信息使用白色背景对话框,我方信息使用蓝色背景对话 ...
- [iOS基础控件 - 6.7] 微博展示 使用代码自定义TableCell(动态尺寸)
A.需求 1.类似于微博内容的展示 2.头像 3.名字 4.会员标志 5.内容 6.分割线 7.配图(可选,可有可无) code source: https://github.com/hellov ...
- [iOS基础控件 - 6.6] 展示团购数据 自定义TableViewCell
A.需求 1.头部广告 2.自定义cell:含有图片.名称.购买数量.价格 3.使用xib设计自定义cell,自定义cell继承自UITableViewCell 4.尾部“加载更多按钮”,以及其被点击 ...
随机推荐
- cocos2d-x3.9 NDK android 环境搭建过程中遇到的错误
编译环境:Mac OS, NDK r9d 错误:arm-linux-androideabi-gcc: error trying to exec '/media/Project/adt-bundle-l ...
- spring transactionmanager
Spring配置文件中关于事务配置总是由三个组成部分,分别是DataSource.TransactionManager和代理机制这三部分,无论哪种配置方式,一般变化的只是代理机制这部分. DataSo ...
- $.cookie 使用不了的问题定位过程
最近在项目中需要使用到jquery的cookie,按理说在html头中引入jquery-1.7.1.min.js和jquery.cookie.js,然后在js中就可以使用cookie函数了.像这样使用 ...
- Qt: qobject_cast<QPushButton*>(sender()) 简化信号与槽的编写
当你觉得写代码是一件重复性极高的工作时,这时你就应该考虑换个方式来实现了. 提高代码效率,减少代码量. 代码片: void Widget::onClicked() { QPushButton* but ...
- POJ3259——Wormholes(Bellman-Ford+SPFA)
Wormholes DescriptionWhile exploring his many farms, Farmer John has discovered a number of amazing ...
- node.js模块之util模块
util提供了各种使用的工具.require('util') to access them. Util.format(format,[..]) Returns a formatted string u ...
- HTML5学习(六)---------SVG 与Canvas
参考教程:http://www.w3school.com.cn/html5/html_5_canvas_vs_svg.asp Canvas 和 SVG 都允许您在浏览器中创建图形,但是它们在根本上是不 ...
- chrome渲染hover状态tranform相邻元素抖动bug
最近同事在使用 css3 的 transition + tranform 的时候影响了相邻的元素出现bug.或者说相邻的元素出现抖动bug. 然而把 hover 状态的 tranform 属性删了后, ...
- Innodb引擎 long semaphore waits
上一篇介绍了因为子表过多,导致innodb crash的情况,但crash的原因是long semaphore waits.long semaphore waits又为何物? 背景:Innodb使用了 ...
- sharedevelop iis express
sharedevelop 的IIS express的配置文件在 %userprofile%\documents\IISExpress\config\applicationhost.config 自动会 ...