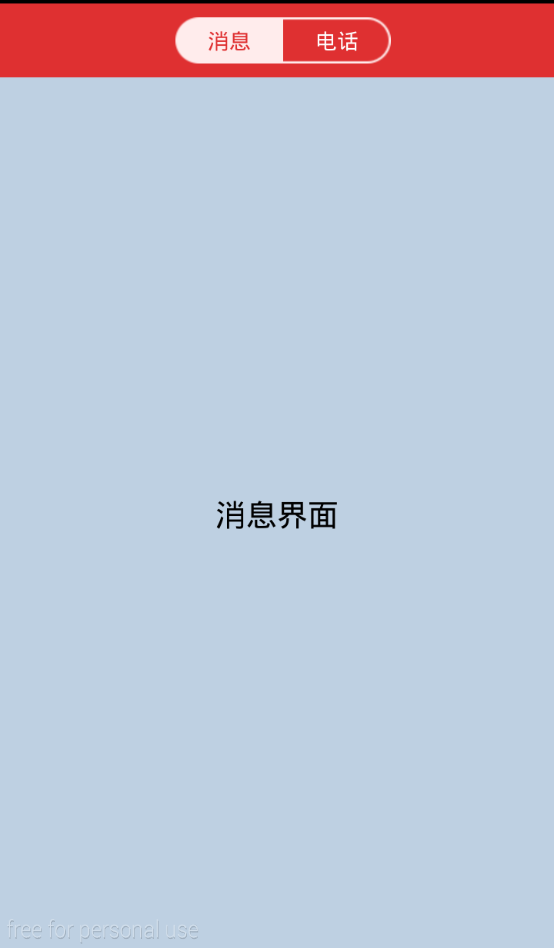
Android 仿QQ消息界面

values 下面
dimens.xml

<resources>

    <!-- Default screen margins, per the Android Design guidelines. -->

    <dimen name="activity_horizontal_margin">16dp</dimen>

    <dimen name="activity_vertical_margin">16dp</dimen>

</resources>
主布局
activity_switch.xml
<?xml version="1.0" encoding="utf-8"?>
<LinearLayout xmlns:android="http://schemas.android.com/apk/res/android"
android:layout_width="fill_parent"
android:layout_height="fill_parent"
android:orientation="vertical" > <RelativeLayout
android:id="@+id/rl_header"
android:layout_width="fill_parent"
android:layout_height="48dp"
android:background="#df3031" > <LinearLayout
android:layout_width="wrap_content"
android:layout_height="wrap_content"
android:layout_centerInParent="true"
android:layout_centerVertical="true"
android:paddingLeft="8.0dp" > <Button
android:id="@+id/btn_message"
android:layout_width="70dip"
android:layout_height="30dip"
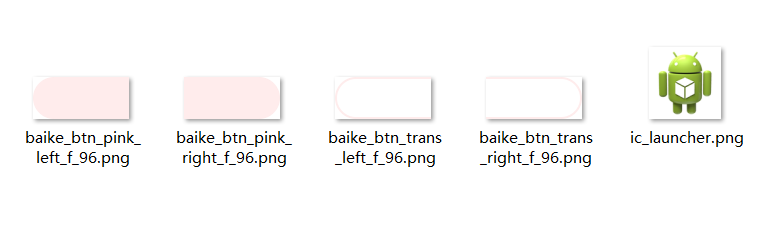
android:background="@drawable/baike_btn_pink_left_f_96"
android:gravity="center"
android:text="消息"
android:textColor="#df3031"
android:textSize="14sp" /> <Button
android:id="@+id/btn_call"
android:layout_width="70dip"
android:layout_height="30dip"
android:background="@drawable/baike_btn_trans_right_f_96"
android:gravity="center"
android:text="电话"
android:textColor="#ffffff"
android:textSize="14sp" />
</LinearLayout>
</RelativeLayout> <FrameLayout
android:id="@+id/fl_content"
android:layout_width="fill_parent"
android:layout_height="fill_parent" /> </LinearLayout>
两个fragment
fragment_message.xml
<?xml version="1.0" encoding="utf-8"?>

<LinearLayout xmlns:android="http://schemas.android.com/apk/res/android"

    android:layout_width="match_parent"

    android:layout_height="match_parent"

    android:orientation="vertical"

    android:gravity="center"

    android:background="#BED0E2">

    <TextView

        android:layout_width="wrap_content"

        android:layout_height="wrap_content"

        android:textSize="20sp"

        android:text="消息界面"

        android:textColor="#000000"/>

</LinearLayout>
fragment_call.xml
<?xml version="1.0" encoding="utf-8"?>

<LinearLayout xmlns:android="http://schemas.android.com/apk/res/android"

    android:layout_width="match_parent"

    android:layout_height="match_parent"

    android:orientation="vertical"

    android:gravity="center"

    android:background="#BED0E2">

    <TextView

        android:layout_width="wrap_content"

        android:layout_height="wrap_content"

        android:textSize="20sp"

        android:text="电话界面"

        android:textColor="#000000"/>

</LinearLayout>
主页面
SwitchActivity.java
package com.example.switchutils;

import android.graphics.Color;

import android.os.Bundle;

import android.support.v4.app.Fragment;

import android.support.v4.app.FragmentActivity;

import android.support.v4.app.FragmentManager;

import android.support.v4.app.FragmentTransaction;

import android.view.View;

import android.view.View.OnClickListener;

import android.view.Window;

import android.widget.Button;

public class SwitchActivity extends FragmentActivity {

    private Button btn_message,btn_call;

    private CallFragment callFragment;

    private MessageFragment messageFragment;

    public static final int MESSAGE_FRAGMENT_TYPE = 1;

    public static final int CALL_FRAGMENT_TYPE = 2;

    public int currentFragmentType = -1;

    @Override

    protected void onCreate(Bundle savedInstanceState) {

        super.onCreate(savedInstanceState);

        this.requestWindowFeature(Window.FEATURE_NO_TITLE);

        setContentView(R.layout.activity_switch);

        btn_message = (Button)findViewById(R.id.btn_message);

        btn_call = (Button)findViewById(R.id.btn_call);

        btn_message.setOnClickListener(onClicker);

        btn_call.setOnClickListener(onClicker);

        FragmentManager fragmentManager = getSupportFragmentManager();

        if (savedInstanceState != null) {

            int type = savedInstanceState.getInt("currentFragmentType");

            messageFragment = (MessageFragment)fragmentManager.findFragmentByTag("message");

            callFragment = (CallFragment)fragmentManager.findFragmentByTag("call");

            if(type > 0)

                loadFragment(type);

        } else {

            FragmentTransaction transaction = fragmentManager

                    .beginTransaction();

            Fragment mainFragment = fragmentManager.findFragmentByTag("message");

            if (mainFragment != null) {

                transaction.replace(R.id.fl_content, mainFragment);

                transaction.commit();

            } else {

                loadFragment(MESSAGE_FRAGMENT_TYPE);

            }

        }

    }

    @Override

    protected void onSaveInstanceState(Bundle outState) {

        super.onSaveInstanceState(outState);

        outState.putInt("lastFragmentTag", currentFragmentType);

    }

    private void switchFragment(int type) {

        switch (type) {

        case MESSAGE_FRAGMENT_TYPE:

            loadFragment(MESSAGE_FRAGMENT_TYPE);

            break;

        case CALL_FRAGMENT_TYPE:

            loadFragment(CALL_FRAGMENT_TYPE);

            break;

        }

    }

    private void loadFragment(int type) {

        FragmentManager fragmentManager = getSupportFragmentManager();

        FragmentTransaction transaction = fragmentManager.beginTransaction();

        if (type == CALL_FRAGMENT_TYPE) {

            if (callFragment == null) {

                callFragment = new CallFragment();

                transaction.add(R.id.fl_content, callFragment, "zhishi");

            } else {

                transaction.show(callFragment);

            }

            if (messageFragment != null) {

                transaction.hide(messageFragment);

            }

            currentFragmentType = MESSAGE_FRAGMENT_TYPE;

        } else {

            if (messageFragment == null) {

                messageFragment = new MessageFragment();

                transaction.add(R.id.fl_content, messageFragment, "wenda");

            } else {

                transaction.show(messageFragment);

            }

            if (callFragment != null) {

                transaction.hide(callFragment);

            }

            currentFragmentType = CALL_FRAGMENT_TYPE;

        }

        transaction.commitAllowingStateLoss();

    }

    private OnClickListener onClicker = new OnClickListener() {

        @Override

        public void onClick(View v) {

            switch (v.getId()) {

            case R.id.btn_message:

                btn_message.setTextColor(Color.parseColor("#df3031"));

                btn_call.setTextColor(Color.WHITE);

                btn_message

                        .setBackgroundResource(R.drawable.baike_btn_pink_left_f_96);

                btn_call

                        .setBackgroundResource(R.drawable.baike_btn_trans_right_f_96);

                switchFragment(MESSAGE_FRAGMENT_TYPE);

                break;

            case R.id.btn_call:

                btn_message.setTextColor(Color.WHITE);

                btn_call.setTextColor(Color.parseColor("#df3031"));

                btn_message

                        .setBackgroundResource(R.drawable.baike_btn_trans_left_f_96);

                btn_call

                        .setBackgroundResource(R.drawable.baike_btn_pink_right_f_96);

                switchFragment(CALL_FRAGMENT_TYPE);

                break;

            }

        }

    };

}
两个fragment
MessageFragment.java
package com.example.switchutils;

import android.os.Bundle;

import android.support.v4.app.Fragment;

import android.view.LayoutInflater;

import android.view.View;

import android.view.ViewGroup;

public class MessageFragment extends Fragment {

    @Override

    public View onCreateView(LayoutInflater inflater,

             ViewGroup container, Bundle savedInstanceState) {

        return inflater.inflate(R.layout.fragment_message, null);

    }

}
CallFragment.java
package com.example.switchutils;

import android.os.Bundle;

import android.support.v4.app.Fragment;

import android.view.LayoutInflater;

import android.view.View;

import android.view.ViewGroup;

public class CallFragment extends Fragment {

    @Override

    public View onCreateView(LayoutInflater inflater,

             ViewGroup container, Bundle savedInstanceState) {

        return inflater.inflate(R.layout.fragment_call, null);

    }

}
Android 仿QQ消息界面的更多相关文章
- Android 仿QQ首页的消息和电话的切换,首页的头部(完全用布局控制)
Android 仿QQ首页的消息和电话的切换,首页的头部(完全用布局控制) 首先贴上七个控制布局代码 1.title_text_sel.xml 字体颜色的切换 放到color文件夹下面 <?xm ...
- 高仿qq聊天界面
高仿qq聊天界面,给有需要的人,界面效果如下: 真心觉得做界面非常痛苦,给有需要的朋友. chat.xml <?xml version="1.0" encoding=&quo ...
- WPF开发实例——仿QQ登录界面
原文:WPF开发实例--仿QQ登录界面 版权声明:本文为博主原创文章,如需转载请标明转载地址 http://blog.csdn.net/u013981858 https://blog.csdn.net ...
- Android仿QQ ios dialog,仿QQ退出向上菜单
Android仿QQ ios dialog,仿QQ退出向上菜单 EasyDialog两种模式 仿QQ退出向上菜单,自己定义向上菜单 github地址:https://gith ...
- wpf实现仿qq消息提示框
原文:wpf实现仿qq消息提示框 版权声明:本文为博主原创文章,未经博主允许不得转载. https://blog.csdn.net/huangli321456/article/details/5052 ...
- 编写Java程序,使用Swing布局管理器和常用控件,实现仿QQ登录界面
返回本章节 返回作业目录 需求说明: 使用Swing布局管理器和常用控件,实现仿QQ登录界面 实现思路: 创建登录界面的类QQLogin,该类继承父类JFrame,在该类中创建无参数的构造方法,在构造 ...
- Android仿QQ界面
最近这几天,一直跟着朋友们聚会什么的,没怎么做项目,今天总算是有时间开电脑继续做我的项目了.下面我就把我做的效果展示一下. 这是模仿了qq的界面效果.因为代码比较长就不粘贴代码了.需要的小伙伴可以跟我 ...
- android 仿QQ手机版
千人2群开启,欢迎大家围观打酱油,群号145667827 您当前位置 : JavaApk-安卓应用游戏源码服务专家 » QQ » Android项目源码界面超级华丽的仿QQ最新版本 Andro ...
- 仿QQ大战—界面篇
之前在<仿QQ大战-服务器的搭建(ServerSocket)>中实现了服务器的搭建,以及一个简单地传递数据的实现,现在就是来实现类似与QQ聊天通信的功能.首先是界面的实现: 首先:服务器和 ...
随机推荐
- 人工神经网络NN
[面向代码]学习 Deep Learning系列 http://blog.csdn.net/coolluyu/article/details/20214617 正则化的最小二乘法 深入浅出LSTM神经 ...
- Go-Agent部署与FQ教程(2016-10-28)
这篇文章是为了帮助使用go-agent-crack来FQ的同学,主要是几个想用该项目来FQ的同学对github主页的FQ文档大力吐槽,索性写一篇详细的文档来支持一下大家,其中包含了google gae ...
- 阿里云服务器Linux CentOS安装配置(十)安装Discuz
0.登录阿里云,停止实例,重新初始化磁盘. 如果不这么做,安装的discuz页面样式丢失,没法解决. 1.安装apache yum install httpd httpd-devel -y 2.安装m ...
- Mysql5.6.17 zip版本安装
1.把 mysql解压到自定义 D:\mysql-5.6.17-W642.我的电脑--属性--高级--环境变量--系统变量--新建系统环境变量 变量名:MYSQL_HOME 变 ...
- windows 系统时钟
偶然发现了一个函数用以查询操作系统的时钟间隔: BOOL WINAPI GetSystemTimeAdjustment( _Out_ PDWORD lpTimeAdjustment, _Out_ PD ...
- git学习手册
#git学习手册 git: Git是一个开源的分布式版本控制系统,可以有效.高速的处理从很小到非常大的项目版本管理.[2] Git 是 Linus Torvalds 为了帮助管理 Linux内核开发而 ...
- 在mvc中将session的值绑定在页面上
第一步,在SqlServer数据库中创建存储过程,查询的是用户名(员工姓名)所扮演的角色: if exists(select * from sys.objects where name='proc_s ...
- css3图片翻转
<!DOCTYPE> <html lang="en"> <head> <meta http-equiv="Content-Typ ...
- Git 常见的一些小命令
Git 常见的一些命令 关于一些参数比较多,比较复杂的都有单独进行介绍 1. git cherry-pick 挑拣命令,当我们不想合并分支,或者git pull 更新仓库,而是 ...
- JMeter学习(三十五)使用jmeter来发送json/gzip格式数据
一.使用jmeter来发送gzip数据 有时候我们需要模拟在客户端将数据压缩后, 发送(post)到服务器端. 通常这种情况,会发生在移动终端上. 这样做的好处, 是可以节省流量. 当然, 服务器返 ...