使用ActivityManager实现进程管理
Android中使用ActivityManager可以获得进程信息,并对进程进行管理,如结束进程等。本文使用ActivityManager获得进程列表,并结束选中的进程。
首先,看看布局文件。
<?xml version="1.0" encoding="utf-8"?>

<LinearLayout xmlns:android="http://schemas.android.com/apk/res/android"

    android:layout_width="match_parent"

    android:layout_height="match_parent"

    android:orientation="vertical" >

    <LinearLayout

        android:layout_width="fill_parent"

        android:layout_height="match_parent"

        android:layout_weight="5" >

        <TextView

            android:id="@+id/textView1"

            style="@style/my_style"

            android:layout_width="match_parent"

            android:layout_height="fill_parent"

            android:layout_weight="3" />

        <TextView

            android:id="@+id/textView2"

            style="@style/my_style"

            android:layout_width="match_parent"

            android:layout_height="fill_parent"

            android:layout_gravity="center_vertical|center_horizontal"

            android:layout_weight="3"

            android:gravity="center_vertical|center_horizontal"

            android:text="进程号" />

        <TextView

            android:id="@+id/textView3"

            style="@style/my_style"

            android:layout_width="match_parent"

            android:layout_height="fill_parent"

            android:layout_weight="2"

            android:gravity="center_vertical|center_horizontal"

            android:text="进程名" />

		<TextView

            android:id="@+id/textView4"

            style="@style/my_style"

            android:layout_width="match_parent"

            android:layout_height="fill_parent"

            android:layout_weight="3"

            android:gravity="center_vertical|center_horizontal"

            android:text="内存" />

    </LinearLayout>

    <ListView

        android:id="@id/android:list"

        android:layout_width="fill_parent"

        android:layout_height="match_parent"

        android:layout_weight="1" >

    </ListView>

    <Button

        android:id="@+id/btn_pro"

        style="@style/my_style"

        android:layout_width="fill_parent"

        android:layout_height="match_parent"

        android:layout_weight="5"

        android:text="结束" />

</LinearLayout>
然后是Java文件。
package com.hzhi.sysinfor; import java.util.ArrayList;
import java.util.HashMap;
import java.util.List;
import java.util.Map; import android.app.ActivityManager;
import android.app.AlertDialog;
import android.app.ListActivity;
import android.app.ProgressDialog;
import android.content.Context;
import android.content.DialogInterface;
import android.content.Intent;
import android.content.pm.PackageInfo;
import android.content.pm.PackageManager;
import android.graphics.drawable.Drawable;
import android.net.Uri;
import android.os.Bundle;
import android.os.Debug;
import android.util.Log;
import android.view.Menu;
import android.view.View;
import android.view.View.OnClickListener;
import android.view.ViewGroup;
import android.widget.BaseAdapter;
import android.widget.Button;
import android.widget.CheckBox;
import android.widget.CompoundButton;
import android.widget.CompoundButton.OnCheckedChangeListener;
import android.widget.ImageView;
import android.widget.LinearLayout;
import android.widget.TextView;
import android.widget.Toast; public class process extends ListActivity{ Button btn_stop;
PackageManager pkg_man;
list_pro list_ada;
ActivityManager am; // 获得所有的进程列表
public void get_pro(){ list_ada = new list_pro(this); // 包管理器
am = (ActivityManager) getSystemService(Context.ACTIVITY_SERVICE);
// 获取手机内所有应用
List<ActivityManager.RunningAppProcessInfo> pi = am.getRunningAppProcesses(); for (int i=0; i<pi.size(); i++){ ActivityManager.RunningAppProcessInfo pii =
(ActivityManager.RunningAppProcessInfo) pi.get(i); int[] mem = new int[] {pii.pid};
Debug.MemoryInfo[] mi = am.getProcessMemoryInfo(mem); list_ada.addItem(String.valueOf(pii.pid),
pii.processName,
String.valueOf(mi[0].dalvikPrivateDirty) + "KB",
false); } setListAdapter(list_ada); } @Override
protected void onCreate(Bundle savedInstanceState) { super.onCreate(savedInstanceState);
setContentView(R.layout.activity_list_process); get_pro(); btn_stop = (Button) findViewById(R.id.btn_pro);
btn_stop.setOnClickListener(new View.OnClickListener() { @Override
public void onClick(View v) { for (int j=0; j<list_ada.list_data.size(); j++){ // 该应用需要删除
if (list_ada.list_data.get(j).is_chk){ String name = (String)
list_ada.list_data.get(j).txt_name.getText();
final String pro = (String)
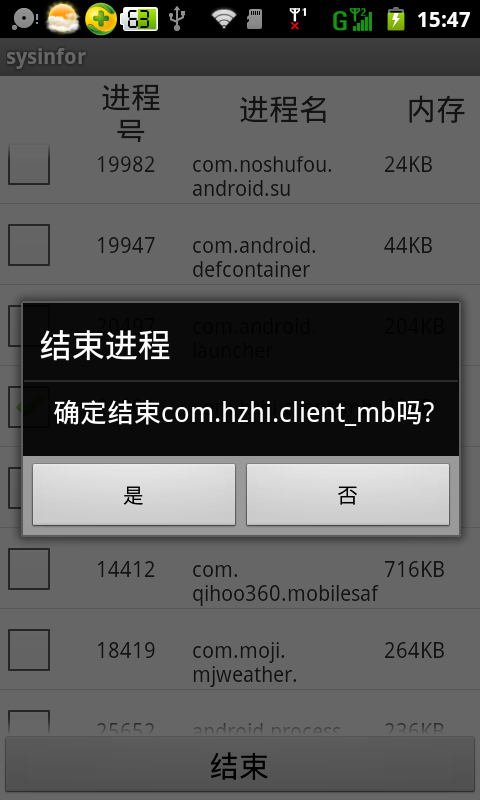
list_ada.list_data.get(j).txt_name.getText(); new AlertDialog.Builder(process.this)
.setTitle("结束进程")
.setMessage("确定结束" + name + "吗?")
.setPositiveButton("是", new DialogInterface.OnClickListener() { @Override
public void onClick(DialogInterface arg0, int arg1) {
unload(pro);
get_pro();
} })
.setNegativeButton("否", null)
.show();
} } }
}); } @Override
public boolean onCreateOptionsMenu(Menu menu) {
getMenuInflater().inflate(R.menu.main, menu);
return true;
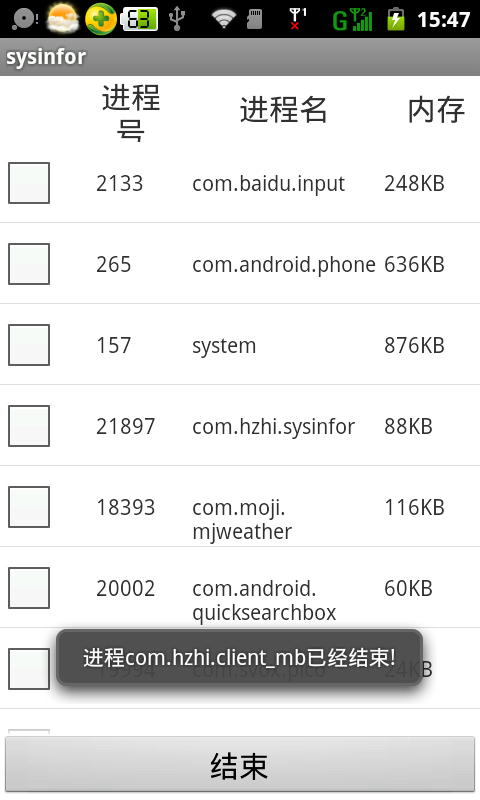
} public boolean unload (String n){ boolean res = true; am.killBackgroundProcesses(n);
Toast.makeText(process.this, "进程" + n + "已经结束!", Toast.LENGTH_LONG)
.show(); return res; } } // pro列表
class list_pro extends BaseAdapter implements OnClickListener{ public Context ctx;
public List<item_pro> list_data; public list_pro(Context context){ ctx = context;
list_data = new ArrayList<item_pro>(); } @Override
public int getCount() {
// TODO Auto-generated method stub
return list_data.size();
} @Override
public Object getItem(int arg0) {
// TODO Auto-generated method stub
return list_data.get(arg0);
} @Override
public long getItemId(int arg0) {
// TODO Auto-generated method stub
return list_data.indexOf(arg0);
} @Override
public View getView(int position, View convertView, ViewGroup parent) { item_pro my_item;
Integer i = 0; if (convertView == null)
{
my_item = new item_pro(ctx,
(String)list_data.get(position).txt_no.getText(),
(String)list_data.get(position).txt_name.getText(),
(String)list_data.get(position).txt_size.getText(),
list_data.get(position).is_chk);
}
else
{
my_item = (item_pro)convertView;
my_item.txt_no.setText(list_data.get(position).txt_no.getText());
my_item.txt_name.setText(list_data.get(position).txt_name.getText());
my_item.txt_size.setText(list_data.get(position).txt_size.getText());
} CheckBox chk_item = (CheckBox) my_item.chk_pro;
chk_item.setOnClickListener(this);
chk_item.setChecked(list_data.get(position).is_chk);
chk_item.setTag(position); return my_item; } public void addItem(String txt_no, String txt_name,
String str_size, Boolean bol_chk)
{
list_data.add(new item_pro(ctx,txt_no,txt_name,str_size,bol_chk));
} @Override
public void onClick(View v) {
// TODO Auto-generated method stub
CheckBox c = (CheckBox) v;
int pos = Integer.parseInt(v.getTag().toString());
list_data.get(pos).is_chk = c.isChecked();
} } // pro列表的一行
class item_pro extends LinearLayout{ public CheckBox chk_pro;
// 进程号
public TextView txt_no;
// 进程名
public TextView txt_name;
// 占用内存大小
public TextView txt_size;
// 是否选中
public boolean is_chk; public item_pro(Context ctx, String str_no, String str_name,
String str_size, Boolean bol_chk)
{
super(ctx);
this.setOrientation(HORIZONTAL); int hei = 80; chk_pro = new CheckBox(ctx);
addView(chk_pro,
new LinearLayout.LayoutParams((int)(MainActivity.wid_scr*0.2),hei)); txt_no = new TextView(ctx);
txt_no.setText(str_no);
addView(txt_no,
new LinearLayout.LayoutParams((int)(MainActivity.wid_scr*0.2),hei)); txt_name = new TextView(ctx);
txt_name.setText(str_name);
addView(txt_name,
new LinearLayout.LayoutParams((int)(MainActivity.wid_scr*0.4),hei)); txt_size = new TextView(ctx);
txt_size.setText(str_size);
addView(txt_size,
new LinearLayout.LayoutParams((int)(MainActivity.wid_scr*0.2),hei)); is_chk = bol_chk; } }
Java文件实现了三个类。process类是整个Activity的类,list_pro是适配器类,item_pro是列表里面的一行。
在process类的get_pro()方法里面,语句am = (ActivityManager) getSystemService(Context.ACTIVITY_SERVICE)获得了一个ActivityManager,List<ActivityManager.RunningAppProcessInfo> pi = am.getRunningAppProcesses()获得了系统的所有进程,并存储在列表pi里面。语句ActivityManager.RunningAppProcessInfo pii = (ActivityManager.RunningAppProcessInfo) pi.get(i)获得了每一个进程信息,pii.processName是该进程的进程名(通常是该进程对应的包名),mi[0].dalvikPrivateDirty是该进程占用的内存大小(通常以KB为单位)。在unload (String n)方法里面,am.killBackgroundProcesses(n)结束了进程名为n的进程,不过要在AndroidManifest.xml中加入android.permission.KILL_BACKGROUND_PROCESSES权限,否则会出现权限错误。
运行效果如下。
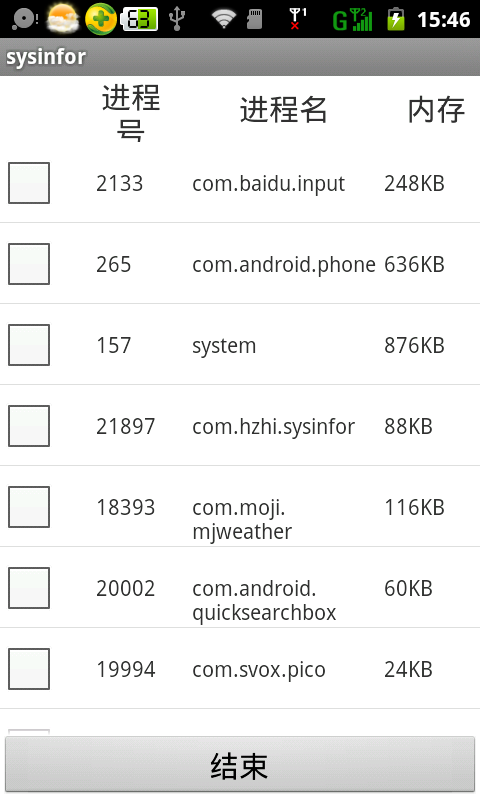
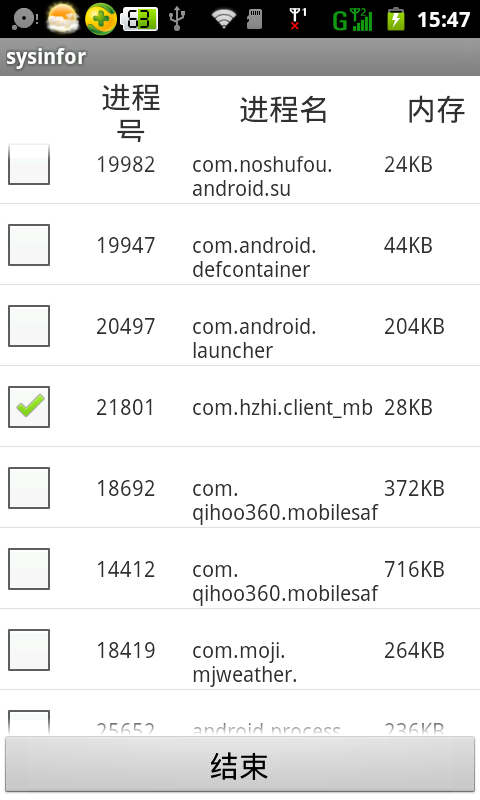
需要注意的是,系统进程是不能结束的。
使用ActivityManager实现进程管理的更多相关文章
- android145 360 进程管理
package com.itheima.mobileguard.activities; import java.util.ArrayList; import java.util.List; impor ...
- Android学习笔记_63_手机安全卫士知识点归纳(3)分享 程序锁 服务 进程管理 widget
1.分享: Intent shareIntent = new Intent(); shareIntent.setAction(Intent.ACTION_SEND); shareIntent.setT ...
- Android项目实战_手机安全卫士进程管理
###1.设备进程信息获取获取设备运行进程 ActivityManager am = (ActivityManager) context.getSystemService(Context.ACTIVI ...
- 《Linux内核设计与实现》读书笔记 第三章 进程管理
第三章进程管理 进程是Unix操作系统抽象概念中最基本的一种.我们拥有操作系统就是为了运行用户程序,因此,进程管理就是所有操作系统的心脏所在. 3.1进程 概念: 进程:处于执行期的程序.但不仅局限于 ...
- 进程管理三大扩展工具htop
三大进程管理监控工具 HTOP 介绍: Htop是一款运行于Linux系统监控与进程管理软件,htop提供所有进程的列表,并且使用彩色标识出处理器.swap和内存状态.用户一般可以在top无法提供详尽 ...
- Linux进程管理子系统分析【转】
本文转载自:http://blog.csdn.net/coding__madman/article/details/51298732 Linux进程管理: 进程与程序: 程序:存放在磁盘上的一系列代码 ...
- Linux下取代top的进程管理工具 htop
一.htop 简介 This is htop, an interactive process viewer for Linux. It is a text-mode application (for ...
- Linux进程管理
一.进程管理简介 进程是正在执行的程序或命令,每一个进程都是一个运行实体,都有自己的地址空间,并占用一定的系统资源. 进程管理的作用: 1.判断服务器的健康状态 2.查看系统中的所有进程 3.杀死进程 ...
- C++ Windows进程管理
功能: 1.各个进程启动.挂起.恢复.停止等 2.监听进程的运行状态,进程退出(正常.非正常)时,通知用户 3.异步队列 4.线程安全 进程管理器类: #ifndef __ProcessManager ...
随机推荐
- java 锁3
先谈线程的状态: 具体来说有, NEW. Running. Blocked.此状态的线程阻塞,它正在等待监视器锁——等待另外一个线程释放锁(通俗说就是等它执行完synchronized了的方法/代码块 ...
- Atitit 电子商务订单号码算法(java c# php js 微信
Atitit 电子商务订单号码算法(java c# php js 微信 1.1. Js版本的居然钱三爷里面没有..只好自己实现了. 1.2. 订单号标准化...长度16位 1.3. 订单号的结构 前 ...
- C#学习系列-String与string的区别
参考:http://www.microsoftvirtualacademy.com/Content/ViewContent.aspx?et=9851&m=9832&ct=31042 如 ...
- iOS-Objective-C内存管理
内存管理: 栈区 [stack]:由编译器自动分配并释放,一般存放函数的参数值,局部变量等 堆区 [heap]:由程序员分配和释放,如果程序员不释放,程序结束时,可能会由操作系统回收 全局区(静态区) ...
- iOS-旧项目中手动内存管理(MRC)转ARC
在ARC之前,iOS内存管理无论对资深级还是菜鸟级开发者来说都是一件很头疼的事.我参 加过几个使用手动内存管理的项目,印象最深刻的是一个地图类应用,由于应用本身就非常耗内存,当时为了解决内存泄露问题, ...
- Eclipse中java获得mysql的查询结果集
不废话,先上代码,再上解释说明 package com.ningmeng; import java.sql.*; /** * 1:获取查询结果集 * @author biexiansheng * */ ...
- HTML基础笔记-01
---恢复内容开始--- 学习网站:W3School 1.基础知识 目录: <1.我的文档—> 选择目录名—> 主页—> 样式(点击标题样式,选择你想要的每个标题,重复此步骤) ...
- python导入模块和包的使用
做项目的时候经常会要求做到模块化管理,即同样功能的代码放到同一个文件夹下,以便于方便管理,相信很多人对模块的引用都模糊不清,今天鄙人在这里就总结下. 一.模块导入的使用 在同一个文件夹下有两个文件分别 ...
- MYSQL数据表建立外键
MySQL创建关联表可以理解为是两个表之间有个外键关系,但这两个表必须满足三个条件1.两个表必须是InnoDB数据引擎2.使用在外键关系的域必须为索引型(Index)3.使用在外键关系的域必须与数据类 ...
- spring源码分析之spring-core-io
1. 看一下源码整体结构: 抓住主要点Resource.ResourceLoader和ResourceEditor 其中Resource作用 Interface for a resource desc ...