python接口自动化测试二十五:执行所有用例,并生成HTML测试报告
import requests
import unittest
class TestQQ(unittest.TestCase):
'''测试QQ号接口''' # 此注释将展示到测试报告的测试组类
def test_qq(self):
'''测试QQ号码,正确的appkey''' # 此注释将展示到测试报告的用例标题
url = 'http://japi.juhe.cn/qqevaluate/qq'
par = {
'key': '8dbee1fcd8627fb6699bce7b986adc45',
'qq': '907728701'
}
# 发送post请求
r = requests.post(url, params=par)
print(r.text) # 获取返回的结果
result = r.json()['reason']
print(result)
# 断言
self.assertTrue('success' == result) # 断言:'success' == result
self.assertTrue('success' in r.text) # 断言:'success' 在 r.text的返回内容里面
self.assertIn('success', r.text) # 断言:'success' 在 r.text的返回内容里面
# 断言:'success' == result
self.assertEqual('success', result, msg='失败的时候,打印这里')
def test_qq_appker_error(self):
'''测试QQ号码,错误的appkey''' # 此注释将展示到测试报告的用例标题
url = 'http://japi.juhe.cn/qqevaluate/qq'
par = {
'key': '8dbee1fcd8627fb6699bce7b986adc45',
'qq': '907728701'
}
# 发送post请求
r = requests.post(url, params=par)
print(r.text) # 获取返回的结果
result = r.json()['reason']
print(result)
# 断言
self.assertTrue('success' == result) # 断言:'success' == result
self.assertTrue('success' in r.text) # 断言:'success' 在 r.text的返回内容里面
self.assertIn('success', r.text) # 断言:'success' 在 r.text的返回内容里面
# 断言:'success' == result
self.assertEqual('success', result, msg='失败的时候,打印这里')
if __name__ == '__main__':
unittest.main
import requests

import unittest

class TestWeather(unittest.TestCase):

    '''测试天气预报接口'''       # 此注释将展示到测试报告的测试组类

    def test_Weather(self):

        '''可用次数超限'''         # 此注释将展示到测试报告的用例标题

        url = "http://v.juhe.cn/weather/index"

        par = {

            "cityname": "深圳",  # 城市名或城市ID,如:"苏州",需要utf8 urlencode

            "dtype": "json",     # 返回数据格式:json或xml,默认json

            "format": "1",       # 未来7天预报(future)两种返回格式,1或2,默认1

            "key": "80b4d4e1d870d257d3344fcf2d08f64a"    # key须申请

              }

        r = requests.get(url, params=par)

        print(r.text)     # 获取返回的结果

        result = r.json()['reason']

        print(result)

        # 断言

        self.assertEqual('reason', result)

        self.assertIn('reason', r.text)

        self.assertTrue('reason'in r.text)

    def test_Weather_appkey_error(self):

        '''错误的key'''        # 此注释将展示到测试报告的用例标题

        url = "http://v.juhe.cn/weather/index"

        par = {

            "cityname": "深圳",  # 城市名或城市ID,如:"苏州",需要utf8 urlencode

            "dtype": "json",     # 返回数据格式:json或xml,默认json

            "format": "1",       # 未来7天预报(future)两种返回格式,1或2,默认1

            "key": "8dfghfhgfhgfh"    # key须申请

              }

        r = requests.get(url, params=par)

        print(r.text)     # 获取返回的结果

        result = r.json()['reason']

        print(result)

        # 断言

        self.assertEqual('reason', result)

        self.assertIn('reason', r.text)

        self.assertTrue('reason'in r.text)
# run_all_case
import unittest
import os
# 从工程下面的第一层开始导入
from common.HtmlTestRunner import HTMLTestRunner
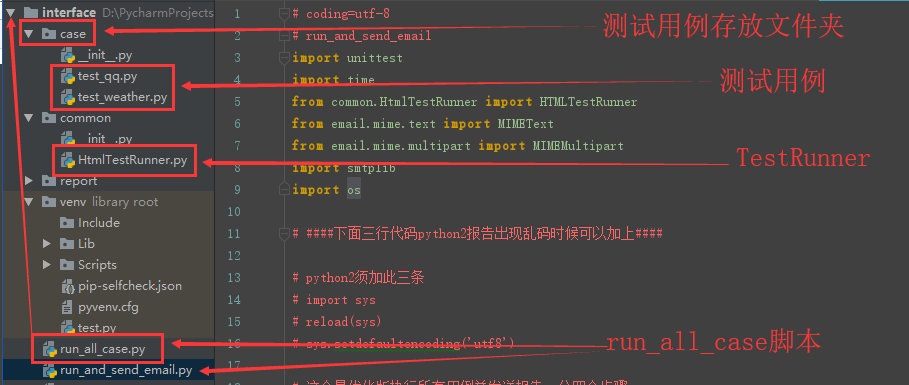
# 用例存放的路径
# startdir = 'D:\PycharmProjects\interface\case' # 绝对路径,容易出错 # 获取当前脚本的路径
curPath = os.path.dirname(os.path.realpath(__file__)) # 获取文件路径
startdir = os.path.join(curPath, 'case') # 测试用例路径
# 获取测试报告:'report.html'路径
reportPath = os.path.join(curPath, 'report', 'report.html') # 匹配规则
rule = 'test*.py'
discover = unittest.defaultTestLoader.discover(startdir, rule)
print(discover) # 生成HTML格式的报告
fp = open(reportPath, 'wb') # 把测试报告以二进制的规则写进“report_report.html”文件中
runner = HTMLTestRunner(fp,
title='钟叶海的接口测试报告', # 报告标题
description='报告如下:', # 报告的描述
verbosity=2, # 将注释在测试用例中展示
retry=1 # 失败后,重跑1次(次数可随意更改)
)
runner.run(discover)
fp.close() # 写完后关闭HTML报告 # 生成TXT格式的报告
# runner = unittest.TextTestRunner()
# runner .run(discover)
# 运行所有用例,以邮件发送结果
# coding=utf-8
# run_and_send_email
import unittest
import time
from common.HtmlTestRunner import HTMLTestRunner
from email.mime.text import MIMEText
from email.mime.multipart import MIMEMultipart
import smtplib
import os
# ####下面三行代码python2报告出现乱码时候可以加上####
# python2须加此三条
# import sys
# reload(sys)
# sys.setdefaultencoding('utf8')
# 这个是优化版执行所有用例并发送报告,分四个步骤
# 第一步加载用例
# 第二步执行用例
# 第三步获取最新测试报告
# 第四步发送邮箱 (这一步不想执行的话,可以注释掉最后面那个函数就行)
# 当前脚本所在文件真实路径
cur_path = os.path.dirname(os.path.realpath(__file__))
def add_case(caseName="case", rule="test*.py"):
'''第一步:加载所有的测试用例'''
case_path = os.path.join(cur_path, caseName) # 用例文件夹
# 如果不存在这个case文件夹,就自动创建一个
if not os.path.exists(case_path): os.mkdir(case_path)
print("test case path:%s" % case_path)
# 定义discover方法的参数
discover = unittest.defaultTestLoader.discover(case_path,
pattern=rule,
top_level_dir=None)
print(discover)
return discover
def run_case(all_case, reportName="report"):
'''第二步:执行所有的用例, 并把结果写入HTML测试报告'''
now = time.strftime("%Y_%m_%d_%H_%M_%S")
report_path = os.path.join(cur_path, reportName) # 用例文件夹
# 如果不存在这个report文件夹,就自动创建一个
if not os.path.exists(report_path): os.mkdir(report_path)
report_abspath = os.path.join(report_path, "result.html")
print("report path:%s" % report_abspath)
fp = open(report_abspath, "wb")
runner = HTMLTestRunner(fp,
title='报告的标题:这个是我的接口项目', # 报告标题
description='报告如下:', # 报告的描述
verbosity=2, # 将注释在测试用例中展示
retry=1 # 失败后,重跑1次(次数可随意更改)
)
# 调用add_case函数返回值
runner.run(all_case)
fp.close()
def get_report_file(report_path):
'''第三步:获取最新的测试报告'''
lists = os.listdir(report_path)
lists.sort(key=lambda fn: os.path.getmtime(os.path.join(report_path, fn)))
print(u'最新测试生成的报告: ' + lists[-1])
# 找到最新生成的报告文件
report_file = os.path.join(report_path, lists[-1])
return report_file
def send_mail(sender, psw, receiver, smtpserver, report_file, port):
'''第四步:发送最新的测试报告内容'''
with open(report_file, "rb") as f:
mail_body = f.read()
# 定义邮件内容
msg = MIMEMultipart()
body = MIMEText(mail_body, _subtype='html', _charset='utf-8')
msg['Subject'] = u"自动化测试报告"
msg["from"] = sender
msg["to"] = str(receiver) # 只能字符串
msg.attach(body)
# 添加附件
att = MIMEText(open(report_file, "rb").read(), "base64", "utf-8")
att["Content-Type"] = "application/octet-stream"
att["Content-Disposition"] = 'attachment; filename= "report.html"'
msg.attach(att)
try:
smtp = smtplib.SMTP()
smtp.connect(smtpserver) # 连服务器
smtp.login(sender, psw)
except:
smtp = smtplib.SMTP_SSL(smtpserver, port)
smtp.login(sender, psw) # 登录
smtp.sendmail(sender, receiver, msg.as_string())
smtp.quit()
print('test report email has send out !')
if __name__ == "__main__":
all_case = add_case() # 1加载用例
# # 生成测试报告的路径
run_case(all_case) # 2执行用例
# # 获取最新的测试报告文件
report_path = os.path.join(cur_path, "report") # 用例文件夹
report_file = get_report_file(report_path) # 3获取最新的测试报告
# #邮箱配置
# sender = "yoyo@qq.com"
# psw = "xxx"
# smtp_server = "smtp.qq.com"
# port = 465
# receiver = "yoyo@qq.com"
# send_mail(sender, psw, receiver, smtp_server, report_file, port) # 4最后一步发送报告
python接口自动化测试二十五:执行所有用例,并生成HTML测试报告的更多相关文章
- python接口自动化测试二十六:使用pymysql模块链接数据库
#!/usr/bin/env python# -*- coding: utf-8 -*-# @Time : 2018/5/28 18:51# @Author : StalloneYang# ...
- python接口自动化测试二十九:yaml配置文件的写和读
# 先安装ruamel.yaml模块 写入配置文件: import os# 先安装ruamel.yaml模块from ruamel import yaml # 将字典写入到yamldict = { ' ...
- python接口自动化测试二十八:连接SQL sever操作
1.中文乱码问题: (1).文件头加上# -*- coding:utf-8 -*- 或者 #coding=utf8 (2).pymssql.connect连接串中charset是要跟你数据库的编码一样 ...
- python接口自动化测试三十五:用BeautifulReport生成报告
GitHub传送门:https://github.com/TesterlifeRaymond/BeautifulReport 配置BeautifulReport 下载.解压并修改名字为Beautifu ...
- python接口自动化测试二十四:上传多个附件,参数化
# 添加多个附件参数化files = [("1.png", "1.png") ("2.png", "2.png") ]d ...
- python接口自动化测试二十二:文件下载
文件下载类型: Content-Type: octets/stream 一般为文件类型:
- python接口自动化测试二十:函数写接口测试
# coding:utf-8import requestsimport refrom bs4 import BeautifulSoup # s = requests.session() # 全局的s ...
- python接口自动化测试二十七:密码MD5加密 ''' MD5加密 ''' # 由于MD5模块在python3中被移除 # 在python3中使用hashlib模块进行md5操作 import hashlib # 待加密信息 str = 'asdas89799,.//plrmf' # 创建md5对象 hl = hashlib.md5() # Tips # 此处必须声明encode # 若写法为
python接口自动化测试二十七:密码MD5加密 ''' MD5加密 '''# 由于MD5模块在python3中被移除# 在python3中使用hashlib模块进行md5操作import has ...
- Python学习日记(二十五) 接口类、抽象类、多态
接口类 继承有两种用途:继承基类的方法,并且做出自己的改变或扩展(代码重用)和声明某个子类兼容于某基类,定义一个接口类interface,接口类中定义了一些接口名(就是函数名)且并未实现接口的功能,子 ...
随机推荐
- pyautogui_pdf内容提取到excel内_3
sklearn实战-乳腺癌细胞数据挖掘(博主亲自录制视频) https://study.163.com/course/introduction.htm?courseId=1005269003& ...
- linux-2.6.26内核中ARM中断实现详解(转)
转载:http://www.cnblogs.com/leaven/archive/2010/08/06/1794293.html 更多文档参见:http://pan.baidu.com/s/1dDvJ ...
- Spark进阶之路-Spark提交Jar包执行
Spark进阶之路-Spark提交Jar包执行 作者:尹正杰 版权声明:原创作品,谢绝转载!否则将追究法律责任. 在实际开发中,使用spark-submit提交jar包是很常见的方式,因为用spark ...
- python---RabbitMQ(2)exchange中订阅者模式fanout<广播>,(一对多,发布一条消息,多人同时接收)
fanout:广播:所有bind到此exchange的queue都可以接受到消息 生产者: # coding:utf8 # __author: Administrator # date: // # / ...
- kudu记录-kudu原理
1.kudu是什么? 2.kudu基本概念 特点: High availability(高可用性).Tablet server 和 Master 使用 Raft Consensus Algorith ...
- 按某个属性排序(字典序,ascII) js/python
javascrapy方法 var compare = (prop)=>{ return (a,b)=>{ : - } } javascrapy测试代码 var aaa = [ {name: ...
- buildroot构建项目(四)--- u-boot 2017.11 适配开发板修改 2 ---- 系统启动初始化之一
一.代码分析 上一节已经分析了链接文件,知道了首先代码是从 _start 开始,之后设置了中断向量表,然后从 start.s 开始运行. _start:vectors.S (arch\arm\lib) ...
- fatal error C1083: 无法打开包括文件: “SDKDDKVer.h”: No such file or directory(转)
fatal error C1083: 无法打开包括文件: “SDKDDKVer.h”: No such file or directory 解决办法:(Vs2013中) 项目--右键--属性--配置属 ...
- python - 装饰器+描述符(给类添加属性且属性类型审核)
装饰器+描述符 实现给一个类添加属性且对添加的时,对属性进行类型审核: def zsq(**kwargs): def fun(obj): for i,j in kwargs.items(): seta ...
- python - 包装 和 授权
包装 # 包装(二次加工标准类型) # 继承 + 派生 的方式实现 定制功能 # 示例: # class list_customization(list): #重新定制append方法,判断添加的数据 ...