springboot与缓存(redis,或者caffeine,guava)
1.理论介绍
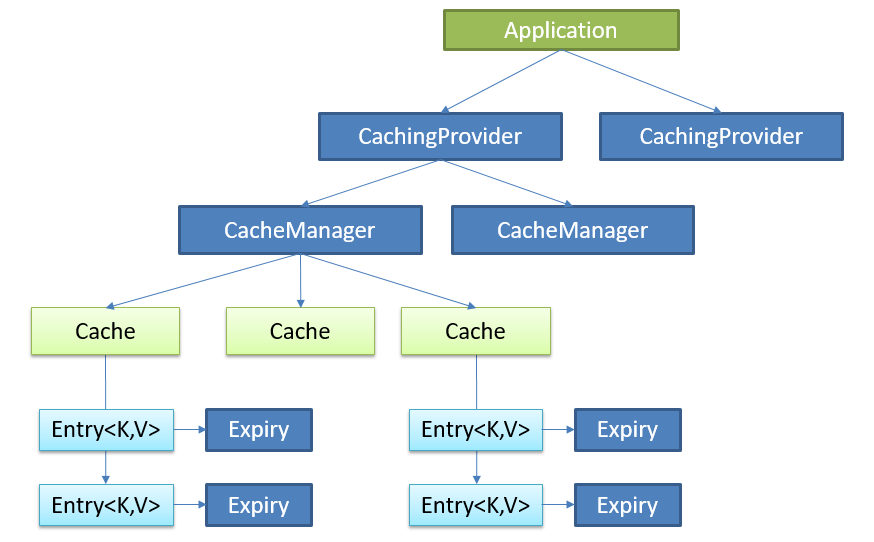
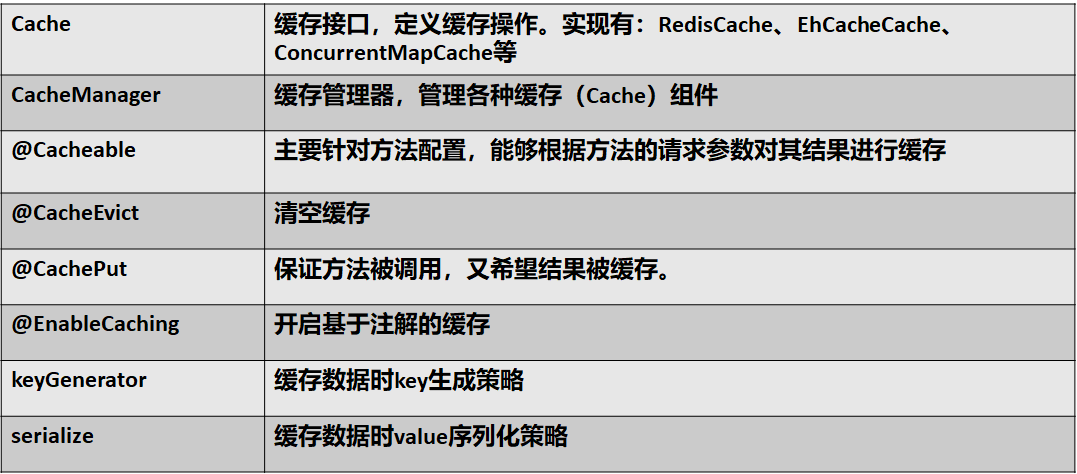
Java Caching定义了5个核心接口,分别是CachingProvider, CacheManager, Cache, Entry 和 Expiry。

CachingProvider定义了创建、配置、获取、管理和控制多个CacheManager。一个应用可以在运行期访问多个CachingProvider。

CacheManager定义了创建、配置、获取、管理和控制多个唯一命名的Cache,这些Cache存在于CacheManager的上下文中。一个CacheManager仅被一个CachingProvider所拥有。

Cache是一个类似Map的数据结构并临时存储以Key为索引的值。一个Cache仅被一个CacheManager所拥有。

Entry是一个存储在Cache中的key-value对。

Expiry 每一个存储在Cache中的条目有一个定义的有效期。一旦超过这个时间,条目为过期的状态。一旦过期,条目将不可访问、更新和删除。缓存有效期可以通过ExpiryPolicy设置。
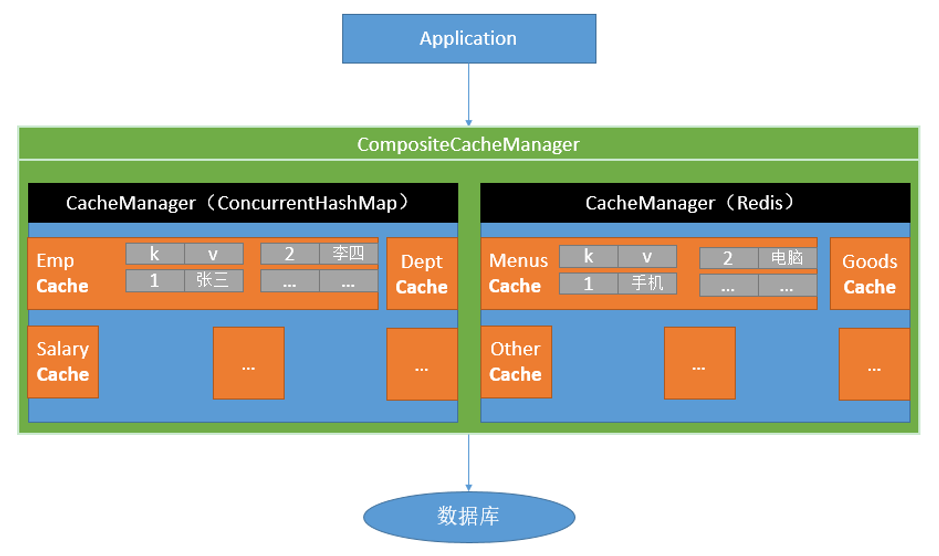
Spring缓存抽象

Spring从3.1开始定义了org.springframework.cache.Cache

和org.springframework.cache.CacheManager接口来统一不同的缓存技术;

并支持使用JCache(JSR-107)注解简化我们开发;

Cache接口为缓存的组件规范定义,包含缓存的各种操作集合;

Cache接口下Spring提供了各种xxxCache的实现;如RedisCache,EhCacheCache , ConcurrentMapCache等;

每次调用需要缓存功能的方法时,Spring会检查检查指定参数的指定的目标方法是否已经被调用过;如果有就直接从缓存中获取方法调用后的结果,如果没有就调用方法并缓存结果后返回给用户。下次调用直接从缓存中获取。

使用Spring缓存抽象时我们需要关注以下两点;

1、确定方法需要被缓存以及他们的缓存策略

2、从缓存中读取之前缓存存储的数据


2.代码结构及pom文件
<?xml version="1.0" encoding="UTF-8"?>

<project xmlns="http://maven.apache.org/POM/4.0.0" xmlns:xsi="http://www.w3.org/2001/XMLSchema-instance"

         xsi:schemaLocation="http://maven.apache.org/POM/4.0.0 http://maven.apache.org/xsd/maven-4.0.0.xsd">

    <modelVersion>4.0.0</modelVersion>

    <groupId>com.zy</groupId>

    <artifactId>spring-boot-cache</artifactId>

    <version>0.0.1-SNAPSHOT</version>

    <packaging>jar</packaging>

    <name>spring-boot-cache</name>

    <description>Demo project for Spring Boot</description>

    <parent>

        <groupId>org.springframework.boot</groupId>

        <artifactId>spring-boot-starter-parent</artifactId>

        <version>1.5.14.RELEASE</version>

        <relativePath/> <!-- lookup parent from repository -->

    </parent>

    <properties>

        <project.build.sourceEncoding>UTF-8</project.build.sourceEncoding>

        <project.reporting.outputEncoding>UTF-8</project.reporting.outputEncoding>

        <java.version>1.8</java.version>

        <lombok.version>1.16.10</lombok.version>

    </properties>

    <dependencies>

        <dependency>

            <groupId>org.springframework.boot</groupId>

            <artifactId>spring-boot-starter-cache</artifactId>

        </dependency>

        <dependency>

            <groupId>org.springframework.boot</groupId>

            <artifactId>spring-boot-starter-jdbc</artifactId>

        </dependency>

        <dependency>

            <groupId>org.springframework.boot</groupId>

            <artifactId>spring-boot-starter-web</artifactId>

        </dependency>

        <dependency>

            <groupId>org.mybatis.spring.boot</groupId>

            <artifactId>mybatis-spring-boot-starter</artifactId>

            <version>1.3.2</version>

        </dependency>

        <!-- 引入redis的starter,这里面有jedis客户端 -->

        <dependency>

            <groupId>org.springframework.boot</groupId>

            <artifactId>spring-boot-starter-data-redis</artifactId>

        </dependency>

        <dependency>

            <groupId>mysql</groupId>

            <artifactId>mysql-connector-java</artifactId>

            <scope>runtime</scope>

        </dependency>

        <dependency>

            <groupId>org.springframework.boot</groupId>

            <artifactId>spring-boot-starter-test</artifactId>

            <!--<scope>test</scope>-->

        </dependency>

        <!-- 引入lombok的依赖 -->

        <dependency>

            <groupId>org.projectlombok</groupId>

            <artifactId>lombok</artifactId>

            <version>${lombok.version}</version>

        </dependency>

        <!-- 引入caffeine缓存Jar包 -->

        <dependency>

            <groupId>com.github.ben-manes.caffeine</groupId>

            <artifactId>caffeine</artifactId>

            <version>2.6.0</version>

        </dependency>

    </dependencies>

    <build>

        <plugins>

            <plugin>

                <groupId>org.springframework.boot</groupId>

                <artifactId>spring-boot-maven-plugin</artifactId>

            </plugin>

        </plugins>

    </build>

</project>
3.启动类
package com.zy;

import org.mybatis.spring.annotation.MapperScan;

import org.springframework.boot.SpringApplication;

import org.springframework.boot.autoconfigure.SpringBootApplication;

import org.springframework.cache.annotation.EnableCaching;

/**

 * 一、搭建基本环境

 * 1、导入数据库文件 创建出department和employee表

 * 2、创建javaBean封装数据

 * 3、整合MyBatis操作数据库

 *         1.配置数据源信息

 *         2.使用注解版的MyBatis;

 *             1)、@MapperScan指定需要扫描的mapper接口所在的包

 * 二、快速体验缓存

 *         步骤:

 *             1、开启基于注解的缓存 @EnableCaching

 *             2、标注缓存注解即可

 *                 @Cacheable

 *                 @CacheEvict

 *                 @CachePut

 * 默认使用的是ConcurrentMapCacheManager==ConcurrentMapCache;将数据保存在    ConcurrentMap<Object, Object>中

 * 开发中使用缓存中间件;redis、memcached、ehcache;

 * 三、整合redis作为缓存

 * Redis 是一个开源(BSD许可)的,内存中的数据结构存储系统,它可以用作数据库、缓存和消息中间件。

 *     1、安装redis:使用docker;

 *     2、引入redis的starter

 *     3、配置redis

 *     4、测试缓存

 *         原理:CacheManager===Cache 缓存组件来实际给缓存中存取数据

 *        1)、引入redis的starter,容器中保存的是 RedisCacheManager;

 *        2)、RedisCacheManager 帮我们创建 RedisCache 来作为缓存组件;RedisCache通过操作redis缓存数据的

 *        3)、默认保存数据 k-v 都是Object;利用序列化保存;如何保存为json

 *               1、引入了redis的starter,cacheManager变为 RedisCacheManager;

 *               2、默认创建的 RedisCacheManager 操作redis的时候使用的是 RedisTemplate<Object, Object>

 *               3、RedisTemplate<Object, Object> 是 默认使用jdk的序列化机制

 *      4)、自定义CacheManager;

 *

 */

@SpringBootApplication

// 扫描mapper,支持mybatis

@MapperScan("com.zy.mapper")

// 开启缓存注解,此外,还要在service层加上缓存注解@Cacheable才能生效

@EnableCaching

public class SpringBootCacheApplication {

    public static void main(String[] args) {

        SpringApplication.run(SpringBootCacheApplication.class, args);

    }

}
4.model层对象
package com.zy.model;

import com.fasterxml.jackson.annotation.JsonIgnoreProperties;

import lombok.*;

import java.io.Serializable;

@Data

@NoArgsConstructor

@AllArgsConstructor

@Builder

@JsonIgnoreProperties(ignoreUnknown = true)

public class Employee implements Serializable {

    private Integer id;

    private String lastName;

    private String email;

    //1 male, 0 female

    private Integer gender;

    private Integer dId;

}

package com.zy.model;

/**

 *

 * 部门的实体类

 */

import com.fasterxml.jackson.annotation.JsonIgnoreProperties;

import lombok.AllArgsConstructor;

import lombok.Builder;

import lombok.Data;

import lombok.NoArgsConstructor;

import java.io.Serializable;

@Data

@NoArgsConstructor

@AllArgsConstructor

@Builder

@JsonIgnoreProperties(ignoreUnknown = true)

public class Department implements Serializable {

    private Integer id;

    private String departmentName;

}
5.mapper层
package com.zy.mapper;

import com.zy.model.Employee;

import org.apache.ibatis.annotations.Delete;

import org.apache.ibatis.annotations.Insert;

import org.apache.ibatis.annotations.Select;

import org.apache.ibatis.annotations.Update;

import java.util.List;

/**

 *

 * employee是xml配置文件版的mapper

 */

// 此处@Mapper也可以不写,但是要在springboot启动类出加上注解@MapperScan

// @Mapper

public interface EmployeeMapper {

    @Select("SELECT * FROM employee WHERE id = #{id}")

    public Employee getEmpById(Integer id);

    @Update("UPDATE employee SET lastName=#{lastName},email=#{email},gender=#{gender},dId=#{dId} WHERE id=#{id}")

    public void updateEmp(Employee employee);

    @Delete("DELETE FROM employee WHERE id=#{id}")

    public void deleteEmpById(Integer id);

    @Insert("INSERT INTO employee(lastName,email,gender,dId) VALUES(#{lastName},#{email},#{gender},#{dId})")

    public void insertEmployee(Employee employee);

    @Select("SELECT * FROM employee WHERE lastName = #{lastName}")

    Employee getEmpByLastName(String lastName);

}

package com.zy.mapper;

/**

 *

 * department是注解版的mybatis

 */

import com.zy.model.Department;

import org.apache.ibatis.annotations.*;

// 此处@Mapper也可以不写,但是要在springboot启动类出加上注解@MapperScan

// @Mapper

public interface DepartmentMapper {

    @Options(useGeneratedKeys = true, keyProperty = "id")

    @Insert("insert into department(departmentName) values(#{departmentName})")

    public int addDept(Department department);

    @Delete("delete from department where id=#{id}")

    public void deleteDeptById(Integer id);

    @Update("update department set departmentName=#{departmentName} where id=#{id}")

    public void updateDeptById(Integer id);

    @Select("select * from department where id=#{id}")

    public Department getDeptById(Integer id);

}
6.service层实现类
package com.zy.service; import com.zy.mapper.EmployeeMapper;
import com.zy.model.Employee;
import org.springframework.beans.factory.annotation.Autowired;
import org.springframework.cache.annotation.*;
import org.springframework.stereotype.Service; // 抽取公共配置-->到类上
@CacheConfig(cacheNames="emp")
@Service("employeeService")
public class EmployeeServiceImpl { @Autowired
private EmployeeMapper employeeMapper; /**
* 将方法的运行结果进行缓存;以后再要相同的数据,直接从缓存中获取,不用调用方法;
* CacheManager管理多个Cache组件的,对缓存的真正CRUD操作在Cache组件中,每一个缓存组件有自己唯一一个名字;
* *
* 原理:
* 1、自动配置类;CacheAutoConfiguration
* 2、缓存的配置类
* org.springframework.boot.autoconfigure.cache.GenericCacheConfiguration
* org.springframework.boot.autoconfigure.cache.JCacheCacheConfiguration
* org.springframework.boot.autoconfigure.cache.EhCacheCacheConfiguration
* org.springframework.boot.autoconfigure.cache.HazelcastCacheConfiguration
* org.springframework.boot.autoconfigure.cache.InfinispanCacheConfiguration
* org.springframework.boot.autoconfigure.cache.CouchbaseCacheConfiguration
* org.springframework.boot.autoconfigure.cache.RedisCacheConfiguration
* org.springframework.boot.autoconfigure.cache.CaffeineCacheConfiguration
* org.springframework.boot.autoconfigure.cache.GuavaCacheConfiguration
* org.springframework.boot.autoconfigure.cache.SimpleCacheConfiguration【默认】
* org.springframework.boot.autoconfigure.cache.NoOpCacheConfiguration
* 3、哪个配置类默认生效:SimpleCacheConfiguration;
*
* 4、给容器中注册了一个CacheManager:ConcurrentMapCacheManager
* 5、可以获取和创建ConcurrentMapCache类型的缓存组件;他的作用将数据保存在ConcurrentMap中;
*
* 运行流程:
* @Cacheable:
* 1、方法运行之前,先去查询Cache(缓存组件),按照cacheNames指定的名字获取;
* (CacheManager先获取相应的缓存),第一次获取缓存如果没有Cache组件会自动创建。
* 2、去Cache中查找缓存的内容,使用一个key,默认就是方法的参数;
* key是按照某种策略生成的;默认是使用keyGenerator生成的,默认使用SimpleKeyGenerator生成key;
* SimpleKeyGenerator生成key的默认策略;
* 如果没有参数;key=new SimpleKey();
* 如果有一个参数:key=参数的值
* 如果有多个参数:key=new SimpleKey(params);
* 3、没有查到缓存就调用目标方法;
* 4、将目标方法返回的结果,放进缓存中
*
* @Cacheable标注的方法执行之前先来检查缓存中有没有这个数据,默认按照参数的值作为key去查询缓存,
* 如果没有就运行方法并将结果放入缓存;以后再来调用就可以直接使用缓存中的数据;
*
* 核心:
* 1)、使用CacheManager【ConcurrentMapCacheManager】按照名字得到Cache【ConcurrentMapCache】组件
* 2)、key使用keyGenerator生成的,默认是SimpleKeyGenerator
*
*
* 几个属性:
* cacheNames或者value:指定缓存组件的名字;将方法的返回结果放在哪个缓存中,是数组的方式,可以指定多个缓存;
*
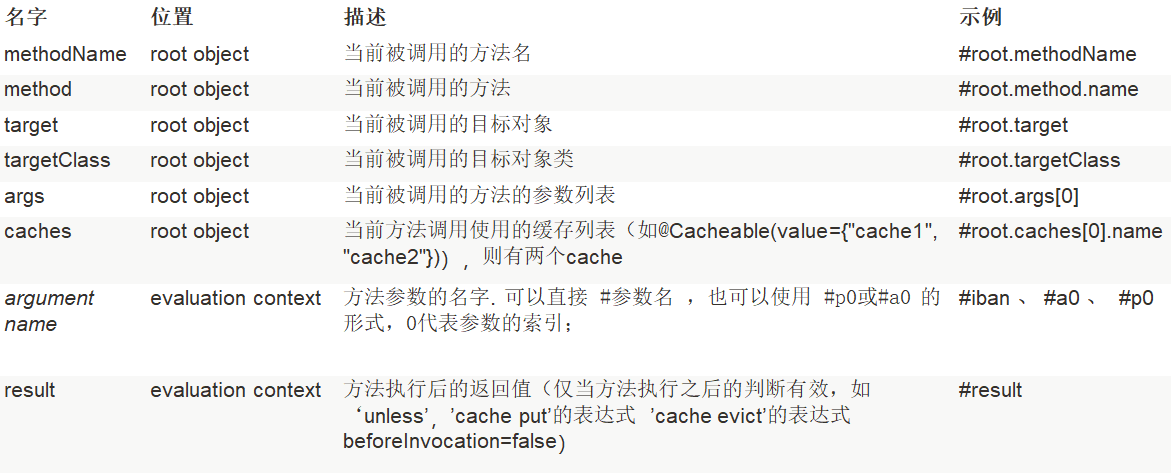
* key:缓存数据使用的key;可以用它来指定。默认是使用方法参数的值 1-方法的返回值
* 编写SpEL; #id;参数id的值 #a0 #p0 #root.args[0]
* getEmp[2]
*
* keyGenerator:key的生成器;可以自己指定key的生成器的组件id
* key和keyGenerator:二选一使用;
*
*
* cacheManager:指定缓存管理器;或者cacheResolver指定获取解析器;二选一使用;
*
* condition:指定符合条件的情况下才缓存;
* ,condition = "#id>0"
* condition = "#a0>1":第一个参数的值》1的时候才进行缓存
*
* unless:否定缓存;当unless指定的条件为true,方法的返回值就不会被缓存;可以获取到结果进行判断
* unless = "#result == null"
* unless = "#a0==2":如果第一个参数的值是2,结果不缓存;
* sync:是否使用异步模式
* @param id
* @return
*
*/
// 此处与启动类的@EnableCaching注解连用才能生效
@Cacheable(value = "{emp}")
public Employee getEmpById(Integer id){
Employee employee = employeeMapper.getEmpById(id);
return employee;
} /**
* @CachePut:既调用方法,又更新缓存数据;同步更新缓存
* 修改了数据库的某个数据,同时更新缓存;
* 运行时机:
* 1、先调用目标方法
* 2、将目标方法的结果缓存起来
*
* 测试步骤:
* 1、查询1号员工;查到的结果会放在缓存中;
* key:1 value:lastName:张三
* 2、以后查询还是之前的结果
* 3、更新1号员工;【lastName:zhangsan;gender:0】
* 将方法的返回值也放进缓存了;
* key:传入的employee对象 值:返回的employee对象;
* 4、查询1号员工?
* 应该是更新后的员工;
* key = "#employee.id":使用传入的参数的员工id;
* key = "#result.id":使用返回后的id
* @Cacheable的key是不能用#result
* 为什么是没更新前的?【1号员工没有在缓存中更新】
*
*/
@CachePut(/*value = "emp",*/key = "#result.id")
public void updateEmp(Employee employee){
employeeMapper.updateEmp(employee);
} /**
* @CacheEvict:缓存清除
* key:指定要清除的数据
* allEntries = true:指定清除这个缓存中所有的数据
* beforeInvocation = false:缓存的清除是否在方法之前执行
* 默认代表缓存清除操作是在方法执行之后执行;如果出现异常缓存就不会清除
*
* beforeInvocation = true:
* 代表清除缓存操作是在方法运行之前执行,无论方法是否出现异常,缓存都清除
*/
@CacheEvict
public void deleteEmp(Integer id){
employeeMapper.deleteEmpById(id);
} // @Caching 定义复杂的缓存规则
@Caching(
cacheable = {
@Cacheable(/*value="emp",*/key = "#lastName")
},
put = {
@CachePut(/*value="emp",*/key = "#result.id"),
@CachePut(/*value="emp",*/key = "#result.email")
}
)
public Employee getEmpByLastName(String lastName){
return employeeMapper.getEmpByLastName(lastName);
}
}
7.controller层
package com.zy.controller;

import com.zy.model.Employee;

import com.zy.service.EmployeeServiceImpl;

import org.springframework.beans.factory.annotation.Autowired;

import org.springframework.web.bind.annotation.*;

@RestController

@RequestMapping("/emps")

public class EmployeeController {

    @Autowired

    private EmployeeServiceImpl employeeService;

    @GetMapping("/getEmpById/{id}")

    public Employee getEmpById(@PathVariable("id") Integer id){

        Employee employee = employeeService.getEmpById(id);

        return employee;

    }

    @GetMapping("/updateEmp")

    public void updateEmp(Employee employee){

        employeeService.updateEmp(employee);

    }

    @GetMapping("/delemp")

    public String deleteEmp(Integer id){

        employeeService.deleteEmp(id);

        return "success";

    }

    @GetMapping("/emp/lastname/{lastName}")

    public Employee getEmpByLastName(@PathVariable("lastName") String lastName){

        return employeeService.getEmpByLastName(lastName);

    }

}
8.application.yml文件
spring:

#  这里指定数据源即配置

  datasource:

    driver-class-name: com.mysql.jdbc.Driver

    url: jdbc:mysql://localhost:3306/spring_boot

    username: root

    password: 123456

#    这里指定cache的类型即配置

  cache:

    type: caffeine

    caffeine:

      spec: initialCapacity=100,maximumSize=500,expireAfterWrite=30s

#      Caffeine配置说明:

#      initialCapacity=[integer]: 初始的缓存空间大小

#      maximumSize=[long]: 缓存的最大条数

#      maximumWeight=[long]: 缓存的最大权重

#      expireAfterAccess=[duration]: 最后一次写入或访问后经过固定时间过期

#      expireAfterWrite=[duration]: 最后一次写入后经过固定时间过期

#      refreshAfterWrite=[duration]: 创建缓存或者最近一次更新缓存后经过固定的时间间隔,刷新缓存

#      weakKeys: 打开key的弱引用

#      weakValues:打开value的弱引用

#      softValues:打开value的软引用

#      recordStats:开发统计功能

#      连接redis缓存主机:这里是redis的配置

#  redis:

#    host: 192.168.0.100

logging:

  level:

    com.zy.mapper: debug

#    打印所有详情

debug: true
9.当使用redis进行缓存时,若需要更改默认的序列化规则,则可以添加:
# docker中国镜像加速http://www.docker-cn.com/registry-mirror
# docker安装redis
docker pull registry.docker-cn.com/library/redis
# docker 运行redis
docker run --name redis01 -p 6379:6379 -d --rm registry.docker-cn.com/library/redis
报错解决:
报错1: WARNING: IPv4 forwarding is disabled. Networking will not work.
解决办法:

# vi /etc/sysctl.conf

或者

# vi /usr/lib/sysctl.d/00-system.conf

添加如下代码:

    net.ipv4.ip_forward=1

重启network服务

# systemctl restart network

查看是否修改成功

# sysctl net.ipv4.ip_forward

如果返回为“net.ipv4.ip_forward = 1”则表示成功了
报错2: /usr/bin/docker-current: Error response from daemon: driver failed programming external connectivity on endpoint redis01 (19c4784b08511fa716aea4d0eb3da402e648f409afa3e532b178ff3c2d95a92d): exec: "docker-proxy": executable file not found in $PATH.
ln -s /usr/libexec/docker/docker-proxy-current /usr/bin/docker-proxy
报错3: /usr/bin/docker-current: Error response from daemon: shim error: docker-runc not installed on system.
ln -s /usr/libexec/docker/docker-runc-current /usr/libexec/docker/docker-runc
9.1MyRedisConfig
package com.zy.config;

import com.zy.model.Department;

import com.zy.model.Employee;

import org.springframework.context.annotation.Bean;

import org.springframework.context.annotation.Configuration;

import org.springframework.context.annotation.Primary;

import org.springframework.data.redis.cache.RedisCacheManager;

import org.springframework.data.redis.connection.RedisConnectionFactory;

import org.springframework.data.redis.core.RedisTemplate;

import org.springframework.data.redis.serializer.Jackson2JsonRedisSerializer;

import java.net.UnknownHostException;

@Configuration

public class MyRedisConfig {

    @Bean

    public RedisTemplate<Object, Employee> empRedisTemplate(

            RedisConnectionFactory redisConnectionFactory)

            throws UnknownHostException {

        RedisTemplate<Object, Employee> template = new RedisTemplate<Object, Employee>();

        template.setConnectionFactory(redisConnectionFactory);

        Jackson2JsonRedisSerializer<Employee> ser = new Jackson2JsonRedisSerializer<Employee>(Employee.class);

        template.setDefaultSerializer(ser);

        return template;

    }

    @Bean

    public RedisTemplate<Object, Department> deptRedisTemplate(

            RedisConnectionFactory redisConnectionFactory)

            throws UnknownHostException {

        RedisTemplate<Object, Department> template = new RedisTemplate<Object, Department>();

        template.setConnectionFactory(redisConnectionFactory);

        Jackson2JsonRedisSerializer<Department> ser = new Jackson2JsonRedisSerializer<Department>(Department.class);

        template.setDefaultSerializer(ser);

        return template;

    }

    //CacheManagerCustomizers可以来定制缓存的一些规则

    @Primary  //将某个缓存管理器作为默认的

    @Bean

    public RedisCacheManager employeeCacheManager(RedisTemplate<Object, Employee> empRedisTemplate){

        RedisCacheManager cacheManager = new RedisCacheManager(empRedisTemplate);

        //key多了一个前缀

        //使用前缀,默认会将CacheName作为key的前缀

        cacheManager.setUsePrefix(true);

        return cacheManager;

    }

    @Bean

    public RedisCacheManager deptCacheManager(RedisTemplate<Object, Department> deptRedisTemplate){

        RedisCacheManager cacheManager = new RedisCacheManager(deptRedisTemplate);

        //key多了一个前缀

        //使用前缀,默认会将CacheName作为key的前缀

        cacheManager.setUsePrefix(true);

        return cacheManager;

    }

}
9.2RedisDemo
package com.zy;

import com.zy.mapper.EmployeeMapper;
import com.zy.model.Employee;
import org.junit.Test;
import org.junit.runner.RunWith;
import org.springframework.beans.factory.annotation.Autowired;
import org.springframework.boot.test.context.SpringBootTest;
import org.springframework.data.redis.core.RedisOperations;
import org.springframework.data.redis.core.RedisTemplate;
import org.springframework.data.redis.core.StringRedisTemplate;
import org.springframework.test.context.junit4.SpringRunner;

import java.util.Set;

/**
 * Redis常见的五大数据类型
 *  String(字符串)、List(列表)、Set(集合)、Hash(散列)、ZSet(有序集合)
 *  stringRedisTemplate.opsForValue()[String(字符串)]
 *  stringRedisTemplate.opsForList()[List(列表)]
 *  stringRedisTemplate.opsForSet()[Set(集合)]
 *  stringRedisTemplate.opsForHash()[Hash(散列)]
 *  stringRedisTemplate.opsForZSet()[ZSet(有序集合)]
 */
@RunWith(SpringRunner.class)
@SpringBootTest
public class SpringBootCacheApplicationTests {

    @Autowired
    private EmployeeMapper employeeMapper;

    @Autowired
    private RedisTemplate redisTemplate;

    @Autowired
    private StringRedisTemplate stringRedisTemplate;

    // 自定义的redisTemplate;
    @Autowired
    private RedisTemplate<Object, Employee> empRedisTemplate;

    @Test
    public void contextLoads() {
        /*employeeMapper*/
        System.out.println(employeeMapper.getEmpById(2));
    }

    @Test
    public void fn01(){
        // 1.向redis中放置数据,并取出
        stringRedisTemplate.opsForValue().append("good", "morning");
        String good = stringRedisTemplate.opsForValue().get("good");
        System.out.println(good);
        // 2.放置其他类型的数据
        stringRedisTemplate.opsForList().leftPush("mylist", "zx");
        RedisOperations<String, String> operations = stringRedisTemplate.opsForList().getOperations();
        Set<String> mylist = operations.keys("mylist");
    }

    @Test
    // 测试保存对象
    public void fn02(){
        Employee employee = employeeMapper.getEmpById(1);
        /*
        官方自带的方式
        redisTemplate.opsForValue().set("emp01", employee);
        */
        //1、将数据以json的方式保存
        //(1)自己将对象转为json
        //(2)redisTemplate默认的序列化规则;改变默认的序列化规则;
        empRedisTemplate.opsForValue().set("emp01", employee);
    }

}
9.3分别在对应的service实现类上加上对应的cacheManager

springboot与缓存(redis,或者caffeine,guava)的更多相关文章
- SpringBoot 集成缓存性能之王 Caffeine
使用缓存的目的就是提高性能,今天码哥带大家实践运用 spring-boot-starter-cache 抽象的缓存组件去集成本地缓存性能之王 Caffeine. 大家需要注意的是:in-memeory ...
- 本地缓存google.guava及分布式缓存redis 随笔
近期项目用到了缓存,我选用的是主流的google.guava作本地缓存,redis作分布式 缓存,先说说我对本地缓存和分布式缓存的理解吧,可能不太成熟的地方,大家指出,一起 学习.本地缓存的特点是速度 ...
- 在springboot中使用redis缓存,将缓存序列化为json格式的数据
背景 在springboot中使用redis缓存结合spring缓存注解,当缓存成功后使用gui界面查看redis中的数据 原因 springboot缓存默认的序列化是jdk提供的 Serializa ...
- 【开源项目系列】如何基于 Spring Cache 实现多级缓存(同时整合本地缓存 Ehcache 和分布式缓存 Redis)
一.缓存 当系统的并发量上来了,如果我们频繁地去访问数据库,那么会使数据库的压力不断增大,在高峰时甚至可以出现数据库崩溃的现象.所以一般我们会使用缓存来解决这个数据库并发访问问题,用户访问进来,会先从 ...
- 本地缓存高性能之王Caffeine
前言 随着互联网的高速发展,市面上也出现了越来越多的网站和app.我们判断一个软件是否好用,用户体验就是一个重要的衡量标准.比如说我们经常用的微信,打开一个页面要十几秒,发个语音要几分钟对方才能收到. ...
- 本地缓存性能之王Caffeine
前言 随着互联网的高速发展,市面上也出现了越来越多的网站和app.我们判断一个软件是否好用,用户体验就是一个重要的衡量标准.比如说我们经常用的微信,打开一个页面要十几秒,发个语音要几分钟对方才能收到. ...
- 由浅入深学习springboot中使用redis
很多时候,我们会在springboot中配置redis,但是就那么几个配置就配好了,没办法知道为什么,这里就详细的讲解一下 这里假设已经成功创建了一个springboot项目. redis连接工厂类 ...
- 带着新人学springboot的应用03(springboot+mybatis+缓存 下)
springboot+mybatis+缓存,基本的用法想必是会了,现在说一说内部大概的原理. 稍微提一下mybatis,只要导入了mybatis的依赖,那么有个自动配置类就会生效,你可以去mybati ...
- 【SpringBoot】整合Redis实战
========================9.SpringBoot2.x整合Redis实战 ================================ 1.分布式缓存Redis介绍 简介: ...
随机推荐
- Visual Studio安装SVN插件
VS的SVN插件 材料 VS安装程序. VisualSVN安装程序,点击下载. VisualSVN-5.0.1 前期准备 在代码管理的服务器上安装SVN server,可参考svn安装部署以及服务器 ...
- 创建用户自定义函数 SQL
//创建用户自定义函数------标量函数 create function dbo.bmrs(@bmh as int) returns int as begin declare @bmrs int s ...
- Lepus监控之安装部署
PHP和Python都是跨平台的语言,所以理论上系统应该可以支持在不同的平台上运行.但是由于时间和精力以及资源有限,目前天兔系统只测试完善了Centos/RedHat系统的支持.我们目前提供的技术支持 ...
- 用GDB调试程序(七)
改变程序的执行——————— 一旦使用GDB挂上被调试程序,当程序运行起来后,你可以根据自己的调试思路来动态地在GDB中更改当前被调试程序的运行线路或是其变量的值,这个强大的功能能够让你更好的调试你的 ...
- eclipse常用快捷键整理
Ctrl + F11 按上次方式执行 Ctrl + Shift + / 加上注释/**/ Ctrl + Shift + \ 取消注释/**/ Ctrl + / 加上或消除行注释 Ctrl + D 删除 ...
- 用Jedis调用Lua脚本来完成redis的数据操作
1.先完成一个简单的set/get操作 package com.example.HnadleTaskQueue; import redis.clients.jedis.Jedis; import ja ...
- github 添加wiki
亲们支持我的新博客哦==>地址(以后更新会尽量在新博客更新,欢迎大家访问加入我的后宫w) ) 平时都是写readMe和docs的,一直眼瞎没有注意到有wiki这个功能 随便找一个写了wiki的看 ...
- Python入门教程丨1300多行代码,让你轻松掌握基础知识点
欢迎关注小编,除了分享技术文章之外还有很多福利,私信学习资料可以领取包括不限于Python实战演练.PDF电子文档.面试集锦.学习资料等. 前言 本文适合有经验的程序员尽快进入Python世界.特别地 ...
- how find out what is causing Visual Studio to think each project is out of date
You can find out what is causing Visual Studio to think each project is out of date, and then addres ...
- 分布式之redis复习精讲
看到一片不错的精简的redis文档,转载之,便于复习梳理之用 转自:https://www.cnblogs.com/rjzheng/p/9096228.html ------------------- ...