.Net Excel 导出图表Demo(柱状图,多标签页) .net工具类 分享一个简单的随机分红包的实现方式
1 使用插件名称Epplus,多个Sheet页数据应用,Demo为柱状图(Epplus支持多种图表)
2 Epplus 的安装和引用
新建一个工程文件或控制台应用程序 打开 Vs2017 Tools 的Nuget 包管理器,使用命令 install-package Epplus

3 开始在创建的工程中编写代码,实现功能

4 具体实现流程代码如下:

1 using OfficeOpenXml;
2 using OfficeOpenXml.Drawing;
3 using OfficeOpenXml.Drawing.Chart;
4 using OfficeOpenXml.Style;
5 using System;
6 using System.Collections.Generic;
7 using System.Drawing;
8 using System.IO;
9 using System.Linq;
10 using System.Text;
11 using System.Threading.Tasks;
12
13 namespace EpplusTest
14 {
15 public class Program
16 {
17 static void Main(string[] args)
18 {
19 FileInfo newFile = new FileInfo(@"d:\test.xlsx");
20 if (newFile.Exists)
21 {
22 newFile.Delete();
23 newFile = new FileInfo(@"d:\test.xlsx");
24 }
25
26 using (ExcelPackage package = new ExcelPackage(newFile))
27 {
28 #region 创建多个Sheet页
29 for (int i = 0; i < 5; i++)
30 {
31 package.Workbook.Worksheets.Add("Demo" + i);
32 }
33 ExcelWorksheet worksheet = package.Workbook.Worksheets["Demo0"];
34 ExcelWorksheet worksheet1 = package.Workbook.Worksheets["Demo1"];
35
36 #endregion
37
38 #region 1 模拟填充数据
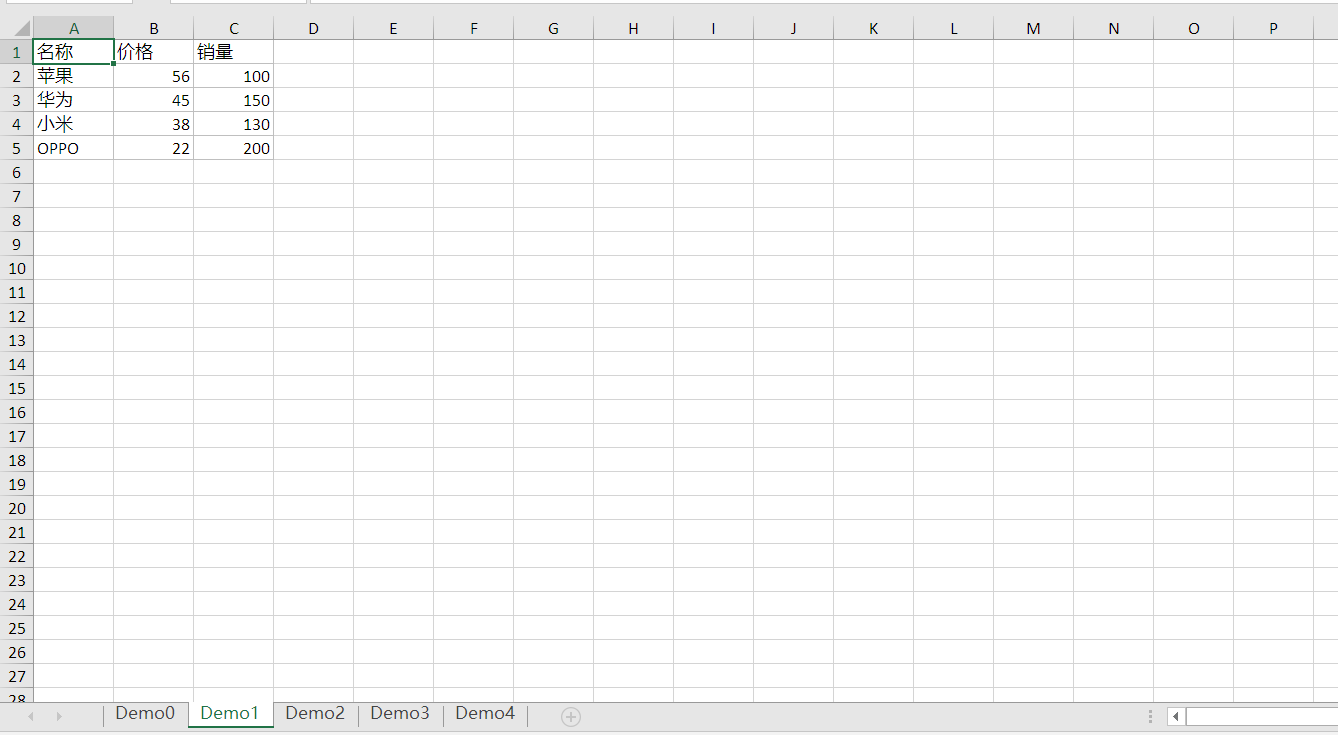
39 worksheet1.Cells[1, 1].Value = "名称";
40 worksheet1.Cells[1, 2].Value = "价格";
41 worksheet1.Cells[1, 3].Value = "销量";
42
43 worksheet1.Cells[2, 1].Value = "苹果";
44 worksheet1.Cells[2, 2].Value = 56;
45 worksheet1.Cells[2, 3].Value = 100;
46
47 worksheet1.Cells[3, 1].Value = "华为";
48 worksheet1.Cells[3, 2].Value = 45;
49 worksheet1.Cells[3, 3].Value = 150;
50
51 worksheet1.Cells[4, 1].Value = "小米";
52 worksheet1.Cells[4, 2].Value = 38;
53 worksheet1.Cells[4, 3].Value = 130;
54
55 worksheet1.Cells[5, 1].Value = "OPPO";
56 worksheet1.Cells[5, 2].Value = 22;
57 worksheet1.Cells[5, 3].Value = 200;
58 #endregion
59
60 #region 2 构造图表
61 worksheet.Cells.Style.WrapText = true;
62 worksheet.View.ShowGridLines = false;//去掉sheet的网格线
63 using (ExcelRange range = worksheet.Cells[1, 1, 5, 3])
64 {
65 range.Style.HorizontalAlignment = ExcelHorizontalAlignment.Center;
66 range.Style.VerticalAlignment = ExcelVerticalAlignment.Center;
67 }
68
69 using (ExcelRange range = worksheet.Cells[1, 1, 1, 3])
70 {
71 range.Style.Font.Bold = true;
72 range.Style.Font.Color.SetColor(Color.White);
73 range.Style.Font.Name = "微软雅黑";
74 range.Style.Font.Size = 12;
75 range.Style.Fill.PatternType = ExcelFillStyle.Solid;
76 range.Style.Fill.BackgroundColor.SetColor(Color.FromArgb(128, 128, 128));
77 }
78
79 worksheet1.Cells[1, 1].Style.Border.BorderAround(ExcelBorderStyle.Thin, Color.FromArgb(191, 191, 191));
80 worksheet1.Cells[1, 2].Style.Border.BorderAround(ExcelBorderStyle.Thin, Color.FromArgb(191, 191, 191));
81 worksheet1.Cells[1, 3].Style.Border.BorderAround(ExcelBorderStyle.Thin, Color.FromArgb(191, 191, 191));
82
83 worksheet1.Cells[2, 1].Style.Border.BorderAround(ExcelBorderStyle.Thin, Color.FromArgb(191, 191, 191));
84 worksheet1.Cells[2, 2].Style.Border.BorderAround(ExcelBorderStyle.Thin, Color.FromArgb(191, 191, 191));
85 worksheet1.Cells[2, 3].Style.Border.BorderAround(ExcelBorderStyle.Thin, Color.FromArgb(191, 191, 191));
86
87 worksheet1.Cells[3, 1].Style.Border.BorderAround(ExcelBorderStyle.Thin, Color.FromArgb(191, 191, 191));
88 worksheet1.Cells[3, 2].Style.Border.BorderAround(ExcelBorderStyle.Thin, Color.FromArgb(191, 191, 191));
89 worksheet1.Cells[3, 3].Style.Border.BorderAround(ExcelBorderStyle.Thin, Color.FromArgb(191, 191, 191));
90
91 worksheet1.Cells[4, 1].Style.Border.BorderAround(ExcelBorderStyle.Thin, Color.FromArgb(191, 191, 191));
92 worksheet1.Cells[4, 2].Style.Border.BorderAround(ExcelBorderStyle.Thin, Color.FromArgb(191, 191, 191));
93 worksheet1.Cells[4, 3].Style.Border.BorderAround(ExcelBorderStyle.Thin, Color.FromArgb(191, 191, 191));
94
95 worksheet1.Cells[5, 1].Style.Border.BorderAround(ExcelBorderStyle.Thin, Color.FromArgb(191, 191, 191));
96 worksheet1.Cells[5, 2].Style.Border.BorderAround(ExcelBorderStyle.Thin, Color.FromArgb(191, 191, 191));
97 worksheet1.Cells[5, 3].Style.Border.BorderAround(ExcelBorderStyle.Thin, Color.FromArgb(191, 191, 191));
98
99 ExcelChart chart = worksheet.Drawings.AddChart("chart", eChartType.ColumnClustered);
100 ExcelChartSerie serie = chart.Series.Add(worksheet1.Cells[2, 3, 5, 3], worksheet1.Cells[2, 1, 5, 1]);//引用worksheet1的数据填充图表的X轴和Y轴
101 serie.HeaderAddress = worksheet1.Cells[1, 3];
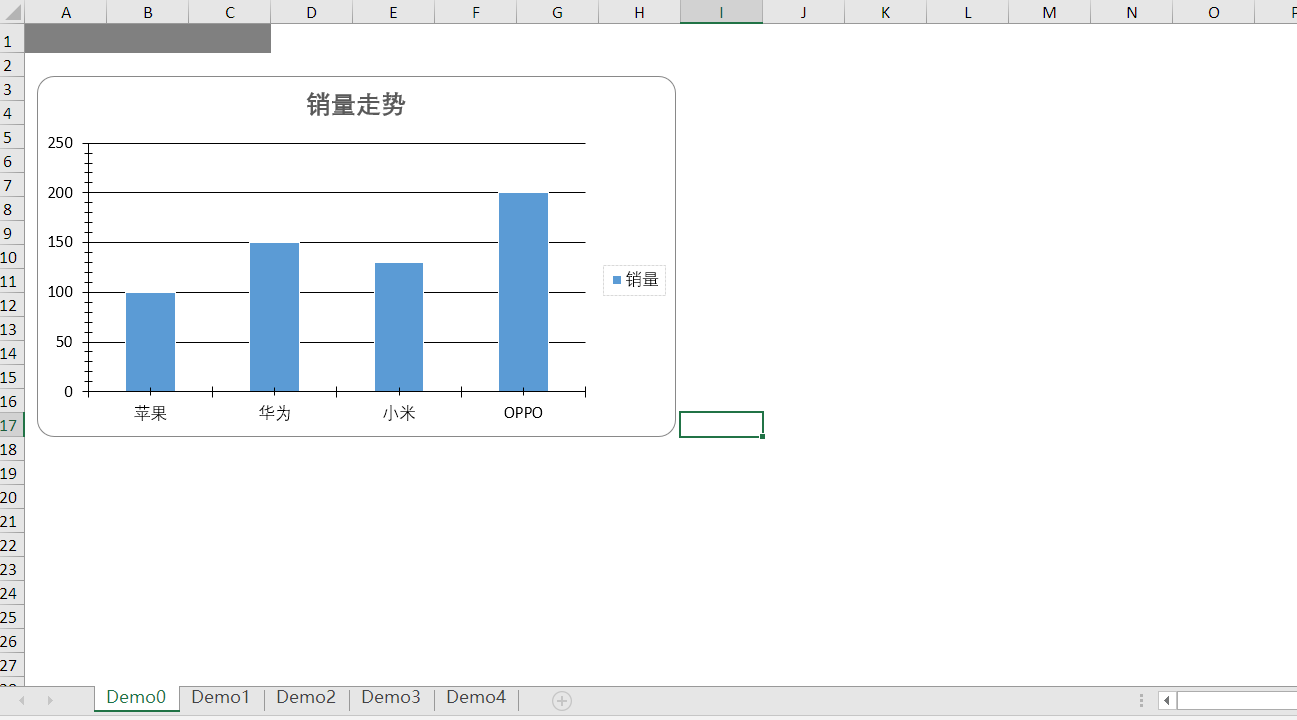
102 #endregion
103
104 #region 3 设置图表的样式
105 chart.SetPosition(40, 10);
106 chart.SetSize(500, 300);
107 chart.Title.Text = "销量走势";
108 chart.Title.Font.Color = Color.FromArgb(89, 89, 89);
109 chart.Title.Font.Size = 15;
110 chart.Title.Font.Bold = true;
111 chart.Style = eChartStyle.Style15;
112 chart.Legend.Border.LineStyle = eLineStyle.SystemDash;
113 chart.Legend.Border.Fill.Color = Color.FromArgb(217, 217, 217);
114 #endregion
115 package.Save();
116 }
117 }
118 }
119 }
5 效果展示:
6 Demo源码GitHub下载地址:https://github.com/HJ520134/.NetDemo.git
.net工具类 分享一个简单的随机分红包的实现方式
废话不多说,直接上代码
    /// <summary>
    /// 分红包
    /// </summary>
    public class RandomMoney
    {
        public RandomMoney(double totalMoney, int totalCount)
        {
            RemainMoney = totalMoney;
            RemainCount = totalCount;
        }
        /// <summary>
        /// 剩下的金额
        /// </summary>
        private double RemainMoney { get; set; }
        /// <summary>
        /// 剩下的次数
        /// </summary>
        private double RemainCount { get; set; }

        private Random r = new Random();
        /// <summary>
        /// 获取当次红包的金额
        /// </summary>
        /// <returns></returns>
        public double GetRandomMoney()
        {
            if (RemainCount < 1)
                throw new Exception("红包已经抢完了");

            if (RemainCount == 1)//最后一次
            {
                RemainCount--;
                return (double)Math.Round(RemainMoney * 100) / 100;
            }
            double min = 0.01;
            double max = RemainMoney / RemainCount * 2;
            double money = r.NextDouble() * max;//随机收取本次金额
            money = money <= min ? 0.01 : money;//判断最小值
            money = Math.Floor(money * 100) / 100;
            RemainCount--;//红包个数递减
            RemainMoney = RemainMoney - money;//计算剩余金额
            return money;//返回本次领取金额
        }
    }
下面写个demo测试一下。
class Program
{
static void Main(string[] args)
{
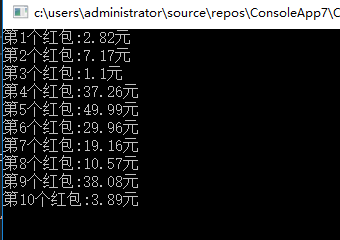
double totalMoney = 200;
int totalCount = 10;
RandomMoney random = new RandomMoney(totalMoney, totalCount);
for (int i = 0; i < totalCount; i++)
{
Console.WriteLine($"第{i + 1}个红包:{random.GetRandomMoney()}元");
}
Console.ReadKey();
}
}
上面的案例是一个200块钱的红包分10份,打印结果如下
这种分红包的方式有一个缺陷,就是 红包的金额 <= 剩下的金额 / 剩下的次数
大家有没有更好的分红包方式呢
.Net Excel 导出图表Demo(柱状图,多标签页) .net工具类 分享一个简单的随机分红包的实现方式的更多相关文章
- .Net Excel 导出图表Demo(柱状图,多标签页)
1 使用插件名称Epplus,多个Sheet页数据应用,Demo为柱状图(Epplus支持多种图表) 2 Epplus 的安装和引用 新建一个工程文件或控制台应用程序 打开 Vs2017 Tools ...
- selenium获取新页面标签页(只弹出一个新页面的切换)
selenium获取新页面标签页(只弹出一个新页面的切换) windows = driver.current_window_handle #定位当前页面句柄 all_handles = driver. ...
- 安卓Html标签,创意工具类
之前开发项目中,遇到了在Textview中使用Html标签的情形,由于在代码中使用字符串,Android Studio上一堆的黄色警告,而且对于过时的Html.fromHtml,拿它一点办法也没有. ...
- 节约内存,请使用标签页管理工具:onetab、better onetab
OneTab可以管理chrome和firefox的标签页,把暂时不用的标签页收藏起来,形成一个列表,当然,可以对列表进行分类管理,以方便后续打开查看. 这样就不用打开很多tab,占用大量内存. 由于O ...
- JavaWeb基础Day17 (JSP EL表达式 jstl标签库 beanutil工具类)
JSP jsp的实质就是指在html界面中嵌入Java代码 jsp脚本 <% Java代码 %> 相当于写在service方法中. <%=java 变量或者表达式 %> ...
- [转] C#操作EXCEL,生成图表的全面应用
gailzhao 原文 关于C#操作EXCEL,生成图表的全面应用 近来我在开发一个运用C#生成EXCEL文档的程序,其中要根据数据生成相应的图表,该图表对颜色和格式都有严格的要求,在百度和谷歌中搜索 ...
- 标签页QTabWidget
样式: import sys from PyQt5.QtGui import QIcon from PyQt5.QtWidgets import QApplication, QWidget, QTab ...
- 第13天 JSTL标签、MVC设计模式、BeanUtils工具类
第13天 JSTL标签.MVC设计模式.BeanUtils工具类 目录 1. JSTL的核心标签库使用必须会使用 1 1.1. c:if标签 1 1.2. c:choos ...
- selenium多个标签页的切换(弹出新页面的切换)
1_windows = driver.current_window_handle #定位当前页面句柄 all_handles = driver.window_handles #获取全部页面句柄 for ...
随机推荐
- ASP.NET获取文件的相关知识
string filePath = FileUpload1.PostedFile.FileName;//获取上传文件的路径 string fileName = filePath.Substring(f ...
- js中常用日期时间转换
常用日期时间处理插件:1. timeago.js处理几分钟之前 2. day.js 3. moment.js 注意: 1. 此处的标准时间格式为 2018-03-23 13:35:47 ...
- When to use static method in a java class
First , please understand its feature : * no need to instantiate a instance, i.e. simply you can jus ...
- HTML5 book响应式翻页效果
翻页,HTML5源码下载,HTML5响应式翻页效果,鼠标移到右上角会看到翻页效果,需要鼠标拖动后翻页,支持ie9+,html5浏览器. 单页和双页. 自动播放和暂停. 点击左右翻页. 鼠标点击左右页面 ...
- 经典笛卡尔积SQL
经典笛卡尔积SQL: 下面的SQL会造成笛卡尔积: insert into tydic.temp_0731 select a.user_id,a.province_code,b.attr_code f ...
- Windows Server 2008 Standard Enterprise Datacenter各个版本区别
-- Windows Server 2008 Standard 包含1个虚拟实例许可,5个客户端访问授权,售价999美元. -- Windows Server 2008 Enterprise 包含4个 ...
- 根据url下载图片和页面
需要将&tp=webp&wxfrom=5去掉,既可以在任何地方显示,也可以下载了 http://mmbiz.qpic.cn/mmbiz_jpg/bf8pC39RBhGFOH1ib9Ac ...
- How to create a Maven web app and deploy to Tomcat - fast
原文地址: http://www.blogjava.net/sealyu/archive/2010/01/08/308706.html Procedure Prerequisites and Assu ...
- Android如何检查对象的类型
The instanceof operator compares an object to a specified type. You can use it to test if an object ...
- 如何将Emmet(ZenCoding)安装到到Dreamweaver8?
用过其他版本的Dreamweaver,还是习惯了Dreamweaver8,占用少,插件也容易安装,下面讲的是ZenCoding插件的安装方法,当然现在这个已经叫Emmet了. 安装方法: a.下载dw ...