python自动化之使用allure生成测试报告
- 安装allure
- Windows用户:
- scoop install allure (需要先下载并安装Scoop,该方法无需配置环境变量)
- MAC用户:
- 通过Homebrew进行自动安装
- brew install allure (如果Homebrew版本比较旧,需要先升级Homebrew,否则安装的allure版本也很老,可能会与Python插件不兼容)
- 手动安装:
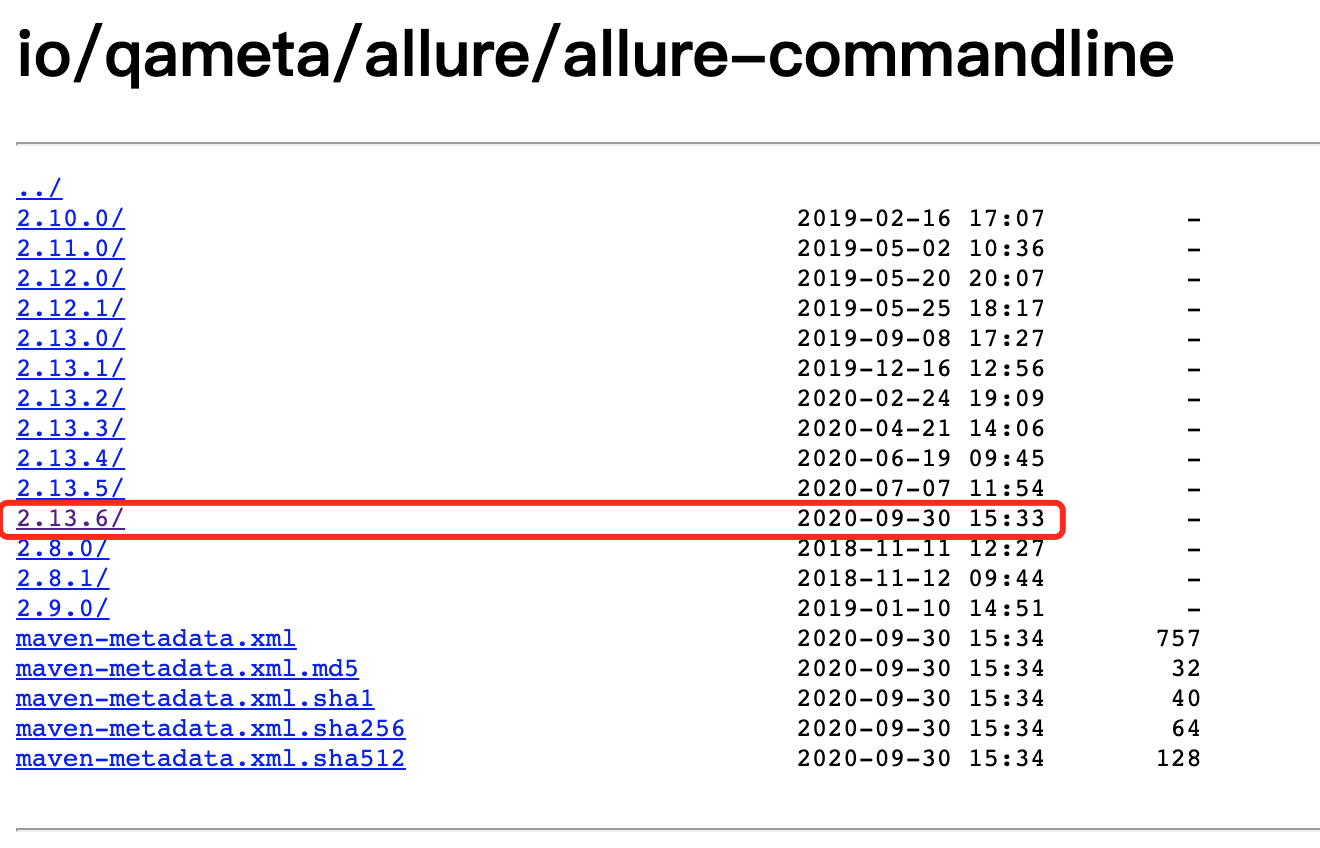
- 可以从官网 https://repo.maven.apache.org/maven2/io/qameta/allure/allure-commandline/ 手动下载
- 目前最新版本为2.13.6
下载后解压并配置环境变量
- 安装allure-pytest插件
- pip install allure-pytest
allure常用特性
希望在报告中看到测试功能,子功能或场景,测试步骤,包括测试附加信息可以使用@feature,@story,@step,@attach
步骤:
- import allure
- 功能上加@allure.feature("功能名称")
- 子功能上加@allure.story("子功能名称")
- 步骤上加@allure.step("步骤细节")
- @allure.attach("具体文本信息"),需要附加的信息,可以是数据,文本,图片,视频,网页
- 如果只测试部分功能运行的时候可以加限制过滤:
- pytest 文件名 --allure-features "需要运行的功能名称"
allure特性—feature/story
@allure.feature与@allure.store的关系
- feature相当于一个功能,一个大的模块,将case分类到某个feature中,报告中在behaviore中显示,相当于testsuite
- story相当于对应这个功能或者模块下的不同场景,分支功能,属于feature之下的结构,报告在features中显示,相当于testcase
- feature与story类似于父与子关系
step特性
- 测试过程中每个步骤,一般放在具体逻辑方法中
- 可以放在关键步骤中,在报告中显示
- 在app,web自动化测试中,建议每切换到一个新的页面当做一个step
- 用法:
- @allure.step() 只能以装饰器的形式放在类或方法上面
- with allure.step(): 可以放在测试用例方法里面,但测试步骤的代码需要被该语句包含
运行:
在测试执行期间收集结果
pytest [测试文件] -s -q --alluredir=./result --clean-alluredir
- --alluredir这个选项,用于指定存储测试结果的路径
- --clean-alluredir 这个选项用来清除之前生成的结果
查看测试报告:
方法一:测试完成后查看实际报告,在线看报告,会直接打开默认浏览器展示当前报告
allure serve ./result
方法二:从结果生成报告,这是一个启动tomcat的服务,需要两个步骤
生成报告:
allure generate ./result -o ./report --clean (注意:--clean用来清除之前已生成的报告)
打开报告:
allure open -h 127.0.0.1 -p 8883 ./report (该方法直接生成一个tomcat服务,可远程访问)
举个例子:
有如下代码文件


#!/usr/bin/python
# -*- coding: UTF-8 -*-
"""
@author:chenshifeng
@file:test_allure.py
@time:2020/10/10
"""
import allure
import pytest @allure.feature('登录模块')
class TestLogin():
@allure.story('登录成功')
@allure.title('登录成功标题')
def test_login_sucess(self):
with allure.step('步骤1:打开应用'):
print('应用已打开')
with allure.step('步骤2:进入登录页面'):
print('登录页面已打开')
with allure.step('步骤3:输入用户名和密码'):
print('用户名和密码输入成功')
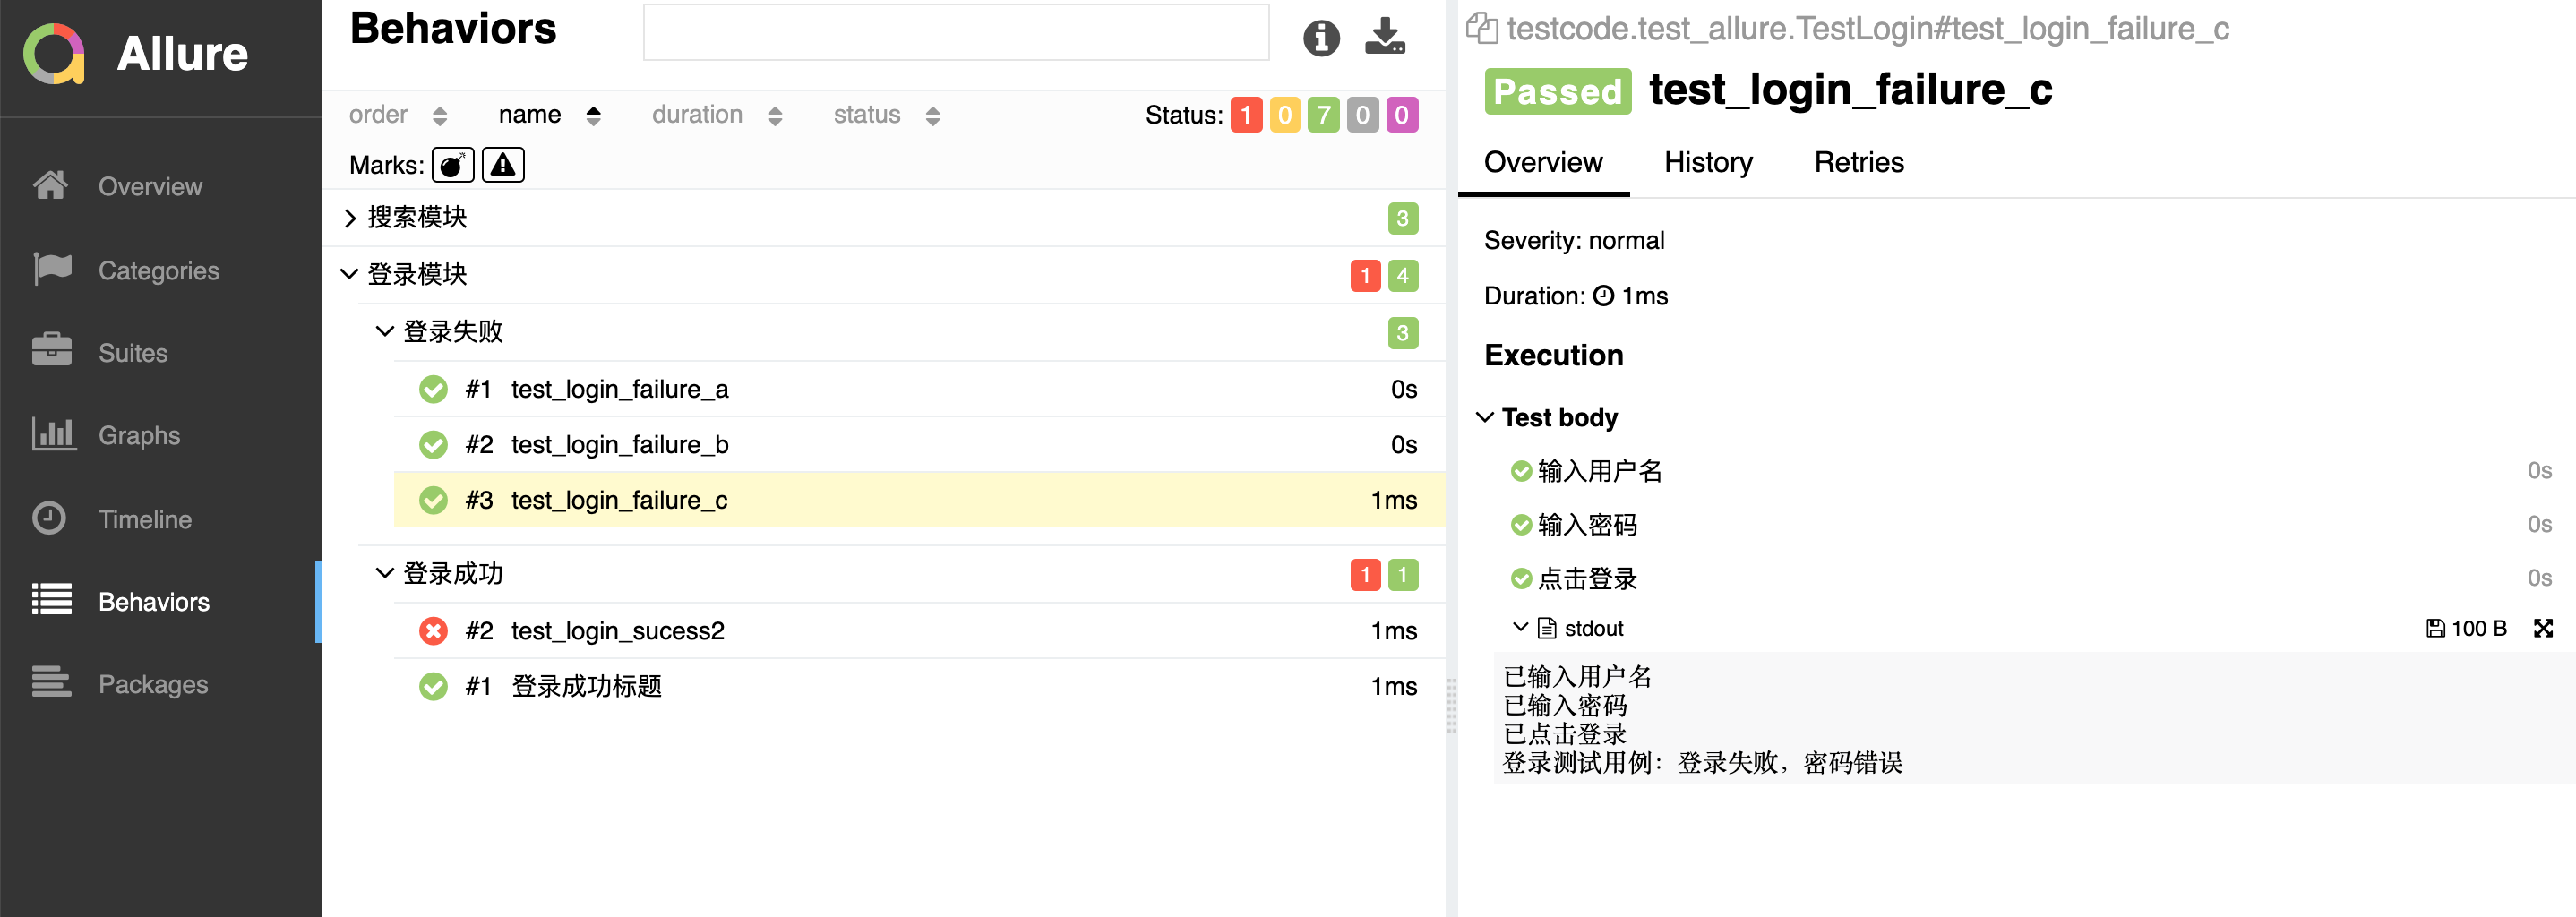
print('登录测试用例:登录成功') @allure.story('登录成功')
def test_login_sucess2(self):
assert '1' == 1
print('登录测试用例:登录成功') @allure.story('登录失败')
def test_login_failure_a(self):
print('登录测试用例:登录失败,用户名缺失') @allure.story('登录失败')
def test_login_failure_b(self):
print('登录测试用例:登录失败,密码缺失') @allure.story('登录失败')
def test_login_failure_c(self):
with allure.step('输入用户名'):
print('已输入用户名')
with allure.step('输入密码'):
print('已输入密码')
with allure.step('点击登录'):
print('已点击登录')
print('登录测试用例:登录失败,密码错误') @allure.feature('搜索模块')
class TestSearch():
def test_search1(self):
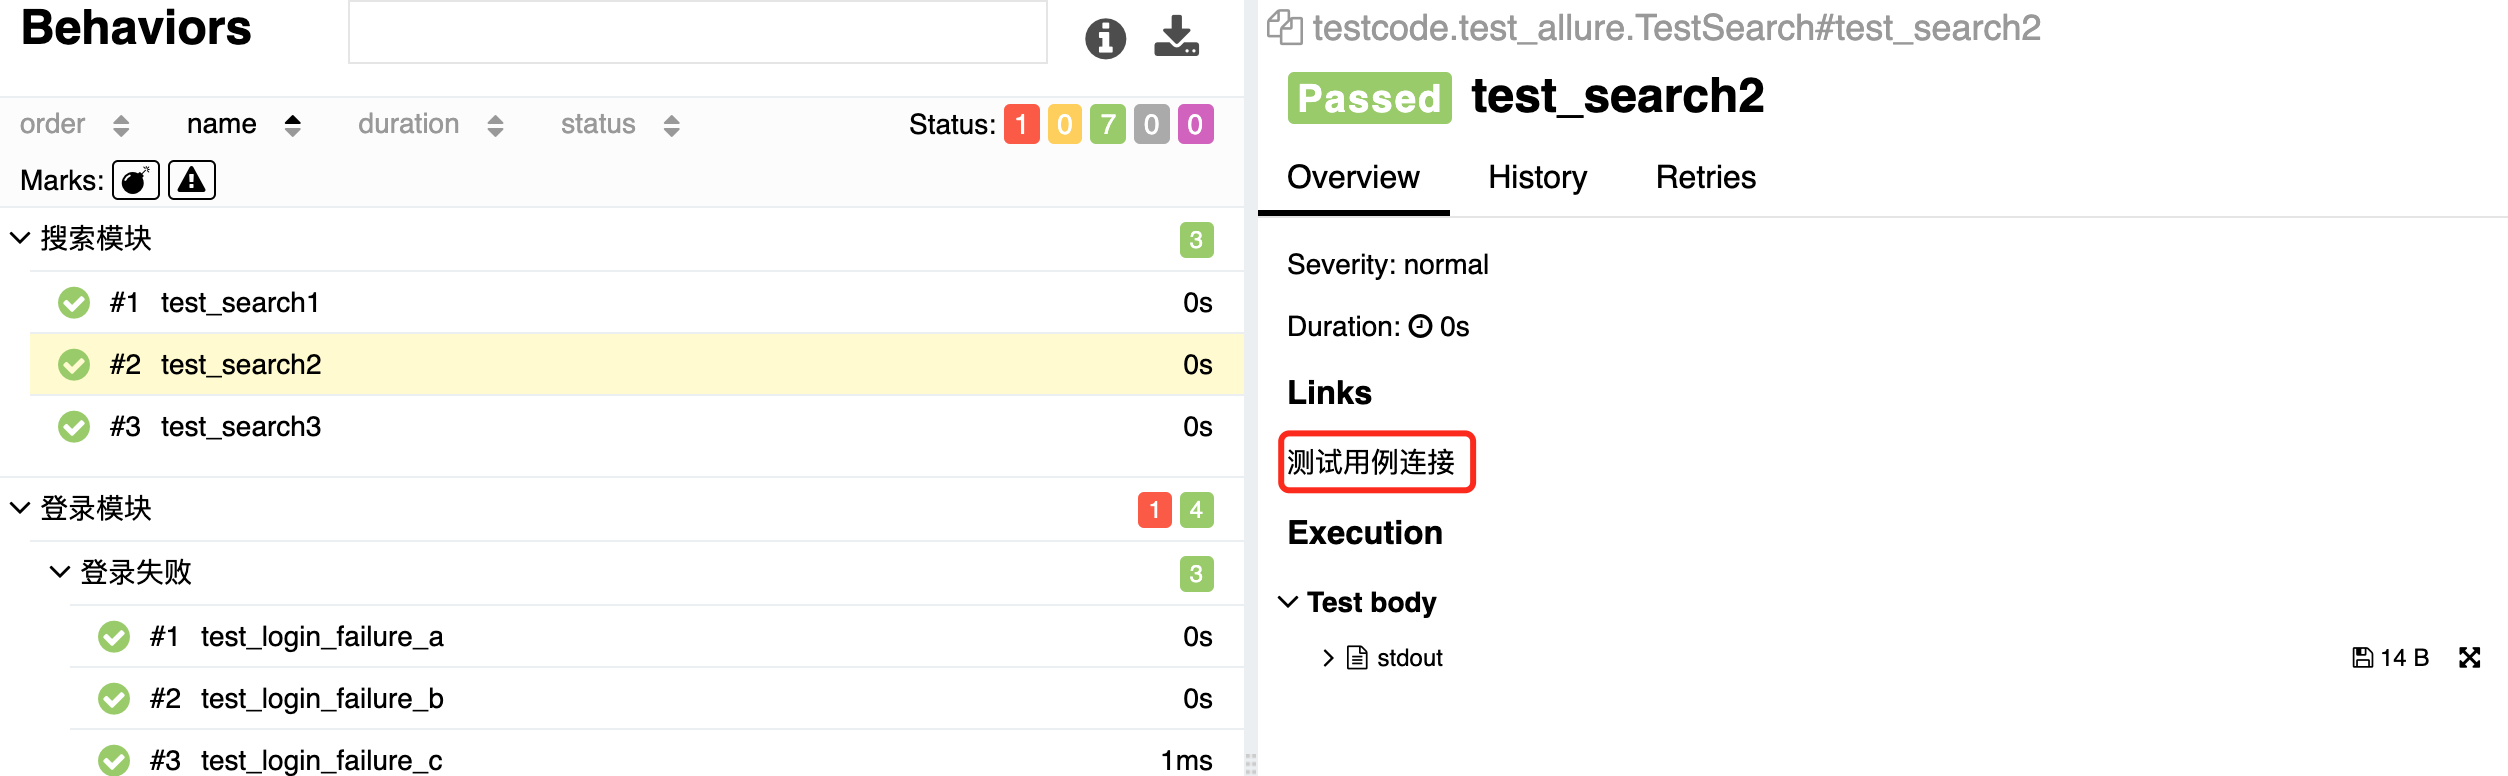
print('搜索用例1') TEST_CASE_LINK = 'https://mirrors.huaweicloud.com/'
@allure.testcase(TEST_CASE_LINK,'测试用例连接')
def test_search2(self):
print('搜索用例2')
@allure.step('搜索步骤')
def test_search3(self):
print('搜索用例3')
依次执行命令:
pytest test_allure.py --alluredir=./result --clean-alluredir
allure serve ./result
chenshifengdeMacBook-Pro:testcode chenshifeng$ pytest test_allure.py --alluredir=./result --clean-alluredir

============================================================================= test session starts =============================================================================

platform darwin -- Python 3.9.0, pytest-6.1.1, py-1.9.0, pluggy-0.13.1

rootdir: /Users/chenshifeng/MyCode/PythonCode/SFDSZL/test_pytest, configfile: pytest.ini

plugins: allure-pytest-2.8.18

collected 8 items

test_allure.py .F......                                                                                                                                                 [100%]

================================================================================== FAILURES ===================================================================================

________________________________________________________________________ TestLogin.test_login_sucess2 _________________________________________________________________________

self = <test_allure.TestLogin object at 0x7fef3d5cba90>

    @allure.story('登录成功')

    def test_login_sucess2(self):

>       assert '1' == 1

E       AssertionError: assert '1' == 1

test_allure.py:27: AssertionError

=========================================================================== short test summary info ===========================================================================

FAILED test_allure.py::TestLogin::test_login_sucess2 - AssertionError: assert '1' == 1

========================================================================= 1 failed, 7 passed in 0.07s =========================================================================

chenshifengdeMacBook-Pro:testcode chenshifeng$ allure serve ./result

Generating report to temp directory...

Report successfully generated to /var/folders/p0/3_7fwrvx6n3ftpfd4wjb01300000gn/T/7024790777193223986/allure-report

Starting web server...

2020-10-13 21:39:56.174:INFO::main: Logging initialized @6818ms to org.eclipse.jetty.util.log.StdErrLog

Server started at <http://192.168.12.100:58977/>. Press <Ctrl+C> to exit
生成的报告:
allure特性-testcase
关联测试用例(可以直接给测试用例的地址链接)
例子:
TEST_CASE_LINK = 'https://mirrors.huaweicloud.com/'

@allure.testcase(TEST_CASE_LINK,'测试用例连接')

def test_search(self):

    print('搜索用例')
按重要性级别进行一定范围测试
通常测试有P0、冒烟测试、验证上线测试。按重要性级别来执行的,比如上线要把主流程和重要模块都跑一遍,可通过以下方法解决
- 通过附加@pytest.mark标记
- 通过allure.feature,allure.story
- 也可以通过allure.severity来附加标记
- 级别:
- trivial:不重要,轻微缺陷(必输项无提示,或者提示不规范)
- minor 不太重要,次要缺陷(界面错误与UI需求不符)
- normal:正常问题,普通缺陷(数值计算错误)
- critical:严重,临界缺陷(功能点缺失)
- blocker:阻塞,中断缺陷(客户端程序无响应,无法执行下一步操作)
使用方法:
在方法、函数和类上面加 @allure.severity(allure.severity_level.TRIVIAL)
执行:
pytest -s -v 文件名 --allure-severities normal,critical
举例说明:
#!/usr/bin/python

# -*- coding: UTF-8 -*-

"""

@author:chenshifeng

@file:test_severity.py

@time:2020/10/11

"""

import allure

import pytest

# 不加任何标记,默认normal

def test_with_no_severity():

    pass

# trivial:不重要,轻微缺陷(必输项无提示,或者提示不规范)

@allure.severity(allure.severity_level.TRIVIAL)

def test_with_trivial_severity():

    pass

# minor 级别 不太重要,次要缺陷(界面错误与UI需求不符)

@allure.severity(allure.severity_level.MINOR)

def test_with_minor_severity():

    pass

# normal:正常问题,普通缺陷(数值计算错误)

@allure.severity(allure.severity_level.NORMAL)

def test_with_normal_severity():

    pass

# critical:严重,临界缺陷(功能点缺失)

@allure.severity(allure.severity_level.CRITICAL)

def test_with_ritical_severity():

    pass

# blocker:阻塞,中断缺陷(客户端程序无响应,无法执行下一步操作)

@allure.severity(allure.severity_level.BLOCKER)

def test_with_blocker_severity():

    pass

@allure.severity(allure.severity_level.NORMAL)

class TestClassWithNormalSeverity(object):

    # 不加任何标记,默认为同class级别

    def test_inside_with_normal_severity(self):

        pass

    # 重新设置了critical级别

    @allure.severity(allure.severity_level.CRITICAL)

    def test_inside_with_critical_severity(self):

        pass
执行:
chenshifengdeMacBook-Pro:testcode chenshifeng$ pytest test_severity.py --alluredir=./result --clean-alluredir -vs
============================================================================= test session starts =============================================================================
platform darwin -- Python 3.9.0, pytest-6.1.1, py-1.9.0, pluggy-0.13.1 -- /usr/local/bin/python3.9
cachedir: .pytest_cache
rootdir: /Users/chenshifeng/MyCode/PythonCode/SFDSZL/test_pytest, configfile: pytest.ini
plugins: allure-pytest-2.8.18
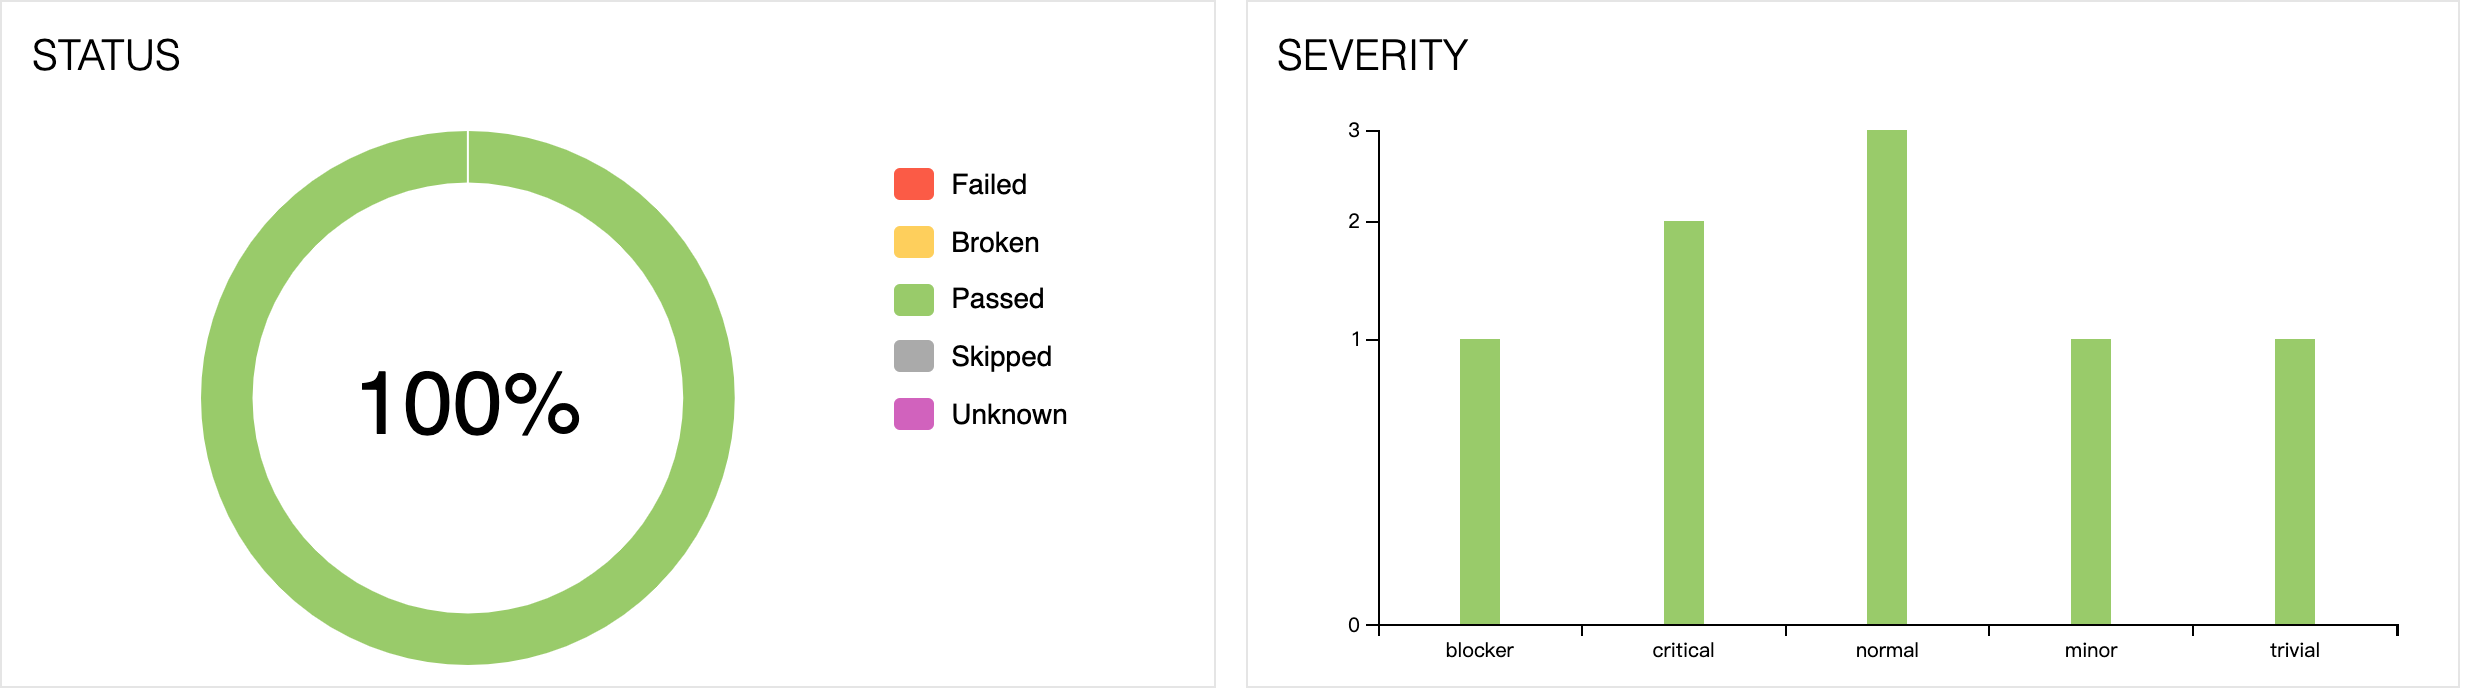
collected 8 items test_severity.py::test_with_no_severity PASSED
test_severity.py::test_with_trivial_severity PASSED
test_severity.py::test_with_minor_severity PASSED
test_severity.py::test_with_normal_severity PASSED
test_severity.py::test_with_ritical_severity PASSED
test_severity.py::test_with_blocker_severity PASSED
test_severity.py::TestClassWithNormalSeverity::test_inside_with_normal_severity PASSED
test_severity.py::TestClassWithNormalSeverity::test_inside_with_critical_severity PASSED ============================================================================== 8 passed in 0.03s ==============================================================================
chenshifengdeMacBook-Pro:testcode chenshifeng$ allure serve ./result
Generating report to temp directory...
Report successfully generated to /var/folders/p0/3_7fwrvx6n3ftpfd4wjb01300000gn/T/17788207943997663035/allure-report
Starting web server...
2020-10-13 22:27:49.842:INFO::main: Logging initialized @6620ms to org.eclipse.jetty.util.log.StdErrLog
Server started at <http://192.168.12.100:59696/>. Press <Ctrl+C> to exit
终极用例:
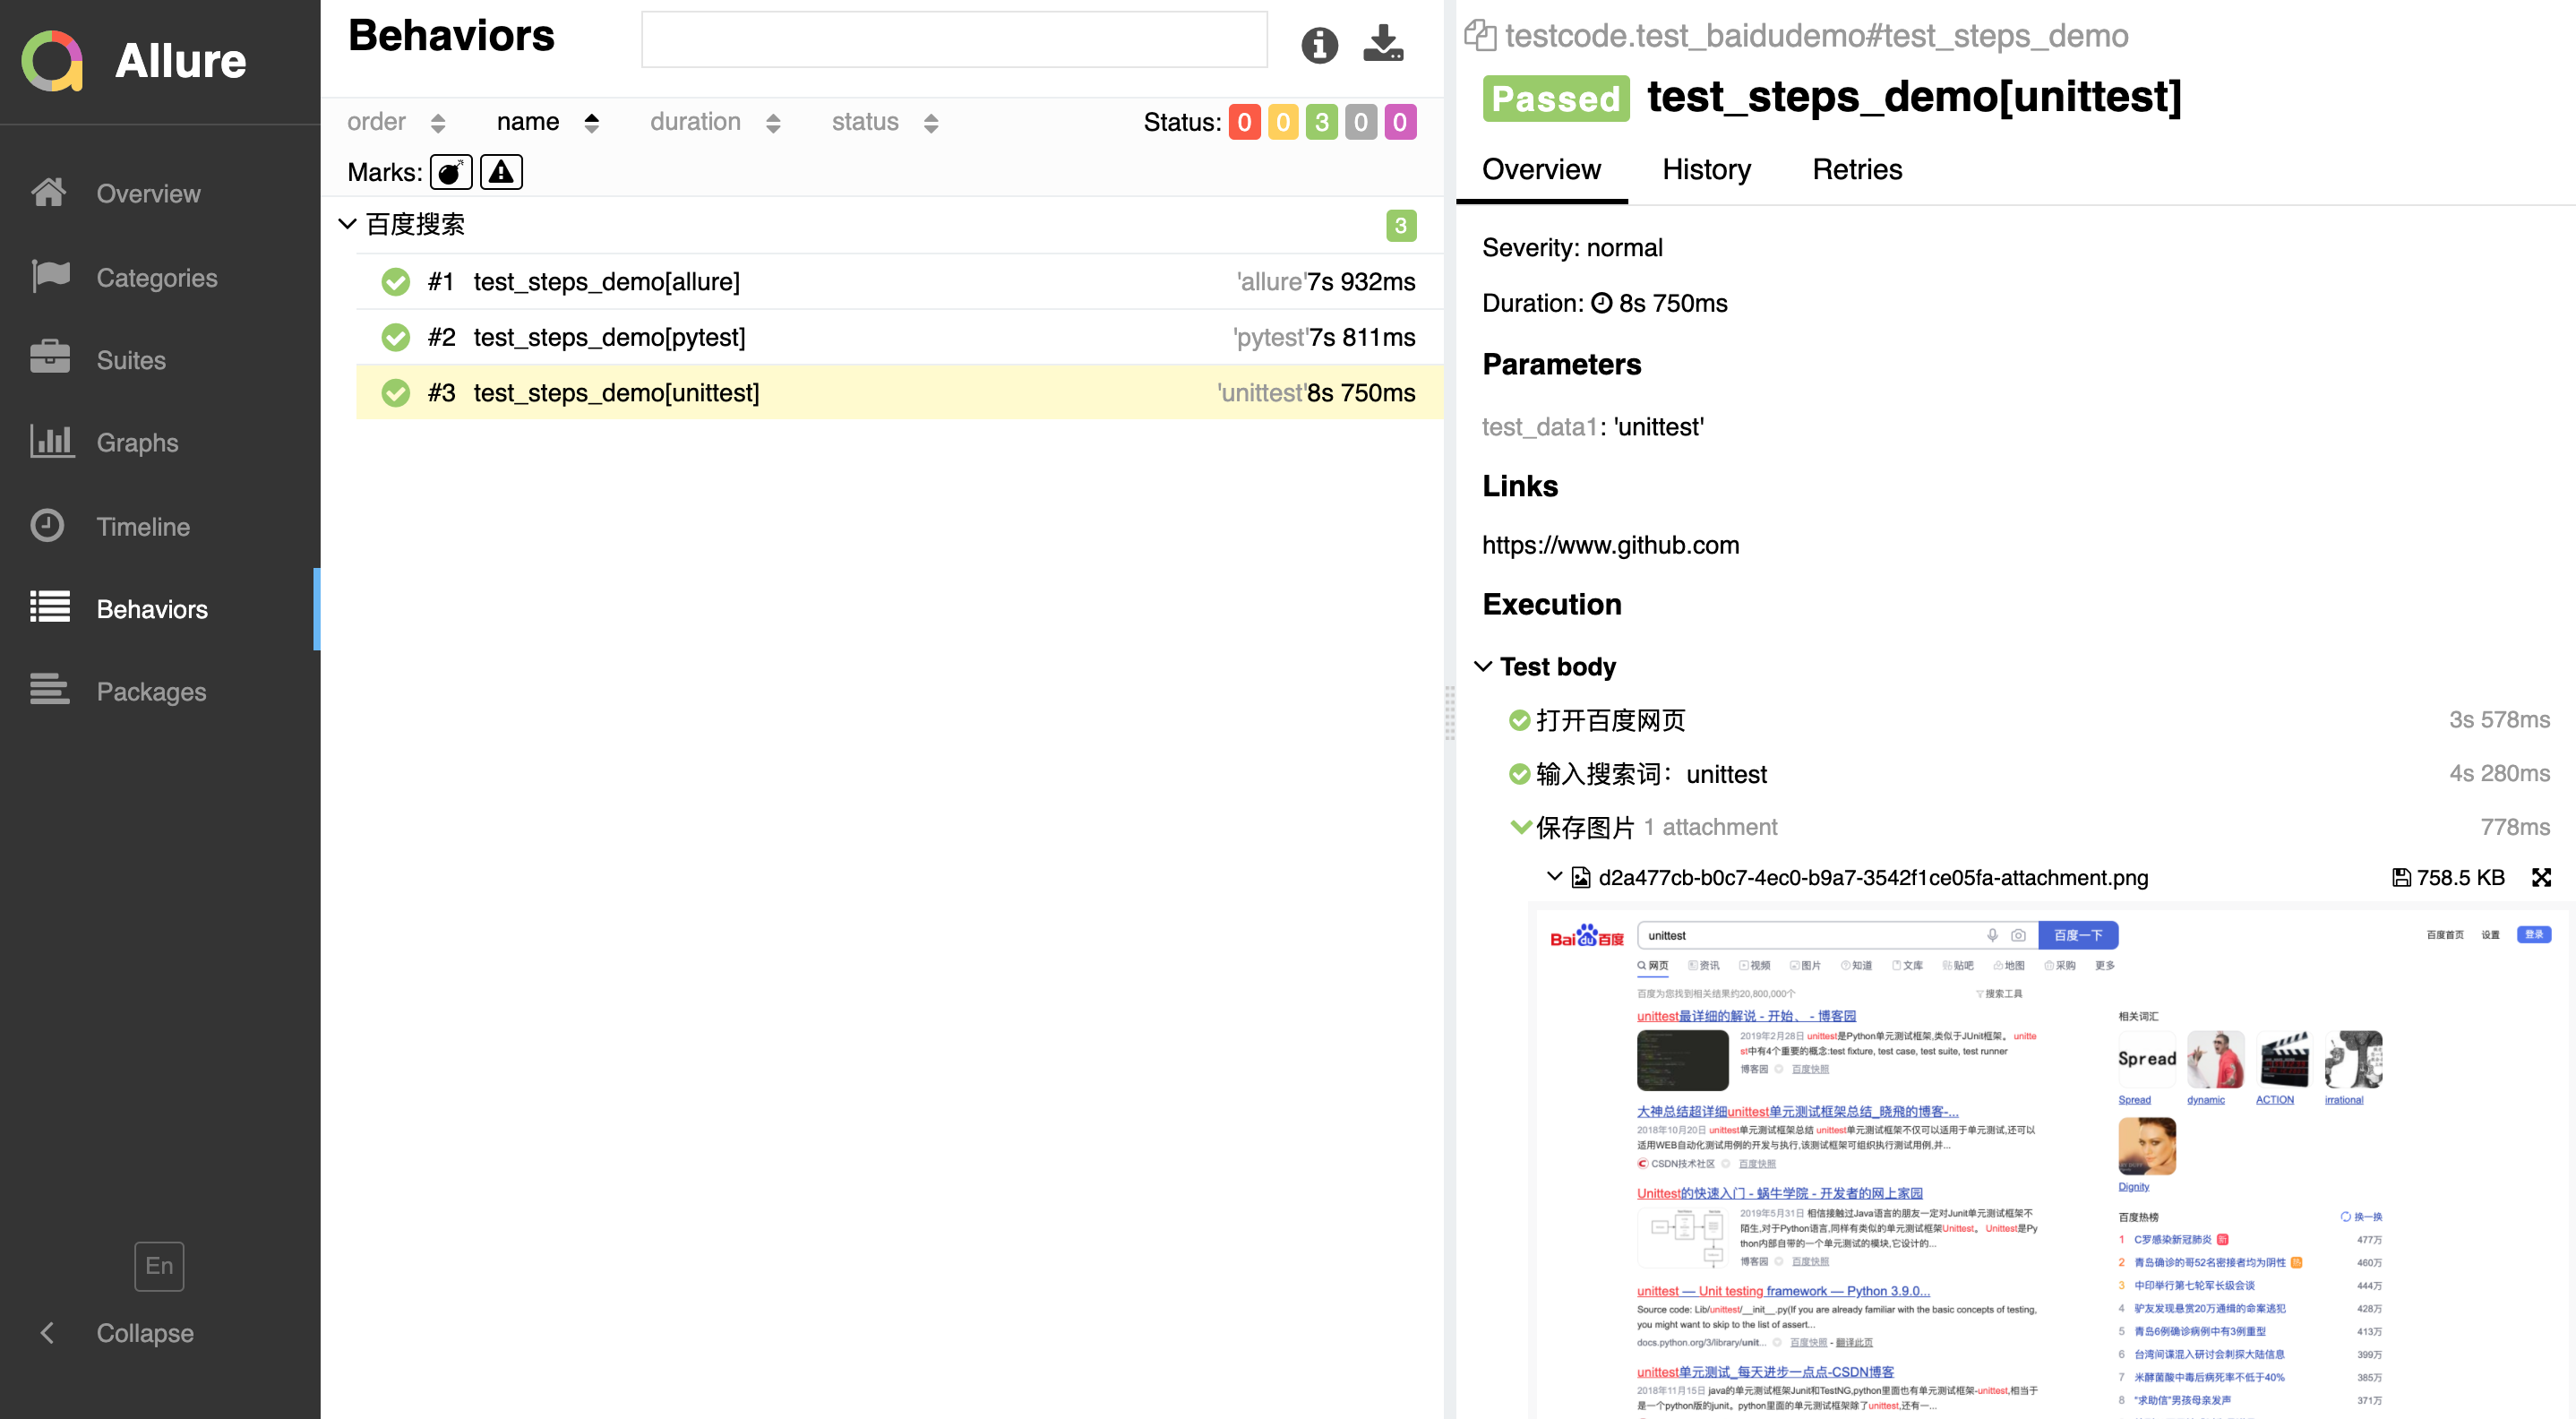
百度搜索:
#!/usr/bin/python

# -*- coding: UTF-8 -*-

"""

@author:chenshifeng

@file:test_baidudemo.py

@time:2020/10/13

"""

import pytest

import allure

from selenium import webdriver

import time

@allure.testcase('https://www.github.com')

@allure.feature("百度搜索")

@pytest.mark.parametrize('test_data1',['allure','pytest','unittest'])

def test_steps_demo(test_data1):

    with allure.step('打开百度网页'):

        driver=webdriver.Chrome()

        driver.get('http://www.baidu.com')

        driver.maximize_window()

    with allure.step(f'输入搜索词:{test_data1}'):

        driver.find_element_by_id('kw').send_keys(test_data1)

        time.sleep(2)

        driver.find_element_by_id('su').click()

        time.sleep(2)

    with allure.step('保存图片'):

        driver.save_screenshot('./screenshot/baidu.png')

        allure.attach.file('./screenshot/baidu.png',attachment_type=allure.attachment_type.PNG)

    with allure.step('关闭浏览器'):

        driver.quit()
执行:
chenshifengdeMacBook-Pro:testcode chenshifeng$ pytest test_baidudemo.py --alluredir=./result --clean-alluredir -vs

============================================================================= test session starts =============================================================================

platform darwin -- Python 3.9.0, pytest-6.1.1, py-1.9.0, pluggy-0.13.1 -- /usr/local/bin/python3.9

cachedir: .pytest_cache

rootdir: /Users/chenshifeng/MyCode/PythonCode/SFDSZL/test_pytest, configfile: pytest.ini

plugins: allure-pytest-2.8.18

collected 3 items

test_baidudemo.py::test_steps_demo[allure] PASSED

test_baidudemo.py::test_steps_demo[pytest] PASSED

test_baidudemo.py::test_steps_demo[unittest] PASSED

============================================================================= 3 passed in 24.65s ==============================================================================

chenshifengdeMacBook-Pro:testcode chenshifeng$ allure serve ./result

Generating report to temp directory...

Report successfully generated to /var/folders/p0/3_7fwrvx6n3ftpfd4wjb01300000gn/T/18005664130273264423/allure-report

Starting web server...

2020-10-13 23:03:39.221:INFO::main: Logging initialized @7360ms to org.eclipse.jetty.util.log.StdErrLog

Server started at <http://192.168.12.100:60775/>. Press <Ctrl+C> to exit
报告:
python自动化之使用allure生成测试报告的更多相关文章
- python + pytest + allure生成测试报告
pytest结合allure生成测试报告 环境搭建 要安装java环境,版本要是jdk1.8的,配置好java环境变量,不然输入allure命令会报错,JAVA_HOME环境,自行配置 安装allur ...
- Pytest测试框架(五):pytest + allure生成测试报告
Allure 是一款轻量级.支持多语言的开源自动化测试报告生成框架,由Java语言开发,可以集成到 Jenkins. pytest 测试框架支持Allure 报告生成. pytest也可以生成juni ...
- pytest(11)-Allure生成测试报告(一)
Allure是一个开源的测试报告生成框架,提供了测试报告定制化功能,相较于我们之前使用过pytest-html插件生成的html格式的测试报告,通过Allure生成的报告更加规范.清晰.美观. pyt ...
- Python&Selenium&pytest借助allure生成自动化测试报告
一.摘要 本篇博文将介绍Python和Selenium进行自动化测试时,如何借助allure生成自动化测试报告 二.环境配置 首先python环境中安装pytest和pytest_allure_ada ...
- pytest+jenkins+allure 生成测试报告发送邮件
前言第一部分:Pycharm for Gitee1. pycharm安装gitee插件2. gitee关联本地Git快速设置- 如果你知道该怎么操作,直接使用下面的地址简易的命令行入门教程:3. Gi ...
- Python单元测试框架unittest之生成测试报告(HTMLTestRunner)
前言 批量执行完用例后,生成的测试报告是文本形式的,不够直观,为了更好的展示测试报告,最好是生成HTML格式的. unittest里面是不能生成html格式报告的,需要导入一个第三方的模块:HTMLT ...
- Python单元测试框架之pytest -- 生成测试报告
继续pytest单元测试框架的学习,pytest可以生成多种类型的测试报告.这一节就来学习pytest如何生成测试报告. 创建test_calss.py 测试用例文件,这里以测试该文件为例. #cod ...
- Python 中 使用 HTMLTestRunner 模块生成测试报告
使用 HTMLTestRunner 模块可以生成测试报告,但是系统自带的报告不详细,不好看,所以找了一份详细的报告 HTMLTestRunner 模板,直接导入就能使用 两种方法生成HTML报告,都 ...
- python+selenium简易自动化框架,包含生成测试报告以及发送结果至Email
Selenium+python环境搭建见虫师的pdf文档,非常详尽 简易框架: 1.文件目录:
随机推荐
- post请求下载文件,获取Content-Disposition文件名
1.post下载文件代码,doload方法 import request from "../../src/utils/request"; import { API } from & ...
- 学习记录——使用PHP实现数据增删查改等基本功能(前后端分离)
萌新初次学习服务器端语言,分享学习经验 实现功能:1.显示数据表 2.对数据进行分页 3.对数据进行增删查改 由于本萌新采用前后端完全分离方案,所以数据传输用的ajax,为了提高代码的复用 ...
- Oracle误删数据的恢复
Oracle误删数据的恢复,分为两种方法:SCN和时间戳两种方法恢复. 一.通过SCN恢复删除且已提交的数据 1.获得当前数据库的SCN号 select current_scn from v$data ...
- 内存性能测试 Memtester+mbw
Memtester简单介绍 Memtester主要是捕获内存错误和一直处于很高或者很低的坏位, 其测试的主要项目有随机值,异或比较,减法,乘法,除法,与或运算等等. 通过给定测试内存的大小和次数, 可 ...
- 【Oracle】substr()函数详解
Oracle的substr函数简单用法 substr(字符串,截取开始位置,截取长度) //返回截取的字 substr('Hello World',0,1) //返回结果为 'H' *从字符串第一个 ...
- Cloudera Manager添加主机节点
为了监控方便,想把研发环境中的主机节点都纳入Cloudera Manager的管理中,这样在遇到问题时可方便的查看主机的硬件资源情况. 添加主机节点有多种方式,由于我是离线工作,所以选择rpm包的方式 ...
- 记忆中的像素块褪色了吗?用开源的体素编辑器重新做个 3D 的吧!
本文适合对图形表现有兴趣的美术或者开发人员 本文作者:HelloGitHub-Joey 早期的的显示设备像素颗粒较大,使得显示内容的颗粒感严重,像是由一堆方块组成的.比较好的例子就是 GBA 上的游戏 ...
- Pulsar vs Kafka,CTO 如何抉择?
本文作者为 jesse-anderson.内容由 StreamNative 翻译并整理. 以三个实际使用场景为例,从 CTO 的视角出发,在技术等方面对比 Kafka 和 Pulsar. 阅读本文需要 ...
- 用 UniRx 实现 Timeline 式的异步操作
没接触 UniRx 之前,我在 Unity 中通常用 Coroutine 或 Callback 来实现异步操作.根据我的任务,一般都是去实现游戏组件的演出,比如:敌方角色图形显示后,我方角色 UI ...
- wmic process进程管理
process 进程管理工具 示例:1.列举当前的进程.进程路径.命令行.进程ID.父进程ID.线程数,内存使用::wmic process get name,executablepath,co ...