
通过uwsgi+nginx启动flask的python web程序
通过uwsgi+nginx启动flask的python web程序
一般我们启动python web程序的时候都是通过python直接启动主文件,测试的时候是可以的,当访问量大的时候就会出问题
python manage.py
通过wsgi web服务器网关接口规范启动是一种比较好的方式:
web服务器 nginx + uwsgi + flask
原理就是nginx通过代理访问通过uwsgi启动监听在本机的flask程序
1.安装uwsgi模块
# pip install uwsgi
2.通过uwsgi启动flask项目
# 通过http方式启动(推荐)
# uwsgi --http 127.0.0.1:9999 -w user:app
# 通过socket方式启动
uwsgi -s 127.0.0.1:9999 -w user:app
# 主入口需要__init__.py文件
user/__init__.py
# cat /etc/nginx/conf.d/cmdb.conf

server {

    listen       8080;

    server_name  cmdb;

    location / {

        root   /home/python/Desktop/51reboot/cmdb/;

        index  index.html index.htm;

        proxy_pass http://127.0.0.1:9999;

    }

}
访问方式是:
http://192.168.3.91:8080 --> uwsgi:9999
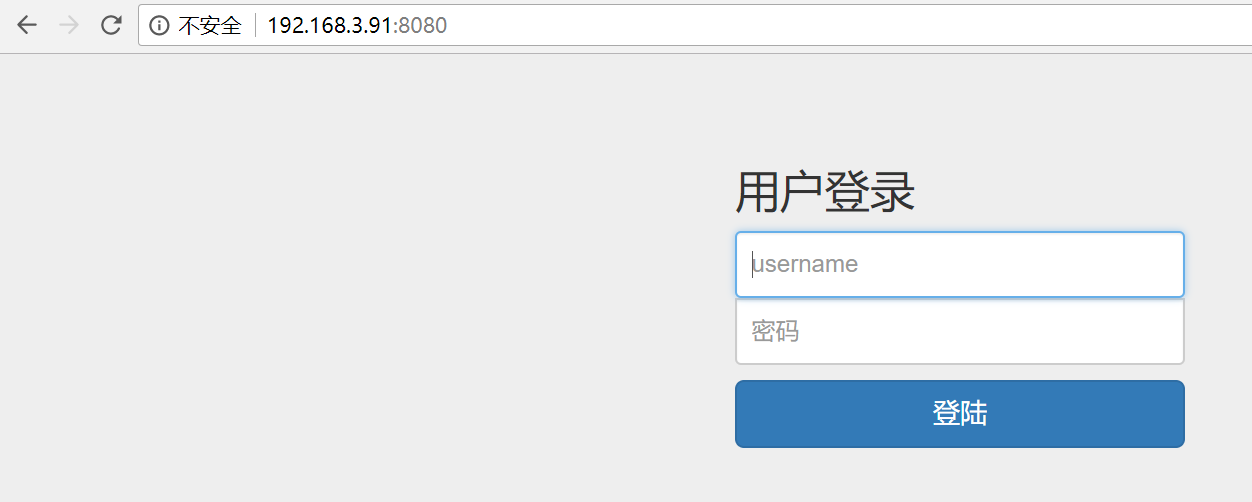
centos6.8_x64安装python3..2和wusgi

wget https://www.python.org/ftp/python/3.7.2/Python-3.7.2.tar.xz

tar -xf Python-3.7..tar.xz

cd Python-3.7.

mkdir /usr/local/python372

./configure --prefix=/usr/local/python372

make

make install

# 报错

    from _ctypes import Union, Structure, Array

ModuleNotFoundError: No module named '_ctypes'

# 解决办法:

yum install libffi-devel libffi

# 再次编译安装即可

./configure --with-ssl --prefix=/usr/local/python372

make

make install

echo $?

# 删除原来的软链,重新建立软连接

# rm -f /usr/local/python3

cd /usr/local

ln -s python372 python3

[root@srv3:/usr/local/python3]# python3 -V

Python 3.7.


# 安装ipython
# pip3 install ipython
# ln -s /usr/local/python372/bin/ipython3 /usr/sbin/ipython3

[root@srv3:/usr/local/uwsgi]# tar zxf uwsgi-latest.tar.gz

[root@srv3:/usr/local/uwsgi]# cd uwsgi-

uwsgi-2.0./        uwsgi-latest.tar.gz

[root@srv3:/usr/local/uwsgi]# cd uwsgi-2.0./

[root@srv3:/usr/local/uwsgi/uwsgi-2.0.]# python3 uwsgiconfig.py --build

################# uWSGI configuration #################

kernel = Linux

execinfo = False

ifaddrs = True

locking = pthread_mutex

event = epoll

timer = timerfd

filemonitor = inotify

pcre = True

routing = True

capabilities = False

yaml = embedded

json = False

ssl = True

xml = libxml2

debug = False

plugin_dir = .

zlib = True

ucontext = True

malloc = libc

############## end of uWSGI configuration #############

total build time:  seconds

*** uWSGI is ready, launch it with ./uwsgi ***

# 继续install

# python3 setup.py install

[root@srv3:~]# whereis uwsgi

uwsgi: /usr/bin/uwsgi /etc/uwsgi /usr/local/bin/uwsgi /usr/local/uwsgi /opt/uwsgi-2.0.13.1/bin/uwsgi

[root@srv3:~]# uwsgi --version

2.0.

# 编写测试文件

[root@srv3:/usr/local/uwsgi/uwsgi-2.0.]# cat testuwsgi.py

def application(env, start_response):

    start_response('200 OK', [('Content-Type','text/html')])

    return [b"Hello World"]

# 启动

[root@srv3:/usr/local/uwsgi/uwsgi-2.0.]# ./uwsgi --http : --wsgi-file testuwsgi.py

*** Starting uWSGI 2.0. (64bit) on [Wed Jun  :: ] ***

compiled with version: 4.4.  (Red Hat 4.4.-) on  June  ::

os: Linux-2.6.-642.6..el6.x86_64 # SMP Wed Oct  :: UTC

nodename: srv3.keepvid.com

machine: x86_64

clock source: unix

pcre jit disabled

detected number of CPU cores:

current working directory: /usr/local/uwsgi/uwsgi-2.0.

detected binary path: /usr/local/uwsgi/uwsgi-2.0./uwsgi

uWSGI running as root, you can use --uid/--gid/--chroot options

*** WARNING: you are running uWSGI as root !!! (use the --uid flag) ***

*** WARNING: you are running uWSGI without its master process manager ***

your processes number limit is

your memory page size is  bytes

detected max file descriptor number:

lock engine: pthread robust mutexes

thunder lock: disabled (you can enable it with --thunder-lock)

uWSGI http bound on : fd

spawned uWSGI http  (pid: )

uwsgi socket  bound to TCP address 127.0.0.1: (port auto-assigned) fd

uWSGI running as root, you can use --uid/--gid/--chroot options

*** WARNING: you are running uWSGI as root !!! (use the --uid flag) ***

Python version: 3.7. (default, Jun  , ::)  [GCC 4.4.  (Red Hat 4.4.-)]

*** Python threads support is disabled. You can enable it with --enable-threads ***

Python main interpreter initialized at 0x1e8dcd0

uWSGI running as root, you can use --uid/--gid/--chroot options

*** WARNING: you are running uWSGI as root !!! (use the --uid flag) ***

your server socket listen backlog is limited to  connections

your mercy for graceful operations on workers is  seconds

mapped  bytes ( KB) for  cores

*** Operational MODE: single process ***

WSGI app  (mountpoint='') ready in  seconds on interpreter 0x1e8dcd0 pid:  (default app)

uWSGI running as root, you can use --uid/--gid/--chroot options

*** WARNING: you are running uWSGI as root !!! (use the --uid flag) ***

*** uWSGI is running in multiple interpreter mode ***

spawned uWSGI worker  (and the only) (pid: , cores: )

[pid: |app: |req: /] 127.0.0.1 () { vars in  bytes} [Wed Jun  :: ] GET / => generated  bytes in  msecs (HTTP/1.1 )  headers in  bytes ( switches on core )

# 验证

[root@srv3:~]# curl http://127.0.0.1:9000/

Hello World
./configure --with-ssl --prefix=/usr/local/python372
编译的时候一定要添加 --with-ssl (cenos7.x上可以)否则pip3 install -r 安装模块时会报错:
pip is configured with locations that require TLS/SSL, however the ssl module in Python is not avail
centos6安装python3.7.x参考 https://www.cnblogs.com/reblue520/p/11103311.html
通过uwsgi+nginx启动flask的python web程序的更多相关文章
- Python Web 程序使用 uWSGI 部署
Python Web 程序使用 uWSGI 部署 WSGI是什么? WSGI,全称 Web Server Gateway Interface,或者 Python Web Server Gateway ...
- 将你的Python Web程序部署到Ubuntu服务器上
在本文记录了我在Ubuntu中部署Flask Web站点的过程, 其中包括用户创建.代码获取.Python3环境的安装.虚拟环境设置.uWSGI启动程序设置,并将Nginx作为前端反向代理.希望对各位 ...
- 使用Flask+uwsgi+Nginx部署Flask正式环境
环境准备 在开始正式讲解之前,我们将首先进行环境准备. Step1:安装Python,pip以及nginx: sudo apt-get update sudo apt-get install pyth ...
- C# 启动 Flask for Python
概览 最近有个需求是通过c#代码来启动 python 脚本.嘿~嘿!!! 突发奇想~~既然可以启动 python 脚本,那也能启动 flask,于是开始着手操作. 先看gif图 准备 因为使用的是.N ...
- 全面解读python web 程序的9种部署方式
转载自鲁塔弗的博客,本文地址http://lutaf.com/141.htm python有很多web 开发框架,代码写完了,部署上线是个大事,通常来说,web应用一般是三层结构 web serve ...
- python web 程序的9种部署方式
python有很多web 开发框架,代码写完了,部署上线是个大事,通常来说,web应用一般是三层结构 Web Server====> Application=====> DB S ...
- Pycharm+Django搭建第一个Python Web程序
1.安装django 无论是Python2.x还是Python3.x版本,都可以使用pip来安装Django.在控制台使用如下命令:pip install django 如: 2.检查dgango是否 ...
- centOS+uwsgi+nginx 部署flask项目,问题记录
用flask做的项目想要部署到centOS系统上,填了一些坑,终于成功了,记录一下遇到的问题: 此次部署主要是按照这个博客进行的 https://www.cnblogs.com/Ray-liang/p ...
- 基于Flask框架的Python web程序的开发实战 <一> 环境搭建
最近在看<Flask Web开发基于Python的Web应用开发实战>Miguel Grinberg著.安道译 这本书,一步步跟着学习Flask框架的应用,这里做一下笔记 电脑只安装一个P ...
随机推荐
- [C#]一个简易的、轻量级的方法并行执行线程辅助类
一个简易的.轻量级的方法并行执行线程辅助类 在实际应用中,经常要让多个方法并行执行以节约运行时间,线程就是必不可少的了,而多线程的管理经常又是一件头疼的事情,比如方法并行执行异步的返回问题,方法并 ...
- 学习总结:CSS(一)定义方式、选择器、选择器权重
一.CSS的定义方式 1.内部样式:<style></style> 2.行间样式:<div style="width:100px;height:100px;&q ...
- Docker 从入门到放弃(三)镜像使用
当运行容器时,使用的镜像如果在本地中不存在,docker 就会自动从 docker 镜像仓库中下载,默认是从 Docker Hub 公共镜像源下载. 下面我们来学习: 1.管理和使用本地 Docker ...
- MyEclipse做的项目改成eclipse能用的
转至:https://blog.csdn.net/cymlancy/article/details/67634531 首先导入一个从Myeclipse导出的项目 Myeclipse项目和Eclipse ...
- 属性集合java.util.Properties
属性集合java.util.Properties java.util.Properties集合 extends Hashtable<k, v> implements Map<k, v ...
- mkdocs 生成帮助文档
简介 MkDocs 可以同时编译多个markdown文件,形成书籍一样的文件.有多种主题供你选择,很适合项目使用. MkDocs 是快速,简单和华丽的静态网站生成器,可以构建项目文档.文档源文件在 M ...
- ASP.NET Web API 2 媒体类型格式化程序
Ø 简介 在之前的ASP.NET Web API 2 消息处理管道文章中有提到,在 Web API 的生命周期中,还包含比较中要的一部分,就是媒体类型格式化程序,该程序主要用于处理 Web API ...
- 15个新鲜出炉的 Photoshop 文本效果教程
文本效果可能是 Photoshop 图形设计中最常用和最通用的技术之一.最重要的是你可以使用任何效果,风格或纹理来产生有趣的排版,越多人尝试过它并制作了一些精彩的教程.所以这篇文章旨在为您提供全面的 ...
- C# WinForm多线程(一)----- Thread类库
Windows是一个多任务的系统,如果你使用的是windows 2000及其以上版本,你可以通过任务管理器查看当前系统运行的程序和进程.什么是进程呢?当一个程序开始运行时,它就是一个进程,进程所指包括 ...
- JS基础题
1.三目运算符(三元条件语句)的使用方法? 条件表达式?true表达式:false表达式 2.JS数据中哪些属于引用类型? 数组.对象 引用类型变量,变量名所储存的不是变量值,而是变量所在的地址. 3 ...