RNN探索(2)之手写数字识别
这篇博文不介绍基础的RNN理论知识,只是初步探索如何使用Tensorflow,之后会用笔推导RNN的公式和理论,现在时间紧迫所以先使用为主~~
import numpy as np
import tensorflow as tf
import matplotlib.pyplot as plt
import tensorflow.examples.tutorials.mnist.input_data as input_data
from tensorflow.contrib import rnn
mnist = input_data.read_data_sets("MNIST_data/",one_hot=True)
trainimgs, trainlabels, testimgs, testlabels \
= mnist.train.images, mnist.train.labels, mnist.test.images, mnist.test.labels
ntrain, ntest, dim, nclasses \
= trainimgs.shape[0], testimgs.shape[0], trainimgs.shape[1], trainlabels.shape[1]
print ("MNIST loaded")
dim_input = 28 #28*1
dim_hidden = 128 #28*128
dim_output = 10 #
nsteps = 28
weight = {
"hidden":tf.Variable(tf.random_normal([dim_input,dim_hidden])),
"out" :tf.Variable(tf.random_normal([dim_hidden,dim_output]))
}
biases = {
"hidden":tf.Variable(tf.random_normal([dim_hidden])),
"out" :tf.Variable(tf.random_normal([dim_output]))
}
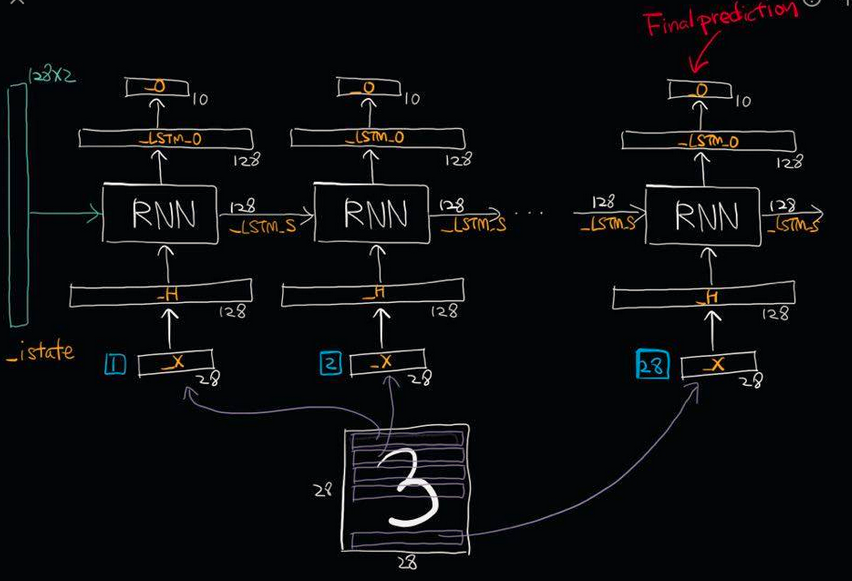
def RNN(_X,_W,_b,_nsteps,_name):
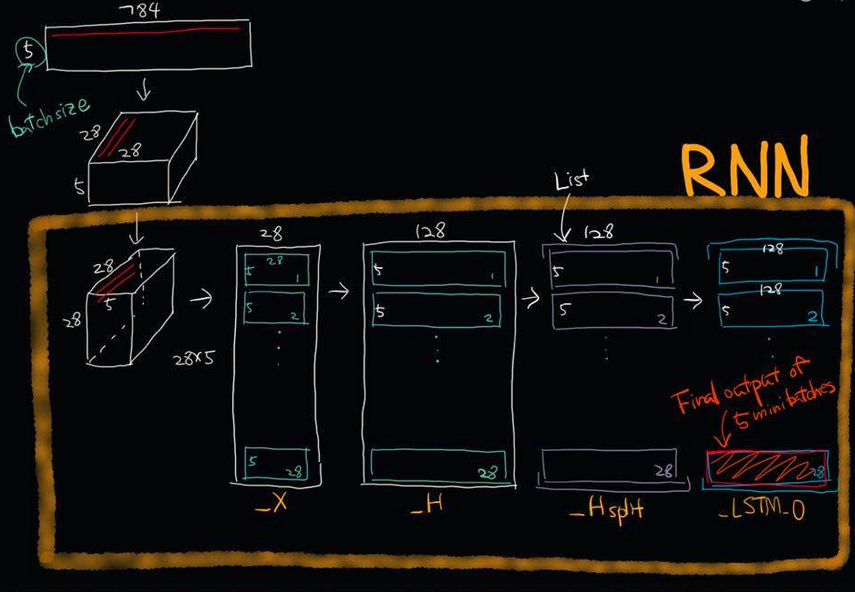
#[batchsize,nsteps*dim_input]-->>[batchsize,nsteps,dim_input]=[num,28,28]
_X = tf.reshape(_X,[-1,28,28])
#-->>[nsteps,batchsize,dim_input]==[28,num,28]
_X = tf.transpose(_X,[1,0,2])
#-->>[nsteps*batchsize,input]==[28*num,28]
_X = tf.reshape(_X,[-1,28])
#这里是共享权重,nsteps个weights全部一样的.
_H = tf.matmul(_X,_W['hidden']) + _b["hidden"]
_Hsplit = tf.split(_H,num_or_size_splits=nsteps,axis=0)
with tf.variable_scope(_name,reuse=tf.AUTO_REUSE):#重复使用参数节约空间,防止报错
#版本更新弃用
#scop.reuse_variables()
#设计一个计算单元
lstm_cell = rnn.BasicLSTMCell(128,forget_bias=1.0)
#版本更新已经弃用
#lstm_cell = rnn_cell.BasicLSTMCell(dim_hidden,forget_bias=1.0)
#利用RNN单元搭建网络,这里用的最简单的,其它以后在说
_LSTM_0,_LSTM_S = rnn.static_rnn(lstm_cell,_Hsplit,dtype=tf.float32)
#版本更新已经弃用
#_LSTM_O, _LSTM_S = tf.nn.rnn(lstm_cell, _Hsplit,dtype=tf.float32)
return tf.matmul(_LSTM_0[-1],_W["out"])+_b["out"]
#使用GPU按需增长模式
config = tf.ConfigProto(allow_soft_placement=True)
gpu_options = tf.GPUOptions(per_process_gpu_memory_fraction=0.3)
config.gpu_options.allow_growth = True
if __name__== "__main__":
learning_rate = 0.001
x = tf.placeholder(dtype=tf.float32,shape=[None,28*28],name="input_x")
y = tf.placeholder(dtype=tf.float32,shape=[None,10],name="output_y")
pred = RNN(x,weight,biases,nsteps,"basic")
cost = tf.reduce_mean(tf.nn.softmax_cross_entropy_with_logits(logits=pred, labels=y))
optm = tf.train.GradientDescentOptimizer(learning_rate).minimize(cost)
accr = tf.reduce_mean(tf.cast(tf.equal(tf.argmax(pred,1),tf.argmax(y,1)),dtype=tf.float32))
init = tf.global_variables_initializer()
print("RNN Already")
training_epochs = 50
batch_size = 16
display_step = 1
sess = tf.Session(config=config)
sess.run(init)
print("Start optimization")
for epoch in range(training_epochs):
avg_cost = 0.
total_batch = int(mnist.train.num_examples/batch_size)
#total_batch = 100
# Loop over all batches
for i in range(total_batch):
batch_xs, batch_ys = mnist.train.next_batch(batch_size)
# Fit training using batch data
feeds = {x: batch_xs, y: batch_ys}
sess.run(optm, feed_dict=feeds)
# Compute average loss
avg_cost += sess.run(cost, feed_dict=feeds) / total_batch
# Display logs per epoch step
if epoch % display_step == 0:
print("Epoch: %03d/%03d cost: %.9f" % (epoch, training_epochs, avg_cost))
feeds = {x: batch_xs, y: batch_ys}
train_acc = sess.run(accr, feed_dict=feeds)
print(" Training accuracy: %.3f" % (train_acc))
feeds = {x: testimgs, y: testlabels}
test_acc = sess.run(accr, feed_dict=feeds)
print(" Test accuracy: %.3f" % (test_acc))
print("Optimization Finished.")
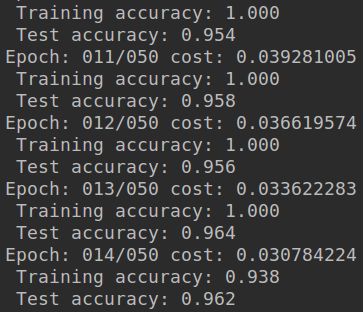
- 没有训练结束,使用的GTX1060训练了大概8分钟,如果训练结束感觉应该可以达到97%左右
- 因为是单层网络,深度不够,也没处理数据~~
- 这只是简单了解RNN工作流程,和如何用TF操作RNN
- 以后会慢慢补上~~
参考:
- 唐迪宇课程,因为版本问题会出现很多代码更新
- 其它中间忘记记录了,如有侵权请联系博主,抱歉~
RNN探索(2)之手写数字识别的更多相关文章
- 5 TensorFlow入门笔记之RNN实现手写数字识别
------------------------------------ 写在开头:此文参照莫烦python教程(墙裂推荐!!!) ---------------------------------- ...
- keras和tensorflow搭建DNN、CNN、RNN手写数字识别
MNIST手写数字集 MNIST是一个由美国由美国邮政系统开发的手写数字识别数据集.手写内容是0~9,一共有60000个图片样本,我们可以到MNIST官网免费下载,总共4个.gz后缀的压缩文件,该文件 ...
- TensorFlow使用RNN实现手写数字识别
学习,笔记,有时间会加注释以及函数之间的逻辑关系. # https://www.cnblogs.com/felixwang2/p/9190664.html # https://www.cnblogs. ...
- C#中调用Matlab人工神经网络算法实现手写数字识别
手写数字识别实现 设计技术参数:通过由数字构成的图像,自动实现几个不同数字的识别,设计识别方法,有较高的识别率 关键字:二值化 投影 矩阵 目标定位 Matlab 手写数字图像识别简介: 手写 ...
- Android+TensorFlow+CNN+MNIST 手写数字识别实现
Android+TensorFlow+CNN+MNIST 手写数字识别实现 SkySeraph 2018 Email:skyseraph00#163.com 更多精彩请直接访问SkySeraph个人站 ...
- 学习笔记CB009:人工神经网络模型、手写数字识别、多层卷积网络、词向量、word2vec
人工神经网络,借鉴生物神经网络工作原理数学模型. 由n个输入特征得出与输入特征几乎相同的n个结果,训练隐藏层得到意想不到信息.信息检索领域,模型训练合理排序模型,输入特征,文档质量.文档点击历史.文档 ...
- Tensorflow实战 手写数字识别(Tensorboard可视化)
一.前言 为了更好的理解Neural Network,本文使用Tensorflow实现一个最简单的神经网络,然后使用MNIST数据集进行测试.同时使用Tensorboard对训练过程进行可视化,算是打 ...
- kaggle 实战 (1): PCA + KNN 手写数字识别
文章目录 加载package read data PCA 降维探索 选择50维度, 拆分数据为训练集,测试机 KNN PCA降维和K值筛选 分析k & 维度 vs 精度 预测 生成提交文件 本 ...
- 用tensorflow搭建RNN(LSTM)进行MNIST 手写数字辨识
用tensorflow搭建RNN(LSTM)进行MNIST 手写数字辨识 循环神经网络RNN相比传统的神经网络在处理序列化数据时更有优势,因为RNN能够将加入上(下)文信息进行考虑.一个简单的RNN如 ...
随机推荐
- Python:从入门到实践--第四章--列表操作--练习
#1.想出至少三种你喜欢的水果,将其名称存储在一个列表中,再使用for循环将每种水果的名称都打印出来. #要求:(1)修改这个for循环,使其打印包含名称的句子,而不是仅仅是水果的名称.对于每种水果, ...
- Python 斗地主发牌
#coding = utf-8 import random def Creat_Card(): card_type = ['♥','♠','♦','♣'] card_values= ['A', '2' ...
- 自己用的Xshell配色方案
[comfort]text=dce2e2cyan(bold)=2ad1b8text(bold)=dce2e2magenta=dd3682green=55bb55green(bold)=55bb55ba ...
- [IOS][已越狱]配合网易云音乐,使用Bridge快速免iTunes导入音乐到“音乐”
前置:已越狱IOS设备 工具表: Bridge{bigboss源,可以使用cydown以非官方服务器下载安装} 网易云音乐{Appstore} Filza{很多源都有} 网易云试听缓存路径 ...
- php闭包的使用实例
$childrenNodes = array_filter($list, function($item) use($parentId){ return $item->node_pid == $p ...
- C++ 状态机接口
最近的状态极差,甚至代码也写不下去了.给自己手臂上的两刀没有任何的作用,看来早已经是麻痹了. 一直想弄一个勉强能用的状态机,用于在各种涉及到状态转换的时候用到,然而脑子并不是太清醒. 先放在这里一个接 ...
- SQL语句整理
- .Net Core 没有 WebForm 是 历史 的 退步, MVC 是一个 糟糕 的 设计
WebForm 自面世以来, 广受广大开发人员的欢迎 . 当然, WebForm 有一些 著名的 弊病, 比如 笨重的 ViewState . 不过 我们 可以 用 一些 更加 先进 和 灵巧 的 ...
- my sql无法删除数据库
mysql有时候会无法删除数据库,可以通过 1.select @@datadir 查询到文件目录 'C:\\ProgramData\\MySQL\\MySQL Server 5.7\\Data\\' ...
- CAST()函数可以进行数据类型的转换。
CAST()函数可以进行数据类型的转换. CAST()函数的参数有两部分,源值和目标数据类型,中间用AS关键字分隔. 以下例子均通过本人测试. 一.转换列或值 语法:cast( 列名/值 as 数据类 ...