第二十二篇-Guideline基准线
效果图:
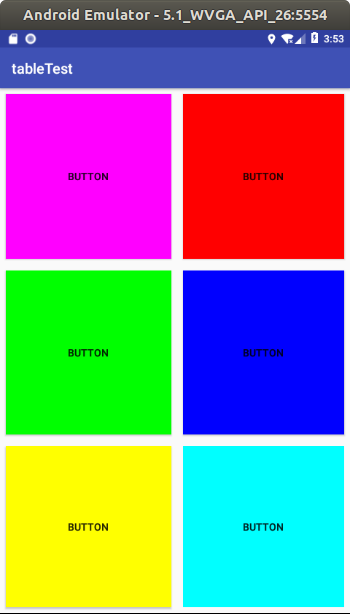
前5个是button填充的,最后一个是线性布局下放置一个button在填充。
layout.xml
<?xml version="1.0" encoding="utf-8"?>

<android.support.constraint.ConstraintLayout xmlns:android="http://schemas.android.com/apk/res/android"

    xmlns:app="http://schemas.android.com/apk/res-auto"

    xmlns:tools="http://schemas.android.com/tools"

    android:id="@+id/linearLayout"

    android:layout_width="match_parent"

    android:layout_height="match_parent">

    <android.support.constraint.Guideline

        android:id="@+id/guideline2"

        android:layout_width="wrap_content"

        android:layout_height="wrap_content"

        android:orientation="horizontal"

        app:layout_constraintGuide_percent="0.3365949" />

    <android.support.constraint.Guideline

        android:id="@+id/guideline3"

        android:layout_width="wrap_content"

        android:layout_height="wrap_content"

        android:orientation="horizontal"

        app:layout_constraintGuide_percent="0.6712329" />

    <android.support.constraint.Guideline

        android:id="@+id/guideline4"

        android:layout_width="wrap_content"

        android:layout_height="wrap_content"

        android:orientation="vertical"

        app:layout_constraintGuide_percent="0.5078125" />

    <Button

        android:background="#ff00ff"

        android:id="@+id/button"

        android:layout_width="0dp"

        android:layout_height="0dp"

        android:layout_marginBottom="8dp"

        android:layout_marginEnd="8dp"

        android:layout_marginStart="8dp"

        android:layout_marginTop="8dp"

        android:text="Button"

        app:layout_constraintBottom_toTopOf="@+id/guideline2"

        app:layout_constraintEnd_toStartOf="@+id/guideline4"

        app:layout_constraintStart_toStartOf="parent"

        app:layout_constraintTop_toTopOf="parent" />

    <Button

        android:background="#ff0000"

        android:id="@+id/button2"

        android:layout_width="0dp"

        android:layout_height="0dp"

        android:layout_marginBottom="8dp"

        android:layout_marginEnd="8dp"

        android:layout_marginStart="8dp"

        android:layout_marginTop="8dp"

        android:text="Button"

        app:layout_constraintBottom_toTopOf="@+id/guideline2"

        app:layout_constraintEnd_toEndOf="parent"

        app:layout_constraintStart_toStartOf="@+id/guideline4"

        app:layout_constraintTop_toTopOf="parent" />

    <Button

        android:background="#00ff00"

        android:id="@+id/button3"

        android:layout_width="0dp"

        android:layout_height="0dp"

        android:layout_marginBottom="8dp"

        android:layout_marginEnd="8dp"

        android:layout_marginStart="8dp"

        android:layout_marginTop="8dp"

        android:text="Button"

        app:layout_constraintBottom_toTopOf="@+id/guideline3"

        app:layout_constraintEnd_toStartOf="@+id/guideline4"

        app:layout_constraintStart_toStartOf="parent"

        app:layout_constraintTop_toTopOf="@+id/guideline2" />

    <Button

        android:background="#0000ff"

        android:id="@+id/button4"

        android:layout_width="0dp"

        android:layout_height="0dp"

        android:layout_marginBottom="8dp"

        android:layout_marginEnd="8dp"

        android:layout_marginStart="8dp"

        android:layout_marginTop="8dp"

        android:text="Button"

        app:layout_constraintBottom_toTopOf="@+id/guideline3"

        app:layout_constraintEnd_toEndOf="parent"

        app:layout_constraintStart_toStartOf="@+id/guideline4"

        app:layout_constraintTop_toTopOf="@+id/guideline2" />

    <Button

        android:background="#ffff00"

        android:id="@+id/button5"

        android:layout_width="0dp"

        android:layout_height="0dp"

        android:layout_marginBottom="8dp"

        android:layout_marginEnd="8dp"

        android:layout_marginStart="8dp"

        android:layout_marginTop="8dp"

        android:text="Button"

        app:layout_constraintBottom_toBottomOf="parent"

        app:layout_constraintEnd_toStartOf="@+id/guideline4"

        app:layout_constraintStart_toStartOf="parent"

        app:layout_constraintTop_toTopOf="@+id/guideline3" />

    <LinearLayout

        android:layout_width="0dp"

        android:layout_height="0dp"

        android:layout_marginBottom="8dp"

        android:layout_marginEnd="8dp"

        android:layout_marginStart="8dp"

        android:layout_marginTop="8dp"

        android:orientation="vertical"

        app:layout_constraintBottom_toBottomOf="parent"

        app:layout_constraintEnd_toEndOf="parent"

        app:layout_constraintStart_toStartOf="@+id/guideline4"

        app:layout_constraintTop_toTopOf="@+id/guideline3">

        <Button

            android:background="#00ffff"

            android:id="@+id/button7"

            android:layout_width="match_parent"

            android:layout_height="match_parent"

            android:text="Button" />

    </LinearLayout>

</android.support.constraint.ConstraintLayout>
ok。
第二十二篇-Guideline基准线的更多相关文章
- Python开发【第二十二篇】:Web框架之Django【进阶】
Python开发[第二十二篇]:Web框架之Django[进阶] 猛击这里:http://www.cnblogs.com/wupeiqi/articles/5246483.html 博客园 首页 ...
- 第二十二篇、IO多路复用 一
一.简介io多路复用 可以监听多个文件描述符(socket对象)(文件句柄),一旦文件句柄出现变化,就会感知到 Linux中的 select,poll,epoll(内核2.6以上) 都是IO多路复用的 ...
- Python之路【第二十二篇】CMDB项目
浅谈ITIL TIL即IT基础架构库(Information Technology Infrastructure Library, ITIL,信息技术基础架构库)由英国政府部门CCTA(Central ...
- Python之路【第二十二篇】:Django之Model操作
Django之Model操作 一.字段 AutoField(Field) - int自增列,必须填入参数 primary_key=True BigAutoField(AutoField) - bi ...
- Python之路(第二十二篇) 面向对象初级:概念、类属性
一.面向对象概念 1. "面向对象(OOP)"是什么? 简单点说,“面向对象”是一种编程范式,而编程范式是按照不同的编程特点总结出来的编程方式.俗话说,条条大路通罗马,也就说我们使 ...
- flask第二十二篇——模板【4】过滤器
请关注微信公众号:自动化测试实战 先来教大家一个pycharm设置默认模板的方法.我们每次新建模板或者平时写代码打开以后可能都要重复写# coding: utf-8这些代码,其实我们可以设置好模板,让 ...
- 【Python之路】第二十二篇--Django【基础篇】
1 Django流程介绍 MTV模式 著名的MVC模式:所谓MVC就是把web应用分为模型(M),控制器(C),视图(V)三层:他们之间以一种插件似的,松耦合的方式连接在一起. 模型负责业 ...
- SpringBoot非官方教程 | 第二十二篇: 创建含有多module的springboot工程
转载请标明出处: 原文首发于:https://www.fangzhipeng.com/springboot/2017/07/11/springbot22-modules/ 本文出自方志朋的博客 这篇文 ...
- 第二十二篇 正在表达式 re模块
re模块****** 就本质而言,正则表达式时一种小型的,高度专业化的编程语言,在python里,它内嵌在python中,并通过re模块实现.正则表达式模式被编译成一系列的字节码.然后用C编写的匹配引 ...
随机推荐
- JavaScript中forEach与each
forEach是ES5中操作数组的一种方法,主要功能是遍历数组,例如: var arr = [1,2,3,4]; arr.forEach(alert); 等价于: var arr = [1, 2, 3 ...
- select、poll、epoll之间的区别(搜狗面试)
(1)select==>时间复杂度O(n) 它仅仅知道了,有I/O事件发生了,却并不知道是哪那几个流(可能有一个,多个,甚至全部),我们只能无差别轮询所有流,找出能读出数据,或者写入数据的流,对 ...
- shit vue & shit iview
shit vue & shit iview <Switch> !== <i-switch> https://www.iviewui.com/components/swi ...
- python数据结构与算法第十七天【概率算法】
1. 古典概率 例如:麻将开始摸到的14张牌中无将的概率,两张相同的牌即为将,则有: 所有的情况:从136张牌中选出14张牌,为C136-14 无将的情况:将不同的牌分组,共有34组,依次取14张牌, ...
- vue表單
使用v-model進行表單雙向數據綁定. 可以根據控件決定數據的類型,可以綁定input.單選.複選.下拉框等 可以使用number和trim等修飾符.
- Java连接RabbitMQ之创建连接
依赖包: <dependencies> <dependency> <groupId>junit</groupId> <artifactId> ...
- C# 动态调用泛型方法
static void Main(string[] args) { #region 具体类型可传递. Personal specifiedPersonal = new Personal(); Empl ...
- POJ 3667 Hotel(算竞进阶习题)
线段树区间染色 题目要求最大的连续段的左端点,我们在查询的时候返回最左端即可,注意查找顺序,应该从左到右!! 另外这类染色的push_down其实比较简单,直接染成上一层的标记即可 push_up和连 ...
- Appium环境的安装以及一路上的坑
Appium环境的安装以及一路上的坑 第一步环境的安装 l javaJDK的安装以及环境变量的配置这个我就不说了网上的教程全都是,搜一个安装一下吧 l AndroidSDK的安装也是如此我是直接安 ...
- Verilog定义计算位宽的函数clogb2
在很多情况下要计算输入输出的位宽,比如你写一个8*8的ram,那么地址需要三位去表示,那么这个函数的方便就体现出来了,你需要使用函数定义就好了,如果对于多文件可以包含定义的文件: 如果你的DEPTH是 ...