
十四、pymysql模块
一、安装的两种方法
第一种
#安装

pip3 install pymysql
第二种
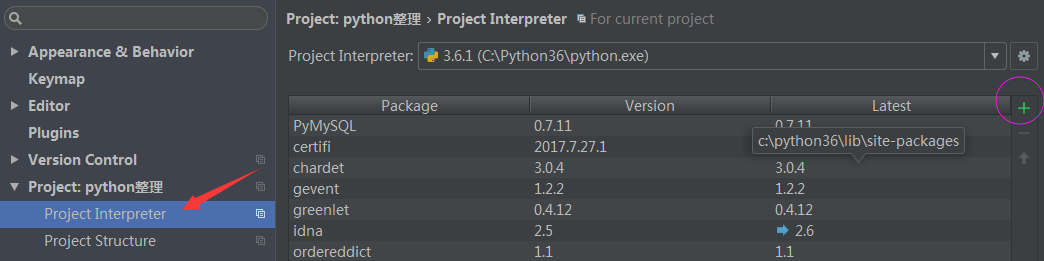
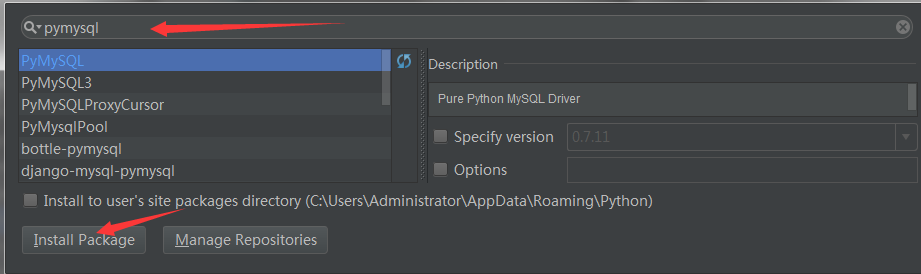
二、链接,执行sql,关闭(游标)
import pymysql

user= input('用户名:>>').strip()

pwd= input('密码:>>').strip()

#先链接,拿到游标

conn=pymysql.connect(host='localhost',user='root',password='',
             database='day47',charset='utf8')

cursor=conn.cursor() #拿到游标,即mysql >

#执行sql

sql='select * from user where user="%s" and password="%s";'%(user,pwd)

print(sql) #注意%s需要加双引号

rows = cursor.execute(sql)  #拿到受影响的行数

cursor.close()

conn.close()

if rows:

    print('登录成功')

else:

    print('登录失败')
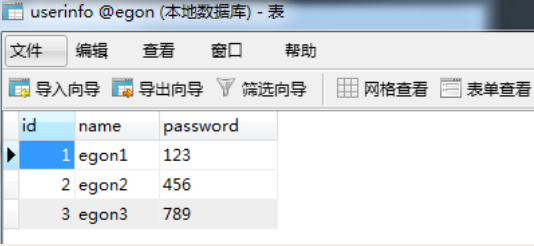
三、execute()之sql注入
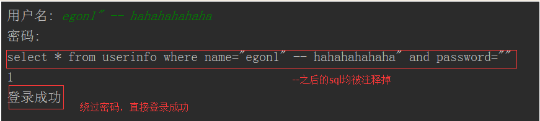
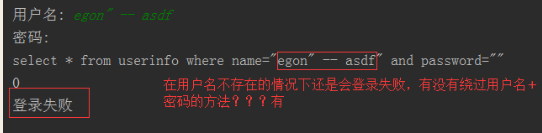
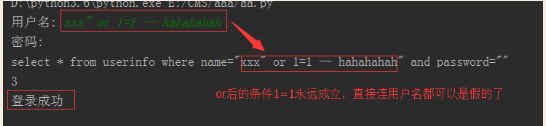
注意:符号--会注释掉它之后的sql,正确的语法:--后至少有一个任意字符
根本原理:就根据程序的字符串拼接name='%s',我们输入一个xxx' -- haha,用我们输入的xxx加'在程序中拼接成一个判断条件name='xxx' -- haha'
最后那一个空格,在一条sql语句中如果遇到select *
from t1 where id > 3 -- and name='egon';则--之后的条件被注释掉了

#1、sql注入之:用户存在,绕过密码

egon' -- 任意字符

#2、sql注入之:用户不存在,绕过用户与密码

xxx' or 1=1 -- 任意字符
解决注入
# 原来是我们对sql进行字符串拼接

# sql="select * from userinfo where name='%s' and password='%s'" %(user,pwd)

# print(sql)

# rows=cursor.execute(sql)

#改写为(execute帮我们做字符串拼接,我们无需且一定不能再为%s加引号了)

sql="select * from userinfo where name=%s
 and password=%s" #!!!注意%s需要去掉引号,因为pymysql会自动为我们加上

rows=cursor.execute(sql,[user,pwd])
#pymysql模块自动帮我们解决sql注入的问题,只要我们按照pymysql的规矩来。
四、增、删、改:conn.commit()
增:
import pymysql

先链接,拿到游标

conn=pymysql.connect(host='localhost',user='root',password='',database='day47')

cursor=conn.cursor() #拿到游标,即mysql >

#执行sql   增:

sql='insert into user1(user,password) VALUES (%s,%s)'

print(sql)

# rows = cursor.execute(sql,('xixi',123))  #插入一条记录

rows = cursor.executemany(sql,[('xixi',123),('aaa',456),('ttt',147)]) #插入多行记录

print('%s row in set (0.00 sec)'%rows)

conn.commit() #提交到数据库

cursor.close()

conn.close()
删:
import pymysql

#先链接,拿到游标

name=input('>>').strip()

conn=pymysql.connect(host='localhost',user='root',password='',database='day47')

cursor=conn.cursor() #拿到游标,即mysql >

#执行sql   删:

sql='delete from user1 where user =%s;'  #删除数据

print(sql)

rows = cursor.execute(sql,(name))

print('%s row in set (0.00 sec)'%rows)

conn.commit() #提交到数据库

cursor.close()

conn.close()
改:
import pymysql

#先链接,拿到游标

id=input('>>').strip()

conn=pymysql.connect(host='localhost',user='root',password='',database='day47')

cursor=conn.cursor() #拿到游标,即mysql >

#执行sql   改:

sql=' update user1 set password = "5555555" where id=%s;'

print(sql)

rows = cursor.execute(sql,(id))

print('%s row in set (0.00 sec)'%rows)

conn.commit() #提交到数据库

cursor.close()

conn.close()
五、查:fetchone,fetchmany,fetchall
---------查fetchone,fetchmany,fetchall-----------

import pymysql

conn=pymysql.connect(host='localhost',user='root',password='',database='day47')

cursor=conn.cursor() #拿到游标,即mysql >

#执行sql   查:

sql='select * from user1;'

rows = cursor.execute(sql)

#查单条fetchone

res1=cursor.fetchone()

res2=cursor.fetchone()

res3=cursor.fetchone()

print(res1)

print(res2)

print(res3)

print(res3[0])

#查多条fetchmany

print(cursor.fetchmany(3))

print(cursor.fetchone())

#查所有fetchall

print(cursor.fetchall())

print(cursor.fetchone())

#-------光标的移动--------

#1.绝对路径:从文件的开头位置算起

print(cursor.fetchall())

cursor.scroll(1,mode='absolute')

print(cursor.fetchone())

cursor.scroll(3,mode='absolute')

print(cursor.fetchone())

#2.相对路径:

print(cursor.fetchone())

print(cursor.fetchone())

cursor.scroll(2,mode='relative') #相对于上面的两条向后移两条

print(cursor.fetchone())

print('%s row in set (0.00 sec)' %rows)

cursor.close()

conn.close()
六、获取插入的最后一条数据的自增ID
------查看表中最后一行的iD

import pymysql

conn=pymysql.connect(host='localhost',user='root',password='',
             database='day47',charset='utf8')

cursor=conn.cursor()

sql='insert into user1(user,password) values(%s,%s);'

rows=cursor.execute(sql,('alex',''))

# rows=cursor.executemany(sql,[('yuanhao','123'),('laowu','123'),('kgf','12323')])

conn.commit()

print(cursor.lastrowid)  #查看表中最后一行的iD

cursor.close()

conn.close()
十四、pymysql模块的更多相关文章
- 14、手把手教你Extjs5(十四)模块字段和Grid列的定义[2]
model和columns生成好了,下面要修改一下Module.js和Grid.js中的代码,使其能够协同工作. /** * 一个模块的主控界面的容器,用来安放各个模块控件以及协调他们之间的关系 */ ...
- 第二十四天- 模块导入 import from xxx import xxx
# 模块:# 模块就是⼀个包含了python定义和声明的⽂件,⽂件名就是模块的名字加上.py后缀# 换句话说我们⽬前写的所有的py⽂件都可以看成是⼀个模块# 为何用模块:写大项目时,把相关的功能进⾏分 ...
- 24、手把手教你Extjs5(二十四)模块Form的自定义的设计[3]
自定义的Form已经可以运行了,下面改一下配置,把Form里面的FieldSet放在Tab之下.修改一下ModuleModel.js中的data下的tf_FormSchemes下的方案,增加一个属性. ...
- perl 第十四章 Perl5的包和模块
第十四章 Perl5的包和模块 by flamephoenix 一.require函数 1.require函数和子程序库 2.用require指定Perl版本二.包 1.包的定义 2.在包间切 ...
- thinkPHP 空模块和空操作、前置操作和后置操作 详细介绍(十四)
原文:thinkPHP 空模块和空操作.前置操作和后置操作 详细介绍(十四) 本章节:介绍 TP 空模块和空操作.前置操作和后置操作 详细介绍 一.空模块和空操作 1.空操作 function _em ...
- Python第二十四天 binascii模块
Python第二十四天 binascii模块 binascii用来进行进制和字符串之间的转换 import binascii s = 'abcde' h = binascii.b2a_hex(s) # ...
- Python第十四天 序列化 pickle模块 cPickle模块 JSON模块 API的两种格式
Python第十四天 序列化 pickle模块 cPickle模块 JSON模块 API的两种格式 目录 Pycharm使用技巧(转载) Python第一天 安装 shell 文件 Py ...
- 第三百二十四节,web爬虫,scrapy模块介绍与使用
第三百二十四节,web爬虫,scrapy模块介绍与使用 Scrapy是一个为了爬取网站数据,提取结构性数据而编写的应用框架. 其可以应用在数据挖掘,信息处理或存储历史数据等一系列的程序中.其最初是为了 ...
- 孤荷凌寒自学python第八十四天搭建jTessBoxEditor来训练tesseract模块
孤荷凌寒自学python第八十四天搭建jTessBoxEditor来训练tesseract模块 (完整学习过程屏幕记录视频地址在文末) 由于本身tesseract模块针对普通的验证码图片的识别率并不高 ...
随机推荐
- Thinkphp 出现 “_CACHE_WRITE_ERROR” 错误的可能解决办法
有可能是老毛病: Cache文件夹和里面的文件,php没有权限 解决办法: chmod -R 777 /.............../www/Cache
- django orm 时间字段讲解
创建django的model时,有DateTimeField.DateField和TimeField三种类型可以用来创建日期字段,其值分别对应着datetime().date().time()三中对象 ...
- 将 Azure SQL 内数据下载到本地,满足企业的「数据收集」
嫌长不看版 本文介绍了通过复制和导出两个操作,将 Azure SQL 数据库中的内容转移至其他位置(例如本地环境)的具体做法.借此可以帮助用户在 Azure 中运行数据库的同时,在本地或指定的其他位置 ...
- Windows server R2 2008上部署gogs git
所需的环境 1. 安装mysql 安装路径:F:\MySQL Server 5.7 2. 安装gogs ...
- 笨办法学Python(十九)
习题 19: 函数和变量 函数这个概念也许承载了太多的信息量,不过别担心.只要坚持做这些练习,对照上个练习中的检查点检查一遍这次的联系,你最终会明白这些内容的. 有一个你可能没有注意到的细节,我们现在 ...
- [转载]在VB.Net中获取COM对象的特定实例(Getting a specific instance of COM object in VB.Net)
转载:http://www.it1352.com/534235.html 问题: I am writing a Windows Form application in .Net to list all ...
- Node.js与npm安装(转载)
2009年的JSCOnf大会上,一个叫Ryan Dahl的年轻程序员向人们展示了一个他正在做的项目,一个基于Google V8引擎的JavaScript运行平台,它提供了一套事件循环和低IO的应用程序 ...
- vuejs使用组件的细节点
is属性 <div id='root'> <table> <tbody> <row></row> <row></row&g ...
- SpringMVC接受JSON参数详解
转:https://blog.csdn.net/LostSh/article/details/68923874 SpringMVC接受JSON参数详解及常见错误总结 最近一段时间不想使用Session ...
- centos6.5下编译安装FFmpeg
以下安装步骤基本来自官网,做个笔记以方便自己以后查看 http://trac.ffmpeg.org/wiki/CompilationGuide 1.安装依赖包 <span style=" ...