
2. 自动化运维系列之Cobbler给Openstack节点安装操作系统。
preface
我们在一篇博文知道了如何搭建Cobbler,那么下面就通过Cobbler来安抓Openstack所有节点吧。
服务器配置信息如下:
| 主机名 | IP | 角色 |
|---|---|---|
| Cobbler.node.com | 192.168.56.10 | cobbler |
| linux-node1.example.com | 192.168.56.11 | keystone+glance等控制节点 |
| linux-node2.example.com | 192.168.56.12 | horizon+nova-computer等计算节点 |
- 内核为3.10.0-514.2.2.el7.x86_64
- 网卡名字设置为了eth0。
- 关闭了selinux,iptables。
- 时间同步ntp.chinacache.com
部署cobbler
部署的话参考上一篇博文:Cobbler的安装
1.Cobbler安装部署完成后,我们需要添加 一个 Openstack仓库:
[root@cobbler kickstarts]# cobbler repo add --name=Openstack-Newton --mirror=https://mirrors.aliyun.com/centos/7/cloud/x86_64/openstack-newton/ --arch=x86_64 --breed=yum

[root@cobbler kickstarts]# cobbler reposync   # 同步得有一会,取决于下载速度。
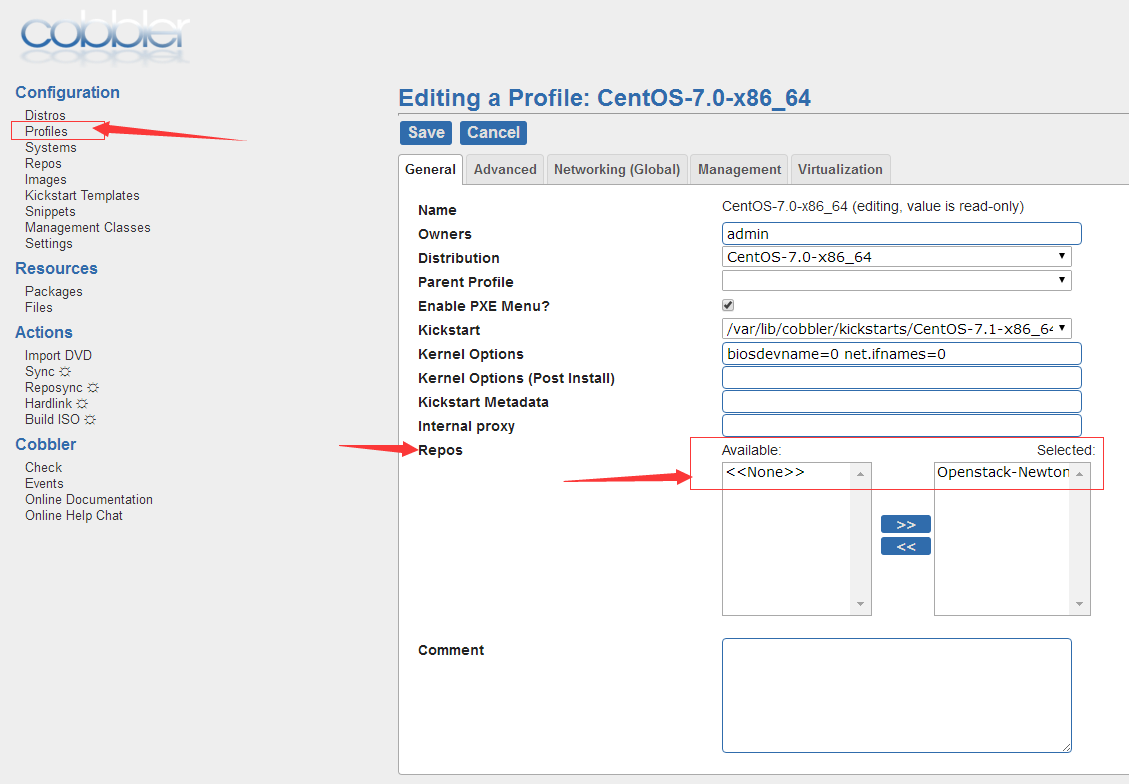
同步完成后,我们在Cobbler-web界面来把Openstack的源添加到profile里面去,这样新安装的操作系统自动Openstack-newton版本的yum源了。如下图所示:
2.kickstart配置文件里面添加一行命令:
[root@cobbler kickstarts]# vim CentOS-7.1-x86_64_cobbler.cfg

%post

rpm -ihv https://mirrors.aliyun.com/epel/epel-release-latest-7.noarch.rpm    # 添加一个epel源

wget -SO  /etc/yum.repos.d/Centos-7.repo https://mirrors.aliyun.com/repo/Centos-7.repo

yum clean all && yum -y install koan   # 安装koan

%end
3.定制系统:
首先针对linux-node2节点:
[root@cobbler kickstarts]#cobbler system add --name=linux-node2 --mac=00:50:56:3E:61:CF \

--profile=CentOS-7.0-x86_64 \

--ip-address=192.168.56.12 --subnet=255.255.255.0 \

--gateway=192.168.56.2 --interface=eth0 \

--static=1 --hostname=linux-node2.example.com \

--name-servers="192.168.56.2" \

--kickstart=/var/lib/cobbler/kickstarts/CentOS-7.1-x86_64_cobbler.cfg
再次针对linux-node1节点
cobbler system add --name=linux-node1 --mac=00:50:56:25:62:A4 \

--profile=CentOS-7.0-x86_64 \

--ip-address=192.168.56.11 --subnet=255.255.255.0 \

--gateway=192.168.56.2 --interface=eth0 \

--static=1 --hostname=linux-node1.example.com \

--name-servers="192.168.56.2" \

--kickstart=/var/lib/cobbler/kickstarts/CentOS-7.1-x86_64_cobbler.cfg
如果是使用的vm虚拟机,请先关闭vmware虚拟机的DHCP功能,如果是在生产环境下,那么请临时关闭路由器或者三层交换机的dhcp功能,由Cobbler来提供dhcp功能。
启动Openstack节点服务器
我们启动Openstack节点服务器,一开机就进入到自动安装系统的界面。待系统安装完后,我们就可以看到主机名、ip、网关、防火墙之类的都是按照我们的配置文件走的。
我们看下yum源:
[root@linux-node2 ~]# cat /etc/yum.repos.d/cobbler-config.repo

# error: could not read repo source: /var/www/cobbler/ks_mirror/config/CentOS-7.0-x86_64-0.repo

[Openstack-Newton]

name=Openstack-Newton

baseurl=http://192.168.56.10/cobbler/repo_mirror/Openstack-Newton

enabled=1

priority=99

gpgcheck=0
已经安装上了Newton版本的Openstack的yum源了,所以我们在部署Openstack的节点的时候不需要执行yum -y install centos-release-openstack-newton。
直接执行yum install Openstack组件就可以了。
由于是使用Cobbler的yum源,所以安装Openstack的组件的时候,内网传输相当快了。
2. 自动化运维系列之Cobbler给Openstack节点安装操作系统。的更多相关文章
- 【转载】自动化运维系列之Cobbler给Openstack节点安装操作系统
preface 我们在一篇博文知道了如何搭建Cobbler,那么下面就通过Cobbler来安抓Openstack所有节点吧. 服务器配置信息如下: 主机名 IP 角色 Cobbler.node.com ...
- 1. 自动化运维系列之Cobbler自动装机
preface 我们之前批量安装操作系统的时候都是采用pxe来安装,pxe也是通过网络安装操作系统的,但是PXE依赖于DHCP,HTTP/TFTP,kicstart等支持.安装流程如下所示: 对于上面 ...
- saltstack自动化运维系列11基于etcd的saltstack的自动化扩容
saltstack自动化运维系列11基于etcd的saltstack的自动化扩容 自动化运维-基于etcd加saltstack的自动化扩容# tar -xf etcd-v2.2.1-linux-amd ...
- saltstack自动化运维系列⑩SaltStack二次开发初探
saltstack自动化运维系列⑩SaltStack二次开发初探 1.当salt运行在公网或者网络环境较差的条件下,需要配置timeout时间vim /etc/salt/master timeout: ...
- saltstack自动化运维系列⑧SaltStack实践配置管理安装nginx-1.10.3
saltstack自动化运维系列⑧SaltStack实践配置管理安装nginx-1.10.3 安装nginx-1.10.3.tar.gz # mkdir -p /srv/salt/prod/pkg / ...
- saltstack自动化运维系列⑦SaltStack实践配置管理安装zabbix
saltstack自动化运维系列⑥SaltStack实践配置管理安装zabbix 1.添加管理zabbix的sls文件# vim /srv/salt/base/init/zabbix_agent.sl ...
- saltstack自动化运维系列⑥SaltStack实践安装配置HAproxy的Keepalived
saltstack自动化运维系列⑥SaltStack实践安装配置HAproxy的Keepalived 安装配置Keepalived 1.编写功能模块 #创建keepalived目录# mkdir -p ...
- saltstack自动化运维系列⑥SaltStack实践安装配置HAproxy
saltstack自动化运维系列⑥SaltStack实践安装配置HAproxy 下载haproxy1.6.2.tar.gz下载地址:http://www.haproxy.org/download/1. ...
- SQL SERVER自动化运维系列
SQL SERVER自动化运维系列 转自:https://www.cnblogs.com/zhijianliutang/p/5001142.html 本系列为SQL SERVER自动化运维的一些操作技 ...
随机推荐
- 【转】eclipse运行 Ant报错Could not find the main class: org.eclipse.ant.internal.launching.remote.InternalAntRunner. Program
原文地址:http://blog.csdn.net/jiangtaoking/article/details/49151763 Could not find the main class: org.e ...
- CDH 修改配置注意事项
cdh 在使用时如果修改了配置文件,需要重启过时服务,而不是重启,重启过时服务才会修改配置文件
- Android——shape和selector和layer-list的(详细说明 转)
<shape>和<selector>在Android UI设计中经常用到.比如我们要自定义一个圆角Button,点击Button有些效果的变化,就要用到<shape> ...
- nginx负载均衡和反相代理的配置
偷懒,参考这里 https://www.cnblogs.com/taiyonghai/p/6728707.html
- module.inc 模块
/** *加载所有已经在系统表被启用的模块. *@参数$bootstrap *是否加载在“引导模式”缓存页面加载的模块只减少集.见bootstrap.inc文件. *@return *如果$ ...
- 【javascript】浮点数运算问题分析及解决方法
问题: 在用 js 进行小数四则运算时发现了一个重大问题,比如:0.7 * 0.8 = 0.5599999999999999 分析: 在 js 中只有一种数字类型 Number,而且在 js 中所有的 ...
- 解决:According to TLD or attribute directive in tag file, attribute value does not accept any express。
http://blog.csdn.net/lzblog/article/details/22076893 ——————————————————————————————————————————————— ...
- OpenResty最佳实践
https://moonbingbing.gitbooks.io/openresty-best-practices/content/
- Java设计模式(16)中介模式(Mediator模式)
Mediator定义:用一个中介对象来封装一系列关于对象交互行为. 为何使用Mediator模式/中介模式 各个对象之间的交互操作非常多,每个对象的行为操作都依赖彼此对方,修改一个对象的行为,同时会涉 ...
- Java设计模式(13)模板模式(Template模式)
Template模式定义:定义一个操作中算法的骨架,将一些步骤的执行延迟到其子类中. 其实Java的抽象类本来就是Template模式,因此使用很普遍.而且很容易理解和使用,我们直接以示例开始: pu ...