
Docker05-容器
容器介绍
容器是Docker的另一个核心组件。
简单的说,容器是镜像的一个运行实例。如果认为虚拟机是模拟运行的一整套操作系统(提供了运行态环境和其他系统环境)和跑在上面的应用。那么Docker容器就是独立运行的一个或一组应用,以及它们的必需运行环境。
创建容器
通过镜像,创建容器,命令格式: docker create [OPTIONS] IMAGE [COMMAND] [ARG...]
关键Options
--name string Assign a name to the container
-p, --publish list Publish a container's port(s) to the host
-t, --tty Allocate a pseudo-TTY
--ulimit ulimit Ulimit options (default [])
-v, --volume list Bind mount a volume
--volume-driver string Optional volume driver for the container
--volumes-from list Mount volumes from the specified container(s)
-w, --workdir string Working directory inside the container
案例:创建 redis 的容器
root@ubuntu:/home/guanfuchang# docker create -p 16379:6379 --name redis redis:5.0

07bf73ec9f73d6d7a2c4bad79813bf1ae63b853e2b3a22a92d58d7ecfe24ca2e
创建成功后,会返回容器ID
[info]Tips:命令中的端口
16379:6379,冒号前面的端口16379是虚拟机的端口,6379是容器内的端口,通过该设置,是将操作系统的16379映射到容器内的6379,我们后面使用redis客户端连接redis时,连接的是16379哦。
查看容器列表
查看正在运行的容器列表,命令 docker ps
查看所有的本地容器,命令 docker ps -a
root@ubuntu:/home/guanfuchang# docker ps

CONTAINER ID        IMAGE               COMMAND             CREATED             STATUS              PORTS               NAMES

root@ubuntu:/home/guanfuchang# docker ps -a

CONTAINER ID        IMAGE               COMMAND                  CREATED             STATUS              PORTS               NAMES

07bf73ec9f73        redis:5.0           "docker-entrypoint.s…"   4 minutes ago       Created                                 redis
启动容器
启动容器,命令格式:docker start 容器名或容器ID,其中容器的id,只需要输入前几位即可。
案例:启动redis容器
root@ubuntu:/home/guanfuchang# docker ps -a

CONTAINER ID        IMAGE               COMMAND                  CREATED             STATUS              PORTS               NAMES

07bf73ec9f73        redis:5.0           "docker-entrypoint.s…"   4 minutes ago       Created                                 redis

root@ubuntu:/home/guanfuchang#

root@ubuntu:/home/guanfuchang# docker start 07bf73ec9f73

07bf73ec9f73

root@ubuntu:/home/guanfuchang#

root@ubuntu:/home/guanfuchang# docker ps

CONTAINER ID        IMAGE               COMMAND                  CREATED             STATUS              PORTS                     NAMES

07bf73ec9f73        redis:5.0           "docker-entrypoint.s…"   8 minutes ago       Up 42 seconds       0.0.0.0:16379->6379/tcp   redis

root@ubuntu:/home/guanfuchang#
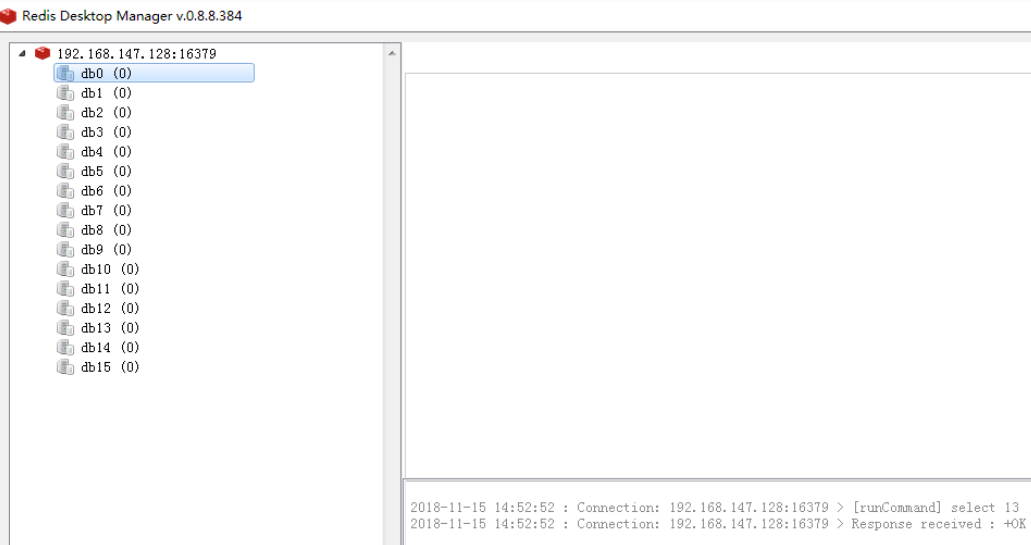
通过上面创建后,主机的16379端口上已经运行了一个redis服务。
案例:通过redis客户端进行测试
Redis可视化管理工具(Redis Desktop Manager])
链接:https://pan.baidu.com/s/1sOiOm7bEALZKA0-GpkZ3_Q 密码:ruxk
下载安装后,连接redis服务器,配置如下:

连接成功如下:
创建并运行容器
上面通过docker create 创建了容器,然后通过docker start 来启动容器。
由于创建容器并且启动容器的操作非常频繁,docker client 提供了更加便捷的命令 docker run 一步创建并且启动容器。
命令格式:docker run [OPTIONS] IMAGE [COMMAND] [ARG...]
案例:创建并运行一个redis容器
root@ubuntu:/home/guanfuchang# docker run -p 16380:6379 --name redis2 redis:5.0

1:C 15 Nov 2018 07:01:49.153 # oO0OoO0OoO0Oo Redis is starting oO0OoO0OoO0Oo

1:C 15 Nov 2018 07:01:49.154 # Redis version=5.0.1, bits=64, commit=00000000, modified=0, pid=1, just started

1:C 15 Nov 2018 07:01:49.154 # Warning: no config file specified, using the default config. In order to specify a config file use redis-server /path/to/redis.conf

1:M 15 Nov 2018 07:01:49.155 * Running mode=standalone, port=6379.

1:M 15 Nov 2018 07:01:49.155 # WARNING: The TCP backlog setting of 511 cannot be enforced because /proc/sys/net/core/somaxconn is set to the lower value of 128.

1:M 15 Nov 2018 07:01:49.156 # Server initialized

1:M 15 Nov 2018 07:01:49.156 # WARNING overcommit_memory is set to 0! Background save may fail under low memory condition. To fix this issue add 'vm.overcommit_memory = 1' to /etc/sysctl.conf and then reboot or run the command 'sysctl vm.overcommit_memory=1' for this to take effect.

1:M 15 Nov 2018 07:01:49.156 # WARNING you have Transparent Huge Pages (THP) support enabled in your kernel. This will create latency and memory usage issues with Redis. To fix this issue run the command 'echo never > /sys/kernel/mm/transparent_hugepage/enabled' as root, and add it to your /etc/rc.local in order to retain the setting after a reboot. Redis must be restarted after THP is disabled.

1:M 15 Nov 2018 07:01:49.156 * Ready to accept connections

上面例子,启动redis容器后,一直在前台运行,如果想要让容器后台运行,加入参数-d,如:
root@ubuntu:/home/guanfuchang# docker run -p 16380:6379 -d --name redis3 redis:5.0

e4a4aae7860f9f5a2bca62cb806e33ef356939708f9655c95af122565d0db3c2
停止容器
停止容器有2种方式
docker stop 容器名或容器iddocker kill 容器名或容器id
案例:停止容器redis3
root@ubuntu:/home/guanfuchang# docker ps

CONTAINER ID        IMAGE               COMMAND                  CREATED             STATUS              PORTS                     NAMES

e4a4aae7860f        redis:5.0           "docker-entrypoint.s…"   3 minutes ago       Up 3 minutes        0.0.0.0:16380->6379/tcp   redis3

07bf73ec9f73        redis:5.0           "docker-entrypoint.s…"   About an hour ago   Up About an hour    0.0.0.0:16379->6379/tcp   redis

root@ubuntu:/home/guanfuchang# docker stop redis3

redis3

root@ubuntu:/home/guanfuchang# docker ps

CONTAINER ID        IMAGE               COMMAND                  CREATED             STATUS              PORTS                     NAMES

07bf73ec9f73        redis:5.0           "docker-entrypoint.s…"   About an hour ago   Up About an hour    0.0.0.0:16379->6379/tcp   redis
删除容器
删除容器,命令格式:docker rm [OPTIONS] CONTAINER [CONTAINER...]
删除正在运行的容器,添加-f参数
案例:删除容器redis3
root@ubuntu:/home/guanfuchang# docker ps -a

CONTAINER ID        IMAGE               COMMAND                  CREATED             STATUS                      PORTS                     NAMES

e4a4aae7860f        redis:5.0           "docker-entrypoint.s…"   7 minutes ago       Exited (0) 3 minutes ago                              redis3

4c371862865e        redis:5.0           "docker-entrypoint.s…"   12 minutes ago      Exited (0) 10 minutes ago                             redis2

07bf73ec9f73        redis:5.0           "docker-entrypoint.s…"   About an hour ago   Up About an hour            0.0.0.0:16379->6379/tcp   redis

root@ubuntu:/home/guanfuchang#

root@ubuntu:/home/guanfuchang# docker rm redis3

redis3

root@ubuntu:/home/guanfuchang# docker ps -a

CONTAINER ID        IMAGE               COMMAND                  CREATED             STATUS                      PORTS                     NAMES

4c371862865e        redis:5.0           "docker-entrypoint.s…"   12 minutes ago      Exited (0) 10 minutes ago                             redis2

07bf73ec9f73        redis:5.0           "docker-entrypoint.s…"   About an hour ago   Up About an hour            0.0.0.0:16379->6379/tcp   redis
进入容器
有些时候,我们需要进入容器内,做一些操作,比如修改配置文件等
(不推荐修改容器,后面会介绍如何挂载外部文件)
进入容器,命令格式:docker exec [OPTIONS] CONTAINER COMMAND [ARG...]
案例:进入容器redis
root@ubuntu:/home/guanfuchang# docker ps

CONTAINER ID        IMAGE               COMMAND                  CREATED             STATUS              PORTS                     NAMES

07bf73ec9f73        redis:5.0           "docker-entrypoint.s…"   About an hour ago   Up About an hour    0.0.0.0:16379->6379/tcp   redis

root@ubuntu:/home/guanfuchang#

root@ubuntu:/home/guanfuchang# docker exec -it redis /bin/bash

root@07bf73ec9f73:/data#

root@07bf73ec9f73:/data# cd /

root@07bf73ec9f73:/# ls

bin  boot  data  dev  etc  home  lib  lib64  media  mnt  opt  proc  root  run  sbin  srv  sys  tmp  usr  var

root@07bf73ec9f73:/# ls /usr/local/bin/

docker-entrypoint.sh  gosu  redis-benchmark  redis-check-aof  redis-check-rdb  redis-cli  redis-sentinel  redis-server
通过上面例子,我们可以得知,容器里面,包含了一个小型的linux系统,在linux系统上安装了redis服务。
[info] control+d 退出容器
查看日志
命令格式: docker logs [OPTIONS] CONTAINER
案例:查看redis容器日志
root@ubuntu:/home/guanfuchang# docker logs -f redis

1:C 15 Nov 2018 06:21:27.687 # oO0OoO0OoO0Oo Redis is starting oO0OoO0OoO0Oo

1:C 15 Nov 2018 06:21:27.689 # Redis version=5.0.1, bits=64, commit=00000000, modified=0, pid=1, just started

1:C 15 Nov 2018 06:21:27.689 # Warning: no config file specified, using the default config. In order to specify a config file use redis-server /path/to/redis.conf

1:M 15 Nov 2018 06:21:27.690 * Running mode=standalone, port=6379.

1:M 15 Nov 2018 06:21:27.690 # WARNING: The TCP backlog setting of 511 cannot be enforced because /proc/sys/net/core/somaxconn is set to the lower value of 128.

1:M 15 Nov 2018 06:21:27.690 # Server initialized

1:M 15 Nov 2018 06:21:27.690 # WARNING overcommit_memory is set to 0! Background save may fail under low memory condition. To fix this issue add 'vm.overcommit_memory = 1' to /etc/sysctl.conf and then reboot or run the command 'sysctl vm.overcommit_memory=1' for this to take effect.

1:M 15 Nov 2018 06:21:27.690 # WARNING you have Transparent Huge Pages (THP) support enabled in your kernel. This will create latency and memory usage issues with Redis. To fix this issue run the command 'echo never > /sys/kernel/mm/transparent_hugepage/enabled' as root, and add it to your /etc/rc.local in order to retain the setting after a reboot. Redis must be restarted after THP is disabled.

1:M 15 Nov 2018 06:21:27.690 * Ready to accept connections
:-: 
微信扫一扫,关注“python测试开发圈”,了解更多测试教程!
Docker05-容器的更多相关文章
- Docker 容器数据 持久化(系统学习Docker05)
写在前面 本来是可以将数据存储在 容器内部 的.但是存在容器内部,一旦容器被删除掉或者容器毁坏(我亲身经历的痛,当时我们的大数据平台就是运行在docker容器内,有次停电后,不管怎样容器都起不来.以前 ...
- docker——容器安装tomcat
写在前面: 继续docker的学习,学习了docker的基本常用命令之后,我在docker上安装jdk,tomcat两个基本的java web工具,这里对操作流程记录一下. 软件准备: 1.jdk-7 ...
- 网页提交中文到WEB容器的经历了些什么过程....
先准备一个网页 <html><meta http-equiv="Content-Type" content="text/html; charset=gb ...
- [Spring]IoC容器之进击的注解
先啰嗦两句: 第一次在博客园使用markdown编辑,感觉渲染样式差强人意,还是github的样式比较顺眼. 概述 Spring2.5 引入了注解. 于是,一个问题产生了:使用注解方式注入 JavaB ...
- 深入理解DIP、IoC、DI以及IoC容器
摘要 面向对象设计(OOD)有助于我们开发出高性能.易扩展以及易复用的程序.其中,OOD有一个重要的思想那就是依赖倒置原则(DIP),并由此引申出IoC.DI以及Ioc容器等概念.通过本文我们将一起学 ...
- Docker笔记一:基于Docker容器构建并运行 nginx + php + mysql ( mariadb ) 服务环境
首先为什么要自己编写Dockerfile来构建 nginx.php.mariadb这三个镜像呢?一是希望更深入了解Dockerfile的使用,也就能初步了解docker镜像是如何被构建的:二是希望将来 ...
- JS判断鼠标进入容器方向的方法和分析window.open新窗口被拦截的问题
1.鼠标进入容器方向的判定 判断鼠标从哪个方向进入元素容器是一个经常碰到的问题,如何来判断呢?首先想到的是:获取鼠标的位置,然后经过一大堆的if..else逻辑来确定.这样的做法比较繁琐,下面介绍两种 ...
- docker4dotnet #2 容器化主机
.NET 猿自从认识了小鲸鱼,感觉功力大增.上篇<docker4dotnet #1 前世今生&世界你好>中给大家介绍了如何在Windows上面配置Docker for Window ...
- 深入分析Spring 与 Spring MVC容器
1 Spring MVC WEB配置 Spring Framework本身没有Web功能,Spring MVC使用WebApplicationContext类扩展ApplicationContext, ...
- Set容器--HashSet集合
Set容器特点: ① Set容器是一个不包含重复元素的Collection,并且最多包含一个null元素,它和List容器相反,Set容器不能保证其元素的顺序; ② 最常用的两个Set接口的实 ...
随机推荐
- XML读写工具
import java.io.ByteArrayOutputStream; import java.io.File; import java.io.FileOutputStream; import j ...
- Superset配置hive数据源
1.在uri中配置 hive://localhost:10000/default 2.查询 3.如果你的hive集群是带有kerberos认证的,hive数据源需要这样配置 hive://xxx:xx ...
- 解决 Yii2 assets 不自动更新问题
问题描述:core 里的 Asset (AssetBundle)更新 js 或 css 时,更新内容没有直接同步到其他模块 -- 如果想节约时间,直接拖到文章底部看结果就好~ 一.项目目录结构(大概介 ...
- [LeetCode] 334. Increasing Triplet Subsequence 递增三元子序列
Given an unsorted array return whether an increasing subsequence of length 3 exists or not in the ar ...
- sql-server-dmv-starter-pack
SELECT wait_type , ) AS [wait_time_s] FROM sys.dm_os_wait_stats DOWS WHERE wait_type NOT IN ( 'SLEEP ...
- 头部文件jq嵌入笔记
var headHtml = '<div class="container">' + '<div class="navbar-header"& ...
- SpringBoot应用部署到Docker上(docker-ce版本)
配置TCP远程连接(docker-maven-plugin插件连接的地址) # 加上红色标识的部分[root@localhost admin]# vim /lib/systemd/system/doc ...
- logback--日志在windows上可以打印,在linux上不能打印的问题
解决问题方法: 本人遇到的问题,属于jar包冲突问题.本人加入的jar包如下: slf4j-api-1.7.5.jar slf4j-log4j12-1.7.5.jar logback-core-1.0 ...
- Python实现双链表
双向链表(Double_linked_list)也叫双链表,是链表的一种,它的每个数据结点中都有两个指针,分别指向直接后继和直接前驱.所以,从双向链表中的任意一个结点开始,都可以很方便地访问它的前驱结 ...
- MySQL单机优化---SQL优化
SQL优化(变多次维护为一次维护) Sql优化分为:DDL.DML.DQL 一.DDL优化 1 .通过禁用索引来提供导入数据性能 . 这个操作主要针对有数据库的表,追加数据 //去除键 alter t ...