
SpringCloud之实现客户端的负载均衡Ribbon(二)
一 Ribbon简介
Ribbon是Netflix发布的负载均衡器,它有助于控制HTTP和TCP的客户端的行为。为Ribbon配置服务提供者地址后,Ribbon就可基于某种负载均衡算法,自动地帮助服务消费者去请求。Ribbon默认为我们提供了很多负载均衡算法,例如轮询、随机等。当然,我们也可为Ribbon实现自定义的负载均衡算法。
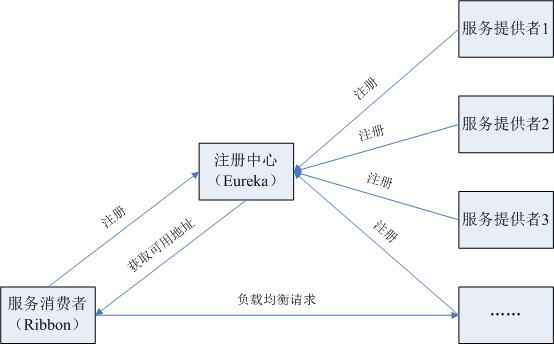
在Spring Cloud中,当Ribbon与Eureka配合使用时,Ribbon可自动从Eureka Server获取服务提供者地址列表,并基于负载均衡算法,请求其中一个服务提供者实例。
下图展示了Ribbon与Eureka配合使用时的架构
搭建负载均衡Ribbon (ribbon-consumer)
接到上篇 “SpringCloud之服务注册与发现Eureka(一)”
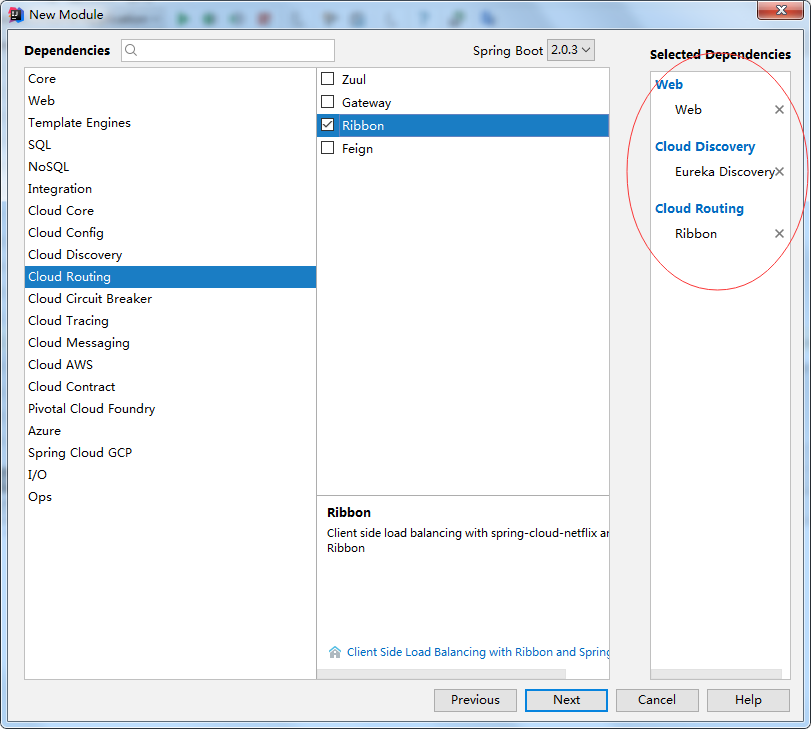
继续在springcloud工程中添加模块ribbon-consumer,也是通过start.spring.io提供的模板创建
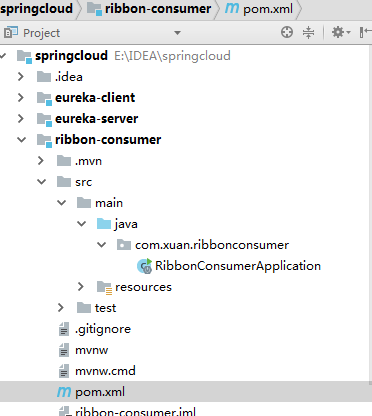
新的目录
生成的pom.xml文件为
<?xml version="1.0" encoding="UTF-8"?>

<project xmlns="http://maven.apache.org/POM/4.0.0" xmlns:xsi="http://www.w3.org/2001/XMLSchema-instance"

    xsi:schemaLocation="http://maven.apache.org/POM/4.0.0 http://maven.apache.org/xsd/maven-4.0.0.xsd">

    <modelVersion>4.0.0</modelVersion>

    <groupId>com.xuan</groupId>

    <artifactId>ribbon-consumer</artifactId>

    <version>0.0.1-SNAPSHOT</version>

    <packaging>jar</packaging>

    <name>ribbon-consumer</name>

    <description>Demo project for Spring Boot</description>

    <parent>

        <groupId>org.springframework.boot</groupId>

        <artifactId>spring-boot-starter-parent</artifactId>

        <version>2.0.3.RELEASE</version>

        <relativePath/> <!-- lookup parent from repository -->

    </parent>

    <properties>

        <project.build.sourceEncoding>UTF-8</project.build.sourceEncoding>

        <project.reporting.outputEncoding>UTF-8</project.reporting.outputEncoding>

        <java.version>1.8</java.version>

        <spring-cloud.version>Finchley.RELEASE</spring-cloud.version>

    </properties>

    <dependencies>

        <dependency>

            <groupId>org.springframework.boot</groupId>

            <artifactId>spring-boot-starter-web</artifactId>

        </dependency>

        <dependency>

            <groupId>org.springframework.cloud</groupId>

            <artifactId>spring-cloud-starter-netflix-eureka-client</artifactId>

        </dependency>

        <dependency>

            <groupId>org.springframework.cloud</groupId>

            <artifactId>spring-cloud-starter-netflix-ribbon</artifactId>

        </dependency>

        <dependency>

            <groupId>org.springframework.boot</groupId>

            <artifactId>spring-boot-starter-test</artifactId>

            <scope>test</scope>

        </dependency>

    </dependencies>

    <dependencyManagement>

        <dependencies>

            <dependency>

                <groupId>org.springframework.cloud</groupId>

                <artifactId>spring-cloud-dependencies</artifactId>

                <version>${spring-cloud.version}</version>

                <type>pom</type>

                <scope>import</scope>

            </dependency>

        </dependencies>

    </dependencyManagement>

    <build>

        <plugins>

            <plugin>

                <groupId>org.springframework.boot</groupId>

                <artifactId>spring-boot-maven-plugin</artifactId>

            </plugin>

        </plugins>

    </build>

</project>
修改启动文件RibbonConsumerApplication.java,注意增加RestTemplate 的bean注解。
package com.xuan.ribbonconsumer;

import org.springframework.boot.SpringApplication;

import org.springframework.boot.autoconfigure.SpringBootApplication;

import org.springframework.cloud.client.discovery.EnableDiscoveryClient;

import org.springframework.cloud.client.loadbalancer.LoadBalanced;

import org.springframework.context.annotation.Bean;

import org.springframework.web.client.RestTemplate;

@EnableDiscoveryClient

@SpringBootApplication

public class RibbonConsumerApplication {

    @Bean

    @LoadBalanced

    RestTemplate restTemplate () {

        return new RestTemplate();

    }

    public static void main(String[] args) {

        SpringApplication.run(RibbonConsumerApplication.class, args);

    }

}
增加测试的消费接口ConsumerController.java
package com.xuan.ribbonconsumer;

import org.springframework.beans.factory.annotation.Autowired;

import org.springframework.web.bind.annotation.RequestMapping;

import org.springframework.web.bind.annotation.RequestMethod;

import org.springframework.web.bind.annotation.RestController;

import org.springframework.web.client.RestTemplate;

@RestController

public class ConsumerController {

    @Autowired

    RestTemplate restTemplate;

    @RequestMapping(value = "/ribbon-consumer", method = RequestMethod.GET)

    public String helloConsumer() {

        return restTemplate.getForEntity("http://eureka-client/hello",

                String.class).getBody();

    }

}
注意要去实现提供者的“hello”接口,在后面在描述具体实现过程。
修改配置文件”application.properties“,让消费者注册中心注册,并且通过注册中心找到服务提供者。
spring.application.name=ribbon-consumer

server.port=9000

eureka.client.serviceUrl.defaultZone=http://localhost:8080/eureka/
为了观察是否进行了负载均衡,在eureka-client模块,增加一个服务提供者接口HelloController.java实现hello接口。
package com.xuan.eurekaclient;

import com.netflix.appinfo.InstanceInfo;

import org.slf4j.Logger;

import org.slf4j.LoggerFactory;

import org.springframework.beans.factory.annotation.Autowired;

import org.springframework.beans.factory.annotation.Value;

import org.springframework.cloud.client.ServiceInstance;

import org.springframework.cloud.client.discovery.DiscoveryClient;

import org.springframework.web.bind.annotation.RequestMapping;

import org.springframework.web.bind.annotation.RequestMethod;

import org.springframework.web.bind.annotation.RestController;

import java.util.List;

@RestController

public class HelloController {

    private static final Logger logger = LoggerFactory.getLogger(HelloController.class);

    @Autowired

    private DiscoveryClient client;

    @Value("${server.port}")

    String port;

    @RequestMapping(value = "hello", method = RequestMethod.GET)

    public String index() {
    StringBuffer uriList = new StringBuffer("Hello World " + port + " 端口为您服务!<br>");

    return uriList.toString();
    }

}
如果需要打印服务端的详细明细可以修改为:
package com.xuan.eurekaclient;

import com.netflix.appinfo.InstanceInfo;

import org.slf4j.Logger;

import org.slf4j.LoggerFactory;

import org.springframework.beans.factory.annotation.Autowired;

import org.springframework.beans.factory.annotation.Value;

import org.springframework.cloud.client.ServiceInstance;

import org.springframework.cloud.client.discovery.DiscoveryClient;

import org.springframework.web.bind.annotation.RequestMapping;

import org.springframework.web.bind.annotation.RequestMethod;

import org.springframework.web.bind.annotation.RestController;

import java.util.List;

@RestController

public class HelloController {

    private static final Logger logger = LoggerFactory.getLogger(HelloController.class);

    @Autowired

    private DiscoveryClient discoveryClient;

    @Value("${server.port}")

    String port;

    @RequestMapping(value = "hello", method = RequestMethod.GET)

    public String index() {

        StringBuffer uriList = new StringBuffer("Hello World " + port + " 端口为您服务!<br>");

        List<ServiceInstance> list = discoveryClient.getInstances("eureka-client");

        uriList.append("<br>discoveryClient.getServices().size() = " + discoveryClient.getServices().size());

        for( String s :  discoveryClient.getServices()){

            List<ServiceInstance> serviceInstances =  discoveryClient.getInstances(s);

            for(ServiceInstance si : serviceInstances){

                uriList.append("<br>services:" + s + ":getHost()=" + si.getHost());

                uriList.append("<br>services:" + s + ":getPort()=" + si.getPort());

                uriList.append("<br>services:" + s + ":getServiceId()=" + si.getServiceId());

                uriList.append("<br>services:" + s + ":getUri()=" + si.getUri());

            }

        }

        return uriList.toString();

    }

}
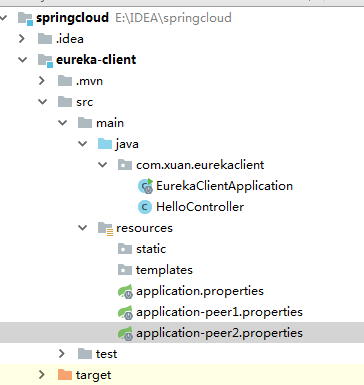
在eureka-client模块再增加两个配置文件,使用不同的端口,从而在一天电脑可以启动多个服务提供者,方便测试
增加”application-peer1.properties“文件
spring.application.name=eureka-client

server.port=8091

eureka.client.serviceUrl.defaultZone=http://localhost:8080/eureka/
增加”application-peer1.properties“文件
spring.application.name=eureka-client

server.port=8092

eureka.client.serviceUrl.defaultZone=http://localhost:8080/eureka/
添加完成后eureka-client模块的目录结构为:
设置IDEA编辑器的Edit Configurations,增加两个启动配置,修改过完后的列表和注意的地方:
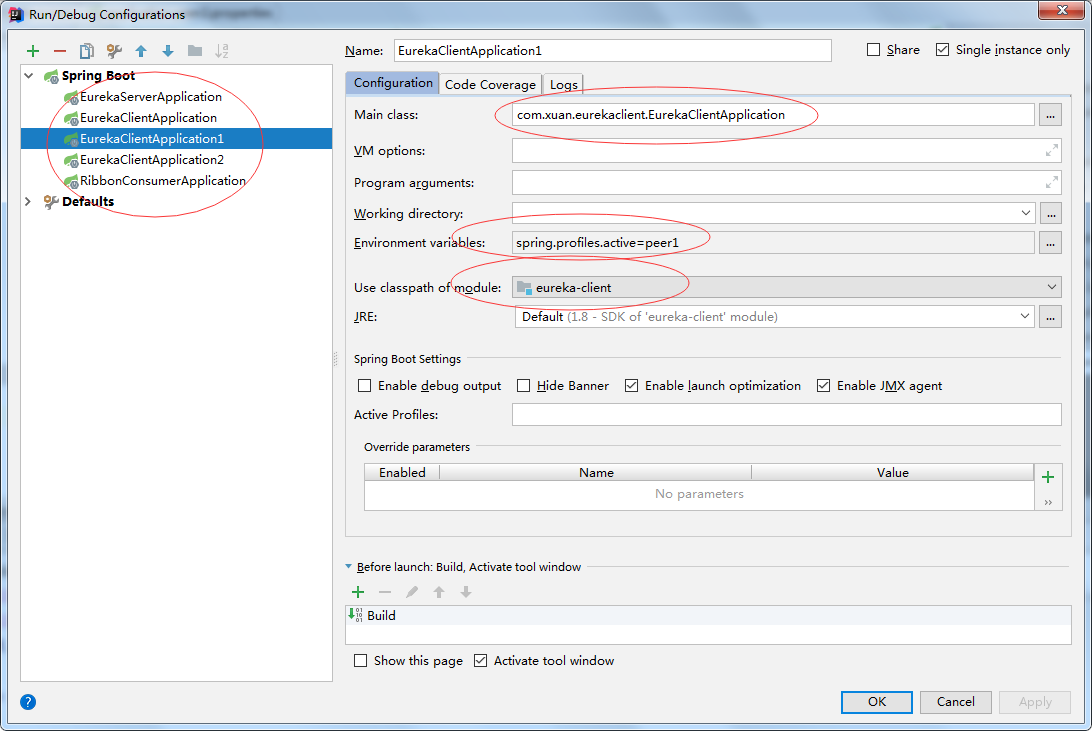
配置和环境都设置完成后:就可以分别启动模块了:
1.EurekaServerApplication
2.EurekaClientApplication,EurekaClientApplication1,EurekaClientApplication2
启动后打开http://localhost:8080/显示如图:

最后启动RibbonConsumerApplication模块在打开http://localhost:8080/显示如下
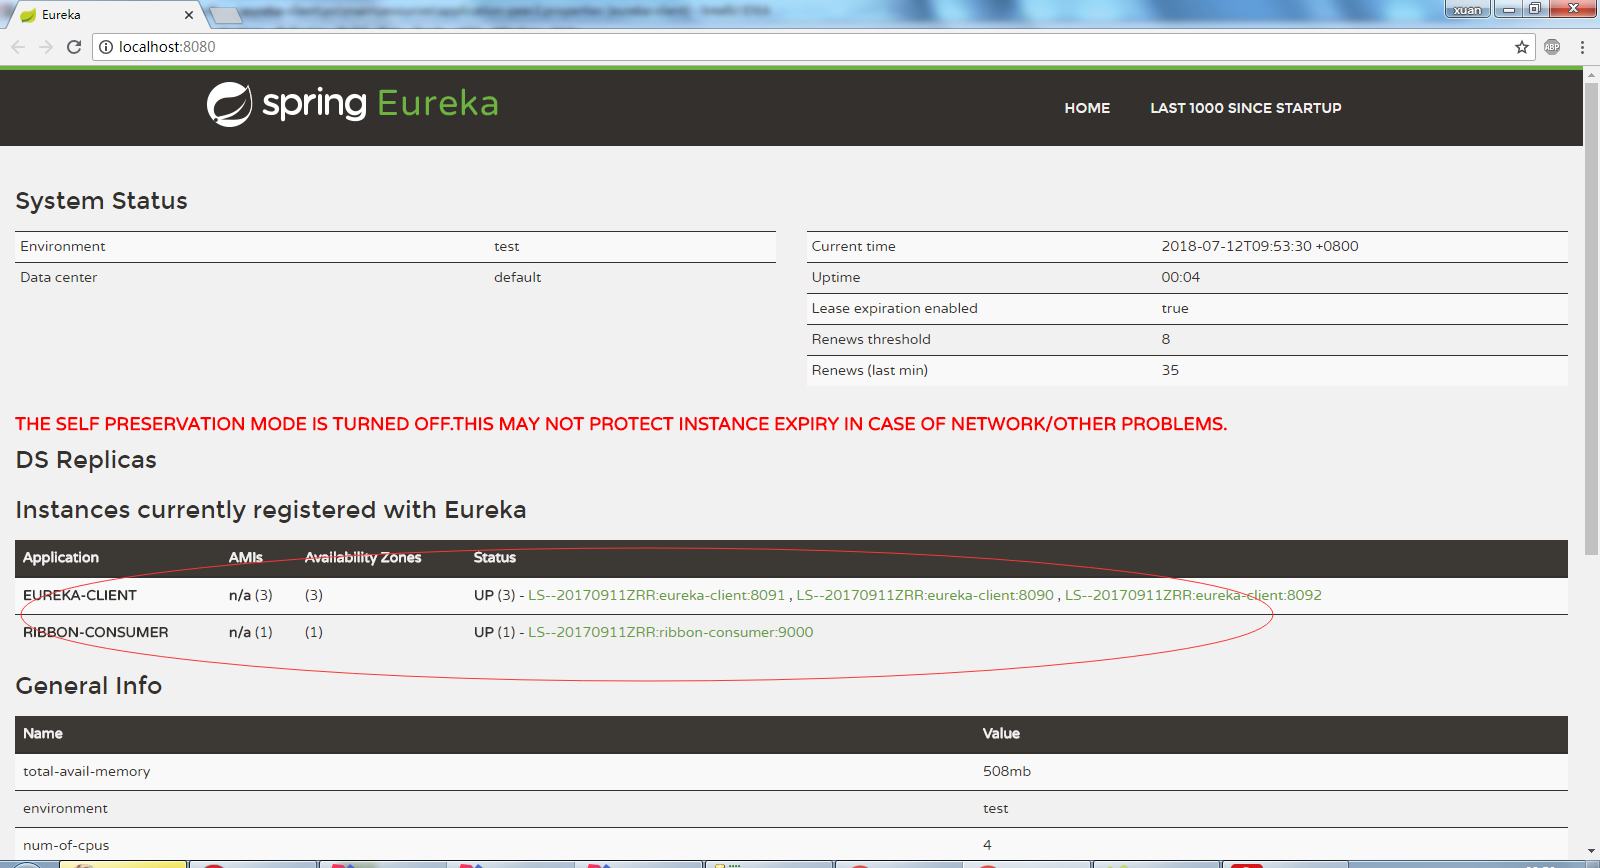
消费者RibbonConsumer也注册成功了。
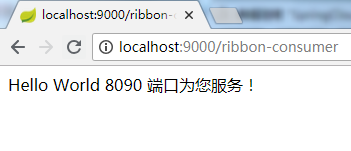
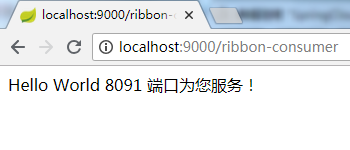
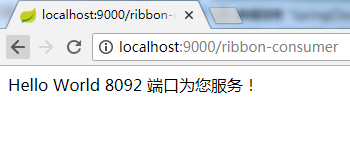
访问消费者提供的接口http://localhost:9000/ribbon-consumer,查看是否进行了负载均衡,刷新一次,端口就变化了一次,说明访问的是不同的服务提供者
源码下载地址:https://gitee.com/xuantest/SpringCloud-Ribbon
SpringCloud之实现客户端的负载均衡Ribbon(二)的更多相关文章
- SpringCloud系列七:使用Ribbon实现客户端侧负载均衡
1. 回顾 在前面,已经实现了微服务的注册与发现.启动各个微服务时,Eureka Client会把自己的网络信息注册到Eureka Server上. 但是,在生成环境中,各个微服务都会部署多个实例,因 ...
- 【微服务】之四:轻松搞定SpringCloud微服务-负载均衡Ribbon
对于任何一个高可用高负载的系统来说,负载均衡是一个必不可少的名称.在大型分布式计算体系中,某个服务在单例的情况下,很难应对各种突发情况.因此,负载均衡是为了让系统在性能出现瓶颈或者其中一些出现状态下可 ...
- SpringCloud学习系列之二 ----- 服务消费者(Feign)和负载均衡(Ribbon)使用详解
前言 本篇主要介绍的是SpringCloud中的服务消费者(Feign)和负载均衡(Ribbon)功能的实现以及使用Feign结合Ribbon实现负载均衡. SpringCloud Feign Fei ...
- SpringCloud学习笔记:负载均衡Ribbon(3)
1. RestTemplate简介 RestTemplate是Spring Resource中一个访问第三方RESTful API接口的网络请求框架. RestTemplate是用来消费REST服务的 ...
- Spring Cloud 入门教程(五): Ribbon实现客户端的负载均衡
接上节,假如我们的Hello world服务的访问量剧增,用一个服务已经无法承载, 我们可以把Hello World服务做成一个集群. 很简单,我们只需要复制Hello world服务,同时将原来的端 ...
- 客户端负载均衡Ribbon之二:Loadbalance的源码
Load Balance负载均衡是用于解决一台机器(一个进程)无法解决所有请求而产生的一种算法. 像nginx可以使用负载均衡分配流量,ribbon为客户端提供负载均衡,dubbo服务调用里的负载均衡 ...
- 服务注册发现Eureka之三:Spring Cloud Ribbon实现客户端负载均衡(客户端负载均衡Ribbon之三:使用Ribbon实现客户端的均衡负载)
在使用RestTemplate来消费spring boot的Restful服务示例中,我们提到,调用spring boot服务的时候,需要将服务的URL写死或者是写在配置文件中,但这两种方式,无论哪一 ...
- 0403-服务注册与发现-客户端负载均衡-Ribbon的基本使用
一.概述 问题1.上一篇文章已说明如何注册微服务,但是调用方如何调用,以及如何防止硬编码.即电影微服务调用用户微服务 问题2.用户微服务多个节点,调用服务方如何负载均衡 二.实现负载均衡方式 2.1. ...
- 客户端负载均衡Ribbon之源码解析
什么是负载均衡器? 假设有一个分布式系统,该系统由在不同计算机上运行的许多服务组成.但是,当用户数量很大时,通常会为服务创建多个副本.每个副本都在另一台计算机上运行.此时,出现 "Load ...
随机推荐
- USB眼图
/********************************************************************** * USB眼图 * 说明: * 对于USB眼图,并不是很 ...
- pip install GitHub package
/********************************************************************************* * pip install Git ...
- 使用Git去管理修改
Git跟踪的是修改而不是文件本身. 看下面一个例子 首先我们修改我们Git管理的git.txt文件 如下: 然后添加: 然后我们再去修改git.txt这个文件 然后直接提交到分支里如图: 也就是说我们 ...
- jvm内存增长问题排查简例
jvm内存增长问题排查 排查个jvm 内存占用持续增加的问题,纪录一下,引以为戒. 运维发现应用jvm内存占用在发布后回落,然后持续增高,,dump后分析一下: 占内存的大部分是这种名字相似的bean ...
- I2C总线以及GPIO模拟I2C
·I2C总线的一些特征: 1. 只要求两条总线,一条串行数据线(SDA),一条串行时钟线(SCL) 2. 两个连接到总线的器件都可以通过唯一的地址和一直存在的简单的主机/从机系统软件设定的地址:主机可 ...
- lesson7cnn architecture-fastai
课程https://v.qq.com/x/page/e0398lijt8h.html 讲解: http://www.sohu.com/a/144583206_697750 resnet可以看作VGG1 ...
- Python——xlsxwriter模块的使用
xlsxwriter是用于制作Excel表格的 安装方法 40 wget https://pypi.python.org/packages/e4/63/e53deacc293c7fadf95b8404 ...
- Xenserver之HA实现-NFS的实现
环境: 在vm上安装好一台Xenserver服务器,一台centos7虚拟机(用来做NFS存储,因为实现HA需要共享存储),网络连接方式为桥接模式 echo '- - -'>> /sys/ ...
- 常用gui软件使用技巧
xmind powerdesinger notepad++ firefox office ========================================= win10企业版安装 xm ...
- CloudStack学习-3
此次试验主要是CloudStack结合openvswitch 背景介绍 之所以引入openswitch,是因为如果按照之前的方式,一个网桥占用一个vlan,假如一个zone有20个vlan,那么岂不是 ...