怎样在UICollectionView中添加Header和footer
---恢复内容开始---
怎样在UICollectionView中添加Header和footer
在前面我们已经学过,每个collection view都必须有数据源为其提供内容。它的责任是为collection views完成以下的事情:
控制collection view的section数目
每个section中的item的个数
为特定的数据项提供cell view
显然,简单的Recipe app,我们在前面的教程中包含了其中一个部分,在这里我们将继续讲讲collection view并且告诉你如何利用不同的section组织items,你将会学到怎样为collection view添加header视图和footer视图。
如果你没有看过前面的教程,建议你去看一看前面的教程,或者你可以到这里下载here。
Split Recipes into Two Sections in UICollectionView
在这个简单的程序中,RecipeCollectionViewController是集合视图的数据源对象,为了把视图分成两个部分,我们需要有一些变化,接下来我们完成:
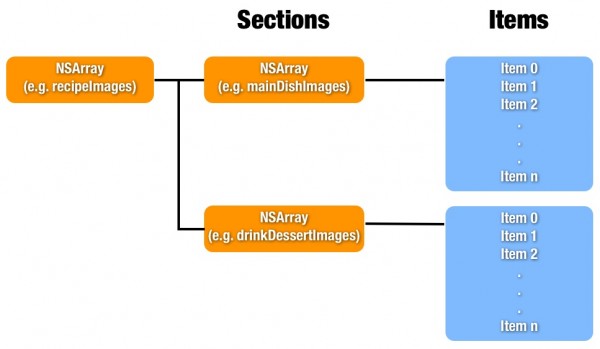
起先,recipeImages数组是存储所有recipes的名称,因为我们想把recipes分成两组,我们要修改我们 的代码,并使用签到数组来存储不同的recipe,也许你还不明白啥是嵌入的数组,下面的图片会让你明白的。第一组包含主要的图像,而另一个为drink 和dessert。顶级数组(即recipeImages)包含两个数组,每个数组部分的特定区域包含特定的data items。
让我们开始编写代码,在RecipeCollectionViewController.m中初始化"recipeImages"数组,并在viewDidload方法中写下面的方法:
- (void)viewDidLoad
{
[super viewDidLoad];
//Initialize recipe image array
NSArray *mainDishImages = [NSArray arrryWithObjects:@"egg_benedict.jpg", @"full_breakfast.jpg", @"ham_and_cheese_panini.jpg", @"ham_and_egg_sandwich.jpg", @"hamburger.jpg", @"instant_noodle_with_egg.jpg", @"japanese_noodle_with_pork.jpg", @"mushroom_risotto.jpg", @"noodle_with_bbq_pork.jpg", @"thai_shrimp_cake.jpg", @"vegetable_curry.jpg", nil];
NSArray *drinkDessertImages = [NSArray arrayWithObjects:@"angry_birds_cake.jpg", @"creme_brelee.jpg", @"green_tea.jpg", @"starbucks_coffee.jpg", @"white_chocolate_donut.jpg", nil];
recipeImages = [NSArray arrayWithObjects:mainDishImages,drinkDesserImages,nil];
}
上面的代码将recipes images分成两组。接下来,修改"numberOfIntemsInSecion:"方法来返回,每个secions中的items数目:
- (NSInteger)collectionView:(UICollectionView*)collectionView numberOfItemsInSecion:(NSInteger)section
{
return [[recipeImages objectAtIndex:sectin]count];
}
接下来我们按照下面的方法修改"cellForItemAtIndexPath:"方法
- (UICollectionVIewCell *)collectionView:(UICollectionView*)collectionView cellForItemAtIndexPath:(NSIndexPath *)indexPath
{
static NSString *identifier = @"Cell";
RecipeViewCell *cell = (RecipeViewCell *)[collectionView dequeueReuseIdentifier:identifier forIndexPath:indexPath];
UIImageView *recipeImageView = (UIImageView *)[cell viewWithTag:100];
recipeImageView.image = [UIImage imagedNamed:[recipeImages[indexPath.section] objectAtIndex:indexPath.row]];
cell.backgroundView = [[UIImageView alloc] initWithImage:[UIImage imageNamed:@"photo-frame-2.png"]];
return cell;
}
你可以和以前的代码比较以下,你就会知道只有一样是唯一的变化。我们首先检索该数组的section number然后从section中获取具体的items。
最后,怎样给collection view实现两个section,这个可以通过方法调用下面的方法来完成即:在RecipeCollectionViewController.m中的 numberOfSectionsInCollectionView方法,在collectin View中返回section中的数量。
- (NSInteger)numberOfSectionsInCollectionVIew:(UICollectionView *)collectionView
{
return [recipeImages count];
}
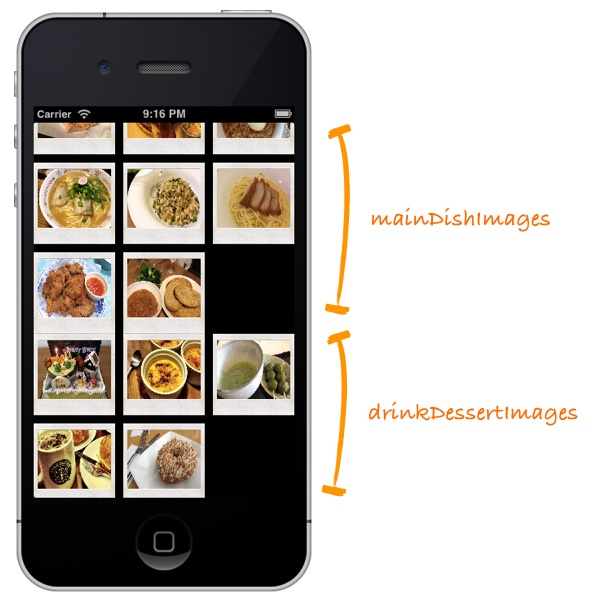
现在运行你的app,你会在屏幕上看到下面的显示
Tweak the Margin of Your Content using Section Insets
(利用Section Insets)
程序是完成了,但是你是否觉得看起来并不怎么顺眼呢?图像的第一部分的最后一行和第二部分的第一样靠的太近。我们可以使用插入图到内容周围的空间中来改变一些格局,通过下图你可以比较直观 的看到影响:
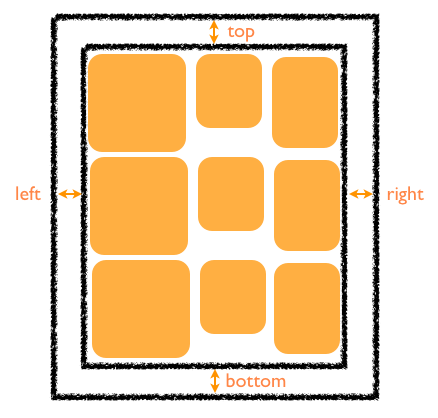
你可以利用UIEdgeInsetsMake来完成插入:
insert = UIEdgeInsetsMake(top,left,botton,right);
在我们的Recipe app中我们只能在两个section之间添加空间。在RecipeCollectionViewController.m文件中的ViewDidLoad方法中,添加下面的方法:
UICollectionViewFlowLayout *collectionViewLayout = (UICollectionViewFlowLayout *)self.collectionViewFlowLayout;
collectionViewLayout.sectionInset = UIEdegeInsetsMake(20,0,0,0);
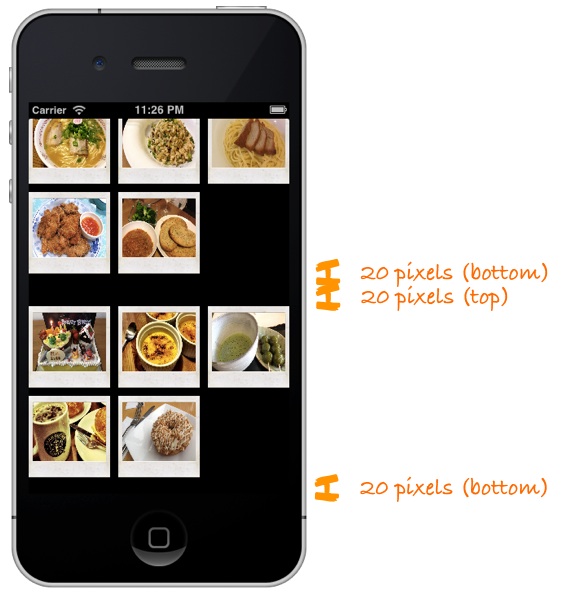
上面的代码实现了在collection view中创建和添加插入。现在我们运行程序,你将会看到下面的 图像显示,我们在两个section之间增加了一些空间。
添加头部和底部视图
现在我们进一步调整应用程序,让其更酷。让我们来给应用程序添加头部和底部视图,我们利用UICollectionViewFlowLayout来实现
这一点。这里的header和footer视图可以被称为流布局的补充。在默认情况下,这些视图是在流布局中禁用的。但可以通过下面几件事情来配置
header和footer视图:
为了尽量保持简单,所以我们可以选择storyboard来实现(当然这不是必须的,你同样可以使用代码来实现这一点)
实现 UICollectionViewDataSource协议的 collectionView:viewForSupplementaryElementOfKind 方法,并通过这个方法来实现补充试图在collection view中显示。
在Storyboard中设计Header和Footer
首先download the header/footer background images并且添加到Xcode工程中。
到Storyboard中,选择collection view controller中的"Collection
View"。在Attributes inspector中,选择"Section Header"和"Section
Footer",一旦选中你就会在屏幕中看到下面的的显示:
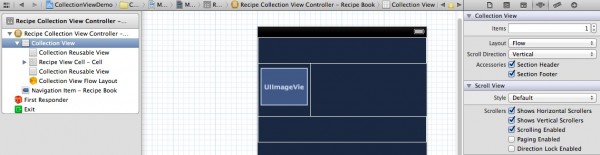
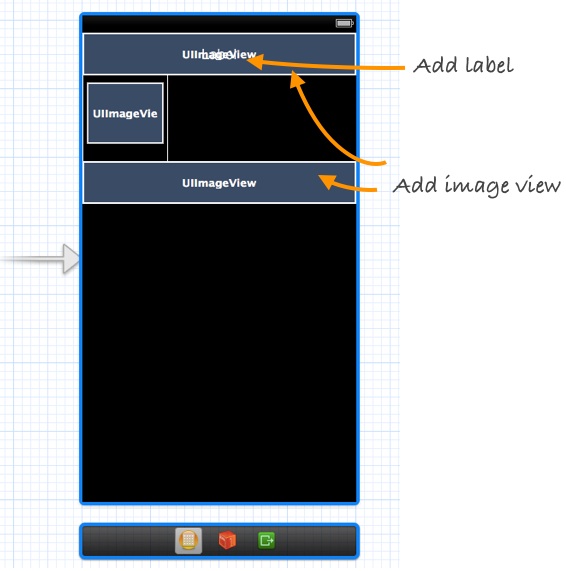
在header和footer之间默认为空,我们会用storyboard来设计视图。header
view是专门用来显示一个部分的标题,而底部视图只显示静态横幅图片。利用storyboard,从对象库中拖出image
view并在其上面添加一个标签。设置字体颜色为白色,底部视图只需添加一个image view。如图:
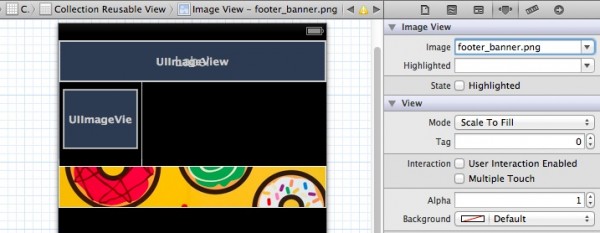
选中footer view中的image view,在Attributes inspector中命名背景图片为"footer_banner.png"
最重要的是,我们必须为header和footer
view指定一个标识符。这个标示符将会被用于代码识别图片名称。在Atteributes inspector中设置header
view的identifier为“HeaderView”,同样的把footer view的identifier设置为“FooterView”。

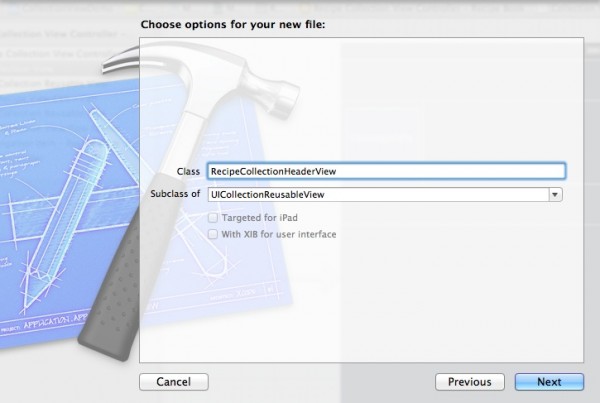
为Header View添加新类
在默认情况下,header和footer view和UICollectionResuable类相关联。为了在header
view中显示我们需要的背景和标题,我们必须创建一个新的继承自UICollectionResuableView的类,我们可以命名为
RecipeCollectionHeaderView。
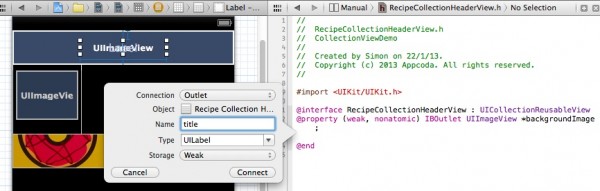
在storyboard的Identifier inspector中的sustom
class设置为“RecipeCollectionHeaderView”。按住Ctrl键,单机header中的image
view,并拖向RecipeCollectionHeaderView.h中插入一个Outlet
变量。命名变量为"backgroundImage"。重复同样的步骤对UILabel实现,然后命名为"title"。
实现viewForSupplementaryElementOfKind方法
如果你尝试运行应用程序,你可能不会看到header和footer,这是因为我们还没有实现"viewFOrSupplementaryElementOfKind:"方法。选择“RecipeCollectionViewController”,并添加import语句。
#import "RecipeCollectionHeaderView.h"
下面就是实现viewforSupplementaryElementOfKind方法的代码:
- (UICollectionReusableView *)collectionView:(UICollectionView
*)collectionView viewForSupplementaryElementOfKind:(NSString *)kind
atIndexPath:(NSIndexPath *)indexPath
{
UICollectionReusableView *reusableview = nil;
if (kind == UICollectionElementKindSectionHeader){
RecipeCollectionHeaderView *headerView = [collectionView
dequeueReusableSupplementaryViewOfKind:UICollectionElementKindSectionHeader
withReuseIdentifier:@"HeaderView" forIndexPath:indexPath];
NSString *title = [[NSString alloc] initWithFormat:@"Recipe Group #%i",indexPath.section +1];
headerView.title.text = title;
UIImage *headerImage = [UIImage imageNamed:@"header_banner.png"];
headerView.backgroundImage.image = headerImage;
reusableView = headerView;
}
if (kind == UICollectionElementKindSectionFooter){
UICollectionReusableView *footerview = [collectionView
dequeueResuableSupplementaryViewOfKind:UICollectionElementKindSectionFooter
withReuseIdentifier:@"FooterView" forIndexPath:indexPath];
reusableview = footerview;
}
return reusableview;
}
上
面的代码告诉它页眉/页脚视图应该在每个部分中使用collect view。我们首先确定该集合视图要求header或footer
view。这可以通过使用一种变量来完成。对于头来看,我们出列header
view(使用dequeueReusableSupplementaryViewOfKind
:方法),并设置适当的标题和图像。正如你可以从两个if之间的代码,我们使用我们之前分配给获得header/footer view标识符。
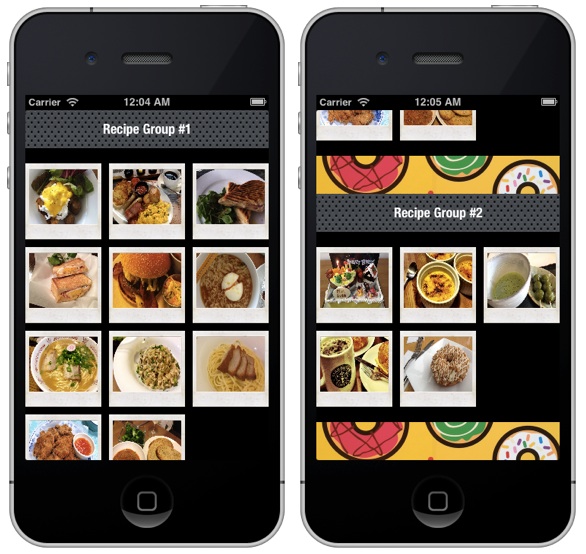
现在运行代码,我们可以看到运行的结果:
---恢复内容结束---
怎样在UICollectionView中添加Header和footer的更多相关文章
- StroyBoard中UICollectionView中添加Header和footer
到Storyboard中,选择collection view controller中的"Collection View".在Attributes inspector中,选择&quo ...
- 在Storyboard中为UITableView添加Header和Footer
我在这里所说的Header和Footer并不是sectionHeader和sectionFooter,而是指UITableView的tableHeaderView和tableFooterView,这两 ...
- ## GridView 布局:item设置的高度和宽度不起作用、自动适配列数、添加Header和Footer ##
一.item设置的高度和宽度不起作用 转自:http://www.cnblogs.com/0616--ataozhijia/p/6031875.html [Android Pro] listView和 ...
- RecyclerView添加Header和Footer
使用过RecyclerView的同学就知道它并没有添加header和footer的方法,而ListView和GirdView都有,但是开发过程中难免有需求需要添加一个自定义的header或者foote ...
- 你必须了解的RecyclerView的五大开源项目-解决上拉加载、下拉刷新和添加Header、Footer等问题
前段时间做项目由于采用的MD设计,所以必须要使用RecyclerView全面代替ListView.但是开发中遇到了需要实现RecyclerView上拉加载.下拉刷新和添加Header以及Footer等 ...
- 在fetch方法中添加header后遇到的预检请求问题
今天在使用fetch方法 fetch('xxx.com',{header:{bbbbbbb:111}}) 浏览器返回的请求信息中,header变成了 :authority:koss.nocorp.me ...
- postman 模拟请求中添加 header,post请求中传json参数
1. GET 请求 2.Post 请求 (请求参数为Json,header中带有参数) 问题延伸 GET请求不能够 添加 Body 吗?[答案]
- HTML中--定义header和footer高度中间自适应
<html> <head> <meta charset="utf-8" /> <title></title> <s ...
- 如何在html文件中导入header、footer等
1.include是php函数,所以确实需要转化成.php文件--(其实除了用php,html都有自带的引入方法)2.html转化为php文件很简单,直接改一下后缀名就可以了--(如:index.ht ...
随机推荐
- [Linux] 修改主机名(hostname)
在Linux命令行下输入hostname,查看当前主机名,如果想修改它,直接在hostname后面加上新主机名即可(注:以下操作都需要root用户执行),如: # hostname newhostna ...
- Struts2 自定义拦截器实例—登陆权限验证
实现一个登陆权限验证的功能 message.jsp: <body> message:${message } </body> login.jsp: <% request.g ...
- Android UI ActionBar功能-ActionBarSherlock 的使用
ActionBarSherlock实现了在ActionBar上添加一个下拉菜单的功能,也是App常用的功能之一: ActionBarSherlock是第三方提供的一个开源类库,下载地址:http:// ...
- python-多线程(原理篇)
多线程的基本概念 语言学习总是绕不过一些东西,例如多进程和多线程,最近越来越发现,上来看几个实例练习一下过几天就不知其所以然了.所以还是先看看原理,在看实例练习吧! 线程的概念 概念:线程是进程中执行 ...
- magento中的各种form标签
1. Text Field $fieldset->addField('title', 'text', array( 'label' => Mage::hel ...
- 利用PowerDesigner15在win7系统下对MySQL 进行反向project(二)
利用PowerDesigner15在win7系统下对MySQL 进行反向project 1.打开PowerDesigner,建立新模型.选择Physical Data Model中的Physical ...
- sql 查询结果中加入空值列
select a,b,c,''d from X; 其中d为新加列,''表示默认值为空值 原文:http://hi.baidu.com/ddduggguo/item/747d5ba5ca18fd2689 ...
- centos防火墙端口配置
增加防火墙配置,允许8080端口: # vi /etc/sysconfig/iptables 在允许ssh的下面增加一条: -A INPUT -m state --state NEW -m tcp - ...
- Oracle EBS 如何月结、对账[Z]
在Oracle系统处理月结业务时,需要遵循一定的操作顺序.这些业务,牵涉到相应的模块,包括:应付模块.采购模块.库存模块.应收模块.薪资模块.固定资产和总帐模块等 在Oracle系统中,总帐模块处于财 ...
- EC读书笔记系列之9:条款16、17
条款16 成对使用new和delete时要采取相同形式 记住: ★若你在new表达式中使用[ ],必须在相应的delete中也使用[ ],反之亦然 -------------------------- ...